


Splash是一个js渲染服务,是一个带有HTTP API的轻量级浏览器,同时它对接了Python中的Twisted和QT库。利用它,同样可以实现动态渲染页面的抓取。
1.功能介绍
- 异步方式处理多个网页渲染过程;
- 获取渲染后的页面的源代码或截图;
- 通过关闭图片渲染或者使用Adblock规则来加快页面渲染速度;
- 可执行特定的JavaScript脚本;
- 可通过Lua脚本来控制页面渲染过程;
- 获取渲染的详细过程并通过HAR(HTTP Archive)格式呈现。
2.准备工作
确定正确安装好了Splash并可以正常运行服务。(在这一步我遇到了很多麻烦,用了很久才安装好)
3.示例引入
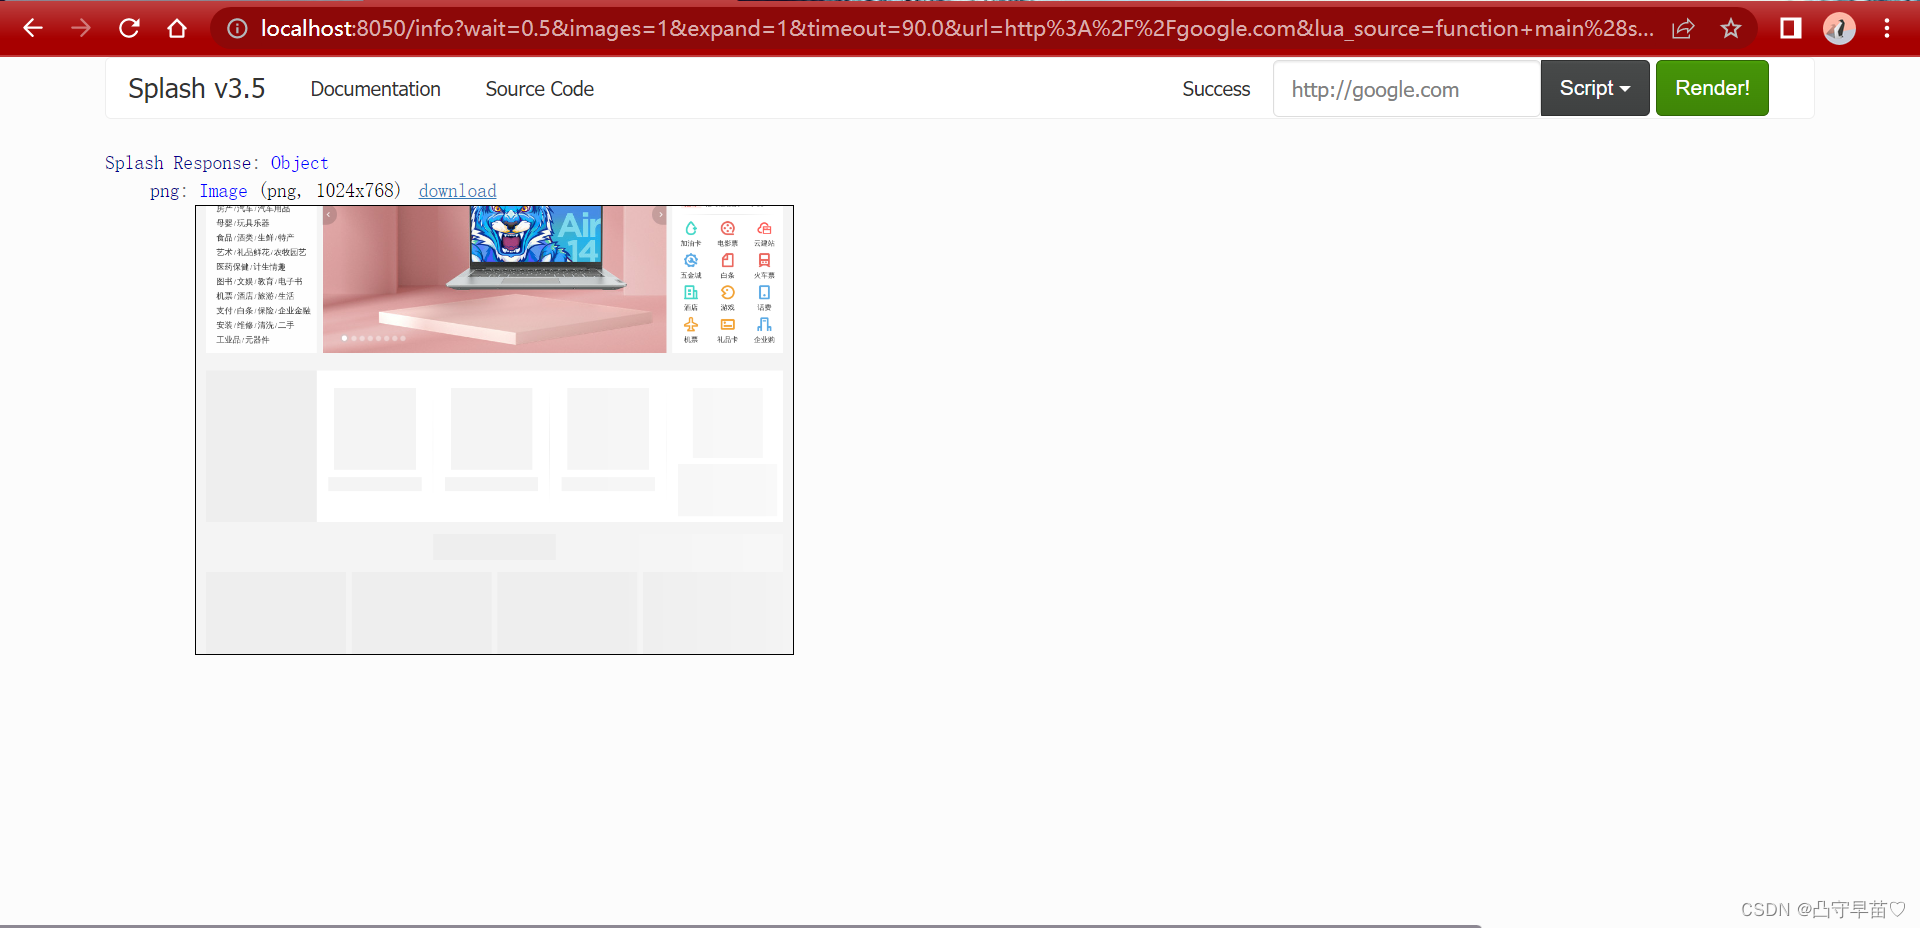
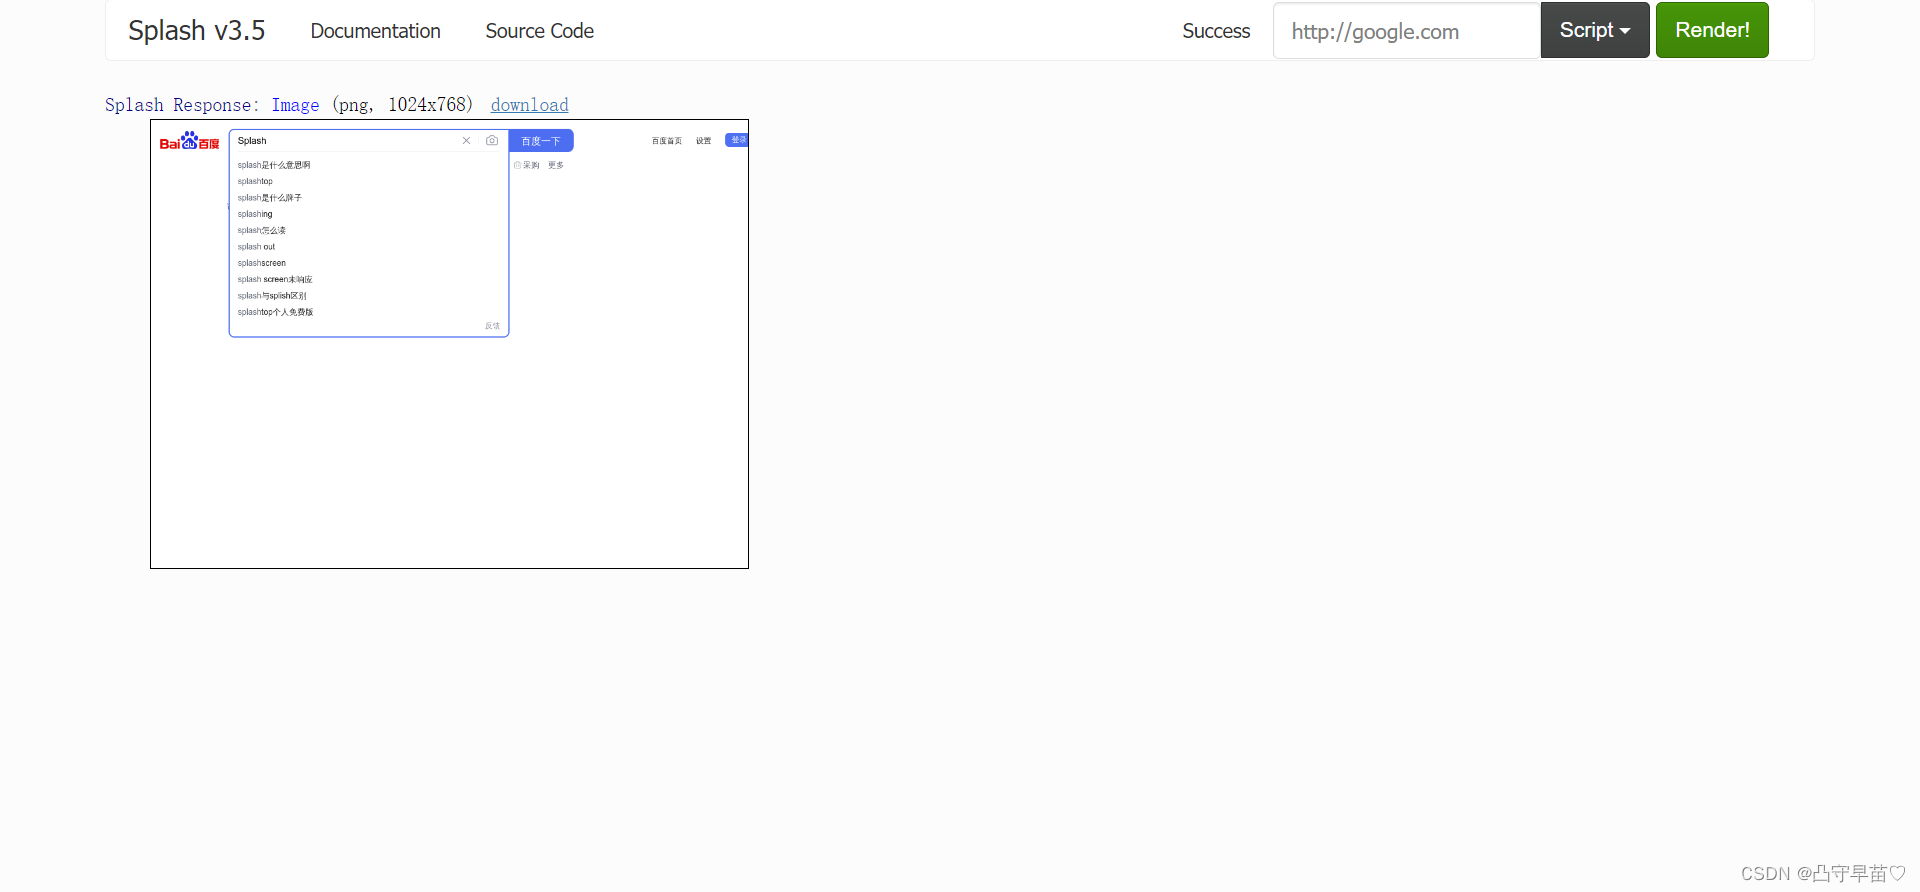
首先通过Splash提供的Web页面来测试其渲染过程。在本机8050端口上运行Splash,打开http://localhost:8050即可看到页面。
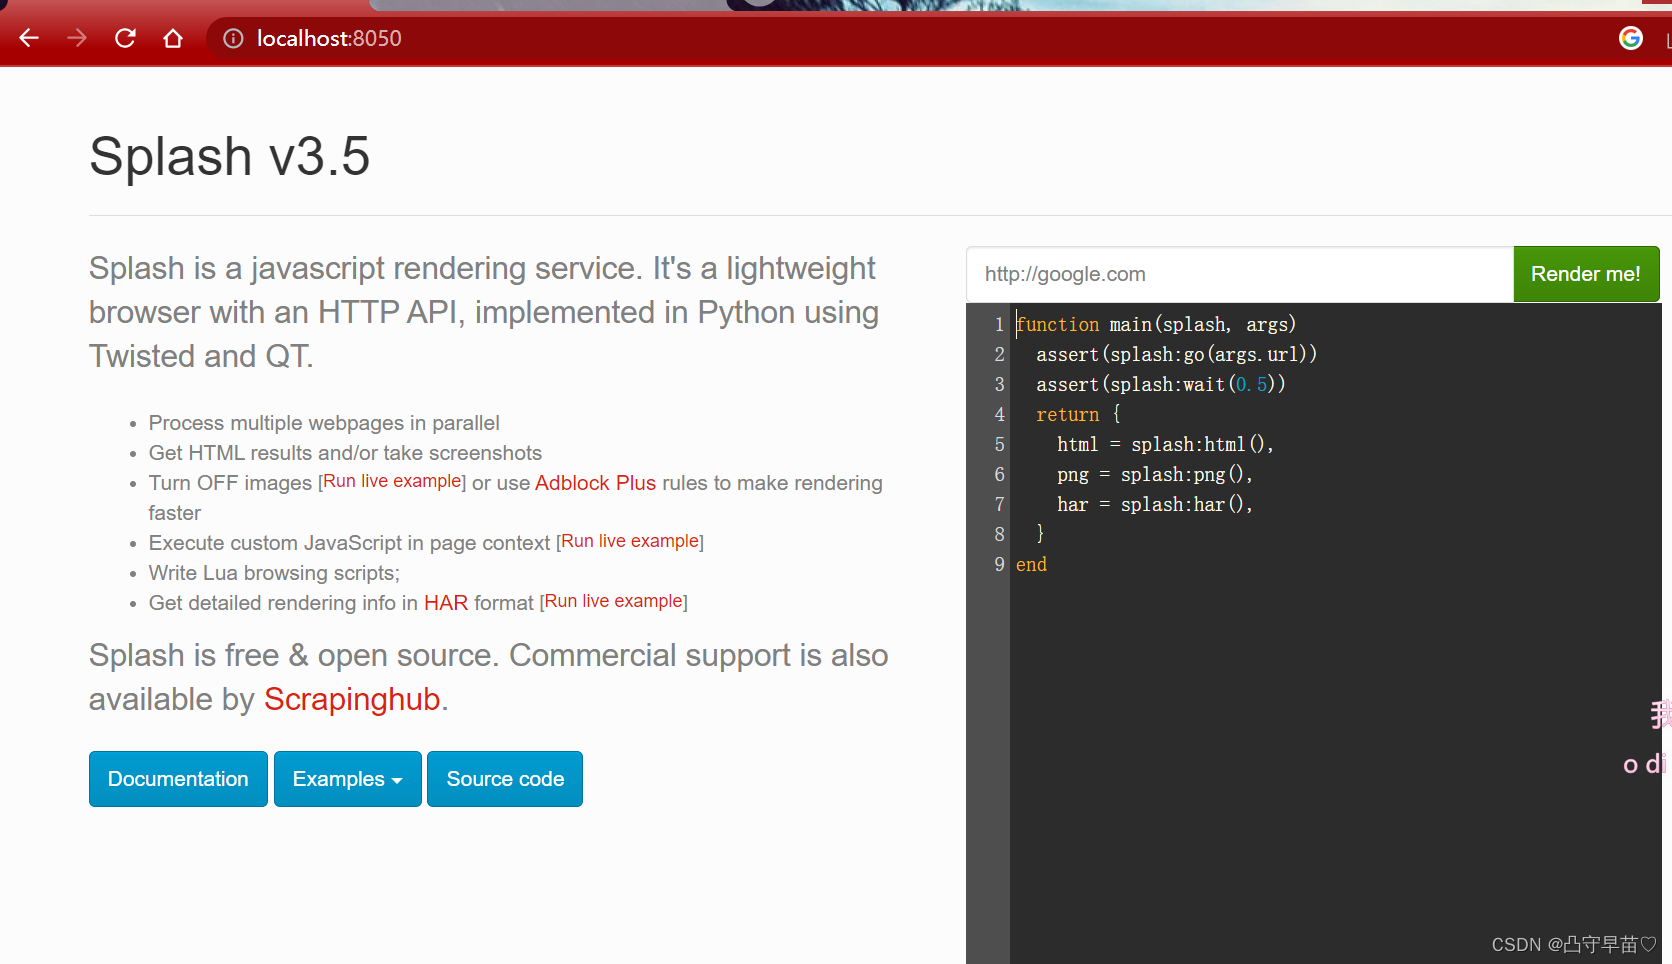
图右侧呈现的是一个渲染示例。上方的输入框默认是http://google.com,也可以换成https://www.baidu.com,然后点击Render me开始渲染,结果如图:
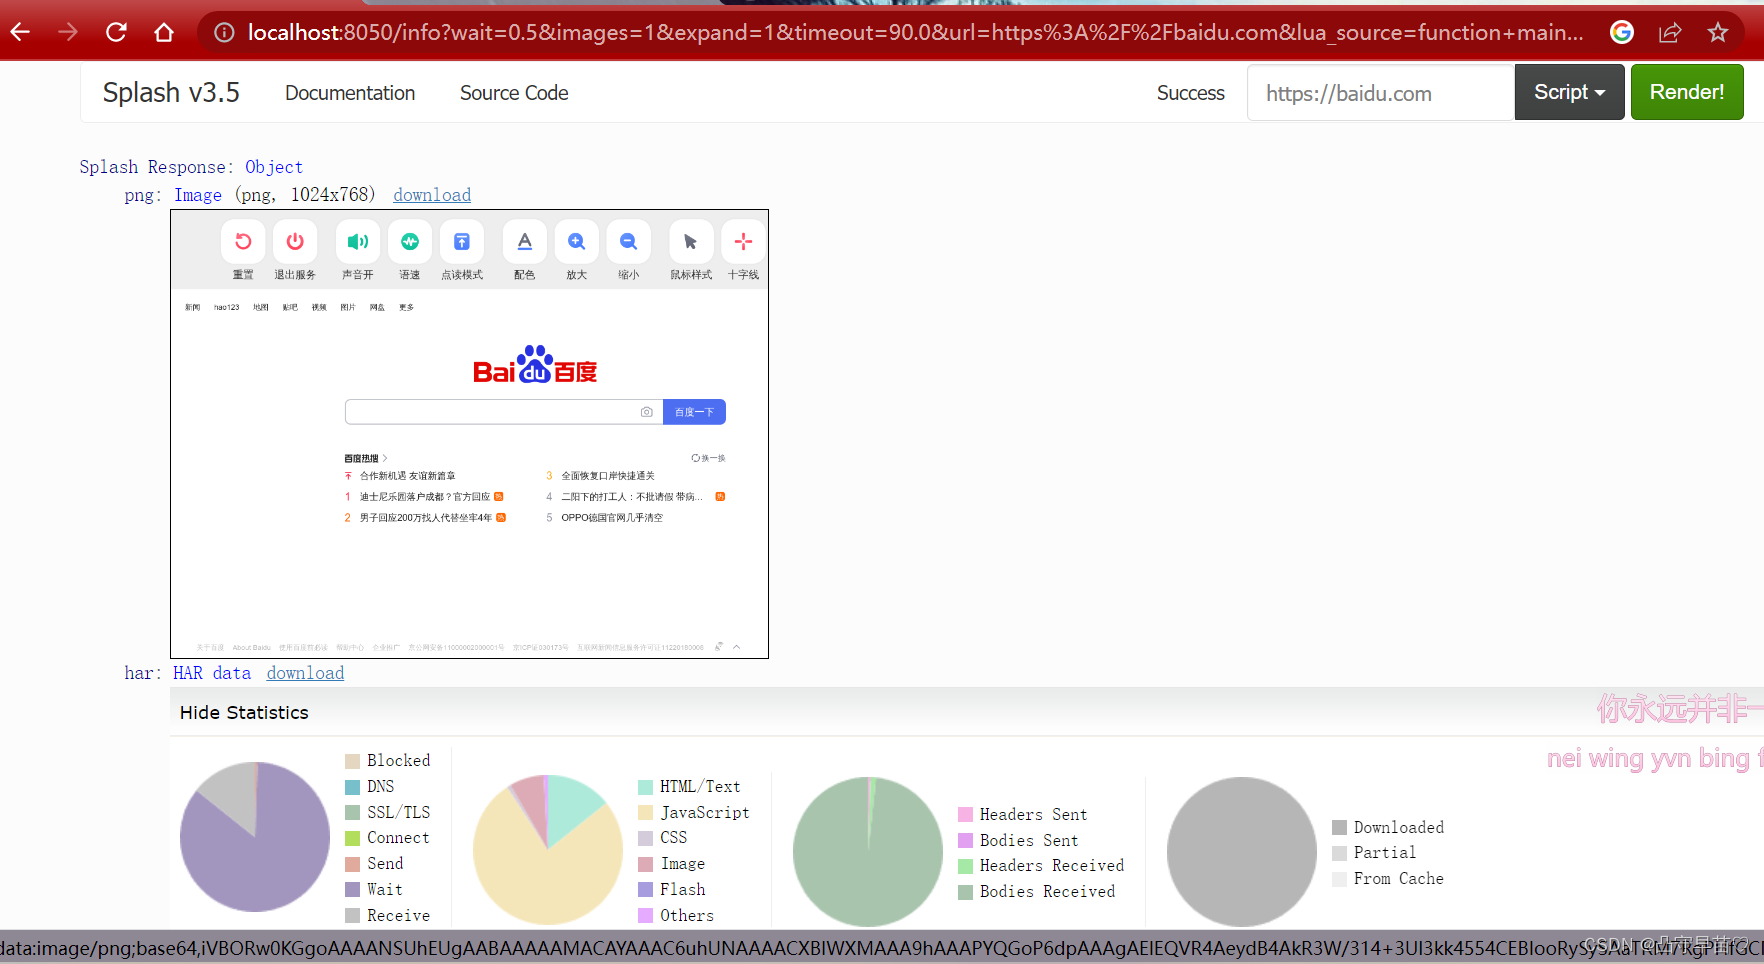
网页返回了渲染截图,HAR加载统计数据,网页的源代码。
通过HAR的结果可以看出Splash执行了整个网页的渲染过程,包括CSS、JavaScript的加载等过程。
这段页面的加载过程由一段Lua脚本控制,内容如下:
function main(splash, args)
  assert(splash:go(args.url))
  assert(splash:wait(0.5))
  return {
    html = splash:html(),
    png = splash:png(),
    har = splash:har(),
  }
end
首先调用go()方法加载页面,然后调用wait()方法等待,最后返回页面截图,HAR信息,源码。加载过程完全模拟浏览器,最后可返回各种格式的结果,如网页源码和截图等。
4.Splash Lua脚本
Splash可以通过Lua脚本执行一系列渲染操作,这样我们就可以通过Splash来模拟类似Chrome、PhantomJS的操作。
首先了解Splash Lua脚本的入口·和执行方式。
- 入口及返回值
function main(splash,args)
    splash:go("http://www.baidu.com")
    splash:wait(0.5)
    local title = splash:evaljs("document.title")
    return{title=title}
end
然后将代码粘贴到http://localhost:8050/的代码编辑区域,然后点击render me按钮来测试一下。
通过evaljs()方法传入JavaScript脚本,document.title会返回网页标题,然后将其赋值给title变量,随后将其返回。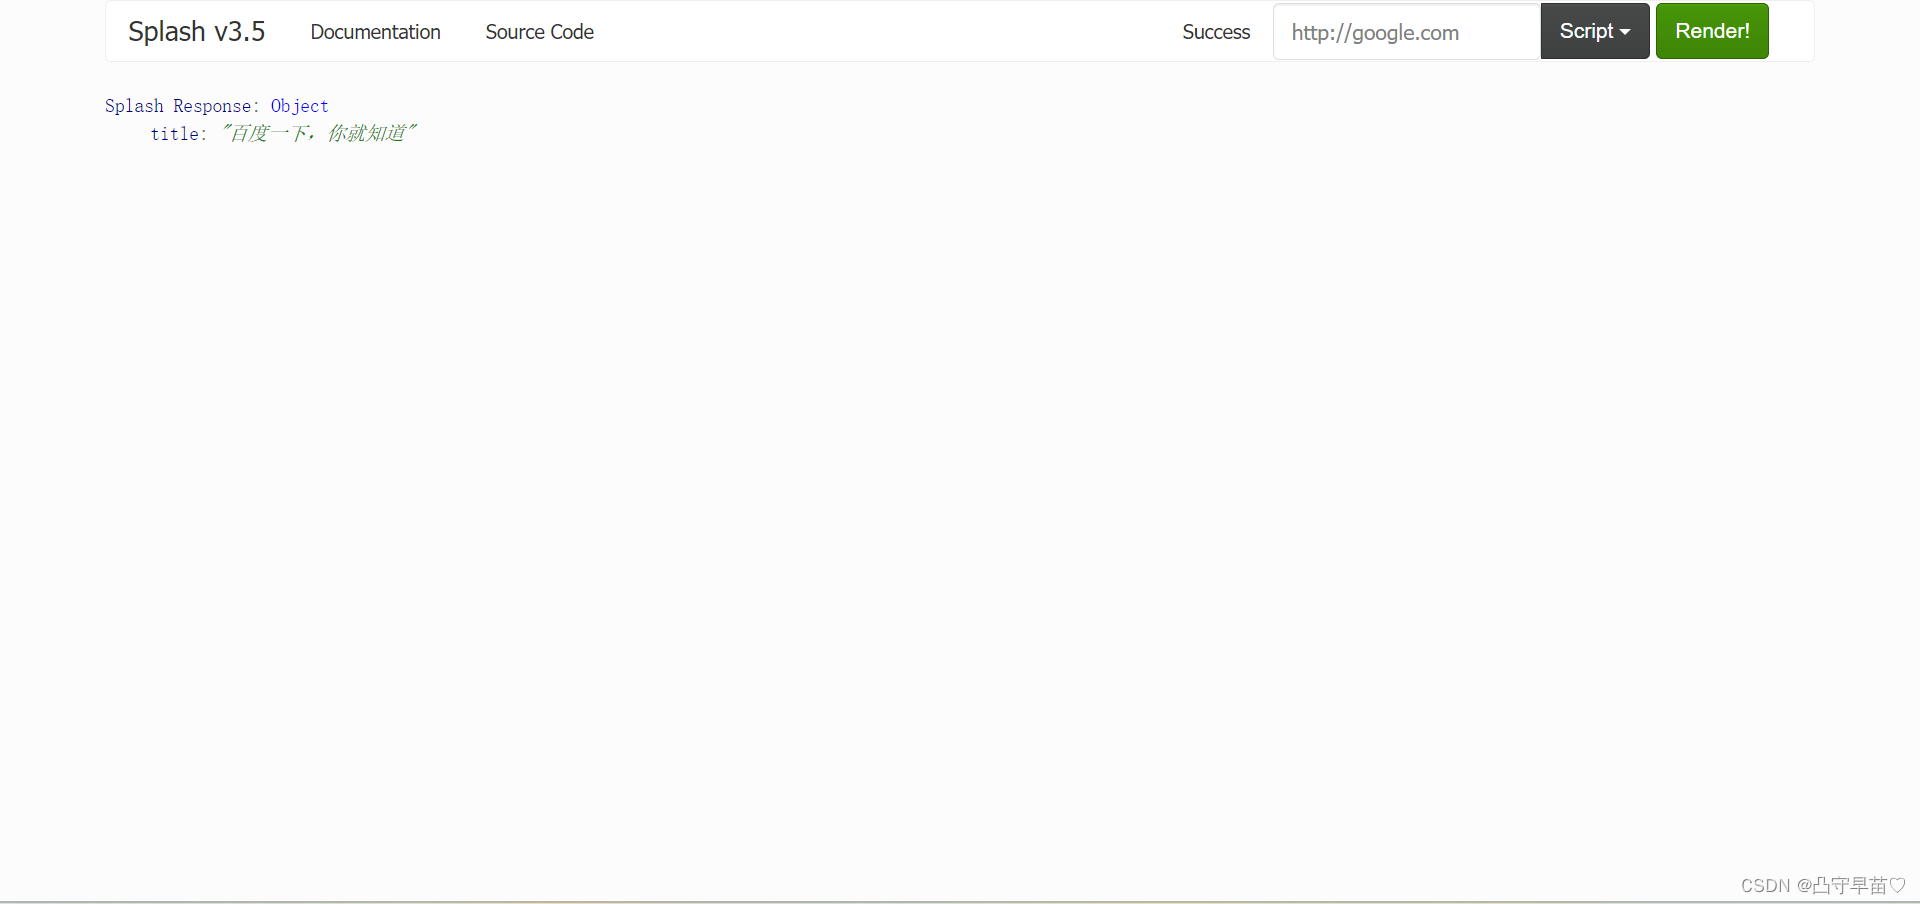
这里定义的方法名为main()。名称必须是固定的,Splash会默认调用这个方法。
该方法的返回值既可以是字典类型,也可以是字符串类型,最后都会转化为Splash HTTP Response,例如:
function main(splash)
    return{hello="world"}
end
返回了一个字典形式的内容。
function main(splash)
    return 'hello'
end
返回了一个字符串形式的内容。
- 异步处理
Splash支持异步处理,但没有显式指明回调方法,其回调的跳转是在Splash的内部完成的。
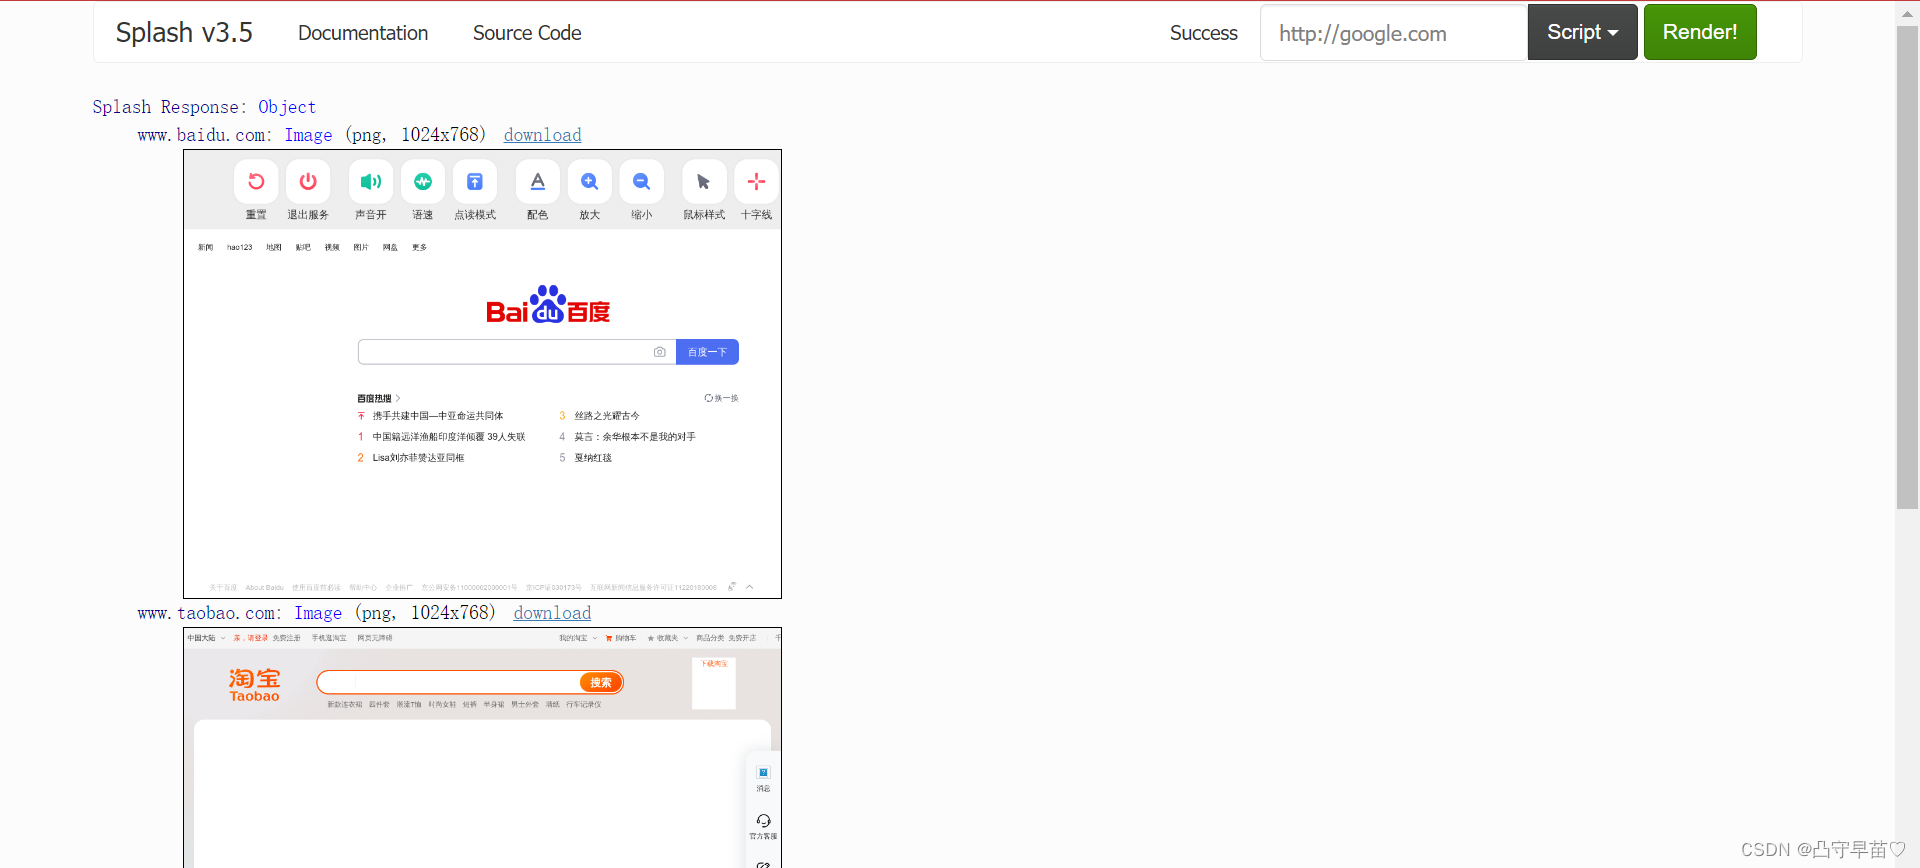
function main(splash,args)
    local example_urls = {"www.baidu.com","www.taobao.com","www.zhihu.com"}
    local urls = args.urls or example_urls
    local results = {}
    for index, url in ipairs(urls) do
        local ok, reason = splash:go("http://"..url)
        if ok then
            splash:wait(2)
            results[url] = splash:png()
        end
    end
    return results
end
运行结果是三个站点的截图。
脚本内调用的wait()方法类似于Python中的sleep()方法,参数为等待的秒数。当Splash执行到此方法时,它会转而去处理其他任务,在指定的时间过后再来继续处理。Lua脚本的字符串拼接用的是".."。了解Lua语法可以参考http://www.runoob.com/lua/lua-basic-syntax.html。
go()方法会返回加载页面的结果状态,如果页面出现4xx或5xx状态码,ok变量就为空,就不会返回加载后的图片。
5.Splash对象属性
前面例子中的main()方法第一个参数为splash,这个对象类似于Selenium中的webdriver对象,可以调用它的一些属性和方法来控制加载过程,先看它的属性。
- args
比如URL,如果为GET请求,可以获取get请求参数;如果为POST请求,可以获取表单中提交的数据。
function main(splash,args)
    local url = args.url
end
第二个参数args就相当于splash.args属性,以上代码等价于:
function main(splash)
    local url = splash.args.url
end- js_enabled
这个属性是Splash的JavaScript执行开关,可以将其配置为true或false来控制是否执行执行JavaScript代码。一班来说,不用设置此属性,默认为true。这里禁止执行js代码:
function main(splash,args)
    splash:go("https://www.baidu.com")
    splash.js_enabled = false
    local title = splash:evaljs("document.title")
    return{title=title}
end
重新调用evaljs()方法执行js代码,此时就会抛出异常:
- resource_timeout
用来设置加载的超时时间,如果为0或者nil(类似于none),代表不检测超时。
function main(splash)
    splash.resource_timeout = 0.1
    assert(splash:go("http://www.taobao.com"))
    return splash:png()
end
将超时时间设为0.1秒,如果在0.1秒内没有得到响应,就会抛出异常:

此属性适合在网速较慢的情况下设置。
- images_enabled
此属性可以设置图片是否加载,默认加载。禁用可以节省流量并提高网页加载速度。但禁用可能会影响js渲染。因为禁用之后,它的外层DOM节点会受影响,影响DOM节点的位置。因此如果js对图片节点有操作的话,执行就会受到影响。
另外,Splash使用了缓存。如果一开始加载出来了图片,然后禁用了该属性,再重新加载页面,之前的图片还可能会显示出来,这是重启Splash即可。
示例如下:
-
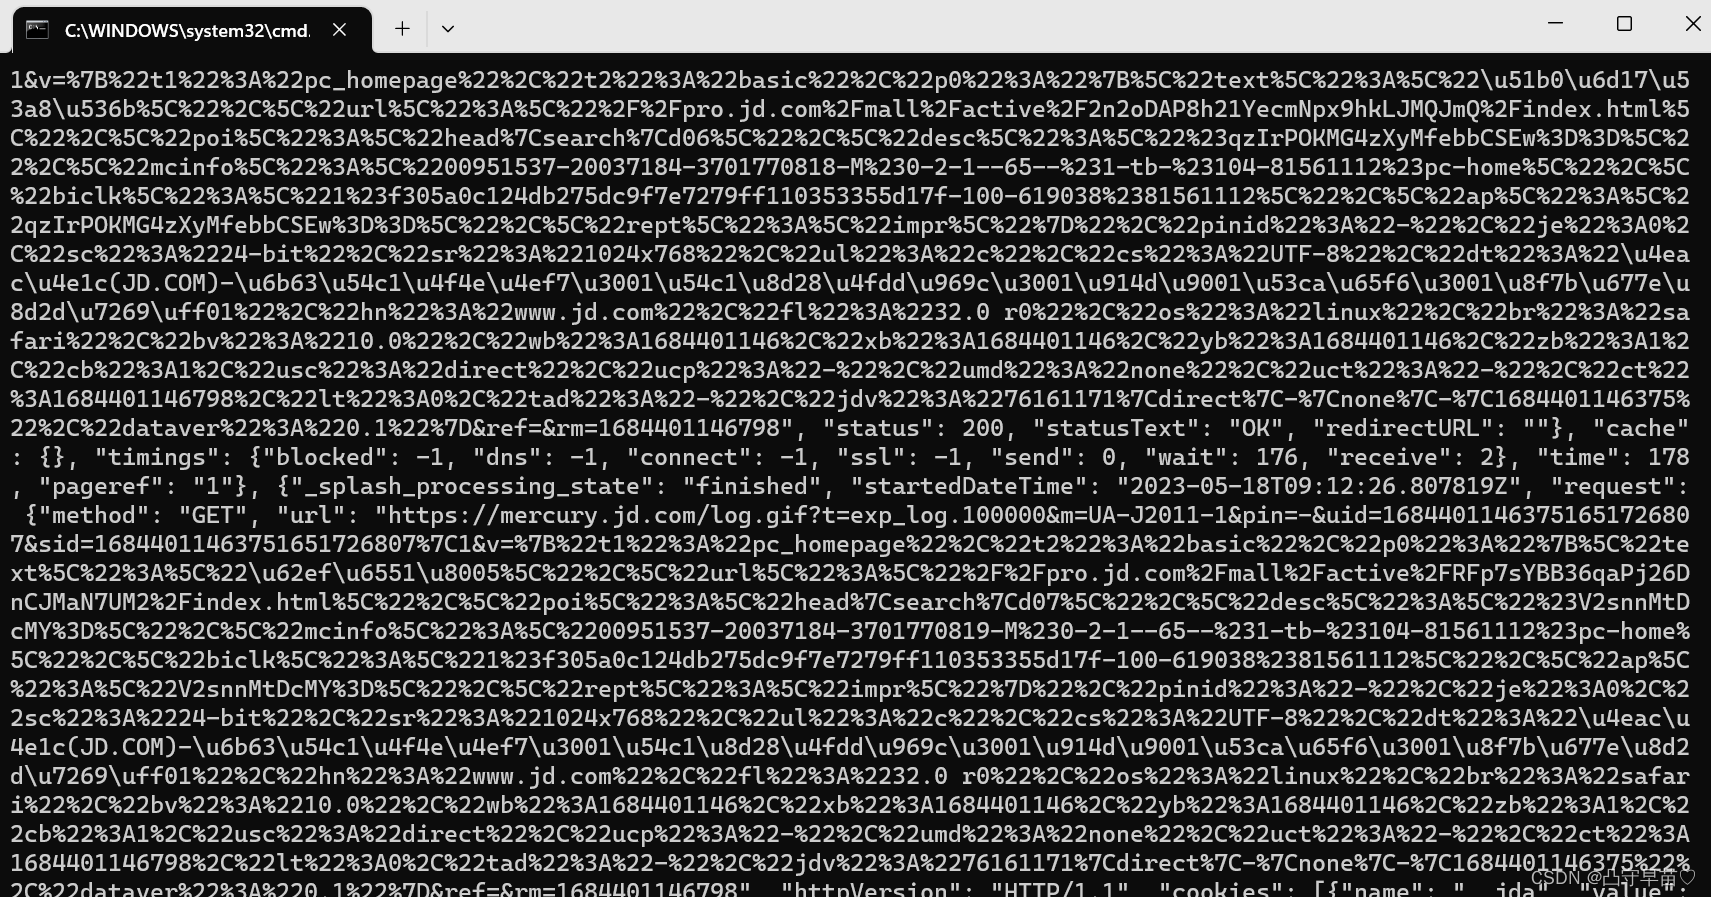
function main(splash)
    splash.images_enabled = false
    assert(splash:go("https://www.jd.com"))
    return{png=splash:png()}
end
这样加载出的页面就没有任何图片。
- plugins_enabled
此属性可以控制浏览器插件(如Flash插件)是否开启。默认false,可以使用如下代码来控制开启或关闭。
splash.plugins_enabled = false/true- scroll_position
通过设置此属性可以控制页面上下或左右滚动。
function main(splash)
    splash:go("https://www.jd.com")
    splash.scroll_position = {y=400}
    return{png=splash:png()}
end
这样就可以控制页面向下滚动400像素。结果如图:
如果要让页面左右滚动,添加x参数即可。
6.Splash对象的方法
- go()
该方法用来请求某个链接,它可以模拟GET和POST请求,同时支持传入请求头、表单等数据。用法如下:
ok,reason = splash:go{url,baseurl=nil,headers-nil,http_method="GET",body=nil,formdata=nil}- url:请求的URL;
- baseurl:可选参数,默认为空,表示资源加载相对路径。
- headers:可选参数,默认为空,表示请求头。
- http_method:可选参数,默认为GET,同事支持POST。
- body:可选参数,默认为空,发POST请求时的表单数据,使用的Content-type为application/json。
- formdata:可选参数,默认为空,POST的时候的表单数据,使用的Content-type为applicatin/x-www-form-urlencoded。
该方法返回的结果为结果ok和原因reason的组合,如果ok为空,代表网页加载错误,此时reason中包含了错误原因。示例如下:
function main(splash)
    local ok,reason = splash:go{"http://httpbin.org/post",http_method = "POST",body = "name=Germey"}
    if ok then
        return splash:html()
    end
end
模拟一个POST请求,并传入POST的表单数据,成功则返回页面源代码:
<html><head></head><body><pre style="word-wrap: break-word; white-space: pre-wrap;">{
  "args": {},
  "data": "",
  "files": {},
  "form": {
    "name": "Germey"
  },
  "headers": {
    "Accept": "text/html,application/xhtml+xml,application/xml;q=0.9,*/*;q=0.8",
    "Accept-Encoding": "gzip, deflate",
    "Accept-Language": "en,*",
    "Content-Length": "11",
    "Content-Type": "application/x-www-form-urlencoded",
    "Host": "httpbin.org",
    "Origin": "null",
    "User-Agent": "Mozilla/5.0 (X11; Linux x86_64) AppleWebKit/602.1 (KHTML, like Gecko) splash Version/10.0 Safari/602.1",
    "X-Amzn-Trace-Id": "Root=1-64646de8-658ed7a6435efb6009fa6e67"
  },
  "json": null,
  "origin": "38.150.13.64",
  "url": "http://httpbin.org/post"
}
</pre></body></html>- wait()
此方法可以控制页面的等待时间,使用方法如下:
ok,reason = splash:wait{time,cancel_on_redirect=false,cancel_on_error=true}- time:等待的秒数。
- cancel_on_redirect:可选参数,默认为false,表示发生了重定向就停止等待,并返回重定向结果。
- cancel_on_error:可选参数,默认为false,表示发生了加载错误就停止等待。
示例:
function main(splash)
    splash:go("https://www.taobao.com")
    splash:wait(2)
    return{html=splash:html()}
end
可以实现访问淘宝页面并等待两秒,然后返回页面源代码。
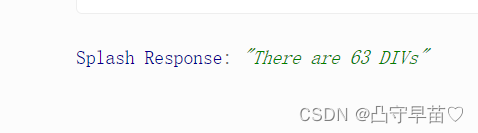
- jsfunc()
此方法可以直接调用js定义的方法,但是要用双中括号包围,相当于实现了js方法到Lua脚本的转换。示例:
function main(splash,args)
    local get_div_count = splash:jsfunc([[
    function(){
    var body = document.body;
    var divs = body.getElementsByTagName('div');
    return divs.length;
    }
    ]])
    splash:go("https://www.baidu.com")
    return ("There are %s DIVs"):format(
            get_div_count()
    )
end
运行结果如下:
- evaljs()
此方法可以执行js代码并返回最后一条js语句的返回结果,使用方法如下:
result = splash:evaljs(js)比如可以用下面方法获取页面标题:
local title = splash:evaljs("document.title")- runjs()
与evaljs()方法十分类似,但更偏向于执行某些动作或声明某些方法:
function main(splash,args)
    splash:go("https://www.baidu.com")
    splash:runjs("foo = function(){return 'bar'}")
    local result = splash:evaljs("foo()")
    return result
end
先用runjs()声明一个js定义的方法,再通过evaljs()来调用得到的结果。
运行结果:bar
- autoload()
此方法可以设置每个页面访问时自动加载的对象,使用方法如下:
ok,reason = splash:autoload{source_or_url,source=nil,url=nil}- source_or_url:js代码或者js库链接。
- source:js代码。
- url:js库链接。
但此方法只负责加载js代码或库,不执行任何操作。要执行操作可以调用evaljs()或runjs()。示例如下:
function main(splash)
    splash:autoload([[
    function get_document_title(){
    return document.title;
    }]])
    splash:go("https://www.baidu.com")
    return splash:evaljs("get_document_title()")
end
运行结果:百度一下,你就知道
另外还可以用autoload()方法加载某些方法库,如jquery,示例如下:
function main(splash,args)
    assert(splash:autoload("https://code.jquery.com/jquery-2.1.3.min.js"))
    assert(splash:go("https://www.baidu.com"))
    local version =splash:evaljs("$.fn.jquery")
    return 'jquery version'..version
end
运行结果:jquery version1.10.2
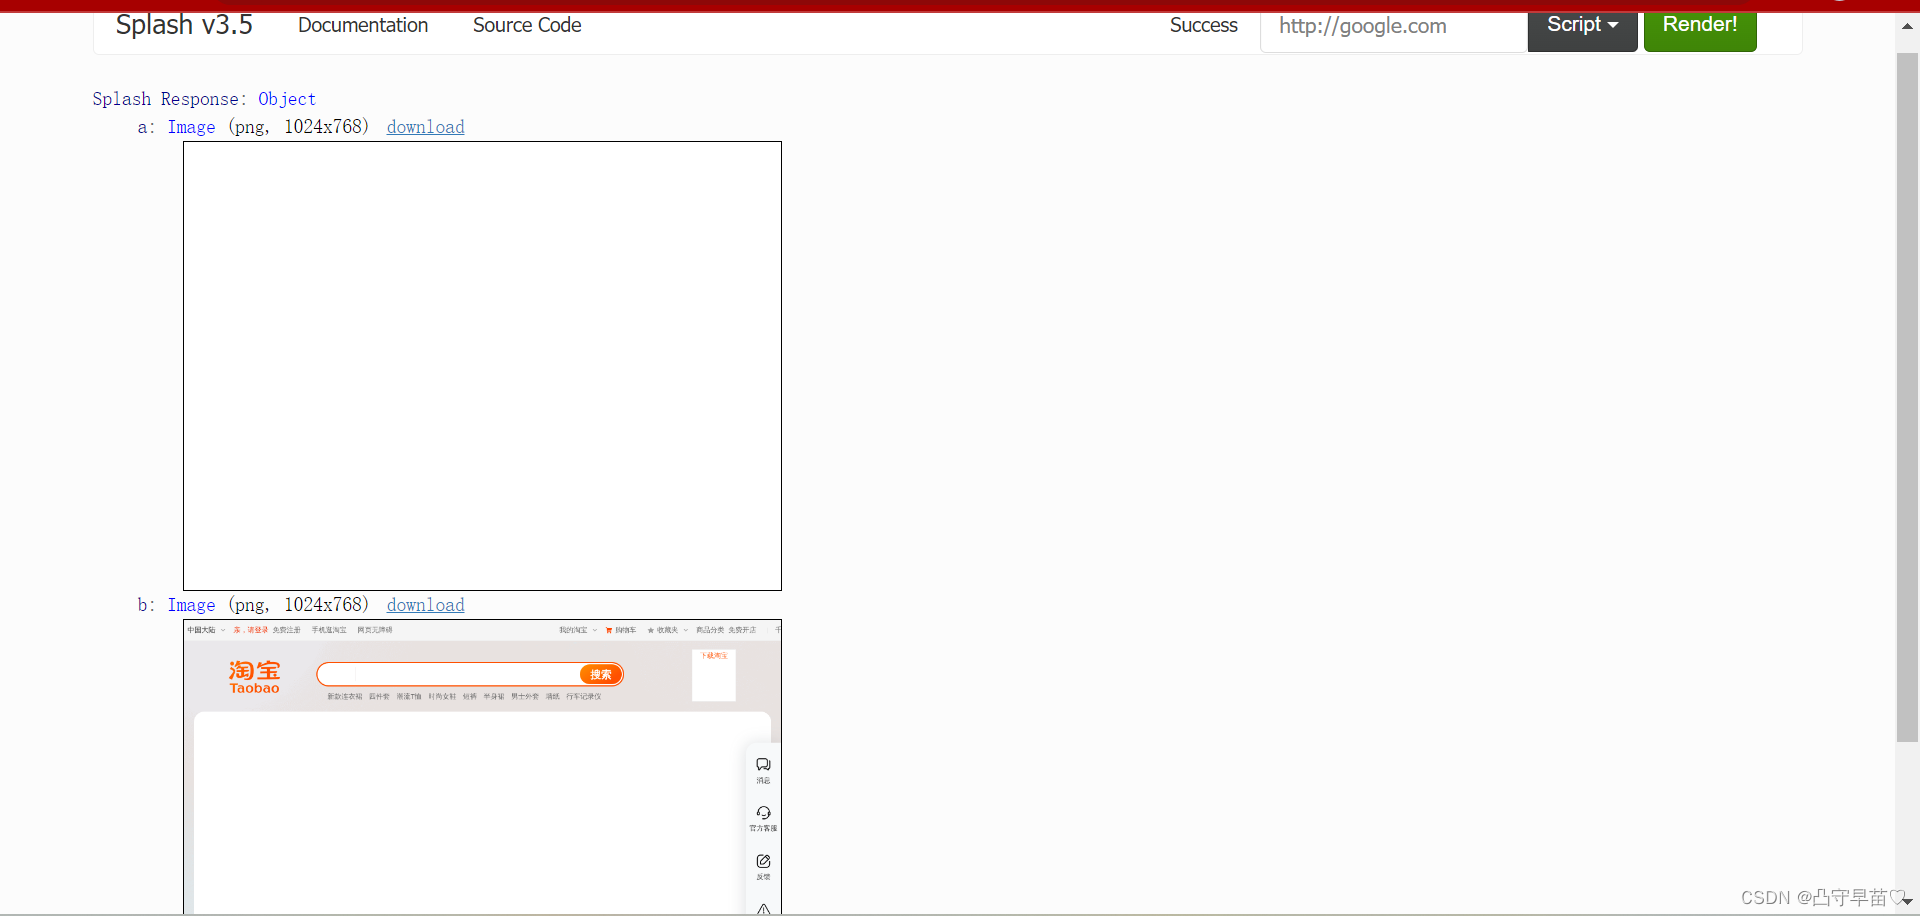
- call_later()
此方法可以通过设置定时任务和延时任务来实现任务的延时执行,并可以在执行前通过cancel()方法重新执行定时任务。示例:
function main(splash)
    local snapshots = {}
    local timer = splash:call_later(function()
        snapshots["a"] = splash:png()
        splash:wait(1)
        snapshots["b"] = splash:png()
    end ,0.02)
    splash:go("https://www.taobao.com")
    splash:wait(3)
    return snapshots
end
0.02秒时获取网页截图,然后等待一秒,再次获取网页截图。如图:
- http_get()
此方法可以模拟发送HTTP的GET请求,使用方法如下:
response = splash:http_get{url,headers=nil,follow_redirects=true}- url:请求url。
- headers:可选参数,默认为空,请求头。
- follow_redirecters:可选参数,表示是否启动自动重定向,默认为true。
示例如下:
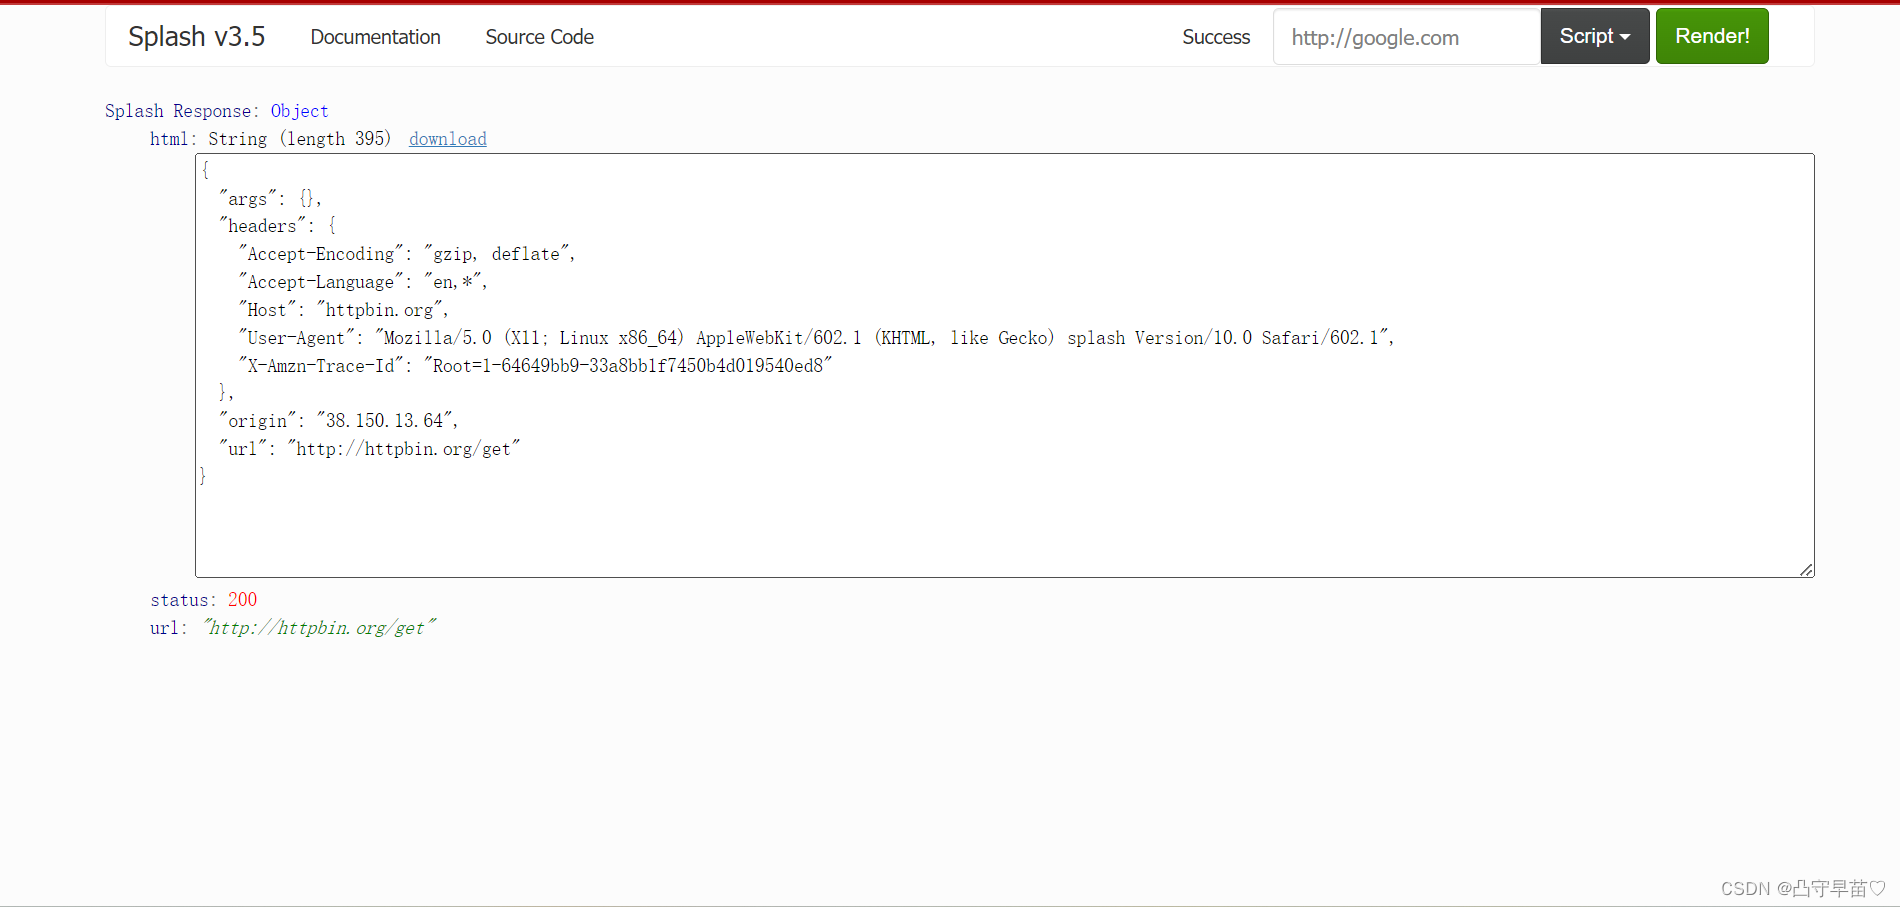
function main(splash)
    local treat = require('treat')
    local response = splash:http_get("http://httpbin.org/get")
    return{
        html = treat.as_string(response.body),
        url = response.url,
        status = response.status
    }
end
运行结果如下:
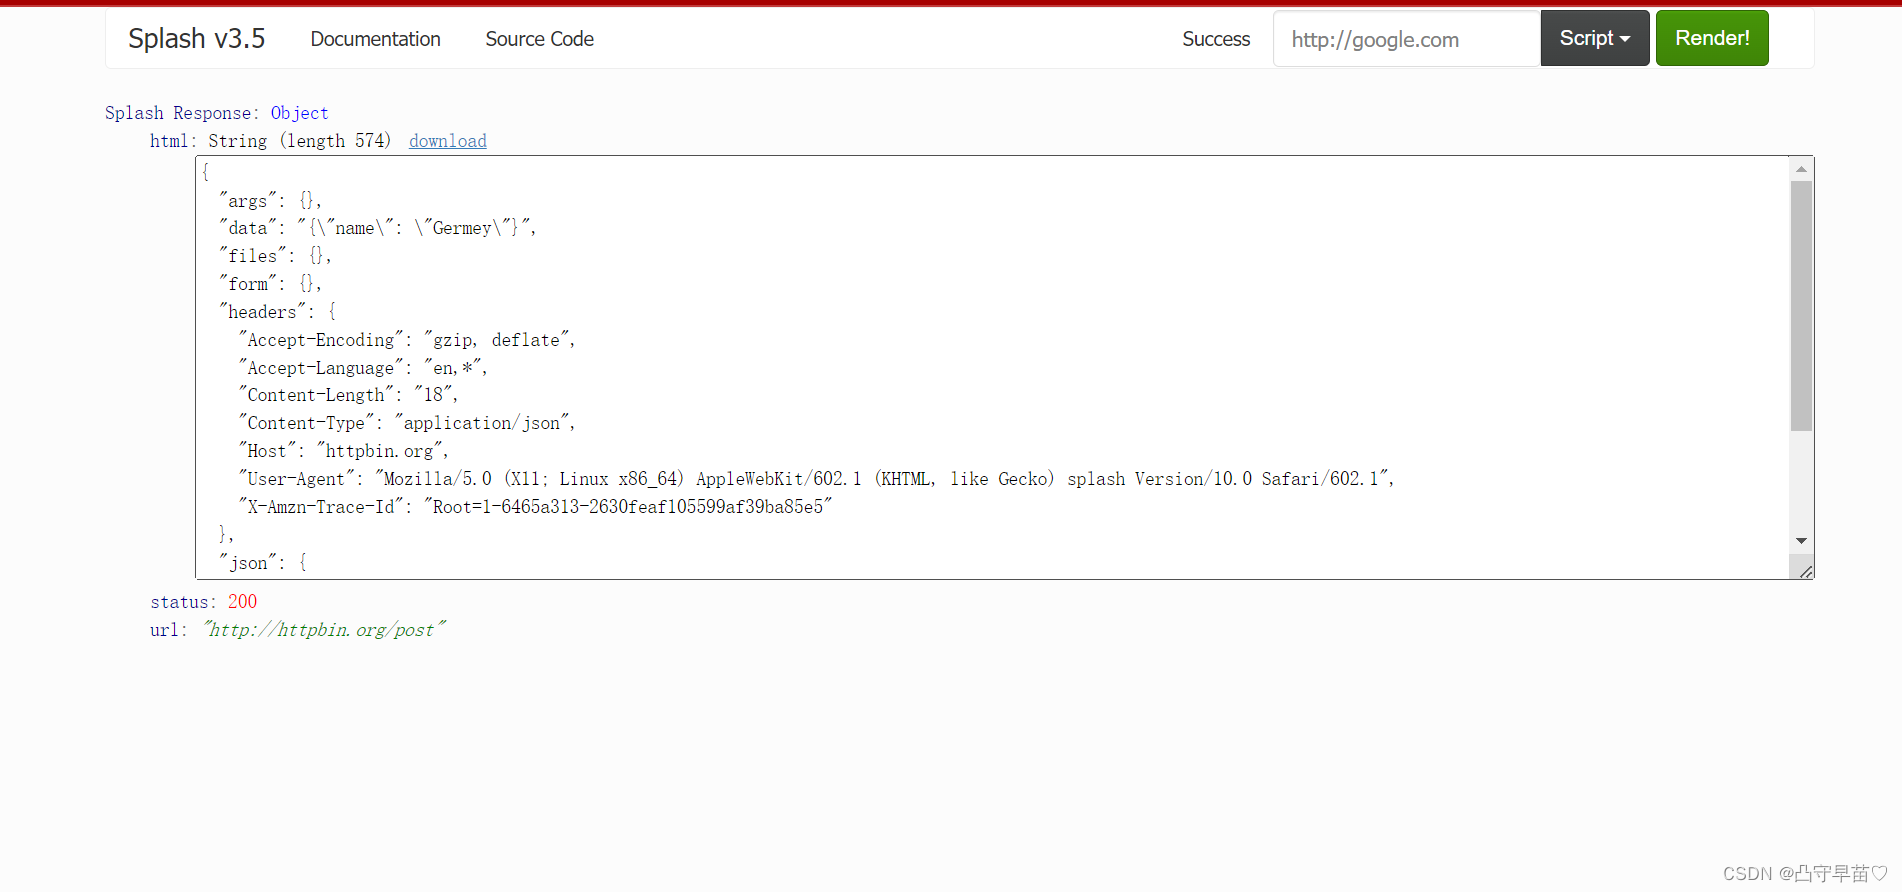
- http_post()
该方法可以用用来发送POST请求,比GET方法多了一个参数body,使用方法如下:
response = splash:http_post{url,headers=nil,follow_redirects=true,body=nil}body:可选参数,即表单数据,默认为空。
实例:
function main(splash)
    local treat = require("treat")
    local json = require("json")
    local response = splash:http_post{"http://httpbin.org/post",body=json.encode({name="Germey"}),headers={["content-type"]="application/json"}}
    return{
        html = treat.as_string(response.body),
        url = response.url,
        status = response.status
    }
end
运行结果如下:
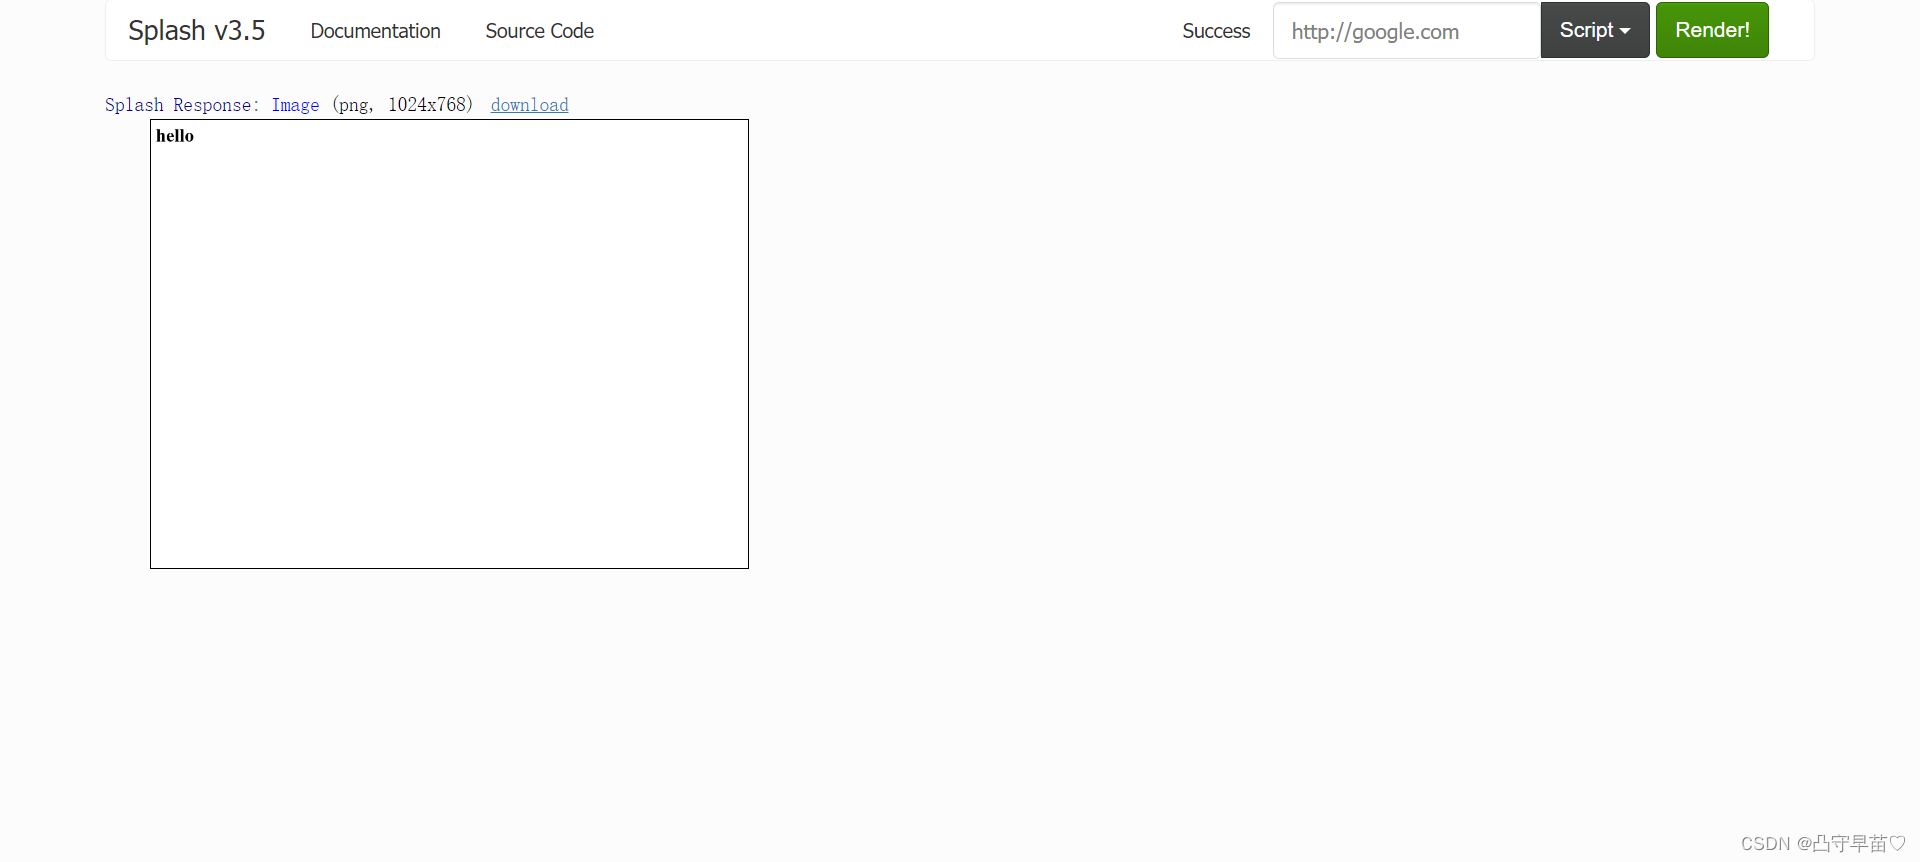
- set_content()
此方法用来设置页面内容。示例:
function main(splash)
    splash:set_content("<html><body><h1>hello</h1></body></html>")
    return splash:png()
end
运行结果如图:
- html()
该方法用来获取网页原代码。
示例如下:
function main(splash)
    splash:go("https://httpbin.org/get")
    return splash:html()
end
运行结果如下:

- png()
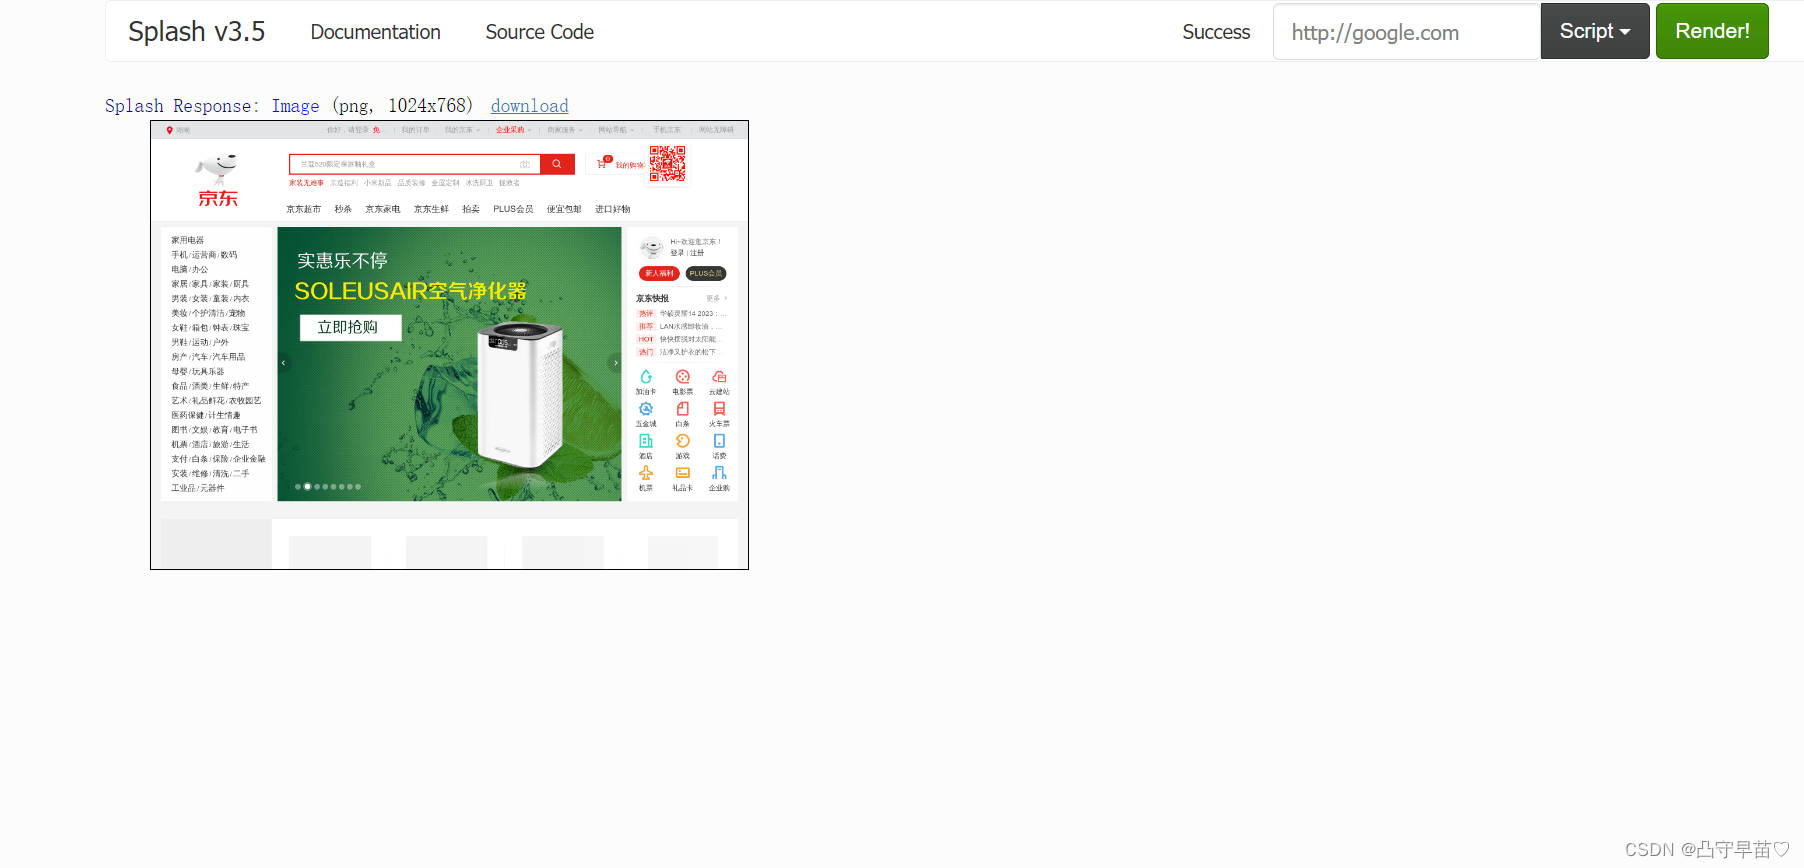
此方法用于获取png格式的网页截图。示例如下:
function main(splash)
    splash:go("https://www.jd.com")
    return splash:png()
end
运行结果如下:
- jpeg()
用法与png()一致。
- har()
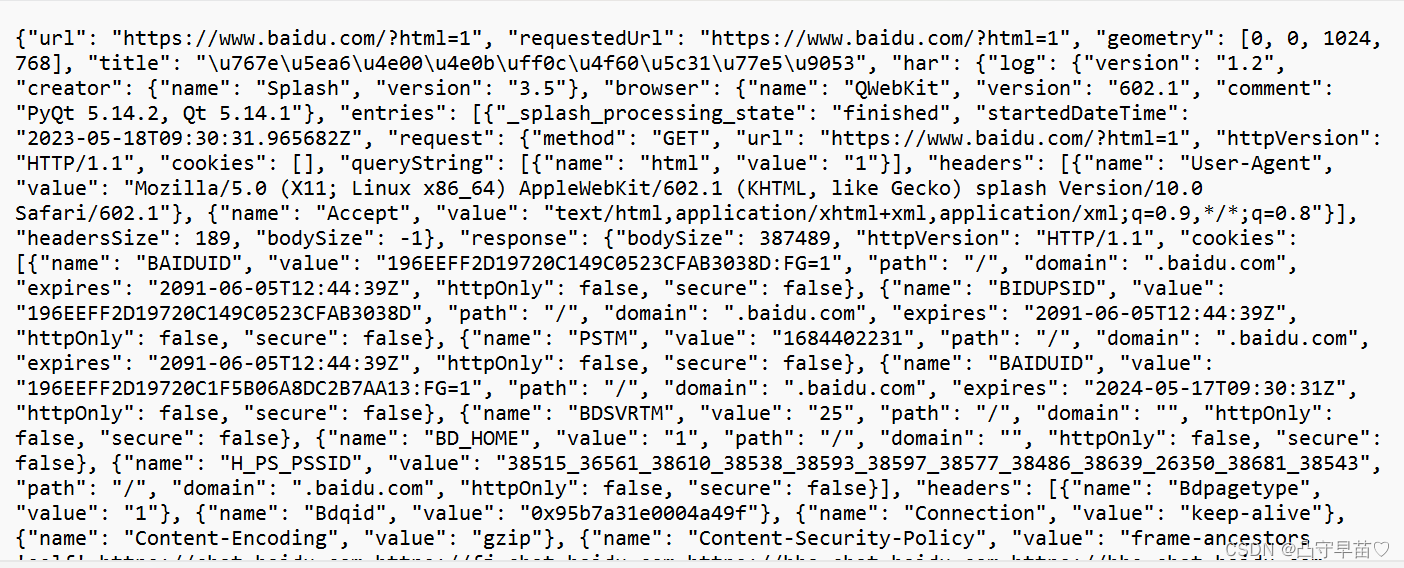
此方法用于获取网页加载过程,示例如下:
function main(splash)
    splash:go("https://www.taobao.com")
    return splash:har()
end
运行结果如图:

其中显示了加载过程中每个请求记录的详情。
- url()
此方法可以获取当前正在访问网页的URL。用法基本都一致就不演示了。
- get_cookies()
也是一样的。不演示了。
- add_cookies()
此方法可以为当前页面添加Cookie,示例如下:
cookies = splash:add_cookie{name,value,path=nil,domain=nil,expires=nil,httpOnly=nil,secure=nil}
该方法各个参数代表Cookie的各个属性。
示例如下:
function main(splash)
    splash:add_cookie{"sessionid","sjdfhjdh","/",domain="http://example.com"}
    splash:go("http://example.com")
    return splash:get_cookies()
end- clear_cookies()
此方法可以清楚所有的Cookies,示例如下:
function main(splash)
    splash:go("https://www.baidu.com")
    splash:clear_cookies()
    return splash:get_cookies()
end
结果如图:

Cookies全部被清空。
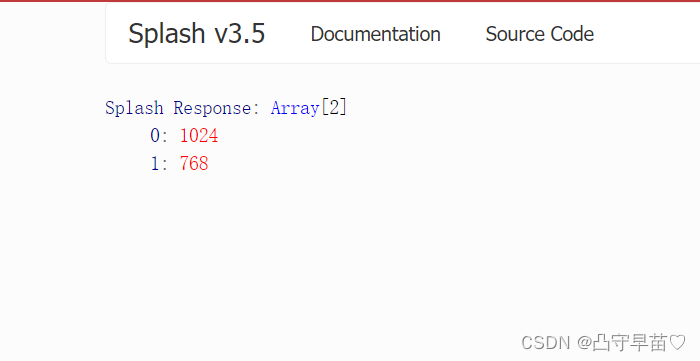
- get_viewport_size()
此方法可以获取当前页面大小,示例如下:
function main(splash)
    splash:go("https://www.taobao.com")
    return splash:get_viewport_size()
end
运行结果如图:
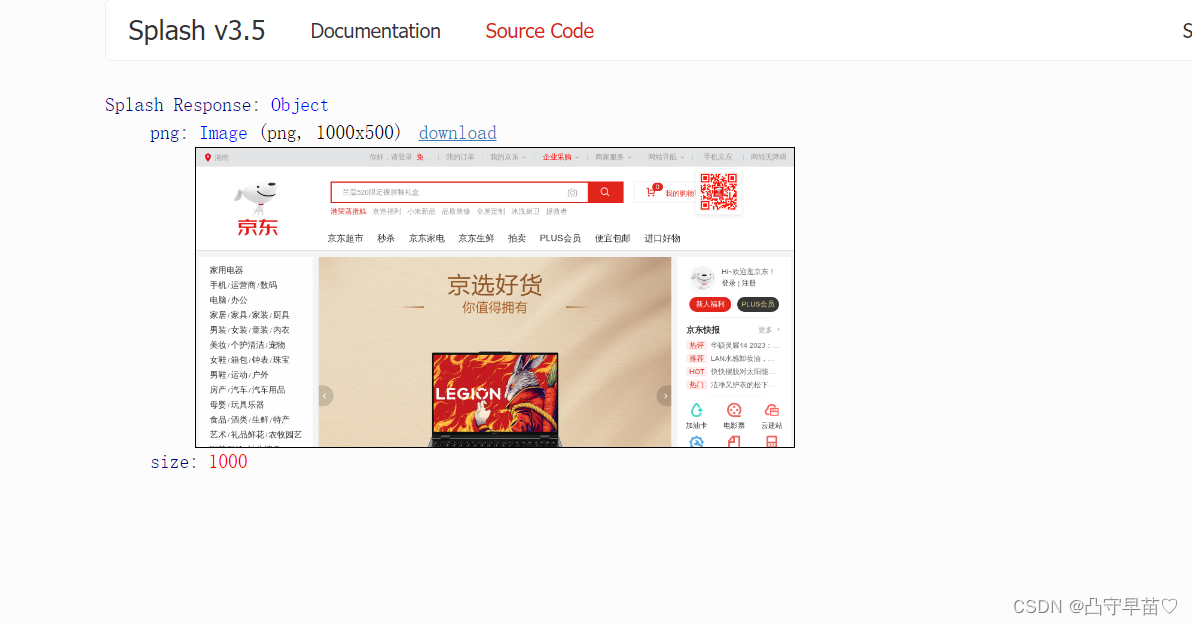
- set_viewport_size()
此方法可以设置当前页面大小,示例如下:
function main(splash)
    splash:go("https://www.jd.com")
    splash:set_viewport_size(1000,500)
    return {
        png=splash:png(),
        size=splash:get_viewport_size()
    }
end
运行结果如图:
- set_viewport_full()
此方法可以设置浏览器页面全屏。
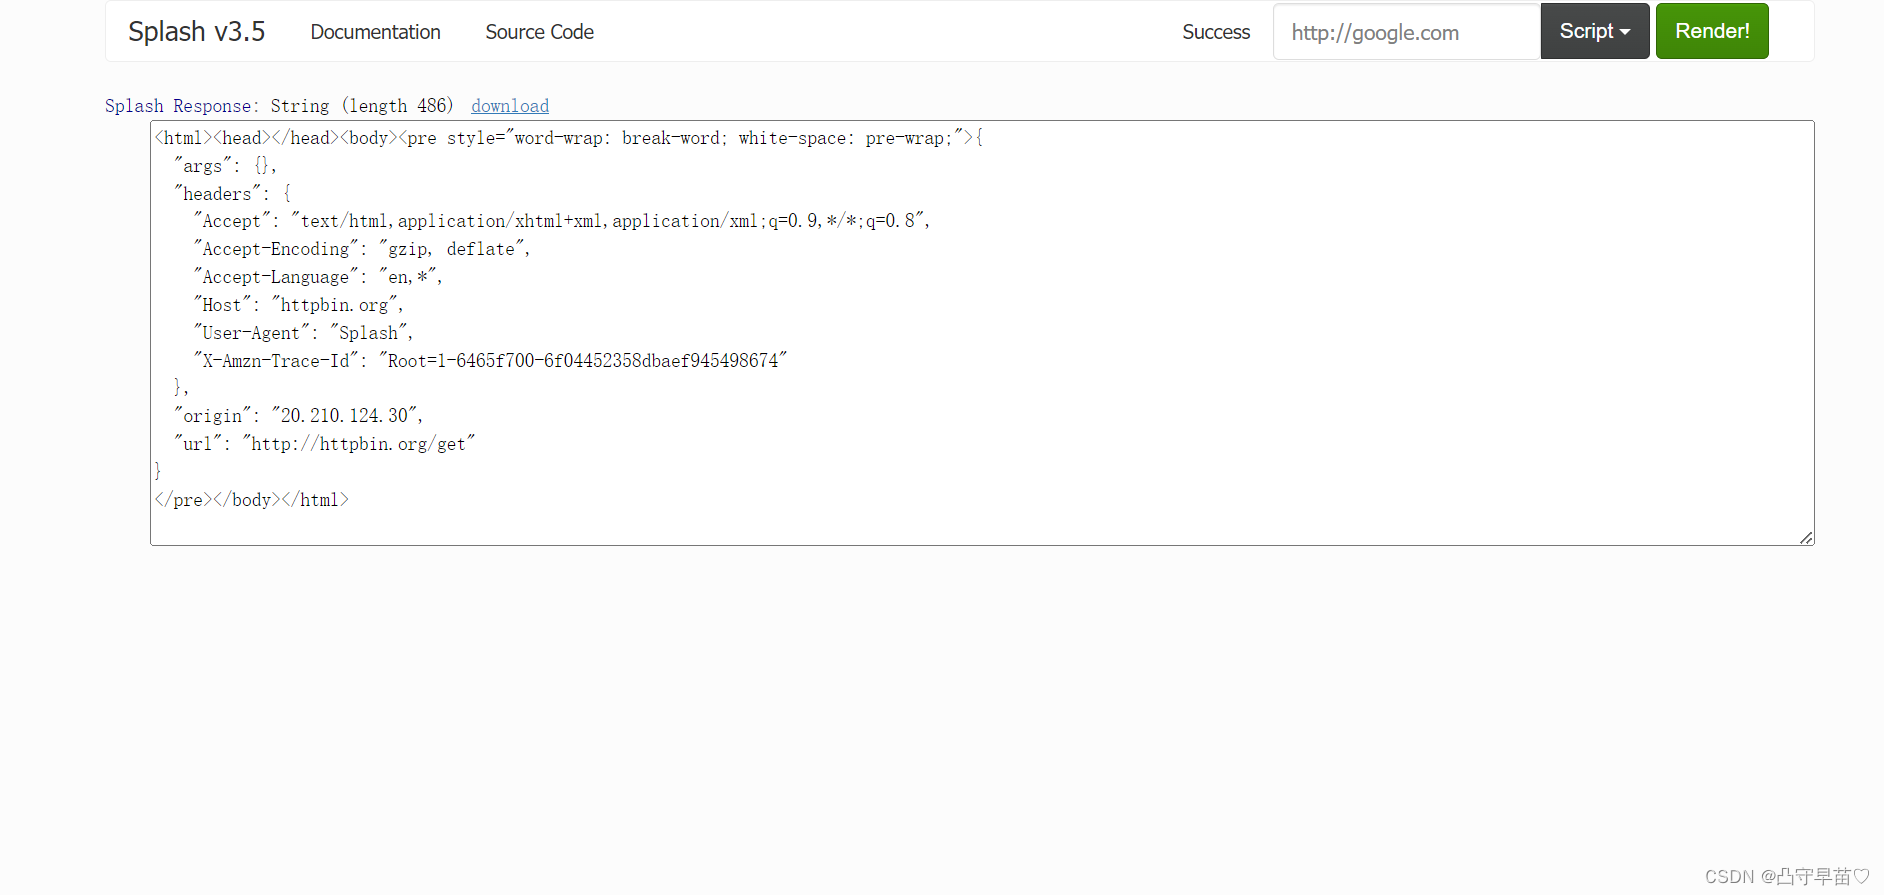
- set_user_agent()
此方法可以设置浏览器的User_Agent,示例如下:
function main(splash)
    splash:set_user_agent("Splash")
    splash:go("http://httpbin.org/get")
    return splash:html()
end
运行结果如下:
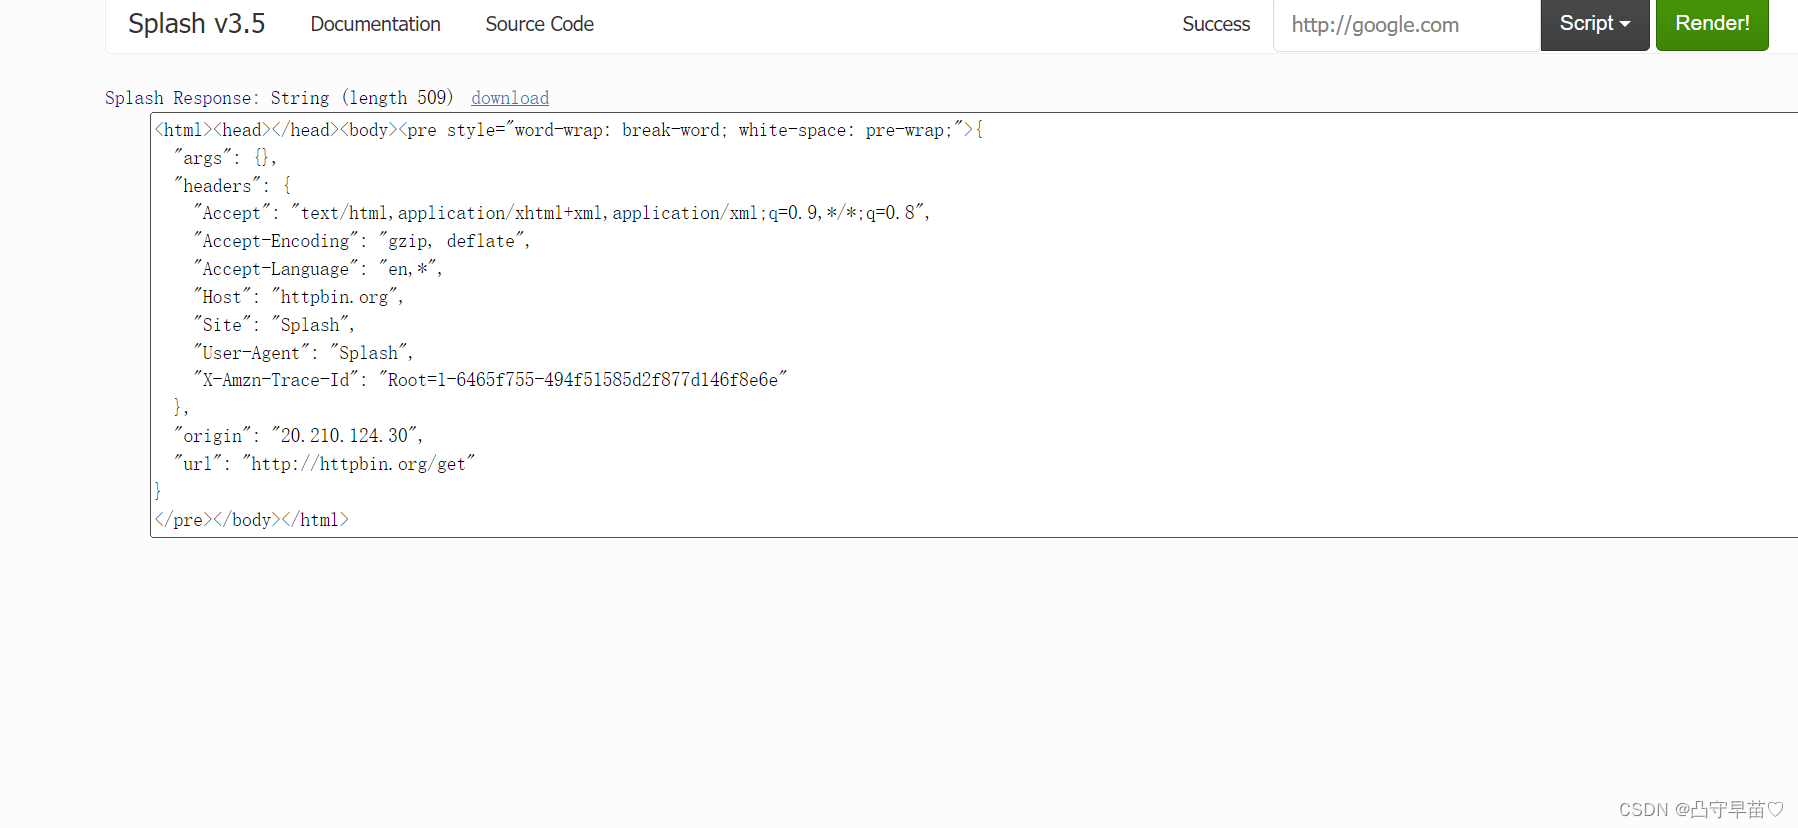
- set_custom_headers()
此方法可以设置请求头,示例如下:
function main(splash)
    splash:set_custom_headers({
        ["User-Agent"]="Splash",
        ["site"]="Splash",
    })
    splash:go("http://httpbin.org/get")
    return splash:html()
end
运行结果如下:
- select()
该方法可以选中满足条件的第一个节点,其参数是CSS选择器。示例如下:
function main(splash)
    splash:go("https://www.baidu.com")
    input = splash:select("#kw")
    input:send_text('Splash')
    splash:wait(3)
    return splash:png()
end
先是访问了百度,然后选中搜索框调用send_text()方法填写文本,然后返回网页截图:
- select_all()
此方法可以选中所有满足条件的节点,参数是CSS选择器。示例如下:
function main(splash)
    local treat = require('treat')
    splash:go("http://quotes.toscrape.com")
    splash:wait(0.5)
    local texts = splash:select_all('.quote .text')
    local results = {}
    for index,text in ipairs(texts) do
        results[index] = text.node.innerHTML
    end
    return treat.as_array(results)
end- mouse_click()
此方法可以模拟鼠标点击操作,传入的参数为坐标x和y,也可以直接选中某个节点,然后调用方法。示例如下:
function main(splash)
    splash:go("https://www.jd.com/")
    input = splash:select('#key')
    input:send_text('iphone12pro')
    submit = splash:select('.button')
    submit:mouse_click()
    splash:wait(3)
    return splash:png()
end
返回的截图为:

7.Splash API的调用
Splash给我们提供了一些HTTP API接口,我们只需要请求这些接口并提供相应的参数即可和Python程序结合使用并抓取js渲染的页面。
- render.html
此接口用于获取JavaScript渲染的页面的HTML代码,接口地址就是Splash的运行地址加此接口的名称。用Python实现代码如下:
import requests
url = 'http://localhost:8050/render.html?url=https://www.baidu.com'
response = requests.get(url)
print(response.text)
这样就可以获取百度页面渲染之后的源代码了。
另外,此接口还可以指定其他参数,如通过wait指定等待的秒数。例如:
import requests
url = 'http://localhost:8050/render.html?url=https://www.baidu.com&wait=5'
response = requests.get(url)
print(response.text)
此时这里就会等待5秒钟再获取百度页面的源代码。另外此接口的其他用法可以参考https://splash.readthedocs.io/en/stable/api.html#render-html。
- render.png
此接口可以获取网页的截图,参数比render.html多了一个,比如通过width,height来控制宽高,它返回的是png格式图片的二进制数据。示例如下:
import requests

url = 'http://localhost:8050/render.png?url=https://www.jd.com&wait=5&width=1000&height=700'
response = requests.get(url)
with open('taobao.png','wb') as f:
    f.write(response.content)
得到的图片如下图所示:

- render.jpeg
该方法与render.png进本一致,返回的是JPEG格式图片的二进制数据。另外接口比render.png多了一个quality参数,它用来设置图片的质量。
- render.har
此接口用来获取页面加载的HAR数据,示例如下:
curl http://localhost:8050/render.har?url=https://www.jd.com&wait=5
它的返回结果非常多,是一个JSON格式的数据,其中包含页面加载过程中的HAR数据。
- render.json
此接口包含了前面接口所有功能,返回结果是JSON格式,示例如下;
curl http://localhost:8050/render.json?url=https://www.baidu.com
结果如下:
{"url": "https://www.baidu.com/", "requestedUrl": "https://www.baidu.com/", "geometry": [0, 0, 1024, 768], "title": "\u767e\u5ea6\u4e00\u4e0b\uff0c\u4f60\u5c31\u77e5\u9053"}
我们可以通过传入不同的参数控制其返回的结果。比如,传入html=1,返回结果就会增加源代码数据;传入png=1,返回结果就会增加页面PNG截图数据等等。例如:
import requests

url = 'http://localhost:8050/render.json?url=https://www.baidu.com?html=1&har=1'
response = requests.get(url)
print(response.text)
返回的结果为:
包含HAR数据和HTML数据。
- execute
此接口是最为强大的接口。用此接口便可实现和Lua脚本的对接。
先实现一个最简单的脚本,直接返回数据:
function main(splash)
    return 'hello'
end
然后将此脚本转化为url编码后的字符串,拼接到execute接口后面。
这里我们通过lua_source参数传递转码后的Lua脚本,通过execute接口获取最终脚本的执行结果。
用Python实现如下:
import requests
from urllib.parse import quote

lua = '''
function main(splash)
    return 'hello'
end'''
url = 'http://localhost:8050/execute?lua_source='+quote(lua)
response = requests.get(url)
print(response.text)
运行结果为:hello
这里用三引号将Lua脚本包围起来,然后再使用urllib.parse模块中的quote()方法将其进行url转码,随后构造了Splash请求URL,将其作为lua_source参数传递,这样运行结果就会显示Lua脚本执行后的结果。
再通过实例看一下:
import requests
from urllib.parse import quote

lua = '''
function main(splash)
    local treat = require('treat')
    local response = splash:http_get("http://httpbin.org/get")
    return{
        html = treat.as_string(response.body),
        url = response.url,
        status = response.status
    }
end'''
url = 'http://localhost:8050/execute?lua_source='+quote(lua)
response = requests.get(url)
print(response.text)
执行结果如下:


 被折叠的 条评论
为什么被折叠?
被折叠的 条评论
为什么被折叠?
 到【灌水乐园】发言


