


前言
开发板:正点原子 STM32F103 精英版
语言:C语言
开发环境:Keil5
使用了 KEY LED LCD RTC
代码下载:
代码参考:正点原子 源码RTC实验例程
功能介绍:
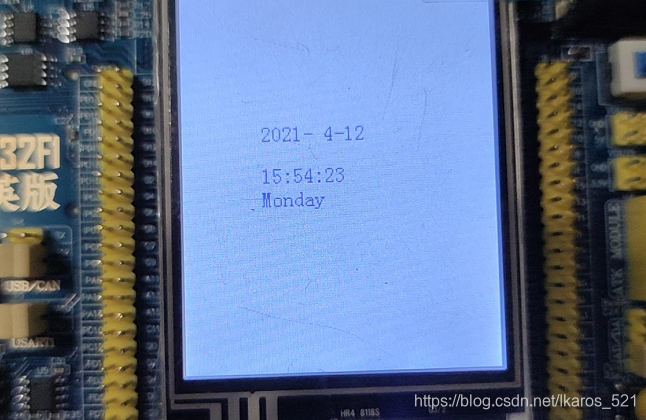
1、LCD显示年月日 时分秒 星期 信息。
2、KEY0 进入修改模式,分别可以修改 年月日时分秒(处于修改状态下,对应值会变红),最后退出修改模式。
3、在KEY0的修改模式下,按KEY1为数字+1,按KEY_UP为数字-1。
效果图

核心代码
#include "led.h"
#include "delay.h"
#include "key.h"
#include "sys.h"
#include "lcd.h"
#include "usart.h"
#include "usmart.h"
#include "rtc.h"

/* 显示时间,index特殊处理 */
void show_index_time( u8 index, _calendar_obj calendar_temp );

int main( void )
{
	/* 按键返回值 */
	u8 key = 0;
	/* 修改指向下标 */
	u8 index = 0;
	/* 日历结构体 */
	_calendar_obj calendar_temp;
	/* 延时函数初始化 */
	delay_init();
	/* 设置中断优先级分组为组2:2位抢占优先级,2位响应优先级 */
	NVIC_PriorityGroupConfig( NVIC_PriorityGroup_2 );
	/* 串口初始化为115200 */
	uart_init( 115200 );
	/* LED端口初始化 */
	LED_Init();
	/* LCD初始化 */
	LCD_Init();
	/* 按键初始化 */
	KEY_Init();
	/* 初始化USMART */
	usmart_dev.init( SystemCoreClock / 1000000 );
	/* RTC初始化 */
	RTC_Init();


	/*
	 * 显示时间
	 * 设置字体为蓝色
	 */
	POINT_COLOR = BLUE;
	LCD_ShowString( 60, 130, 200, 16, 16, "    -  -  " );
	LCD_ShowString( 60, 162, 200, 16, 16, "  :  :  " );
	calendar_temp = calendar;
	while ( 1 )
	{
		/* 根据index显示不同日历变量 */
		if ( 0 == index )
			show_index_time( index, calendar );
		else show_index_time( index, calendar_temp );


		/*
		 * 键处理函数
		 * 返回按键值
		 * mode:0,不支持连续按;1,支持连续按;
		 * 0,没有任何按键按下
		 * 1,KEY0按下
		 * 2,KEY1按下
		 * 3,KEY3按下 WK_UP
		 */
		key = KEY_Scan( 0 );
		/* KEY0 进入修改模式,依次顺序循环 */
		if ( 1 == key )
		{
			index++;
			index = index % 7;
			/* 进入修改 */
			if ( 1 == index )
			{
				calendar_temp = calendar;
			}
			/* 退出修改 */
			else if(0 == index)
			{
				calendar = calendar_temp;
				RTC_Set( calendar_temp.w_year, calendar_temp.w_month, calendar_temp.w_date, calendar_temp.hour, calendar_temp.min, calendar_temp.sec );
			}
		}
		/* KEY1 选中值+1 */
		else if ( 2 == key )
		{
			if ( 1 == index )
			{
				calendar_temp.w_year++;
			} else if ( 2 == index )
			{
				calendar_temp.w_month++;
				calendar_temp.w_month = calendar_temp.w_month > 12 ? 1 : calendar_temp.w_month;
			} else if ( 3 == index )
			{
				/* 判断闰年 */
				if ( Is_Leap_Year( calendar_temp.w_year ) )
				{
					calendar_temp.w_date++;
					calendar_temp.w_date = calendar_temp.w_date > (calendar_temp.w_month == 2 ? (mon_table[calendar_temp.w_month - 1] + 1) : mon_table[calendar_temp.w_month - 1]) ? 1 : calendar_temp.w_date;
				} else {
					calendar_temp.w_date++;
					calendar_temp.w_date = calendar_temp.w_date > mon_table[calendar_temp.w_month - 1] ? 1 : calendar_temp.w_date;
				}
			} else if ( 4 == index )
			{
				calendar_temp.hour++;
				calendar_temp.hour = calendar_temp.hour > 23 ? 0 : calendar_temp.hour;
			} else if ( 5 == index )
			{
				calendar_temp.min++;
				calendar_temp.min = calendar_temp.min > 59 ? 0 : calendar_temp.min;
			} else if ( 6 == index )
			{
				calendar_temp.sec++;
				calendar_temp.sec = calendar_temp.sec > 59 ? 0 : calendar_temp.sec;
			}
		}
		/* KEY_UP 选中值-1 */
		else if ( 3 == key )
		{
			if ( 1 == index )
			{
				calendar_temp.w_year--;
				calendar_temp.w_year = calendar_temp.w_year > 0 ? calendar_temp.w_year : 0;
			} else if ( 2 == index )
			{
				calendar_temp.w_month--;
				calendar_temp.w_month = calendar_temp.w_month > 0 ? calendar_temp.w_month : 12;
			} else if ( 3 == index )
			{
				if ( Is_Leap_Year( calendar_temp.w_year ) )
				{
					calendar_temp.w_date--;
					calendar_temp.w_date = calendar_temp.w_date > 0 ? calendar_temp.w_date : (calendar_temp.w_month == 2 ? (mon_table[calendar_temp.w_month - 1] + 1) : mon_table[calendar_temp.w_month - 1]);
				} else {
					calendar_temp.w_date--;
					calendar_temp.w_date = calendar_temp.w_date > 0 ? calendar_temp.w_date : mon_table[calendar_temp.w_month - 1];
				}
			} else if ( 4 == index )
			{
				calendar_temp.hour = calendar_temp.hour == 0 ? 23 : calendar_temp.hour - 1;
			} else if ( 5 == index )
			{
				calendar_temp.min = calendar_temp.min == 0 ? 59 : calendar_temp.min - 1;
			} else if ( 6 == index )
			{
				calendar_temp.sec = calendar_temp.sec == 0 ? 59 : calendar_temp.sec - 1;
			}
		}
		delay_ms( 10 );
	}
}


/* 显示时间,index特殊处理 */
void show_index_time( u8 index, _calendar_obj calendar_temp )
{
	POINT_COLOR = BLUE;
	if ( 1 == index )
		POINT_COLOR = RED;
	LCD_ShowNum( 60, 130, calendar_temp.w_year, 4, 16 );
	POINT_COLOR = BLUE;
	if ( 2 == index )
		POINT_COLOR = RED;
	LCD_ShowNum( 100, 130, calendar_temp.w_month, 2, 16 );
	POINT_COLOR = BLUE;
	if ( 3 == index )
		POINT_COLOR = RED;
	LCD_ShowNum( 124, 130, calendar_temp.w_date, 2, 16 );
	POINT_COLOR = BLUE;
	if ( 4 == index )
		POINT_COLOR = RED;
	LCD_ShowNum( 60, 162, calendar_temp.hour, 2, 16 );
	POINT_COLOR = BLUE;
	if ( 5 == index )
		POINT_COLOR = RED;
	LCD_ShowNum( 84, 162, calendar_temp.min, 2, 16 );
	POINT_COLOR = BLUE;
	if ( 6 == index )
		POINT_COLOR = RED;
	LCD_ShowNum( 108, 162, calendar_temp.sec, 2, 16 );
	POINT_COLOR = RED;

	POINT_COLOR = BLUE;
	switch ( RTC_Get_Week( calendar_temp.w_year, calendar_temp.w_month, calendar_temp.w_date ) )
	{
		case 0:
			LCD_ShowString( 60, 180, 200, 16, 16, "Sunday   " );
			break;
		case 1:
			LCD_ShowString( 60, 180, 200, 16, 16, "Monday   " );
			break;
		case 2:
			LCD_ShowString( 60, 180, 200, 16, 16, "Tuesday  " );
			break;
		case 3:
			LCD_ShowString( 60, 180, 200, 16, 16, "Wednesday" );
			break;
		case 4:
			LCD_ShowString( 60, 180, 200, 16, 16, "Thursday " );
			break;
		case 5:
			LCD_ShowString( 60, 180, 200, 16, 16, "Friday   " );
			break;
		case 6:
			LCD_ShowString( 60, 180, 200, 16, 16, "Saturday " );
			break;
	}
}
参考图


 5729
5729

 被折叠的 条评论
为什么被折叠?
被折叠的 条评论
为什么被折叠?
 到【灌水乐园】发言


