


 本文介绍了注解的概念,以及如何自定义注解和注解处理器。通过实例展示了如何利用注解处理器在编译时生成代码,简化ButterKnife类似的视图绑定和点击事件处理。此外,还探讨了注解在提高代码可读性和减少反射性能影响上的优势,并提供了完整的代码示例和项目结构。
-
什么是注解?
-
如何自定义注解?
-
怎么对自定义注解标注的元素(属性,方法等)进行解析?
一、什么是注解?
个人理解就是对程序的解释,并且具有一定的功能,相比注释只是说明性文字。例如:常见的@ResId、@Nullable 起到编译时规范代码的作用,第三方有名的框架:ButterKnife、ARouter、Retrofit等等都使用了大量的注解,除此之外注解还能让代码更简洁,可读性更强。
二、如何自定义注解 ?
我们以实现ButterKnife的绑定控件为例子讲解:
1、工程目录新建三个依赖
- lib-annotation(Java依赖):存放自定义注解
- lib-processor (Java依赖 ):存放注解处理器
- bind-core (Android依赖):供外部调用
2、自定义注解
@Retention(RetentionPolicy.SOURCE)
@Target(ElementType.FIELD)
public @interface BindView {
    int value();
    String describe() default "";//多个参数示例,default 指定默认值
}
@Target(ElementType.METHOD)
@Retention(RetentionPolicy.RUNTIME)
public @interface OnClick {
int[] value();//传递View的id,
}- @Retention:指定注解作用时期,包括SOURCE、CLASS、RUNTIME。RUNTIME的作用时期最长
- @Target:指明该注解作用的代码元素,例如属性、方法、类、接口等
- value() :默认的字段,给注解携带参数,另外你也可以自定义字段
三、自定义注解处理器(lib-annotation包下),对注解进行解析
1、 lib-annotation的gradle内容容
plugins {
    id 'java-library'
}

java {
    sourceCompatibility = JavaVersion.VERSION_1_8
    targetCompatibility = JavaVersion.VERSION_1_8
}

dependencies {
    implementation fileTree(include: ['*.jar'], dir: 'libs')

    implementation project(':lib-annotation')
    //用于自动为 JAVA Processor 生成 META-INF 信息。
    implementation 'com.google.auto.service:auto-service:1.0-rc6'
    annotationProcessor 'com.google.auto.service:auto-service:1.0-rc6'
    //快速生成.java文件的库
    implementation 'com.squareup:javapoet:1.13.0'
}
2、创建BindingProcessor 继承自AbstractProcessor,重写主要的三个方法
-
getSupportedSourceVersion():设置版本
-
getSupportedAnnotationTypes():设置支持的注解
set集合
-
process(Set<? extends TypeElement> annotations, RoundEnvironment roundEnv):主要的注解元素解析方法
@AutoService(Processor.class) //自动生成注解处理器路径文件
public class BindingProcessor extends AbstractProcessor {
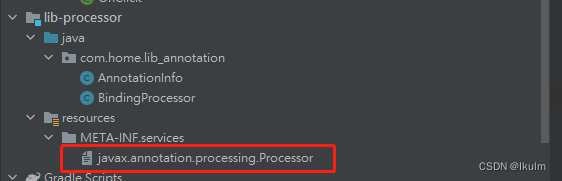
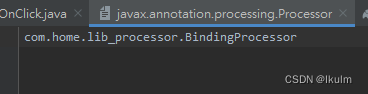
}@AutoService 用于自动为 JAVA Processor 生成 META-INF 信息。原始的方法在如下目录新建一个javax.annotation.processing.Processor的文件,内容为BindingProcessor的全类名:
com.home.lib_processor.BindingProcessor(使用@AutoService可忽略此步骤)
注解处理器代码如下:
@AutoService(Processor.class) //自动生成注解处理器路径文件
public class BindingProcessor extends AbstractProcessor {

    private Filer filer;//文件生成
    private Messager messager;//日志
    private Elements elementUtil;//工具类
    //全类名:生成复制类所需信息
    private Map<String, AnnotationInfo> annotationInfoMap = new HashMap<>();

    private void log(String msg) {
        System.out.println(msg);
    }

    /**
     * 初始化操作
     * @param processingEnv
     */
    @Override
    public synchronized void init(ProcessingEnvironment processingEnv) {
        super.init(processingEnv);
        filer = processingEnv.getFiler();
        elementUtil = processingEnv.getElementUtils();
        messager = processingEnv.getMessager();
    }

    /**
     * 设置版本
     *
     * @return
     */
    @Override
    public SourceVersion getSupportedSourceVersion() {
        return SourceVersion.latestSupported();
    }

    /**
     * 返回支持的注解类型,set集合
     * @return
     */
    @Override
    public Set<String> getSupportedAnnotationTypes() {
        Set<String> set = new LinkedHashSet<>();
        set.add(BindView.class.getCanonicalName());
        set.add(OnClick.class.getCanonicalName());
        return set;
    }

    /**
     * 主要的注解解析
     * @param annotations 注解集合
     * @param roundEnv
     * @return
     */
    @Override
    public boolean process(Set<? extends TypeElement> annotations, RoundEnvironment roundEnv) {
        //获取所有被MBindView注解标记的元素
        Set<? extends Element> fieldElements = roundEnv.getElementsAnnotatedWith(BindView.class);
        Set<? extends Element> methodElements = roundEnv.getElementsAnnotatedWith(OnClick.class);

        if (fieldElements.size() < 1 && methodElements.size() < 1) {
            return true;
        }

        for (Element element : methodElements) {
            //获取当前元素父元素,即当前类
            TypeElement typeElement = (TypeElement) element.getEnclosingElement();

            //获取全类名:com.home.test.MainActivity
            String className = typeElement.getQualifiedName().toString();
            String packageName = elementUtil.getPackageOf(typeElement).toString();

            //以类为一个对象,保存所需元素信息
            AnnotationInfo annotationInfo = annotationInfoMap.get(className);
            if (annotationInfo == null) {
                AnnotationInfo temp = new AnnotationInfo(typeElement, packageName);
                //以方法名作为key
                temp.onClickElements.put(element.getSimpleName().toString(), element);
                annotationInfoMap.put(className, temp);
            } else {
                annotationInfo.onClickElements.put(element.getSimpleName().toString(), element);
            }
        }

        //=====================================BindView 相关==========================
        for (Element element : fieldElements) {
            if (element.getKind() == ElementKind.FIELD) {
                //获取当前元素父元素,即当前类
                TypeElement typeElement = (TypeElement) element.getEnclosingElement();

                //获取全类名:com.home.test.MainActivity
                String className = typeElement.getQualifiedName().toString();
                String packageName = elementUtil.getPackageOf(typeElement).toString();

                //以类为一个对象,保存所需元素信息
                AnnotationInfo annotationInfo = annotationInfoMap.get(className);
                BindView annotation = element.getAnnotation(BindView.class);
                if (annotationInfo == null) {
                    AnnotationInfo temp = new AnnotationInfo(typeElement, packageName);
                    temp.bindViewElements.put(annotation.value(), element);
                    annotationInfoMap.put(className, temp);
                } else {
                    annotationInfo.bindViewElements.put(annotation.value(), element);
                }
            }
        }


        for (String classNameKey : annotationInfoMap.keySet()) {
            AnnotationInfo info = annotationInfoMap.get(classNameKey);
            String packageName = info.getPackageName();

            //要生成.java文件的类名:com.home.test.MainActivity_Binding
            ClassName classBindName = ClassName.get(packageName, info.getTypeElement().getSimpleName() + AnnotationInfo.TAG_NAME);
            //生成类要实现的接口:com.home.bind_core.IViewInjector
            ClassName classInterface = ClassName.get("com.home.bind_core", "IViewInjector");
            //className:com.home.test.MainActivity
            ClassName className = ClassName.get(info.getTypeElement());
            //泛型接口,implements IViewInjector<MainActivity>
            ParameterizedTypeName parameterizedTypeName = ParameterizedTypeName.get(classInterface, className);

            //生成接口的实现方法
            MethodSpec.Builder implMethod = MethodSpec.methodBuilder("initView")
                    .addModifiers(Modifier.PUBLIC)
                    .addAnnotation(Override.class)
                    .addParameter(className, "activity")
                    .addParameter(Object.class, "source");

            for (int id : info.bindViewElements.keySet()) {
                //VariableElement:表示字段、 enum常量、方法或构造函数参数、局部变量、资源变量或异常参数
                VariableElement element = (VariableElement) info.bindViewElements.get(id);
                String fieldName = element.getSimpleName().toString();
                log("filedName:" + fieldName);
                //生成真正的初始化控件代码
                implMethod.beginControlFlow("if (source instanceof android.app.Activity)")
                        .addStatement("activity.$L = ((android.app.Activity) source).findViewById($L)", fieldName, id)
                        .nextControlFlow("else")
                        .addStatement("activity.$L = ((android.view.View)source).findViewById($L)", fieldName, id)
                        .endControlFlow();
            }

            //=====================================onClick 相关==========================
            //构造函数
            MethodSpec.Builder constructorBuilder = MethodSpec.constructorBuilder()
                    .addModifiers(Modifier.PUBLIC)
                    .addParameter(className, "activity");

            for (String methodName:info.onClickElements.keySet()){
                Element element = info.onClickElements.get(methodName);
                //ExecutableElement:表示类或接口的方法、构造函数
                ExecutableElement executableElement = (ExecutableElement) element;
                OnClick annotation = executableElement.getAnnotation(OnClick.class);
                int[] ids = annotation.value();
                for (int idTemp: ids){
                    //匿名内部类
                    TypeSpec comparator = TypeSpec.anonymousClassBuilder("")
                            .addSuperinterface(ClassName.get("android.view","View.OnClickListener"))
                            .addMethod(MethodSpec.methodBuilder("onClick")
                                    .addAnnotation(Override.class)
                                    .addModifiers(Modifier.PUBLIC)
                                    .addStatement("activity.$L(view)",element.getSimpleName())
                                    .addParameter(ClassName.get("android.view","View"), "view")
                                    .build())
                            .build();

                    constructorBuilder.addStatement("activity.findViewById($L).setOnClickListener($L)",idTemp,comparator);
                }
            }

            //创建类
            TypeSpec typeSpec = TypeSpec.classBuilder(classBindName)
                    .addModifiers(Modifier.PUBLIC)
                    .addMethod(constructorBuilder.build())//构造器
                    .addSuperinterface(parameterizedTypeName) //实现接口
                    .addMethod(implMethod.build()) //添加类中的方法
                    .build();
            try {
                //生成 MainActivity_Binding.java文件
                JavaFile javaFile = JavaFile.builder(packageName, typeSpec)
                        .build();
                javaFile.writeTo(filer);//生成java文件
                javaFile.writeTo(System.out);//控制台输出生成的代码
            } catch (IOException e) {
                e.printStackTrace();
            }
        }
        return false;
    }

}原理:找到程序中被注解标注的元素(代码注释很详细,这里不再赘述),获取注解的参数,通过Javapoet 编译时自动生成你想要的Java代码,例如生成的如下代码

四、代码中使用
App下gradle引入注解
    implementation project(':bind-core')
    implementation project(':lib-annotation')
    kapt project(':lib-processor')// Kotlin使用kapt ,java中使用annotationProcessor
MainActivity中
   @BindView(R.id.tv_1)
    @JvmField
    var tv1:TextView?=null

    @BindView(R.id.tv_2)
    @JvmField
    var tv2:TextView?=null
    override fun onCreate(savedInstanceState: Bundle?) {
        super.onCreate(savedInstanceState)
        setContentView(R.layout.activity_main)
        //绑定
        MButterKnife.bind(this)
        tv1?.text = "绑定成功!"
        tv2?.text = "^_^"
    }

    @OnClick(R.id.btn_1,R.id.btn_2)
    fun btnClick(v:View){
        when(v.id){
            R.id.btn_1 ->{
                Toast.makeText(this,"点击按钮11",Toast.LENGTH_SHORT).show()
            }
            R.id.btn_2 ->{
                Toast.makeText(this,"点击按钮22",Toast.LENGTH_SHORT).show()
            }
        }
    }
五、总结
- 学会如何自定义注解
- 如何获取程序的元素,对注解进行功能性代码建设
- 学习如何使用Javapoet框架,自动生成java模板代码
- 注解在使用的时候同样使用到反射,但一个类里面只有对应的一个绑定类通过反射生成,其性能的影响可以忽略不记


 946
946

 被折叠的 条评论
为什么被折叠?
被折叠的 条评论
为什么被折叠?
 到【灌水乐园】发言


