


 本文介绍了如何通过Vue脚手架安装并使用Element UI组件,如按钮、日期选择和文件上传,以及创建相应的自定义组件。重点在于演示了如何在项目中整合第三方UI库以提升开发效率。
element-ui是饿了么推出的一个开源ui库,它不依赖于vue。但是却是当前和vue配合做项目开发的一个比较好的ui框架。
官网:Element - The world's most popular Vue UI framework
今天分享一下这个插件的基本使用,
1.创建一个项目,并安装element-ui插件
创建项目参考使用vue脚手架搭建项目详细解说_Im_xiaopei的博客-CSDN博客
安装element-ui
打开终端,输入npm install element-ui -S命令,等待安装完成,
2.在main.js入口文件使用element-ui插件
import Vue from 'vue'
import ElementUI from 'element-ui';                      // 引入element-ui
import 'element-ui/lib/theme-chalk/index.css';           // element-ui的css样式要单独引入
import App from './App.vue'

Vue.use(ElementUI);   // 这种方式引入了ElementUI中所有的组件

new Vue({
  el: '#app',
  render: h => h(App)
})
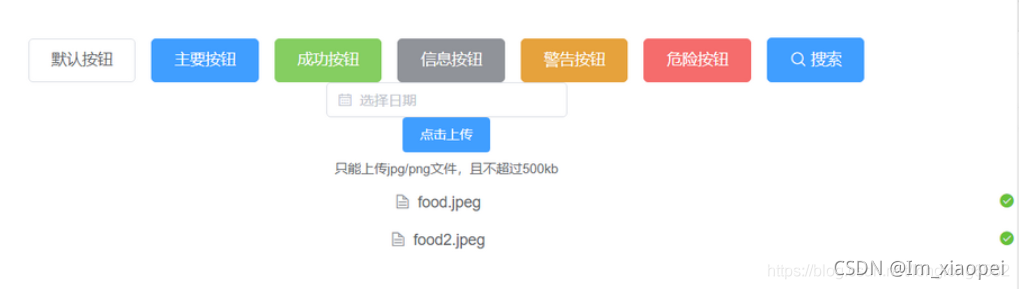
3.在APP.vue组件中使用element-ui组件,,这里我选择的是按钮组件,日期组件和上传图片组件,在官网中选择想要的样式复制代码到vue组件中即可
<template>
  <div id="app">
    {{msg}}

    <!--图标-->
    <div>
      <el-row>
        <el-button>默认按钮</el-button>
        <el-button type="primary">主要按钮</el-button>
        <el-button type="success">成功按钮</el-button>
        <el-button type="info">信息按钮</el-button>
        <el-button type="warning">警告按钮</el-button>
        <el-button type="danger">危险按钮</el-button>
        <el-button type="primary" icon="el-icon-search">搜索</el-button>
      </el-row>
    </div>

    <!-- 日期选择器 -->
    <DatePicker></DatePicker>
    <!-- 文件上传 -->
    <Upload></Upload>
  </div>
</template>

<script>
  // 导入组件
  import DatePicker from './components/DatePicker.vue'
  import Upload from './components/Upload.vue'

export default {
  name: 'app',
  data () {
    return {
      msg: '测试msg'
    }
  },
  components:{
    DatePicker,
    Upload
  }
}
</script>

<style>
#app {
  font-family: 'Avenir', Helvetica, Arial, sans-serif;
  -webkit-font-smoothing: antialiased;
  -moz-osx-font-smoothing: grayscale;
  text-align: center;
  color: #2c3e50;
  margin-top: 60px;
}

h1, h2 {
  font-weight: normal;
}

ul {
  list-style-type: none;
  padding: 0;
}

li {
  display: inline-block;
  margin: 0 10px;
}

a {
  color: #42b983;
}
</style>
4.然后创建日期组件和上传文件组件,在src中创建 components/DatePicker.vue 和 components/Upload.vue 两个组件
DatePicker.vue:(日期组件)
<template>
    <el-date-picker
      v-model="value"
      type="date"
      placeholder="选择日期"
      size="small"
      :picker-options="options">
    </el-date-picker>
</template>

<script>
    export default {
        data(){
            return {
                value:'',
                options:{
                    disabledDate(time) {
                        return time.getTime() < Date.now() - 8.64e7;
                    },
                    firstDayOfWeek:1
                }
            }
        }
    }
</script>
Upload.vue:(上传文件组件)
<template>
    <el-upload
      class="upload-demo"
      action="https://jsonplaceholder.typicode.com/posts/"
      :on-preview="handlePreview"
      :on-remove="handleRemove"
      :file-list="fileList">
      <el-button size="small" type="primary">点击上传</el-button>
      <div slot="tip" class="el-upload__tip">只能上传jpg/png文件,且不超过500kb</div>
    </el-upload>
</template>

<script>
    export default {
        data(){
            return {
                fileList: [
                        {
                            name: 'food.jpeg',
                            url: 'https://fuss10.elemecdn.com/3/63/4e7f3a15429bfda99bce42a18cdd1jpeg.jpeg?imageMogr2/thumbnail/360x360/format/webp/quality/100'
                        },
                        {
                            name: 'food2.jpeg',
                            url: 'https://fuss10.elemecdn.com/3/63/4e7f3a15429bfda99bce42a18cdd1jpeg.jpeg?imageMogr2/thumbnail/360x360/format/webp/quality/100'
                        }
                ]
            }
        },
         methods: {
          handleRemove(file, fileList) {
            console.log(file, fileList);
          },
          handlePreview(file) {
            console.log(file);
          }
        }
    }

</script>
启动项目,展示效果图
然后根据自己想要的样式,来自己修改
总之,虽然有了第三方插件提高了我们的编码速度,但是,打铁还需自身硬,一定要多多练习,多多学习呀,祝生活安好。。。。。


 1379
1379

 被折叠的 条评论
为什么被折叠?
被折叠的 条评论
为什么被折叠?
 到【灌水乐园】发言


