史上最全springboot配置,踩坑,注解,使用手册(持续更新中)

cover

springboot

春节在家长了几斤肉,今天开始减肥了(工作了)。19年的第一篇文章,本篇文章将覆盖springboot所有配置(本人实际工作中所遇到问题以及学习总结),后续将会持续更新!话不多说,直接开始。

详细配置

注意:本演示全部基于springboot最新版本,现在是**2.1.2.RELEASE**,并且所有配置将全部使用yaml格式!

如何配置springboot监听端口?

  1. 通过application.yml指定。(推荐)
server:
  port: 8080

注意:如果使用server.port=0,将使用一个随机端口,可以控制台查看。
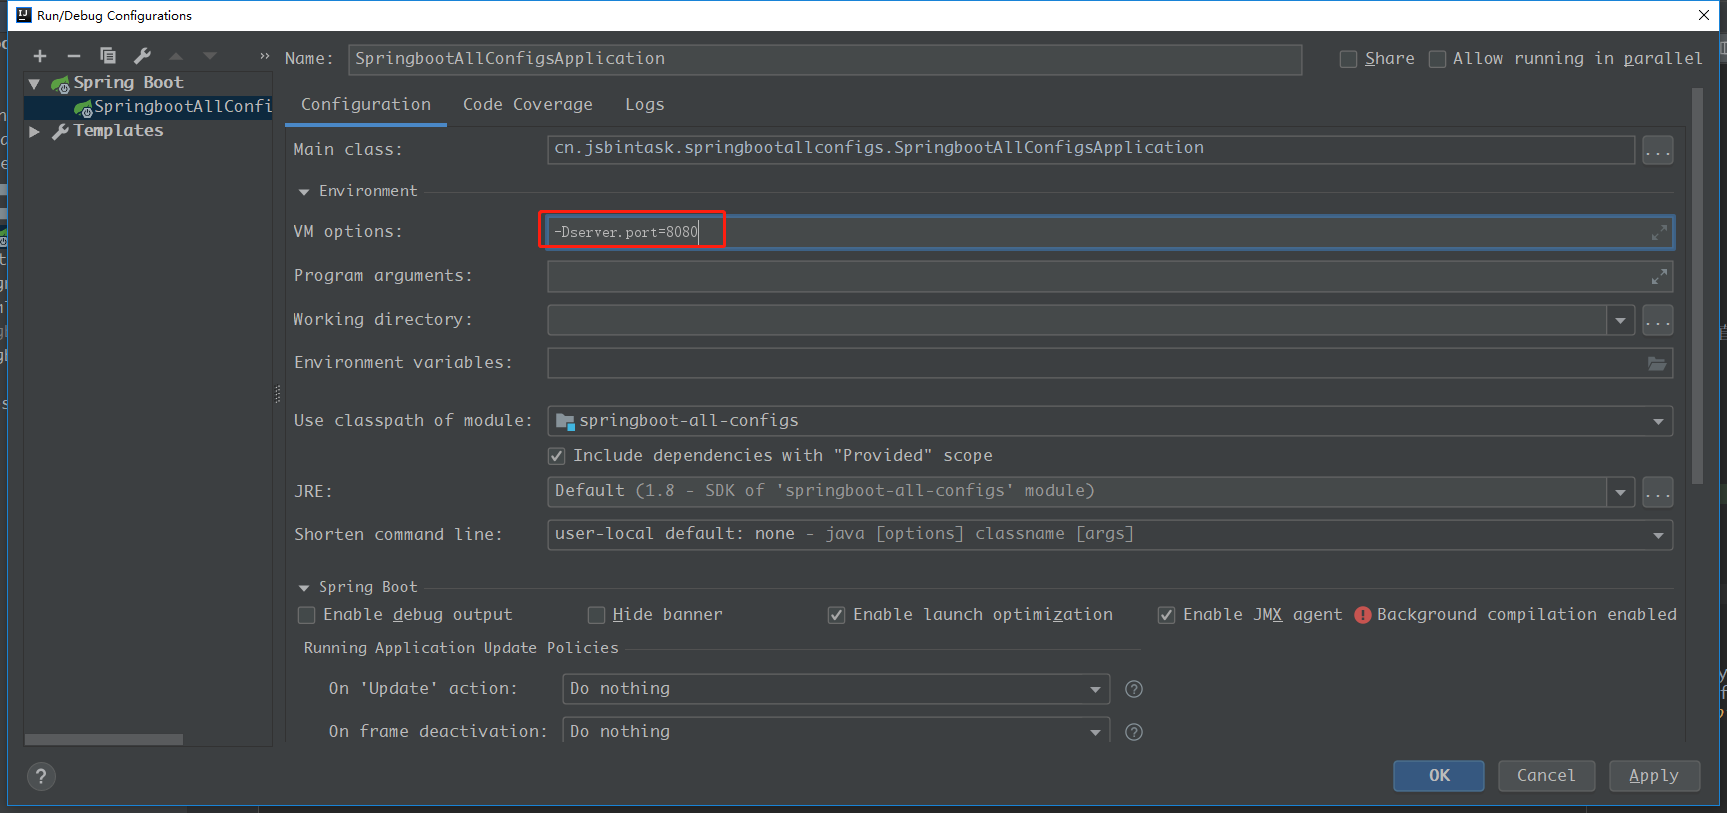
2. 指定jvm参数(启动多个项目调试时推荐使用)
idea中:Edit Configurations -> VM options
运行jar命令: java -Dserver.port=8080 app.jar
springboot
3. 运行java -jar命令时指定
如: java -jar app.jar --server.port=8080
4. 通过代码指定:

@Configuration
public class TomcatConfig {

    @Bean
    @Autowired
    public TomcatWebServerFactoryCustomizer factoryCustomizerAutoConfiguration(Environment environment, ServerProperties serverProperties) {
            serverProperties.setPort(8888);
        return new TomcatWebServerFactoryCustomizer(environment, serverProperties);
    }
}

springboot中如何添加filter

  1. 继承Filter并且将该类作为一个bean加入spring容器,使用@Order设置filter顺序
@Component
@Order(1000)
public class FirstFilter implements Filter {
    @Override
    public void doFilter(ServletRequest servletRequest, ServletResponse servletResponse, FilterChain filterChain) throws IOException, ServletException {
        //to do something.
        
        filterChain.doFilter(servletRequest, servletResponse);
    }
}

注意!使用这种方式注册的filter将拦截所有请求,无法指定拦截url。
2. 使用FilterRegistrationBean类手动注册一个filter(推荐)

public class SecondFilter implements Filter {
    @Override
    public void doFilter(ServletRequest servletRequest, ServletResponse servletResponse, FilterChain filterChain) throws IOException, ServletException {
        //to do something.

        System.out.println("SecondFilter.doFilter");

        filterChain.doFilter(servletRequest, servletResponse);
    }
}
@Configuration
public class FilterConfig {
    @Bean
    public FilterRegistrationBean<SecondFilter> secondFilterFilterRegistrationBean() {
        FilterRegistrationBean<SecondFilter> registrationBean = new FilterRegistrationBean<>();
        registrationBean.setFilter(new SecondFilter());
        registrationBean.setOrder(10001);

        registrationBean.addUrlPatterns("/**");
        
        return registrationBean;
    }
}
  1. 开启@WebFilter扫描。
    在启动类上加上@ServletComponentScan注解,定义filter如下:
@WebFilter(filterName = "ThridFilter", urlPatterns = "/**")
@Order(1002)
public class ThridFilter implements Filter {

    @Override
    public void doFilter(ServletRequest req, ServletResponse resp, FilterChain chain) throws ServletException, IOException {
        System.out.println("ThridFilter.doFilter");
        chain.doFilter(req, resp);
    }

}

采坑记录:该方式只在内置web容器下有效(打jar包),如果使用war包,将失效,有兴趣的可以看一看@ServletComponentScan注解说明。

springboot如何添加servlet

  1. 同上类似,使用ServletRegistrationBean
@Bean
public ServletRegistrationBean servletRegistrationBean(){
    return new ServletRegistrationBean(new FooServlet(),"/foo/*");
}

如何配置jpa,数据源?

引入jpa依赖,application.yml中添加数据源信息

 <dependency>
    <groupId>org.springframework.boot</groupId>
    <artifactId>spring-boot-starter-data-jpa</artifactId>
</dependency>
<dependency>
    <groupId>mysql</groupId>
    <artifactId>mysql-connector-java</artifactId>
</dependency>
spring:
  datasource:
    driver-class-name: com.mysql.jdbc.Driver
    username: root
    password: jason
    url:  jdbc:mysql://localhost:3306/springboot-all-configs?useSSL=false

  jpa:
    show-sql: true
    hibernate:
      ddl-auto: update
    properties:
      hibernate:
        format_sql: true

采坑记录1:如果引入jpa但是不定义数据源将会启动失败
采坑记录2:最新版springboot默认mysql驱动为8.1,自定义参数较多,启动可能造成数据源初始化失败,建议降级mysql驱动版本,在pom文件中定义:
springboot

<mysql.version>5.1.47</mysql.version>

生war包运行,部署在weblogic获取其它servlet容器中

  1. 将tomcat从maven依赖中去掉,启动类继承SpringBootServletInitializer
<dependency>
    <groupId>org.springframework.boot</groupId>
    <artifactId>spring-boot-starter-tomcat</artifactId>
    <scope>provided</scope>
</dependency>
@SpringBootApplication
@ServletComponentScan
public class SpringbootAllConfigsApplication extends SpringBootServletInitializer implements WebApplicationInitializer {

    public static void main(String[] args) {
        SpringApplication.run(SpringbootAllConfigsApplication.class, args);
    }

    @Override
    protected SpringApplicationBuilder configure(SpringApplicationBuilder builder) {
        return builder.sources(SpringBootApplication.class);
    }
}

最后将pom文件打包方式修改为war:
<packaging>war</packaging>
使用idea打包:
springboot

使用springboot默认生成的项目mvnw.cmd有什么用

  1. 用作生产环境(linux)上没有maven环境自动下载maven,打包依赖使用
  2. 没卵用,直接删除

如何设置项目的log level

  1. application.yml中指定:
logging:
  level:
    org:
      springframework:
        web: debug
  1. 如果使用logback,添加一个append:
    <logger name="cn.jsbintask.springbootallconfigs.mapper" level="DEBUG"/>

springboot中访问配置文件中的配置?

  1. 使用@Value注解
@Value("${server.port}")
private int port;
  1. 注入Environment实例,然后获取值
@RestController
@RequestMapping
public class PropertiesController {
    @Autowired
    private Environment environment;
    
    @GetMapping("/path")
    public String getPath() {
        return environment.getProperty("server.port");
    }
}
  1. 使用ConfigurationProperties注解,定义多个属性值
    .yml:
cn:
  jsbintask:
    name: jason
    age: 22

.Properties class:

@ConfigurationProperties(prefix = "cn.jsbintask")
@EnableConfigurationProperties
@Component
@Data
public class JsbintaskProperties {
    private String name;
    private int age;
}

使用:

@Autowired
private JsbintaskProperties jsbintaskProperties;

如何指定springboot启动类

  1. 使用idea指定main class
    springboot
  2. 在pom文件中指定启动类
<properties>
    <!-- The main class to start by executing java -jar -->
    <start-class>cn.jsbintask.springbootallconfigs.SpringbootAllConfigsApplication</start-class>
</properties>
  1. 在springboot maven插件中指定:
<build>
    <plugins>
        <plugin>
            <groupId>org.springframework.boot</groupId>
            <artifactId>spring-boot-maven-plugin</artifactId>
            <configuration>
                <mainClass>cn.jsbintask.springbootallconfigs</mainClass>
            </configuration>
        </plugin>
    </plugins>
</build>

application.yml和bootstrap.yml的区别?

  1. bootstrap配置文件先于application.yml配置加载,bootstrap配置属性一般只在spring cloud获取配置服务时使用,所以一般如果不使用spring cloud的话,优先使用application.yml.

如何定义rest服务?

  1. 使用@ResponseBody注解配置**@RequestMapping**注解使用
  2. 使用新注解@RestController配置**@XXXMaping(GetMapping)**使用。
@RestController
@RequestMapping
public class HelloController {
    
    @GetMapping("/hello")
    public String hello() {
        return "hello";
    }
}

springboot中如何处理异常?

  1. 使用RestControllerAdvice新注解以及@ExceptionHanlder处理异常
@RestControllerAdvice
public class ExceptionHandler {
    @org.springframework.web.bind.annotation.ExceptionHandler
    @ResponseStatus(code = HttpStatus.INTERNAL_SERVER_ERROR)
    public String hanld(Exception e) {
        return "error";
    }
}

springboot使用restful服务如何自定错误白页?

当出现错误的时候,springboot默认使用一个自定义的错误页面,当使用rest服务时,我们希望自定义返回数据类型。

  1. 实现ErrorController接口:
@RestController
@RequestMapping
public class CustomErrorController implements ErrorController {
    public static final String ERROR_PATH = "/error";

    @RequestMapping(path = ERROR_PATH)
    public String error() {
        return "custom error";
    }

    @Override
    public String getErrorPath() {
        return ERROR_PATH;
    }
}

如何定义静态资源访问映射(图片)

  1. 开启@EnableWebMvc,继承WebMvcConfigurer类,添加映射
@Configuration
@EnableWebMvc
public class WebMvcConfig implements WebMvcConfigurer {

    @Override
    public void addResourceHandlers(ResourceHandlerRegistry registry) {
        registry.addResourceHandler("/**").addResourceLocations(ResourceUtils.CLASSPATH_URL_PREFIX + "/static/");
    }
}

在static文件夹下新建images文件夹,添加一张图片,访问 /images/gril.jpg
springboot
采坑记录:上述映射和定位必须一一对应,如改成 registry.addResourceHandler("/static/").addResourceLocations(ResourceUtils.CLASSPATH_URL_PREFIX + “/static/”);**
url则需使用 /static/images/gril.jpg,其它静态资源同样使用此方法映射。

springboot项目启动后如何自动运行指定代码(如初始化)?

  1. 在main方法后面运行指定service:
public static void main(String[] args) {
    ConfigurableApplicationContext applicationContext = SpringApplication.run(SpringbootAllConfigsApplication.class, args);

    /* way one to init */
    HelloController bean = applicationContext.getBean(HelloController.class);
    bean.init();
}
  1. 使用@EventListener监听启动事件
@Component
public class AppReadyListener {
    @EventListener(ApplicationReadyEvent.class)
    public void init() {
        System.out.println("AppReadyListener.init");
    }
}

查看控制台如下:
springboot
3. 使用@PostConstruct注解

@PostConstruct
public void postConstruct() {
    System.out.println("AppReadyListener.postConstruct");
}
  1. 实现ApplicationRunner接口
@Component
public class AppRunner implements ApplicationRunner {

    @Override
    public void run(ApplicationArguments args) throws Exception {
        System.out.println("AppRunner.run");
    }
}

采坑记录:方法1在war环境中不起作用,方法3可能过早执行(这个bean初始化后就执行),方法4,2为最佳实践

如何自定义模板引擎(freemarker)

  1. 添加依赖,修改配置文件:
 <dependency>
    <groupId>org.springframework.boot</groupId>
    <artifactId>spring-boot-starter-freemarker</artifactId>
</dependency>
spring:
  freemarker:
    template-loader-path: classpath:/templates/
    check-template-location: true
    charset: UTF-8
    enabled: true
    suffix: .html

接着添加hello.html在templates文件夹下:

<!DOCTYPE html>
<html lang="en">
<head>
    <meta charset="UTF-8">
    <title>templates</title>
</head>
<body>
<h2>hello from jsbintask blog.</h2>
</body>
</html>

添加一个controller,映射到该模板

@Controller
@RequestMapping("/templates")
public class TemplateController {
    @GetMapping("/hello")
    public String hello() {
        return "hello";
    }
}

启动项目,访问/templates/hello
springboot

springboot如何自定义首页面,如何自定义视图

  1. 同上定义模板引擎
  2. 实现WebMvcConfigurer接口,添加视图映射
@Configuration
@EnableWebMvc
public class WebMvcConfig implements WebMvcConfigurer {

    @Override
    public void addViewControllers(ViewControllerRegistry registry) {
        //前面为访问路径( '/'即为主页面),后面为视图模板位置(如本例配置的为 templates下)。
        registry.addViewController("/").setViewName("home");
    }
}

配置文件中如何添加数组属性?

  1. 使用’-'每行一个属性
key:
  - value1
  - value2
  1. 使用’,'号隔开每个值
key: value1, value2

使用jpa作数据查询时,发现实体类的id不能序列化?

这是springboot默认处理了,id不作序列化处理,可以添加如下配置:

@Configuration
public class RepositoryConfig extends RepositoryRestConfigurerAdapter {
    @Override
    public void configureRepositoryRestConfiguration(RepositoryRestConfiguration config) {
        config.exposeIdsFor(User.class);
    }
}

采坑记录:最新版springboot已经默认作了此配置。

springboot修改默认的favicon图标

  1. 同上,继承WebMvcConfigure配置类,添加如下配置:
@Override
public void addResourceHandlers(ResourceHandlerRegistry registry) {
    registry.addResourceHandler("/static/**").addResourceLocations(ResourceUtils.CLASSPATH_URL_PREFIX + "/static/");

    registry.addResourceHandler("/favicon.ico").addResourceLocations(ResourceUtils.CLASSPATH_URL_PREFIX + "/static/images/favicon.jpg");
}

springboot的api如何编写单元测试?

建立在已有的springboot项目上,例如helloController,测试 /hello,编写测试类:

@RunWith(SpringRunner.class)
@WebMvcTest(HelloController.class)
public class HelloControllerTest {
    @Autowired
    private MockMvc mockMvc;
    @Autowired
    private ServletContext servletContext;

    @Test
    public void test1() throws Exception{
        MvcResult end = mockMvc.perform(requestBuilder("/hello"))
                .andExpect(mvcResult -> {
                    if (mvcResult.getResponse().getStatus() != 200) {
                        throw new RuntimeException("failed.");
                    }
                })
                .andExpect(result -> {
                    if (!result.getResponse().getContentType().contains("json")) {
                        throw new RuntimeException("failed");
                    }
                }).andReturn();

        System.out.println(end);
    }

    private RequestBuilder requestBuilder(String uri) {
        return MockMvcRequestBuilders.get(URI.create(uri)).accept(MediaType.APPLICATION_JSON_UTF8)
                .characterEncoding("UTF-8");
    }
}

其中api看名字便知。

springboot如何为api配置安全访问?

  1. 参考系列文章:springsecurity整合springboot从入门到源码解析

springboot整合各种消息队列?

  1. 参考系列文章:springboot整合各种消息队列(持续更新中)

未完待续

今天暂时更新到这,此文章会一直更新! 或者你有感兴趣的配置,欢迎留言!

总结

未完待续!
例子源码:https://github.com/jsbintask22/springboot-all-configs-learning.git,欢迎fork,star学习修改。
本文原创地址:https://jsbintask.cn/2019/02/15/springboot/springboot-all-configs/,转载请注明出处。
如果你觉得本文对你有用,欢迎关注,分享。这里只有干货!

  • 0
    点赞
  • 4
    收藏
    觉得还不错? 一键收藏
  • 0
    评论

“相关推荐”对你有帮助么?

  • 非常没帮助
  • 没帮助
  • 一般
  • 有帮助
  • 非常有帮助
提交
评论
添加红包

请填写红包祝福语或标题

红包个数最小为10个

红包金额最低5元

当前余额3.43前往充值 >
需支付:10.00
成就一亿技术人!
领取后你会自动成为博主和红包主的粉丝 规则
hope_wisdom
发出的红包
实付
使用余额支付
点击重新获取
扫码支付
钱包余额 0

抵扣说明:

1.余额是钱包充值的虚拟货币,按照1:1的比例进行支付金额的抵扣。
2.余额无法直接购买下载,可以购买VIP、付费专栏及课程。

余额充值