


AsyncTask
AsyncTask是一个异步任务类,可以使用它开启一个任务去执行耗时操作,并实时将任务执行进度更新到UI线程中。使用起来非常方便。
AsyncTask使用
onPreExecute()在UI线程执行,在这个方法中,可以做一些任务开启前的准备工作,譬如初始化显示任务进度的ViewdoInBackground(Params... params)在子线程中执行,该方法在onPreExecute()方法执行后执行,在这个方法可以做一些耗时操作,并可以将执行的结果通过publishProgress(Progress... values)发布到UI线程中,通过调用onProgressUpdate()更新UI。onProgressUpdate(Progress... values)在UI线程中调用,在publishProgress(Progress... values)执行后执行,用于更新当前任务执行的进度。onPostExecute(Result result)在doInBackground(Params... params)执行完后调用,参数是doInBackground执行完后返回的结果。通过这几个方法可以看出,AsyncTask内部封装了Handler用于线程间的切换,完成进程间的通信(UI线程更新任务执行进度),过程也描述的非常清晰。具体的怎么实现,我这里写了一个demo
public class MultiThreadActivity extends BaseActivity implements EasyPermissions.PermissionCallbacks {
    private static final int REQUEST_PERMISSION_WRITE = 0x01;
    private String path1 = "";
    private String path2 = "";
    private String path3 = "";
    private TextView mTvText;
    private String mCurrPath;

    @Override
    protected void onCreate(@Nullable Bundle savedInstanceState) {
        super.onCreate(savedInstanceState);
        setContentView(R.layout.activity_multi_thread);
        initView();
        initEvent();
    }

    private void initView() {
        mTvText = findViewById(R.id.tv_text);
    }

    private void initEvent() {
        mTvText.setOnClickListener(v ->
                new MyAsyncTask().execute(path1, path2, path3));
    }

    class MyAsyncTask extends AsyncTask {

        @Override
        protected Object doInBackground(Object[] objects) {
            int count = objects.length;
            long totalCount = 0;
            for (int i = 0; i < count; i++) {
                mCurrPath = (String) objects[i];
                requestWritePermission();
                publishProgress(totalCount);
                totalCount += i;
            }
            return totalCount;
        }

        @Override
        protected void onPostExecute(Object o) {
            super.onPostExecute(o);
            mTvText.setText("下载完成");
        }

        @Override
        protected void onProgressUpdate(Object[] values) {
            super.onProgressUpdate(values);
            mTvText.setText(String.valueOf(values[0]));
        }
    }

    private void downloadImgToLocal(String path) {
        BufferedOutputStream bufferedOutputStream = null;
        InputStream inputStream = null;
        FileOutputStream fileOutputStream = null;
        try {
            URL url = new URL(path);
            inputStream = url.openStream();
            Bitmap bitmap = BitmapFactory.decodeStream(inputStream);
            String imgPath = Environment.getExternalStorageDirectory().getAbsolutePath();
            File file = new File(imgPath);
            if (!file.exists()) {
                file.mkdir();
            }
            String imgName = UUID.randomUUID().toString() + ".jpg";
            File imgFile = new File(imgPath, imgName);
            fileOutputStream = new FileOutputStream(imgFile);
            bufferedOutputStream = new BufferedOutputStream(fileOutputStream);
            bitmap.compress(Bitmap.CompressFormat.JPEG, 100, bufferedOutputStream);
            Log.d("Thread", "图片保存成功");
        } catch (
                MalformedURLException e) {
            e.printStackTrace();
        } catch (
                IOException e) {
            e.printStackTrace();
        } finally {
            if (inputStream != null) {
                try {
                    inputStream.close();
                } catch (IOException e) {
                    e.printStackTrace();
                }
            }
            if (fileOutputStream != null) {
                try {
                    fileOutputStream.close();
                } catch (IOException e) {
                    e.printStackTrace();
                }
            }
            if (bufferedOutputStream != null) {
                try {
                    bufferedOutputStream.close();
                } catch (IOException e) {
                    e.printStackTrace();
                }
            }
        }
    }

    private void requestWritePermission() {
        String[] permissions = {Manifest.permission.WRITE_EXTERNAL_STORAGE};
        if (EasyPermissions.hasPermissions(this, permissions)) {
            downloadImgToLocal(mCurrPath);
        } else {
            EasyPermissions.requestPermissions(this, getString(R.string.request_write_permission),
                    REQUEST_PERMISSION_WRITE, permissions);
        }
    }

    @Override
    public void onPermissionsGranted(int requestCode, List<String> perms) {
        switch (requestCode) {
            case REQUEST_PERMISSION_WRITE:
                requestWritePermission();
            default:
                break;
        }
    }

    @Override
    public void onPermissionsDenied(int requestCode, List<String> perms) {
        Toast.makeText(this, "请开启读取权限", Toast.LENGTH_SHORT).show();
    }
}
图片的地址可以自行百度即可。可以发现,我们只要自定义一个类,继承AsyncTask,在doInBackground写上在子线程要做的事情然后调用execute()方法就可以完成我们要在子线程做的事情了。上述只是大概描述了AsyncTask概念和大概的使用方法,要更好的理解它,以及为什么它是这样用的呢,看看源码就能解决疑惑。
AsyncTask源码
首先我们看execute()方法
execute()方法又调了executeOnExecutor(),继续看executeOnExecutor()
executeOnExecutor方法中,首先判断是子线程的状态如果是执行中或者是已结束就抛出异常。这里调用了onPreExecute()去做任务执行前的准备工作,然后将参数给mWorker,然后执行了exec.execute(mFuture)。exec是个线程池,所以这里调用的线程池的execute()方法。
这里需要说明一下,AsyncTask有两种方法可以去开启任务。一是 new MyAsyncTask().execute()),二是 new MyAsyncTask().executeOnExecutor()) ,execute()里面其实也是调用executeOnExecutor()。不同的是,使用第一种方法的使用的线程池是AsyncTask内部的SerialExecutor,SchuangerialExecutor的循环数组其实是队列,将任务都放入队列中,然后一个个取出来执行,所以方法一exec.execute(mFuture)线程执行顺序是串行执行的。方法二的线程池是我们传入的,所以方法二中exec.execute(mFuture)是直接用我们传入的线程池的execute()方法,因为AsyncTask有创建好的线程池THREAD_POOL_EXECUTOR,所以方法二一般这样使用
new MyAsyncTask().executeOnExecutor(AsyncTask.THREAD_POOL_EXECUTOR));
ok,我们了解这里的区别,我们来看看方法一的串行执行的实现。当执行exec.execute(mFuture)就会执行下面的execute()方法,execute()方法会创建一个任务添加到队尾,然后判断没有运行中的线程后调用scheduleNext(),scheduleNext()会在队首中取出一个任务出来执行。当一个任务执行完后继续从队首中取任务出来执行知道执行为止。
当任务执行其run方法的时候,会调用其call()方法,所以又会调用mWork的call()方法,如下图。


这里看到了调用了我们实现的方法doInBackground,并将开始传入的参数传递到doInBackground中。当doInBackground()或者取消任务都会调用postResult()方法。
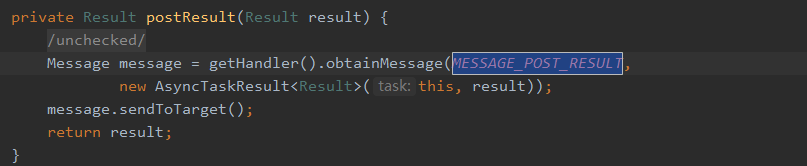

postResult()方法做的事情的切换到主线程去执行。看看finish()方法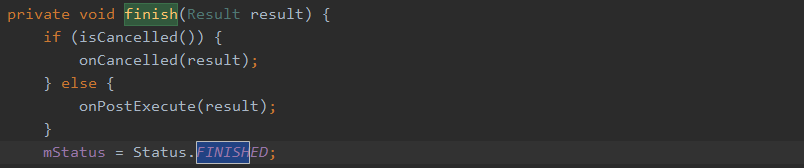
finish()方法的逻辑是,如果任务取消了,就执行onCancelled(),否则执行onPostExecute()。至此,任务执行前到任务执行结束的过程都完成了。
AsyncTask注意事项
1.AsyncTask只能执行一次,上述的源码中也表明了,当判断到了,任务的状态是进行中或者是已完成会抛出异常。
2.AsyncTask要在UI线程中创建。
3.execute和executeOnExecutor要在UI线程中调用。
4.不要自行在程序中自行调用onPreExecute(),doInBackground(),onProgressUpdate(),onPostExecute()这几个方法。
5.一个AsyncTask对象只能执行一次execute或executeOnExecutor。
AsyncTask很多人都说是一个轻量级的异步类,其实在这里并不是很懂为什么是轻量级的,就因为一个AsyncTask对象只能执行一次execute()?AsyncTask的源码注解也解释了AsyncTask应该用于短时间的线程操作,如果要用于长时间的后台操作,应该用线程池。AsyncTask本来就是用线程池对线程进行管理的,而且executeOnExecutor(Executor exec, Params... params)方法也允许传入自定义线程池。这里先抛出我自己的疑问吧。
参考:《Android开发艺术探索》


 9576
9576


 被折叠的 条评论
为什么被折叠?
被折叠的 条评论
为什么被折叠?
 到【灌水乐园】发言


