


Vue Router 是 Vue.js 官方的路由管理器。它和 Vue.js 的核心深度集成,让构建单页面应用变得易如反掌。这篇文章知识将路由基础知识按照下面的图解来学习梳理。
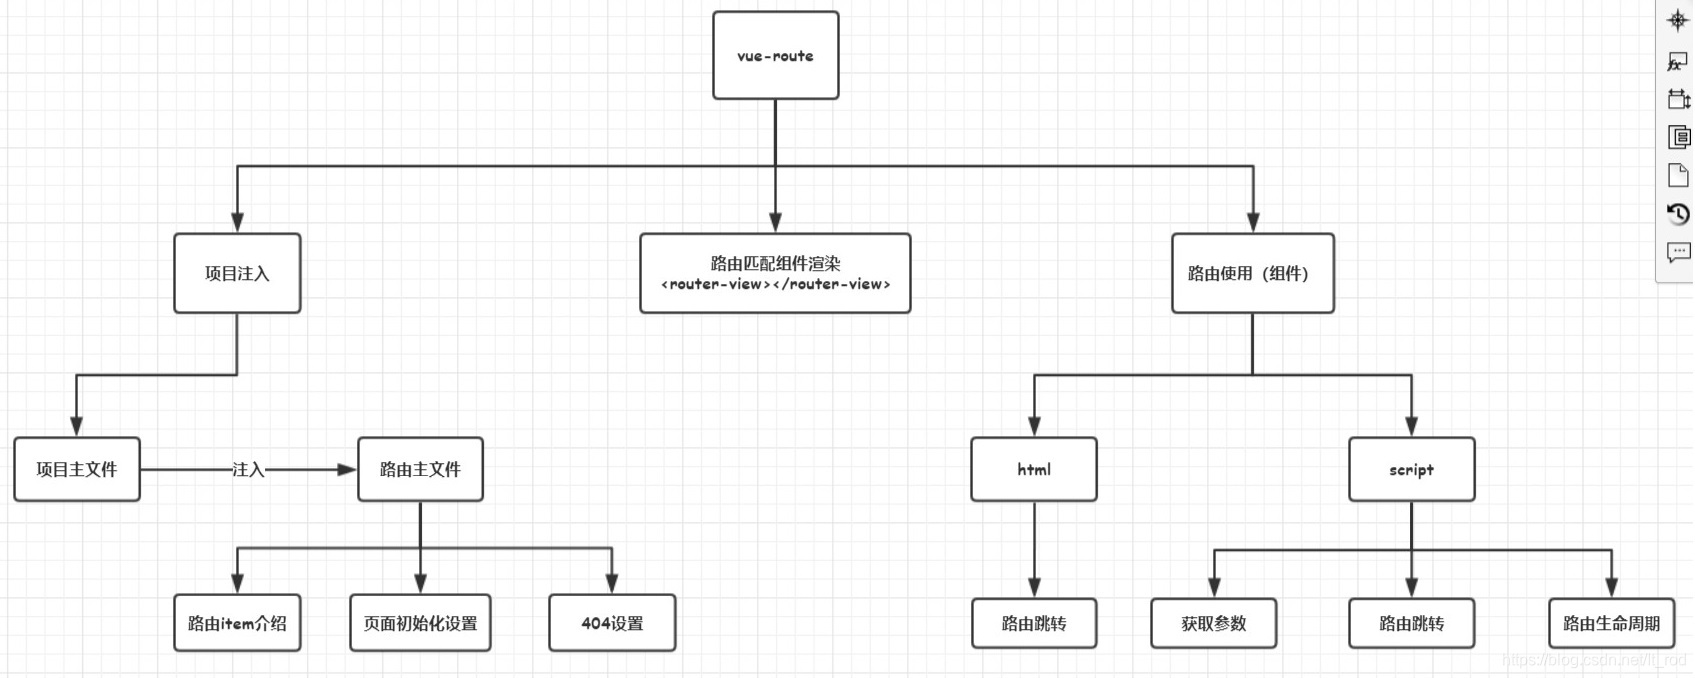
项目注入
项目主文件
main.js注册router文件
// The Vue build version to load with the `import` command
// (runtime-only or standalone) has been set in webpack.base.conf with an alias.
import Vue from 'vue'
import ElementUI from 'element-ui'
import 'element-ui/lib/theme-chalk/index.css'
import './assets/variables.styl'
import './assets/base.styl'
import App from './App'
import router from './router'

Vue.config.productionTip = false
Vue.use(ElementUI)

/* eslint-disable no-new */
new Vue({
  el: '#app',
  router,
  components: { App },
  template: '<App/>'
})
路由主文件
import Vue from 'vue'
import Router from 'vue-router'

Vue.use(Router)

export default new Router({
  routes: [
    {
      path: '/',
      name: 'Layout',
      component: () => import('@/components/Layout'),
      children: [
        {
          path: '/',
          redirect: 'dashboard'
        },
        {
          path: 'dashboard',
          name: 'dashboard',
          component: () => import('@/pages/Dashboard')
        },
        {
          path: 'basic',
          name: 'basic',
          component: () => import('@/pages/BasicRoute')
        },
        {
          path: '*',
          name: '404',
          component: () => import('@/pages/404')
        }
      ]
    }
  ]
})
路由item
    {
      path: '/',
      name: 'Layout',
      component: () => import('@/components/Layout'),
      children: []
    }
路由初始设置
{
  path: '/',
  redirect: 'dashboard'
},
{
  path: 'dashboard',
  name: 'dashboard',
  component: () => import('@/pages/Dashboard')
},
404设置
{
  path: '*',
  name: '404',
  component: () => import('@/pages/404')
}
路由匹配组件渲染
上面是在当前项目中注入路由,但是路由响应内容渲染在何处呢?这个需要通过<router-view></router-view>来决定。
例如上面例子中router-view放置在layout的组件内部。
<template>
  <div calss="layout">
    <div class="layout-main">
      <div class="layout-main-sider-menu">
        <sider-menu></sider-menu>
      </div>
      <div class="layout-main-content">
        <router-view/>
      </div>
    </div>
  </div>
</template>

<script>
import SiderMenu from './SiderMenu'
export default {
  name: 'Layout',
  components: {
    'sider-menu': SiderMenu
  },
  data () {
    return {
      msg: 'Welcome to Your Vue.js App'
    }
  }
}
</script>

<!-- Add "scoped" attribute to limit CSS to this component only -->
<style lang="stylus" scoped>
@import '../../assets/variables.styl'
  .layout
    height 100%
    &-main
      display flex
      height 100%
</style>
路由使用
html页面路由操作
路由跳转
// 路由路径不带参数
<router-link to="/basic">basic</router-link>

// 路由路径带参数
<router-link to="/basic/2">basic-id</router-link>

// 路由名称
 <router-link :to="{ name: 'basic-id', params: { id: 123 }}">basic-id</router-link>
script文件操作
获取参数
this.$route.params['id']组件内部通过访问this.$route(当前路由对象,局部对象)属性得到相关数据,具体访问API
路由跳转
const userId = '123'
this.$router.push({ name: 'user', params: { userId }}) // -> /user/123
this.$router.push({ path: `/user/${userId}` }) // -> /user/123
// 这里的 params 不生效
this.$router.push({ path: '/user', params: { userId }}) // -> /user
this.$router是全局的路由对象。通过Vue.use(VueRouter)和VueRouter构造函数得到一个router的实例对象,这个对象中是一个全局的对象,他包含了所有的路由包含了许多关键的对象和属性。
生命周期
下面方法需要next()执行才可以页面正常跳转,更多内容访问
  beforeRouteEnter (to, from, next) {
    // 在渲染该组件的对应路由被 confirm 前调用
    // 不!能!获取组件实例 `this`
    // 因为当守卫执行前,组件实例还没被创建
  },
  beforeRouteUpdate (to, from, next) {
    // 在当前路由改变,但是该组件被复用时调用
    // 举例来说,对于一个带有动态参数的路径 /foo/:id,在 /foo/1 和 /foo/2 之间跳转的时候,
    // 由于会渲染同样的 Foo 组件,因此组件实例会被复用。而这个钩子就会在这个情况下被调用。
    // 可以访问组件实例 `this`
  },
  beforeRouteLeave (to, from, next) {
    // 导航离开该组件的对应路由时调用
    // 可以访问组件实例 `this`
  }


 1287
1287


 被折叠的 条评论
为什么被折叠?
被折叠的 条评论
为什么被折叠?
 到【灌水乐园】发言


