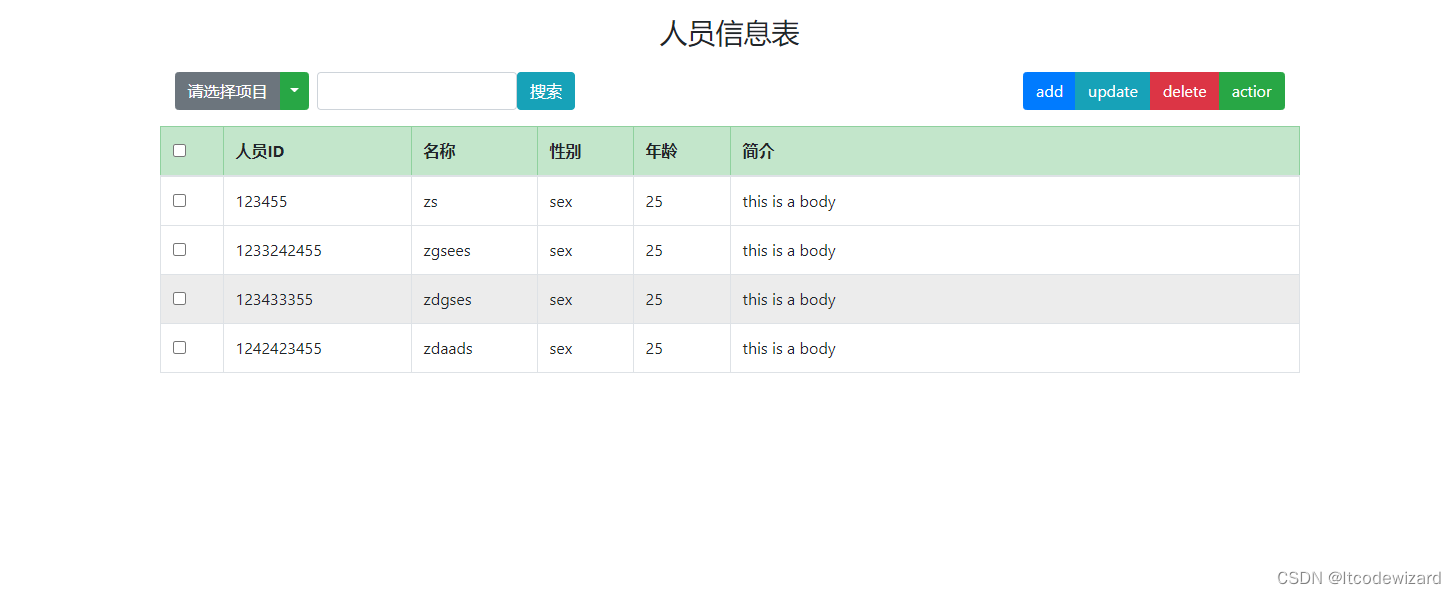
二、Bootstrap之HTML—table表格案例(人员信息录入)

运行截图:

代码如下:

<!DOCTYPE html>
<html>
	<head>
		<meta charset="utf-8" />
		<title>人员管理列表</title>
		<link rel="stylesheet" href="../bootstrap/css/bootstrap.css">
	</head>
	<body>
		<div class="container">
			<h3 class="text-center my-3">人员信息表</h3>
			<div class="clearfix mb-2">
				<div class="py-2 float-left">
					<form action="" class="form-inline">
						<div class="dropdown btn-group">
							<button class="btn btn-secondary" type="button">请选择项目</button>
							<button class="btn btn-success dropdown-toggle  dropdown-toggle-split" data-toggle="dropdown" data-offset="-105,0" type="button"></button>
							<div class="dropdown-menu">
								<a href="#" class="dropdown-item">option1</a>
								<a href="#" class="dropdown-item">option2</a>
								<a href="#" class="dropdown-item">option3</a>
							</div>
						</div>
						<div class="form-group ml-2">
							<input type="search" class="form-control">
							<button class="btn btn-info" type="submit">搜索</button>
						</div>
					</form>
				</div>
				<div class="py-2 float-right">
					<div class="ml-auto btn-group">
						<button class="btn btn-primary">add</button>
						<button class="btn btn-info">update</button>
						<button class="btn btn-danger">delete</button>
						<button class="btn btn-success">actior</button>
					</div>
				</div>
			</div>
			<div class="row tbbody">
				<table class="table table-bordered table-hover">
					<thead class="table-success">
						<tr>
							<th class="w-5"><input type="checkbox"></th>
							<th class="w-15">人员ID</th>
							<th class="w-15">名称</th>
							<th class="w-5">性别</th>
							<th class="w-5">年龄</th>
							<th class="w-50">简介</th>
						</tr>
					</thead>
					<tbody>
						<tr>
							<td class="w-5"><input type="checkbox" name="" id=""></td>
							<td class="w-15">123455</td>
							<td class="w-15">zs</td>
							<td class="w-5">sex</td>
							<td class="w-5">25</td>
							<td class="w-50">this is a body</td>
						</tr>
						<tr>
							<td class="w-5"><input type="checkbox" name="" id=""></td>
							<td class="w-15">1233242455</td>
							<td class="w-15">zgsees</td>
							<td class="w-5">sex</td>
							<td class="w-5">25</td>
							<td class="w-50">this is a body</td>
						<tr>
							<td class="w-5"><input type="checkbox" name="" id=""></td>
							<td class="w-15">123433355</td>
							<td class="w-15">zdgses</td>
							<td class="w-5">sex</td>
							<td class="w-5">25</td>
							<td class="w-50">this is a body</td>
						</tr>
						<tr>
							<td class="w-5"><input type="checkbox" name="" id=""></td>
							<td class="w-15">1242423455</td>
							<td class="w-15">zdaads</td>
							<td class="w-5">sex</td>
							<td class="w-5">25</td>
							<td class="w-50">this is a body</td>
						</tr>
					</tbody>
				</table>
			</div>
		</div>
	</body>
<!--引入js文件-->
<script src="https://code.jquery.com/jquery-3.3.1.slim.min.js"></script>
<script src="https://cdnjs.cloudflare.com/ajax/libs/popper.js/1.14.6/umd/popper.min.js"></script>
	<!--Bootstrap核心JavaScript文件-->
	<script src="https://cdn.bootcss.com/twitter-bootstrap/4.4.1/js/bootstrap.min.js"></script>
</html>

  • 2
    点赞
  • 0
    收藏
    觉得还不错? 一键收藏
  • 0
    评论
Bootstrap Table 是一个功能强大的开源 jQuery 插件,它可以将简单的 HTML 表格转换为功能丰富、易于使用且可扩展的 Bootstrap 样式表格。下面是 Bootstrap Table 的使用方法: 1. 引入相关文件:在 HTML 文件中引入 jQuery 和 Bootstrap 的相关文件以及 Bootstrap Table 的 CSS 和 JS 文件。 ```html <link rel="stylesheet" href="https://cdn.bootcdn.net/ajax/libs/twitter-bootstrap/3.3.7/css/bootstrap.min.css"> <link rel="stylesheet" href="https://cdn.bootcdn.net/ajax/libs/bootstrap-table/1.11.1/bootstrap-table.min.css"> <script src="https://cdn.bootcdn.net/ajax/libs/jquery/1.12.4/jquery.min.js"></script> <script src="https://cdn.bootcdn.net/ajax/libs/twitter-bootstrap/3.3.7/js/bootstrap.min.js"></script> <script src="https://cdn.bootcdn.net/ajax/libs/bootstrap-table/1.11.1/bootstrap-table.min.js"></script> ``` 2. 创建 HTML 表格:在 HTML 文件中创建一个普通的表格。 ```html <table id="myTable"> <thead> <tr> <th data-field="id">ID</th> <th data-field="name">Name</th> <th data-field="price">Price</th> </tr> </thead> <tbody> <tr> <td>1</td> <td>Item 1</td> <td>$1</td> </tr> <tr> <td>2</td> <td>Item 2</td> <td>$2</td> </tr> </tbody> </table> ``` 3. 初始化 Bootstrap Table:在 JavaScript 中使用 Bootstrap Table 插件来初始化表格。 ```javascript $(function() { $('#myTable').bootstrapTable(); }); ``` 此时,你就可以看到一个基本的 Bootstrap Table 表格了。你可以根据自己的需要进行配置和定制,以下是一些常用的配置选项: - `data-url`:指定从服务器加载数据的 URL。 - `data`:指定表格的数据,可以是一个数组或一个 URL。 - `columns`:定义表格的列,可以包含列的名称、数据字段、格式化函数等。 - `search`:启用搜索功能。 - `pagination`:启用分页功能。 - `sortable`:启用排序功能。 - `showExport`:启用导出功能。 以上是 Bootstrap Table 的基本使用方法和常用配置选项,希望能对你有所帮助。

“相关推荐”对你有帮助么?

  • 非常没帮助
  • 没帮助
  • 一般
  • 有帮助
  • 非常有帮助
提交
评论
添加红包

请填写红包祝福语或标题

红包个数最小为10个

红包金额最低5元

当前余额3.43前往充值 >
需支付:10.00
成就一亿技术人!
领取后你会自动成为博主和红包主的粉丝 规则
hope_wisdom
发出的红包
实付
使用余额支付
点击重新获取
扫码支付
钱包余额 0

抵扣说明:

1.余额是钱包充值的虚拟货币,按照1:1的比例进行支付金额的抵扣。
2.余额无法直接购买下载,可以购买VIP、付费专栏及课程。

余额充值