1. SpringBoot之Bean的使用及处理
1.1引入pom依赖
<properties>
<maven.compiler.source>8</maven.compiler.source>
<maven.compiler.target>8</maven.compiler.target>
</properties>
<parent>
<groupId>org.springframework.boot</groupId>
<artifactId>spring-boot-starter-parent</artifactId>
<version>2.3.2.RELEASE</version>
</parent>
<dependencies>
<dependency>
<groupId>org.springframework.boot</groupId>
<artifactId>spring-boot-starter-web</artifactId>
</dependency>
<dependency>
<groupId>org.springframework.boot</groupId>
<artifactId>spring-boot-starter-test</artifactId>
</dependency>
<dependency>
<groupId>junit</groupId>
<artifactId>junit</artifactId>
</dependency>
</dependencies>
1.2 JavaBean对象
1.2.1 Teacher对象
public class Teacher {
private String name;
private String subject;
public String getName() {
return name;
}
public void setName(String name) {
this.name = name;
}
public String getSubject() {
return subject;
}
public void setSubject(String subject) {
this.subject = subject;
}
@Override
public String toString() {
return "Teacher{" +
"name='" + name + '\'' +
", subject='" + subject + '\'' +
'}';
}
}
1.2.2 Student对象
public class Student {
private String name;
private int age;
private String address;
public String getName() {
return name;
}
public void setName(String name) {
this.name = name;
}
public int getAge() {
return age;
}
public void setAge(int age) {
this.age = age;
}
public String getAddress() {
return address;
}
public void setAddress(String address) {
this.address = address;
}
@Override
public String toString() {
return "Student{" +
"name='" + name + '\'' +
", age=" + age +
", address='" + address + '\'' +
'}';
}
}
1.3配置启动类
@ImportResource: 注解主要用于导入Spring的xml配置文件注册的Bean。
import org.springframework.boot.SpringApplication;
import org.springframework.boot.autoconfigure.SpringBootApplication;
import org.springframework.context.annotation.ImportResource;
@SpringBootApplication
@ImportResource("classpath*:spring-config.xml")
public class SpringBootBeanApplication {
public static void main(String[] args) {
SpringApplication.run(SpringBootBeanApplication.class, args);
}
}
1.4 JavaBean的注入及使用
1.4.1 通过注解式@Bean注入IOC
@Configuration: 声明一个类为配置类,用于取代bean.xml配置文件注册bean对象。@Bean: 等价于Spring中的bean标签用于注册bean对象的,给容器中添加组件,一般以方法名作为组件的id(注解中value属性为组件的id),配置类里面使用,默认是单实例的。@Scope: Spring IOC 容器中的一个作用域,在 Spring IOC 容器中,他用来配置Bean实例的作用域对象。
作用域:
singleton: 单实例的(单例)(默认) ----全局有且仅有一个实例
prototype: 多实例的(多例) ---- 每次获取Bean的时候会有一个新的实例
reqeust: 同一次请求 ----每一次HTTP请求都会产生一个新的bean,同时该bean仅在当前HTTP request内有效
session: 同一个会话级别 ----每一次HTTP请求都会产生一个新的bean,同时该bean仅在当前HTTP session内有效
import com.it.mhh.entity.Teacher;
import org.springframework.context.annotation.Bean;
import org.springframework.context.annotation.Configuration;

@Configuration
public class MyConfigurationTeacherBean {

    private String name;

    private String subject;

    @Bean("teacher")
    public Teacher getTeacher(){
        Teacher teacher = new Teacher();
        teacher.setSubject(subject);
        teacher.setName(name);
        return teacher;
    }

    public String getName() {
        return name;
    }

    public void setName(String name) {
        this.name = name;
    }

    public String getSubject() {
        return subject;
    }

    public void setSubject(String subject) {
        this.subject = subject;
    }
}
1.4.1 通过注解式@Bean注入的使用测试
@Value():
“#{}”:表示SpEl表达式通常用来获取bean的属性,或者调用bean的某个方法。当然还有可以表示常量
“${}”:表示从配置文件读取值的用法
import com.it.mhh.entity.Student;
import com.it.mhh.entity.Teacher;
import org.junit.Test;
import org.junit.runner.RunWith;
import org.springframework.beans.factory.annotation.Autowired;
import org.springframework.beans.factory.annotation.Qualifier;
import org.springframework.beans.factory.annotation.Value;
import org.springframework.boot.test.context.SpringBootTest;
import org.springframework.test.context.junit4.SpringRunner;
import javax.annotation.Resource;
@SpringBootTest
@RunWith(SpringRunner.class)
public class GetBeanTest {
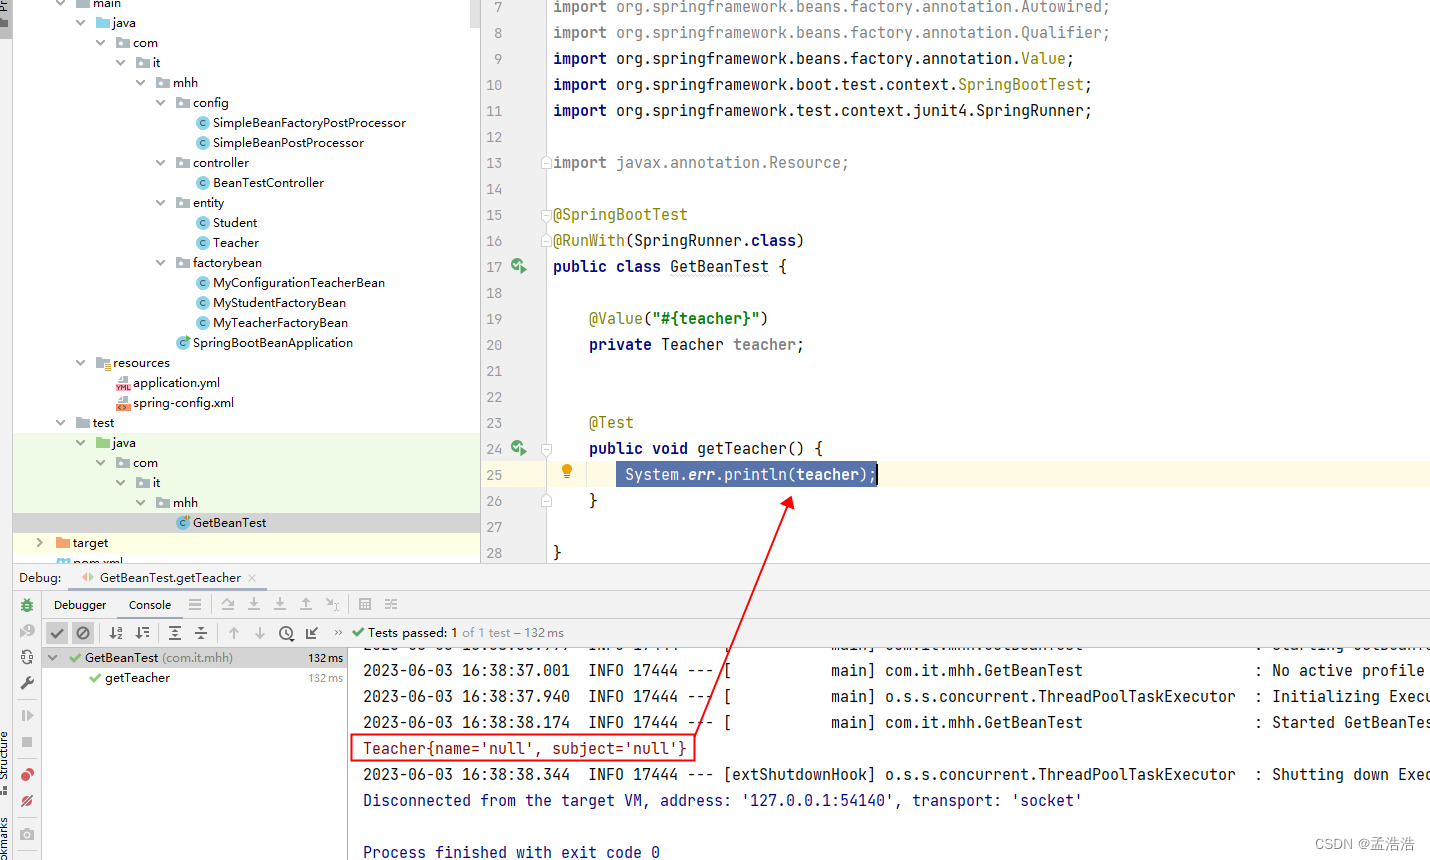
@Value("#{teacher}")
private Teacher teacher;
@Test
public void getTeacher() {
System.err.println(teacher);
}
}
1.4.2 通过实现FactoryBean接口注入IOC
@Configuration:声明一个类为配置类,用于取代bean.xml配置文件注册bean对象。@Component: 定义Spring管理Bean(也就是将标注@Component注解的类交由spring管理)
这里两个注解都可以用,他们的value属性就是bean对象的id
import com.it.mhh.entity.Student;
import org.springframework.beans.factory.FactoryBean;
import org.springframework.context.annotation.Configuration;
import org.springframework.stereotype.Component;
@Configuration("student")
public class MyStudentFactoryBean implements FactoryBean<Student> {
private String name = "小白";
private int age = 12;
private String address = "山东济南";
@Override
public Student getObject() throws Exception {
Student student = new Student();
student.setAddress(address);
student.setAge(age);
student.setName(name);
return student;
}
@Override
public Class<?> getObjectType() {
return Student.class;
}
@Override
public boolean isSingleton() {
return FactoryBean.super.isSingleton();
}
public String getName() {
return name;
}
public void setName(String name) {
this.name = name;
}
public int getAge() {
return age;
}
public void setAge(int age) {
this.age = age;
}
public String getAddress() {
return address;
}
public void setAddress(String address) {
this.address = address;
}
}
1.4.2 通过实现FactoryBean接口注入使用测试
@Autowired: 可以对成员变量、方法和构造函数进行标注,来完成自动装配的工作,@Autowired标注可以放在成员变量上,也可以放在成员变量的set方法上,也可以放在任意方法上表示,自动执行当前方法,如果方法有参数,会在IOC容器中自动寻找同类型参数为其传值。
@Autowired是根据类型进行自动装配的,如果需要按名称进行装配,则需要配合@Qualifier使用;
required: 属性为true的时候,注入SpringBean的时候,该bean必须存在,不然会注入失败,启动报错@Qualifier: 在使用Spring框架中@Autowired标签时默认情况下使用 @Autowired 注释进行自动注入时,Spring 容器中匹配的候选 Bean 数目必须有且仅有一个。
import com.it.mhh.entity.Student;
import com.it.mhh.entity.Teacher;
import org.junit.Test;
import org.junit.runner.RunWith;
import org.springframework.beans.factory.annotation.Autowired;
import org.springframework.beans.factory.annotation.Qualifier;
import org.springframework.beans.factory.annotation.Value;
import org.springframework.boot.test.context.SpringBootTest;
import org.springframework.test.context.junit4.SpringRunner;
import javax.annotation.Resource;
@SpringBootTest
@RunWith(SpringRunner.class)
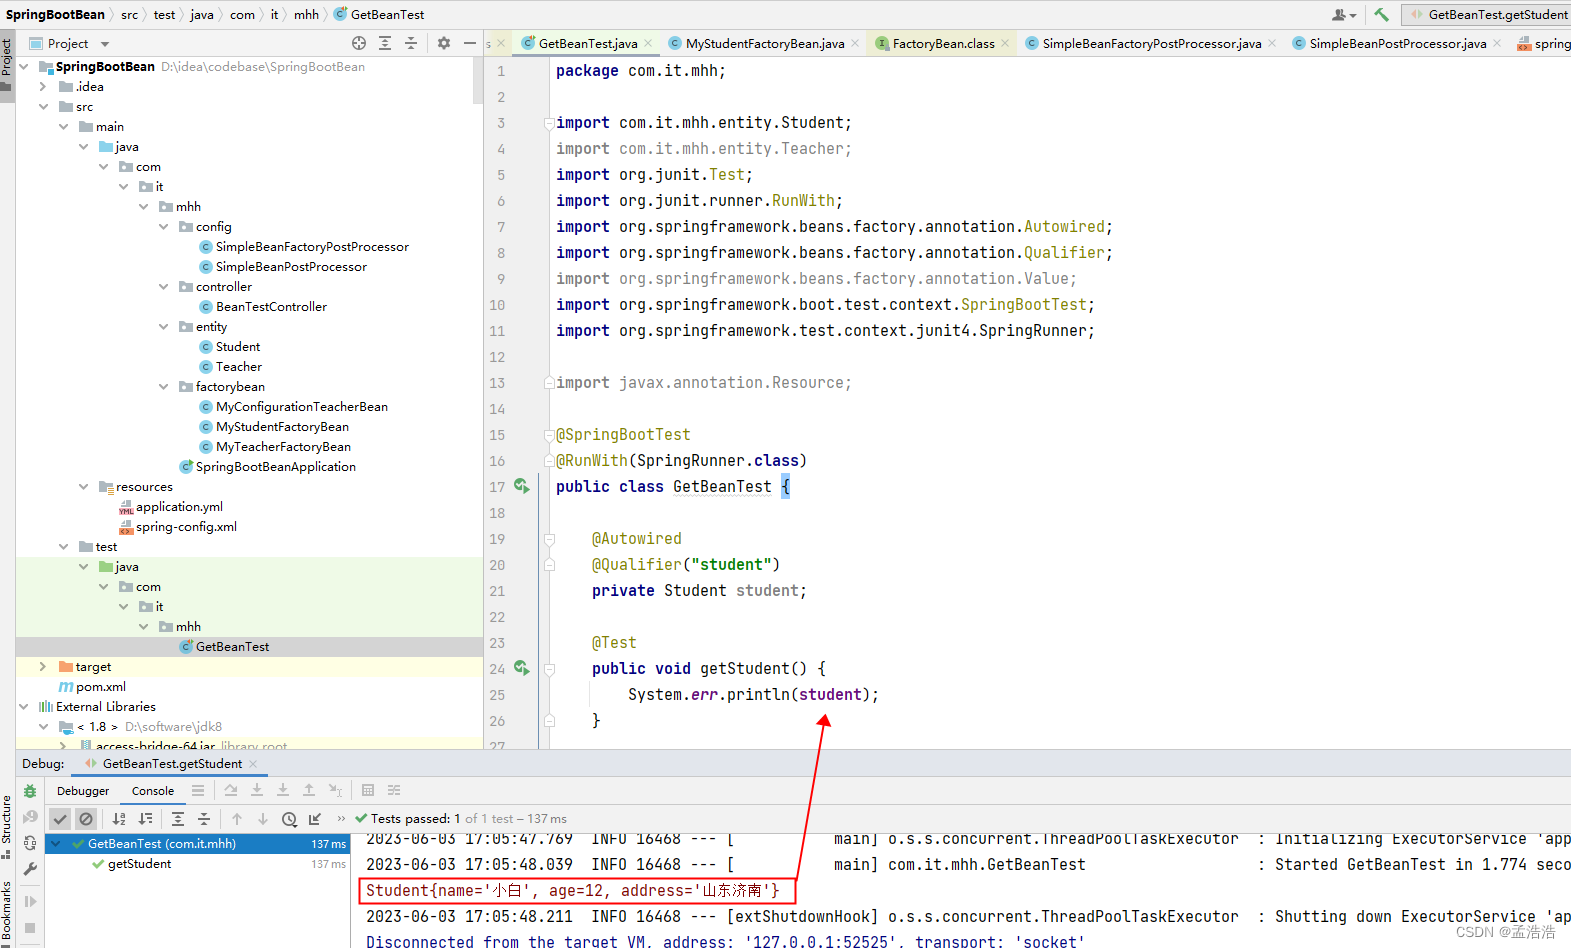
public class GetBeanTest {
@Autowired
@Qualifier("student")
private Student student;
@Test
public void getStudent() {
System.err.println(student);
}
}
1.4.3 通过XML形式注入IOC
- 在resources包下创建spring-config.xml
primary标签: 能够指定配置在xml里面的bean,哪些是作为优先注入的bean。property标签: name 为对应对象中的属性名,value 为该属性的值
<?xml version="1.0" encoding="UTF-8"?>
<beans xmlns="http://www.springframework.org/schema/beans"
       xmlns:xsi="http://www.w3.org/2001/XMLSchema-instance"
       xmlns:content="http://www.springframework.org/schema/context"
       xsi:schemaLocation="http://www.springframework.org/schema/beans http://www.springframework.org/schema/beans/spring-beans.xsd http://www.springframework.org/schema/context https://www.springframework.org/schema/context/spring-context.xsd">

    <bean id="beanTeacher" class="com.it.mhh.entity.Teacher" primary="true"/>

    <bean id="beanChangeTeacher" class="com.it.mhh.entity.Teacher">
        <property name="name" value="小小黑"/>
        <property name="subject" value="c++"/>
    </bean>
</beans>
1.4.3 通过XML形式注入使用测试
@Autowired:可以对成员变量、方法和构造函数进行标注,来完成自动装配的工作,@Autowired标注可以放在成员变量上,也可以放在成员变量的set方法上,也可以放在任意方法上表示,自动执行当前方法,如果方法有参数,会在IOC容器中自动寻找同类型参数为其传值。
@Autowired是根据类型进行自动装配的,如果需要按名称进行装配,则需要配合@Qualifier使用;(这里可以看出有两个TeacherBean被注入到ioc没有报错的原因时因为使用了primary,设置了primary则优先注入)@Resource:默认按照名字装配Bean,即会按照name属性的值来找到具有相同id的Bean Definition 并注入。如果@Resource没有指定name属性,则会根据这个将要被注入的属性的名字来进行Bean装配。
name: 按照name属性的值来找到具有相同id的Bean
type: 使用JavaBeans 属性的类型(Class<?>)自动注入策略,将值作为需要注入bean的类型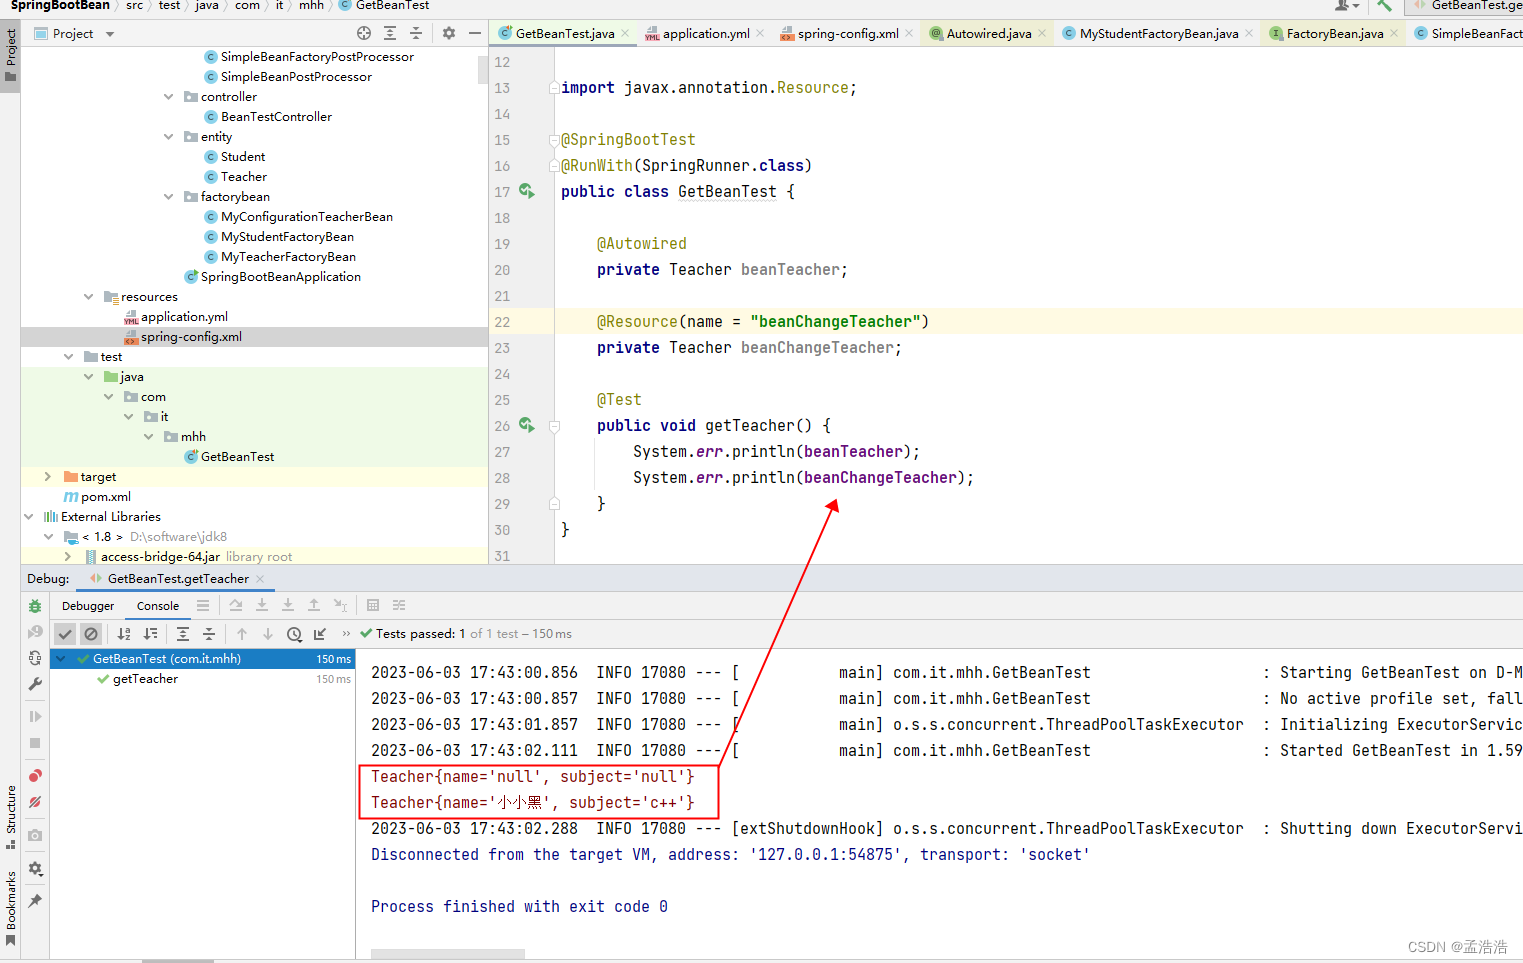
import com.it.mhh.entity.Student;
import com.it.mhh.entity.Teacher;
import org.junit.Test;
import org.junit.runner.RunWith;
import org.springframework.beans.factory.annotation.Autowired;
import org.springframework.beans.factory.annotation.Qualifier;
import org.springframework.beans.factory.annotation.Value;
import org.springframework.boot.test.context.SpringBootTest;
import org.springframework.test.context.junit4.SpringRunner;

import javax.annotation.Resource;

@SpringBootTest
@RunWith(SpringRunner.class)
public class GetBeanTest {

    @Autowired
    private Teacher beanTeacher;

    @Resource(name = "beanChangeTeacher")
    private Teacher beanChangeTeacher;

    @Test
    public void getTeacher() {
        System.err.println(beanTeacher);
        System.err.println(beanChangeTeacher);
    }
}
1.5 对bean的处理
1.5.1 BeanPostProcessor的使用
- BeanPostProcessor是针对Bean级别的处理,可以针对某个具体的Bean。
- 注意在 postProcessBeforeInitialization方法中对bean的使用
postProcessBeforeInitialization:
: bean 实例化之前执行的方法
: bean : 这里的bean是还没有实例化的bean,如果是用工厂FactoryBean方式生成的 则就是实现FactoryBean接口的那个对象
: beanName : 生成bean的名字(bean的id)postProcessAfterInitialization:
: bean 实例化之后执行的方法
: bean : 这里的bean就是自己需要的已经实例化的了
: beanName : 生成bean的名字(bean的id)
import com.it.mhh.entity.Student;
import com.it.mhh.entity.Teacher;
import com.it.mhh.factorybean.MyStudentFactoryBean;
import com.it.mhh.factorybean.MyTeacherFactoryBean;
import org.springframework.beans.BeansException;
import org.springframework.beans.factory.config.BeanPostProcessor;
import org.springframework.stereotype.Component;
@Component
public class SimpleBeanPostProcessor implements BeanPostProcessor {
@Override
public Object postProcessBeforeInitialization(Object bean, String beanName) throws BeansException {
if (bean instanceof MyStudentFactoryBean) {
MyStudentFactoryBean myStudentFactoryBean = (MyStudentFactoryBean) bean;
myStudentFactoryBean.setName("(MyStudentFactoryBean)postProcessBeforeInitialization::" + myStudentFactoryBean.getName());
}
if (bean instanceof MyTeacherFactoryBean) {
MyTeacherFactoryBean myTeacherFactoryBean = (MyTeacherFactoryBean) bean;
myTeacherFactoryBean.setName("(MyTeacherFactoryBean)postProcessBeforeInitialization::" + myTeacherFactoryBean.getName());
}
if (bean instanceof Teacher) {
Teacher teacher = (Teacher) bean;
teacher.setName("(Teacher)postProcessBeforeInitialization::" + teacher.getName());
}
return BeanPostProcessor.super.postProcessBeforeInitialization(bean, beanName);
}
@Override
public Object postProcessAfterInitialization(Object bean, String beanName) throws BeansException {
if (bean instanceof Student) {
Student student = (Student) bean;
student.setAddress("postProcessAfterInitialization::" + student.getAddress());
}
return BeanPostProcessor.super.postProcessAfterInitialization(bean, beanName);
}
}
1.5.1 BeanPostProcessor的使用测试
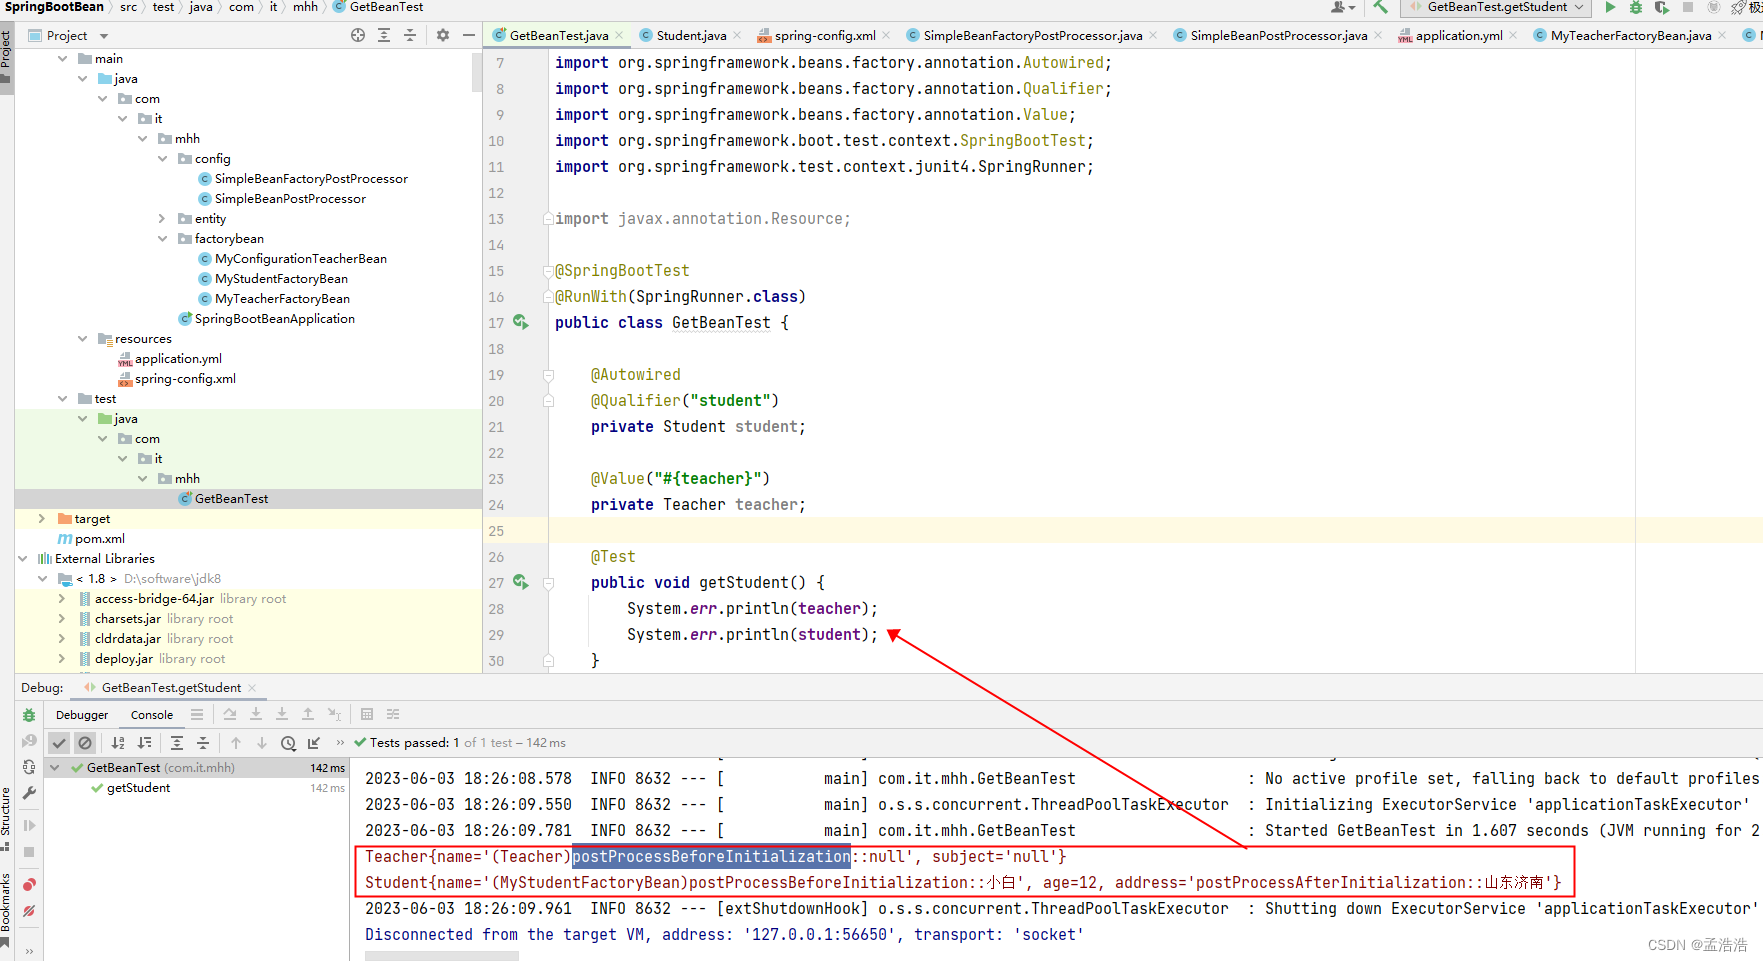
- teacher对象是通过 @Bean方式注入的,并没有使用 FactoryBean,所以postProcessBeforeInitialization方法的实例就是Teacher类
- student对象使用了实现FactoryBean的方法 所以postProcessBeforeInitialization方法的实例就是实现FactoryBean接口的那个对象
import com.it.mhh.entity.Student;
import com.it.mhh.entity.Teacher;
import org.junit.Test;
import org.junit.runner.RunWith;
import org.springframework.beans.factory.annotation.Autowired;
import org.springframework.beans.factory.annotation.Qualifier;
import org.springframework.beans.factory.annotation.Value;
import org.springframework.boot.test.context.SpringBootTest;
import org.springframework.test.context.junit4.SpringRunner;

import javax.annotation.Resource;

@SpringBootTest
@RunWith(SpringRunner.class)
public class GetBeanTest {

    @Autowired
    @Qualifier("student")
    private Student student;

    @Value("#{teacher}")
    private Teacher teacher;

    @Test
    public void getStudent() {
        System.err.println(teacher);
        System.err.println(student);
    }

}
1.5.2 BeanFactoryPostProcessor的使用
- BeanFactoryPostProcessor : BeanFactory级别的处理,是针对整个Bean的⼯⼚进⾏处理
- 调⽤ BeanFactoryPostProcessor ⽅法时,这时候bean还没有实例化,此时 bean 刚被解析成BeanDefifinition对象。
import com.it.mhh.factorybean.MyStudentFactoryBean;
import org.springframework.beans.BeansException;
import org.springframework.beans.factory.config.BeanDefinition;
import org.springframework.beans.factory.config.BeanFactoryPostProcessor;
import org.springframework.beans.factory.config.ConfigurableListableBeanFactory;
import org.springframework.stereotype.Component;
import java.util.Iterator;
@Component
public class SimpleBeanFactoryPostProcessor implements BeanFactoryPostProcessor {
@Override
public void postProcessBeanFactory(ConfigurableListableBeanFactory configurableListableBeanFactory) throws BeansException {
configurableListableBeanFactory.clearMetadataCache();
configurableListableBeanFactory.freezeConfiguration();
boolean configurationFrozen = configurableListableBeanFactory.isConfigurationFrozen();
System.err.println("bean的定义是否被冻结:"+configurationFrozen);
Iterator<String> beanNamesIterator = configurableListableBeanFactory.getBeanNamesIterator();
System.err.println("返回所有Bean名称的迭代对象:"+beanNamesIterator);
BeanDefinition beanDefinition = configurableListableBeanFactory.getBeanDefinition("student");
beanDefinition.setPrimary(true);
System.err.println("获取bean类的名称"+beanDefinition.getBeanClassName());
MyStudentFactoryBean bean = configurableListableBeanFactory.getBean(MyStudentFactoryBean.class);
bean.setAddress("BeanFactoryPostProcessor->" + bean.getAddress());
}
}
}
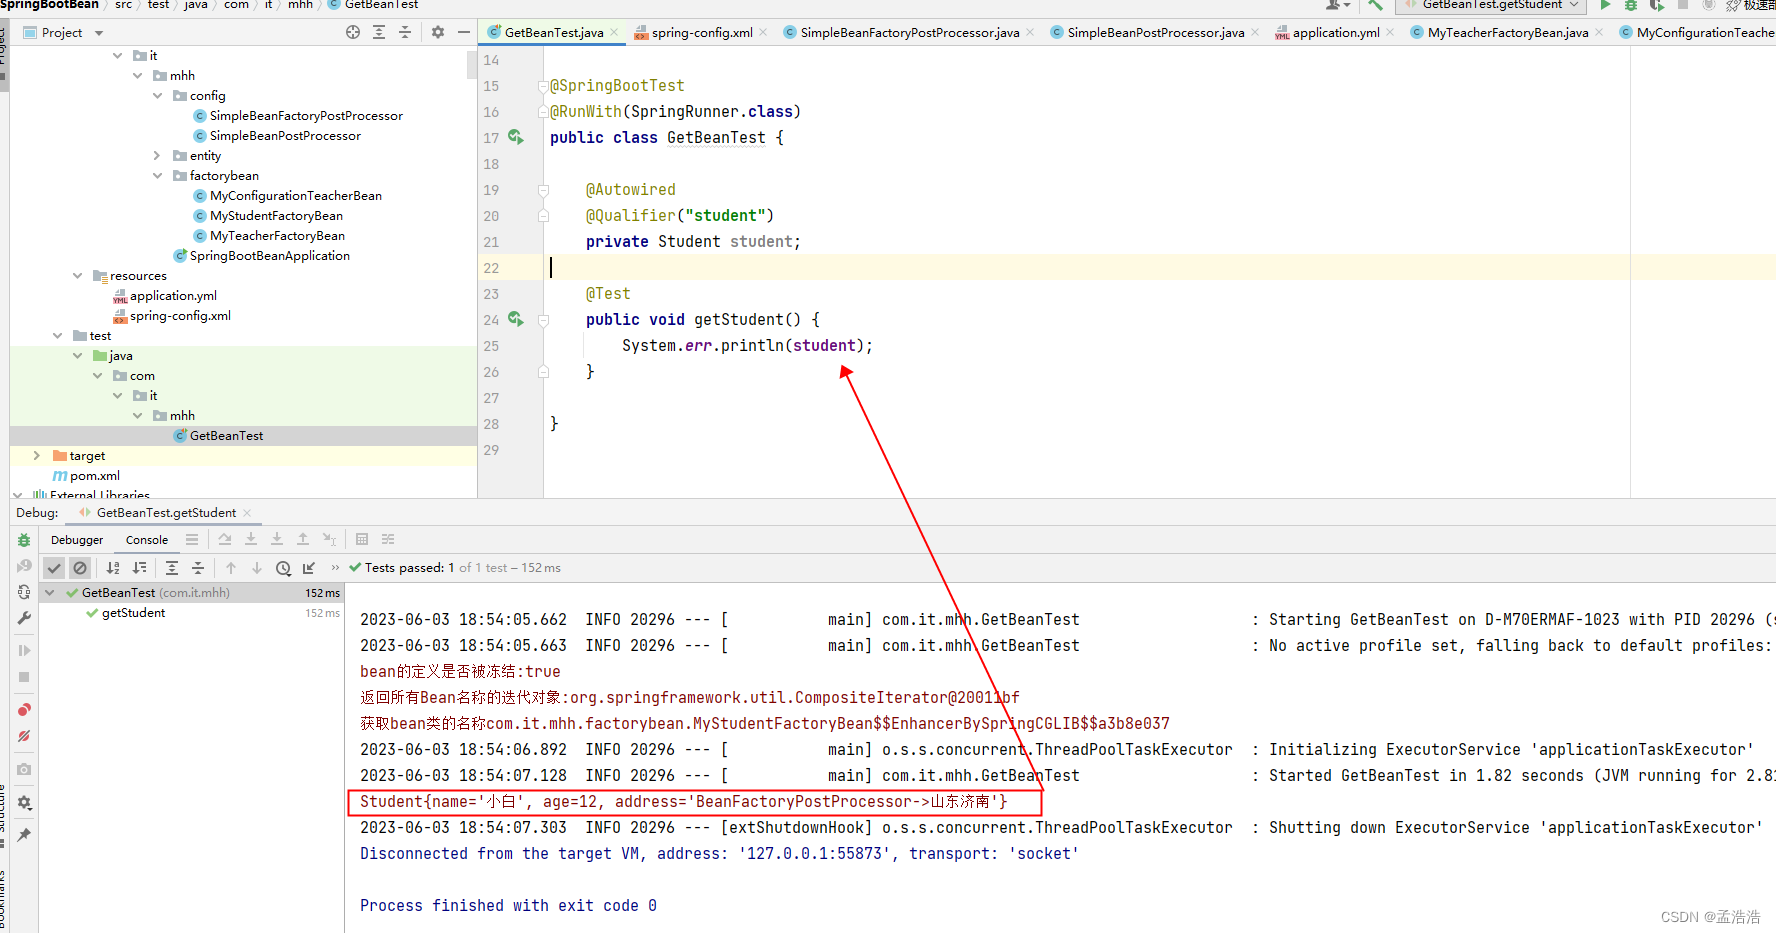
1.5.2 BeanFactoryPostProcessor的使用测试
- 可以通过实现BeanFactoryPostProcessor 来针对整个Bean的⼯⼚进⾏处理
- 也可以通过configurableListableBeanFactory.getBean的形式修改指定的bean参数
import com.it.mhh.entity.Student;
import com.it.mhh.entity.Teacher;
import org.junit.Test;
import org.junit.runner.RunWith;
import org.springframework.beans.factory.annotation.Autowired;
import org.springframework.beans.factory.annotation.Qualifier;
import org.springframework.beans.factory.annotation.Value;
import org.springframework.boot.test.context.SpringBootTest;
import org.springframework.test.context.junit4.SpringRunner;

import javax.annotation.Resource;

@SpringBootTest
@RunWith(SpringRunner.class)
public class GetBeanTest {

    @Autowired
    @Qualifier("student")
    private Student student;

    @Test
    public void getStudent() {
        System.err.println(student);
    }

}


 4678
4678

 被折叠的 条评论
为什么被折叠?
被折叠的 条评论
为什么被折叠?
 到【灌水乐园】发言


