


关于scrollWidth() clientWidth() offsetWidth() style.width() screen.height(),这几个js方法的区别和用处在我一直都处于很晕的状态,今天决定把它给彻底的弄清楚。网上有很多文档介绍这几个方法,但是我觉得太杂了,没有条理,而且篇幅过长,即使看懂了过后也容易忘记。今天在这里自己总结了一下,然后用一个尽可能简短,清晰的条理给写出来。
一、计算宽高
方法有:
①scrollWidth、scrollHeight
②clientWidth、clientHeight
③offsetWidth、offsetHeight
④style.width、style.height
⑤screen.height、 screen.width 、window.screen.availHeight、window.screen.availWidth
以计算宽度的方法来举例说明,计算高度的方法和计算宽度的方法同理:
scrollWidth
width +padding
当没有滚动条的时候scrollWidth==clientWidth;有滚动条时scrollWidth(内容实际的宽度)>clientWidth 会随对象中内容的多少改变
clientWidth
width +padding
没有margin外边距和border 书面上叫做内容可视区的宽度
offsetWidth
width +padding+border+滚动条 没有margin外边距 书面上叫做元素的实际宽度
style.width
width +padding+border
没有margin外边距
需要提一下:CSS中的margin属性,与clientWidth、offsetWidth、clientHeight、offsetHeight均无关
<textarea wrap="off" onfocus="alert('offsetWidth:'+this.offsetWidth+'\n clientWidth:'+this.clientWidth+'\n scrollWidth:'+this.scrollWidth);"></textarea>screen.width
显示器的宽度也可以理解为显示器的分辨率
window.screen.availWidth
屏幕可用工作区宽度
注意:offsetWidth(offsetHeight)与style.width(style.height)的区别
1. style.height 返回的是字符串,如28px,offsetWidth返回的是数值28,如果需要对取得的值进
行计算,用offsetWidth比较方便;如果拿到offsetWidth设置style.left的值,需加’px’。
2. style.width/style.height与scrollWidth/scrollHeight是可读写的属性,clientWidth/clientHeight与offsetWidth/offsetHeight是只读属性
3. style.height的值需要事先定义,否则取到的值为空。而且必须要定义在html里,如果定义在css里,style.height的值仍然为空,但元素偏移有效;而offsetWidth则仍能取到。
4.与style.width属性的区别在于:如对象的宽度设定值为百分比宽度,则无论页面变大还是变小,style.width都返回此百分比,而offsetWidth则返回在不同页面中对象的宽度值而不是百分比值
例:
<!DOCTYPE html PUBLIC "-//W3C//DTD XHTML 1.0 Transitional//EN" "http://www.w3.org/TR/xhtml1/DTD/xhtml1-transitional.dtd">
<html xmlns="http://www.w3.org/1999/xhtml">
<head>
<meta http-equiv="Content-Type" content="text/html; charset=utf-8" />
<title>所有列表索引</title>
<script src="http://libs.baidu.com/jquery/1.9.0/jquery.js"></script>
</head>
<style>
body{background: #13e0de;margin:150px 0 0 150px;}
#divs{background: yellow;width:500px;height:415px;position:relative;border:10px solid #ccc;margin:20px 200px;padding:17px 26px;overflow-x:scroll;}
#spans{display:inline-block;width:600px;padding:30px;margin:50px;border:5px solid #f00;background: #deac00;}
</style>
<body>
        <input type="button" value="点我设置obj2的scrollLeft值" onclick="move()">
      <div id="divs"><span id="spans">offsetWidth、clientWidth、width、scrollWidth区别offsetWidth、clientWidth、width、scrollWidth区别offsetWidth、clientWidth、width、scrollWidth区别offsetWidth、clientWidth、width、scrollWidth区别offsetWidth、clientWidth、width、scrollWidth区别</span></div>


</body>
<script>
var obj1 = document.getElementById("divs");
var obj2=document.getElementById("spans");
console.log('这里输出obj1')
console.log('offsetWidth:'+obj1.offsetWidth);
console.log('clientWidth:'+obj1.clientWidth);
console.log('scrollWidth:'+obj1.scrollWidth);
console.log('screen.width:'+screen.width);
console.log('这里输出obj2')
console.log('offsetTop:'+obj2.offsetTop);
console.log('clientTop:'+obj2.clientTop);
console.log('scrolTop:'+obj2.scrolTop);
console.log('screenLeft:'+screenLeft)
function move(){
    a=eval(20);
    obj1.scrollLeft+=a;
    console.log('输出scrollLeft:'+obj1.scrollLeft);
}
</script>
</html>
二、计算边距
方法有;
①offsetTop offsetLeft
②clientTop clientLeft
③scrollTop scrollLeft
④style.top style.left
⑤screenTop screenLeft
以计算左边距的方法来举例说明,计算上边距的方法和计算左边距的方法同理:
offsetLeft
当前对象到其上级层左边的距离,当前元素的边缘要把border padding算入在内但不包括margin,上级元素的边缘包括padding,但不包括border和margin
clientLeft
当前元素周围边框(border)的厚度
scrollLeft
网页被卷去的长度 对象的最左边到对象在当前窗口显示的局限内的左边的间隔 呈现了横向迁移转变条的景象下,迁移转变条拉动的间隔
style.left
定位元素与包含它的矩形左边界的偏移量
screenLeft
浏览器外边缘距显示屏可视区域的长度
三、计算坐标
方法有:
①offsetX
②clientX
③pageX
④screen.X
offsetX
只有IE事件有这2个属性,标准事件没有对应的属性。获取鼠标指针位置相对于触发事件的对象的 x 坐标,也就是说事件在哪个对象上被触发就以那个对象的左上角为原点获取坐标
clientX
跟screenX相比就是将参照点改成了浏览器内容区域的左上角,该参照点会随之滚动条的移动而移动
pageX
参照点也是浏览器内容区域的左上角,但它不会随着滚动条而变动
screen.X
鼠标位置相对于用户屏幕水平偏移量,而screenY也就是垂直方向的,此时的参照点也就是原点 是屏幕的左上角creenX,screenY的最大值不会超过你的屏幕分辨率
例:
<!DOCTYPE html PUBLIC "-//W3C//DTD XHTML 1.0 Transitional//EN" "http://www.w3.org/TR/xhtml1/DTD/xhtml1-transitional.dtd">
<html xmlns="http://www.w3.org/1999/xhtml">
<head>
<meta http-equiv="Content-Type" content="text/html; charset=utf-8" />
<title>无标题文档</title>
<style>
body{margin:0;padding:0;}
.div{width:1300px;height:300px;color:#ff0;text-align:center;font-size:24px;line-height:300px;}
#d1{background-color:red;}
#d2{background-color:green;}
#d3{background-color:#00f;}
#d4{position:absolute;top:0;width:120px;height:150px;background-color:#ff0;}
</style>
</head>
<body>
<div id="d1" class="div">div1 height:300px width:1300px</div>
<div id="d2" class="div">div2 height:300px width:1300px</div>
<div id="d3" class="div">div3 height:300px width:1300px</div>
<div id="d4"></div>
</body>
<script type="text/javascript">
$(function() {
window.onscroll = function() {
$("#d4").css("top", getScrollTop());
};
document.onmousemove = function(e) {
if (e == null) {
e = window.event;
}
var html = "screenX:" + e.screenX + "<br/>";
html += "screenY:" + e.screenY + "<br/><br/>";
html += "clientX:" + e.clientX + "<br/>";
html += "clientY:" + e.clientY + "<br/><br/>";
if (e.pageX == null) {
html += "pageX:" + e.x + "<br/>";
html += "pageY:" + e.y + "<br/>";
} else {
html += "pageX:" + e.pageX + "<br/>";
html += "pageY:" + e.pageY + "<br/>";
}
$("#d4").html(html);
};
});
function getScrollTop() {
var top = (document.documentElement && document.documentElement.scrollTop) || document.body.scrollTop;
return top;
}
</script>
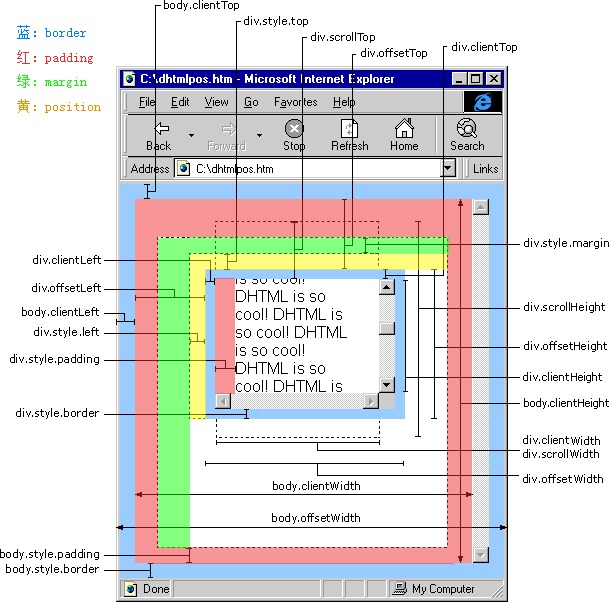
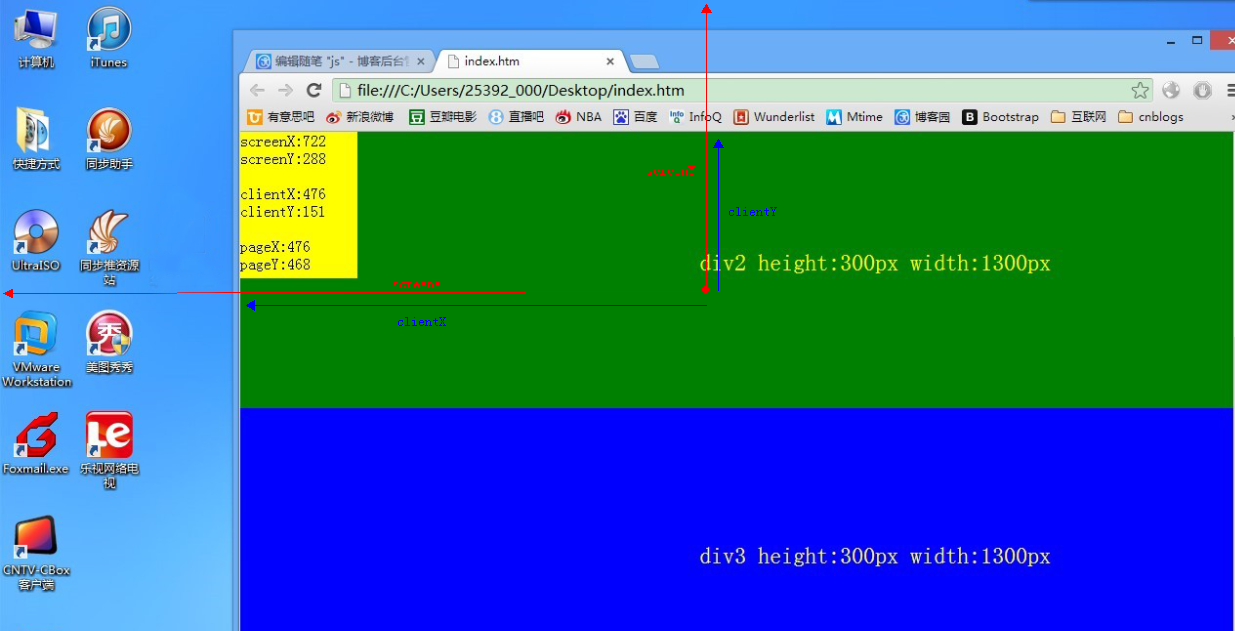
</html>最后附上两张张详细的讲解图,如果以上所述实在不懂,配着图看。应该就不难理解了


 266
266

 被折叠的 条评论
为什么被折叠?
被折叠的 条评论
为什么被折叠?
 到【灌水乐园】发言


