


MySQL读写分离
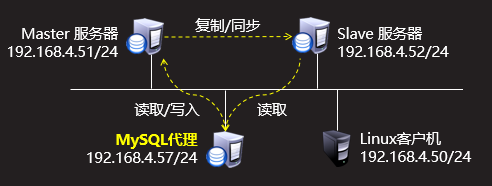
使用4台虚拟机,如图所示。其中192.168.4.51和192.168.4.52,分别提供读、写服务,均衡流量,通过主从复制保持数据一致性,由MySQL代理192.168.4.57面向客户端提供服务,收到SQL写请求时,交给主服务器处理,收到SQL读请求时,交给从服务器处理。在客户机192.168.4.50测试配置。
步骤一:搭建MySQL一主一从同步结构
1)配置主服务器192.168.4.51
]# vim /etc/my.cnf
[mysqld]
server_id=51    //指定服务器ID号
log-bin=master51        //启用binlog日志,并指定文件名前缀
...
[root@master10 ~]# systemctl restart mysqld        //重启mysqld
2)主服务器授权用户,并查看binlog日志信息
]# mysql -uroot -p123456
mysql> grant all on *.* to 'repluser'@'%' identified by '123456';
Query OK, 0 rows affected, 1 warning (0.00 sec)
mysql> show master status;
+-----------------+----------+--------------+------------------+-------------------+
| File      | Position | Binlog_Do_DB | Binlog_Ignore_DB | Executed_Gtid_Set |
+-----------------+----------+--------------+------------------+-------------------+
| master51.000001 |      449 |              |                  |                   |
+-----------------+----------+--------------+------------------+-------------------+
1 row in set (0.00 sec)
3)配置从服务器192.168.4.52
]# vim /etc/my.cnf
[mysqld]
server_id=52 //指定服务器ID号,不要与Master的相同
]# systemctl restart mysqld
4)配置从服务器192.168.4.52,指定主服务器信息,日志文件、偏移位置(参考MASTER上的状态输出)
]# mysql -uroot -p123456
mysql> change master to master_host='192.168.4.51',
    -> master_user='repluser',
    -> master_password='123456',
    -> master_log_file='master51.000001',
    -> master_log_pos=449;
Query OK, 0 rows affected, 2 warnings (0.01 sec)
mysql> start slave;
Query OK, 0 rows affected (0.01 sec)
mysql> show  slave status\G;
*************************** 1. row ***************************
               Slave_IO_State: Waiting for master to send event
                  Master_Host: 192.168.4.51
                  Master_User: repluser
                  Master_Port: 3306
                Connect_Retry: 60
              Master_Log_File: master51.000001
          Read_Master_Log_Pos: 738
               Relay_Log_File: slave20-relay-bin.000002
                Relay_Log_Pos: 319
        Relay_Master_Log_File: master51.000001
             Slave_IO_Running: Yes        //IO线程YES
            Slave_SQL_Running: Yes        //SQL线程YES
              Replicate_Do_DB:
          Replicate_Ignore_DB:
           Replicate_Do_Table:
       Replicate_Ignore_Table:
      Replicate_Wild_Do_Table:
  Replicate_Wild_Ignore_Table:
                   Last_Errno: 0
                   Last_Error:
                 Skip_Counter: 0
          Exec_Master_Log_Pos: 738
              Relay_Log_Space: 528
              Until_Condition: None
               Until_Log_File:
                Until_Log_Pos: 0
           Master_SSL_Allowed: No
           Master_SSL_CA_File:
           Master_SSL_CA_Path:
              Master_SSL_Cert:
            Master_SSL_Cipher:
               Master_SSL_Key:
        Seconds_Behind_Master: 0
Master_SSL_Verify_Server_Cert: No
                Last_IO_Errno: 0
                Last_IO_Error:
               Last_SQL_Errno: 0
               Last_SQL_Error:
  Replicate_Ignore_Server_Ids:
             Master_Server_Id: 10
                  Master_UUID: 95ada2c2-bb24-11e8-abdb-525400131c0f
             Master_Info_File: /var/lib/mysql/master.info
                    SQL_Delay: 0
          SQL_Remaining_Delay: NULL
      Slave_SQL_Running_State: Slave has read all relay log; waiting for more updates
           Master_Retry_Count: 86400
                  Master_Bind:
      Last_IO_Error_Timestamp:
     Last_SQL_Error_Timestamp:
               Master_SSL_Crl:
           Master_SSL_Crlpath:
           Retrieved_Gtid_Set:
            Executed_Gtid_Set:
                Auto_Position: 0
         Replicate_Rewrite_DB:
                 Channel_Name:
           Master_TLS_Version:
1 row in set (0.00 sec)
5)测试配置,在主服务器本机创建数据库 aa库
]# mysql –uroot –p123456
mysql> create database aa;
Query OK, 1 row affected (0.00 sec)
mysql> show databases;
+--------------------+
| Database           |
+--------------------+
| information_schema |
| aa                 |
| mysql              |
| performance_schema |
| sys                |
+--------------------+
5 rows in set (0.00 sec)
6)从服务器上查看,有aa库
mysql> show databases;
+--------------------+
| Database           |
+--------------------+
| information_schema |
| aa                 |
| mysql              |
| performance_schema |
| sys                |
+--------------------+
5 rows in set (0.00 sec)
步骤二:配置maxscale代理服务器
1)环境准备
关闭防火墙和SElinux,保证yum源可以正常使用,安装提供服务的软件
]# rpm -ivh maxscale-2.1.2-1.rhel.7.x86_64.rpm         //安装maxscale
warning: maxscale-2.1.2-1.rhel.7.x86_64.rpm: Header V4 RSA/SHA1 Signature, key ID 8167ee24: NOKEY
Preparing...                          ################################# [100%]
Updating / installing...
1:maxscale-2.1.2-1                 ################################# [100%]
2)修改主配置文件
]# vim /etc/maxscale.cnf
[maxscale]
threads=auto            //运行的线程的数量
[server1]            //定义数据库服务器
type=server
address=192.168.4.51        //主服务器ip
port=3306
protocol=MySQLBackend
[server2]
type=server
address=192.168.4.52        //从服务器IP
port=3306
protocol=MySQLBackend
[MySQL Monitor]                //定义监控的数据库服务器
type=monitor
module=mysqlmon
servers=server1, server2        //监控的数据库列表,不能写ip
user=maxscalemon                    //监控用户
passwd=123qqq...A                //密码
monitor_interval=10000
#[Read-Only Service]        //不定义只读服务
#type=service
#router=readconnroute
#servers=server1
#user=myuser
#passwd=mypwd
#router_options=slave
[Read-Write Service]            //定义读写分离服务
type=service
router=readwritesplit
servers=server1, server2
user=maxscalerouter            //路由用户
passwd=123qqq…A                //密码
max_slave_connections=100%
[MaxAdmin Service]        //定义管理服务
type=service
router=cli
#[Read-Only Listener]        //不定义只读服务使用的端口号
#type=listener
#service=Read-Only Service
#protocol=MySQLClient
#port=4008
[Read-Write Listener]            //定义读写服务使用的端口号
type=listener
service=Read-Write Service
protocol=MySQLClient
port=4006
[MaxAdmin Listener]        //管理服务使用的端口号
type=listener
service=MaxAdmin Service
protocol=maxscaled
socket=default
port=4016     //手动添加,不指定时使用的是默认端口在启动服务以后可以知道默认端口是多少
3)添加授权用户
根据maxscale.cnf文件配置,在主/从服务器上添加对应的授权用户,因为2台数据库服务器是主从同步结构,只在主数据库服务器添加用户即可,从服务器会自动同步
mysql> grant replication slave,replication client on *.* to  maxscalemon@'%' identified by "123qqq…A"; //授权监控用户
mysql> grant select on mysql.* to maxscalerouter@"%" identified by "123qqq…A"; //授权路由用户
4)查看授权用户
分别在主/从服务器上面查看
mysql> select user,host from mysql.user where user like “maxscale%”;
+----------------+------+
| user           | host |
+----------------+------+
| maxscalemon    | %    |
| maxscalerouter | %    |
+----------------+------+
2 rows in set (0.00 sec)
在代理服务器57主机,测试授权用户
]# yum -y  install mariadb  //安装提供mysql命令的软件包
]# mysql -h 192.168.4.51 -umaxscalemon -p123qqq…A
]# mysql -h 192.168.4.52 -umaxscalemon -p123qqq…A
]# mysql -h 192.168.4.51 -umaxscalerouter -p123qqq…A
]# mysql -h 192.168.4.52 -umaxscalerouter -p123qqq…A
5)启动服务代理服务
]# maxscale -f  /etc/maxscale.cnf
]# ps -C  maxscale        //查看进程
PID TTY          TIME CMD
17930 ?        00:00:00 maxscale
]# netstat  -antup | grep :4006  //查看读写分离端口
tcp6       0      0 :::4006      :::*                    LISTEN      17930/maxscale
]# netstat  -antup | grep :4016  //查看管理服务端口
tcp6       0      0 :::4016       :::*                    LISTEN      17930/maxscale
步骤三:测试配置
1)查看监控信息(在主机57 本机自己访问自己)
]# maxadmin  -uadmin -pmariadb -P4016
MaxScale> list  servers
Servers.
-------------------+-----------------+-------+-------------+--------------------
Server             | Address         | Port  | Connections | Status
-------------------+-----------------+-------+-------------+--------------------
server1            | 192.168.4.51    |  3306 |           0 | Master, Running
server2            | 192.168.4.52    |  3306 |           0 | Slave, Running
-------------------+-----------------+-------+-------------+--------------------
2)在主服务器上添加访问数据连接用户
在主服务器添加即可,从服务器会自动同步数据
mysql> create database gamedb;
mysql> create table gamedb.a(id int);
mysql> grant select,insert on  gamedb.* to  yaya66@"%" identified by "123qqq...A";
客户端连接代理服务57 访问数据
]# mysql -h192.168.4.57 -P4006 -uyaya66 -p123qqq...A
mysql> select * from gamedb.a;
mysql> insert into gamedb.a values(99);
mysql> select * from gamedb.a;
mysql> select * from gamedb.a;
Empty set (0.00 sec)
mysql>
mysql> insert into gamedb.a values(99);
Query OK, 1 row affected (0.06 sec)
mysql>
mysql> select * from gamedb.a;
+------+
| id |
+------+
| 99 |
+------+
1 row in set (0.00 sec)
3)验证57主机的数据读写分离功能
在从服务器添加新纪录
Mysql> insert into gamedb.values(52);
Mysql> select * from mysql> select * from gamedb.a;
+------+
| id |
+------+
| 99 |
| 52 |
+------+
在主服务器查看记录
Mysql> select * from mysql> select * from gamedb.a;
+------+
| id |
+------+
| 99 |
+------+
客户端连接代理服务器57 访问数据
]# mysql -h192.168.4.57 -P4006 -uyaya66 -p123qqq...A
Mysql> select * from mysql> select * from gamedb.a;
+------+
| id |
+------+
| 99 |
| 52 |
+------+


 1万+
1万+


 被折叠的 条评论
为什么被折叠?
被折叠的 条评论
为什么被折叠?
 到【灌水乐园】发言


