


1.Hibernate的jar包下载和导入
1).下载相应的 jar 包等
http://hibernate.org/orm/(hibernate-release-5.2.17.Final)
2).解压后的目录结构

目录结构
3.新建动态web工程:Hibernate5_d01_c03
1)、将lib\required下面的包复制到项目的lib的目录下
2)、将MySQL的驱动jar包复制到项目的lib的目录下

项目jar包导入
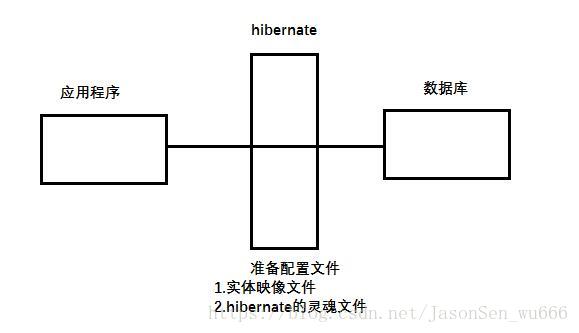
2.开发准备和配置
1、在数据库中创建表结构
create database hibernate_day01; use hibernate_day01;
CREATE TABLE `cst_customer` (
`cust_id` bigint(32) NOT NULL AUTO_INCREMENT COMMENT '客户编号(主键)',
`cust_name` varchar(32) NOT NULL COMMENT '客户名称(公司名称)',
`cust_user_id` bigint(32) DEFAULT NULL COMMENT '负责人 id',
`cust_create_id` bigint(32) DEFAULT NULL COMMENT '创建人 id',
`cust_source` varchar(32) DEFAULT NULL COMMENT '客户信息来源',
`cust_industry` varchar(32) DEFAULT NULL COMMENT '客户所属行业',
`cust_level` varchar(32) DEFAULT NULL COMMENT '客户级别',
`cust_linkman` varchar(64) DEFAULT NULL COMMENT '联系人',
`cust_phone` varchar(64) DEFAULT NULL COMMENT '固定电话',
`cust_mobile` varchar(16) DEFAULT NULL COMMENT '移动电话', PRIMARY KEY (`cust_id`)
) ENGINE=InnoDB AUTO_INCREMENT=1 DEFAULT CHARSET=utf8;
2、编写 Hibernate 核心的配置文件
1)在 src 目录下,创建名称为 hibernate.cfg.xml 的配置文件(可以从hibernate-release-5.2.17.Final\project\etc中复制hibernate.cfg.xml到项目的src中)
/Hibernate5_d01_c03/src/hibernate.cfg.xml
程序代码如下:
<?xml version="1.0" encoding="UTF-8"?> 2)在 XML 中引入 DTD 约束
/Hibernate5_d01_c03/src/hibernate.cfg.xml
程序代码如下:
<?xml version="1.0" encoding="UTF-8"?>
<!DOCTYPE hibernate-configuration PUBLIC
    "-//Hibernate/Hibernate Configuration DTD 3.0//EN"
"http://www.hibernate.org/dtd/hibernate-configuration-3.0.dtd"> 1、复制该信息http://www.hibernate.org/dtd/hibernate-configuration-3.0.dtd;
2、依次打开Eclipse中Window/Preferences/XML/XML Catalog;
3、选择的文件路径一般是XXX\hibernate-release-5.2.17.Final\project\hibernate-core\src\main\resources\org\hibernate;

关联约束
3)打开hibernate-release-5.2.17.Final/project/etc/hibernate.properties,可以查看具体的配置信息。

hibernate-release-5.2.17.Final/project/etc
4)具体的配置如下
/Hibernate5_d01_c03/src/hibernate.cfg.xml
程序代码如下:
<?xml version="1.0" encoding="UTF-8"?>

<!DOCTYPE hibernate-configuration PUBLIC
    "-//Hibernate/Hibernate Configuration DTD 3.0//EN"
    "http://www.hibernate.org/dtd/hibernate-configuration-3.0.dtd">

<hibernate-configuration>
    <session-factory>
        <!-- 必选配置 -->
        <property name="hibernate.connection.driver_class">com.mysql.jdbc.Driver</property>
                <!-- jdbc:mysql:///hibernate_day01 -->
        <property name="hibernate.connection.url">jdbc:mysql://127.0.0.1:3306/hibernate_day01</property>
        <property name="hibernate.connection.username">root</property>
        <property name="hibernate.connection.password">root</property>
                <!--数据库方言 使用的数据库类型  -->
        <property name="hibernate.dialect org.hibernate.dialect.MySQLDialect"></property>
        <!-- 可选配置 -->
                <!-- 在控制台输出sql语句 -->
        <property name="show_sql">true</property>
                <!-- 在控制台输出的sql语句格式化 -->
        <property name="hibernate.format_sql">true</property>
        <!-- 映射文件 -->
    </session-factory>
</hibernate-configuration>
5)创建 TestCustomer 类,测试是否连接上数据库。
/Hibernate5_d01_c03/src/hibernate/test/TestConnection.java
程序代码如下:
package hibernate.test;

import org.hibernate.SessionFactory;
import org.hibernate.cfg.Configuration;
import org.junit.Test;

public class TestConnection {
    @Test
    public void testConn(){
        //读取hibernate.cfg.xml中的配置信息
        Configuration config = new Configuration();
        config.configure();
        //获取数据库连接池
        SessionFactory factory = config.buildSessionFactory();
        System.out.println(factory);
    }
} Eclipse中,项目右键依次打开properties/Java Build Path/Libraries;
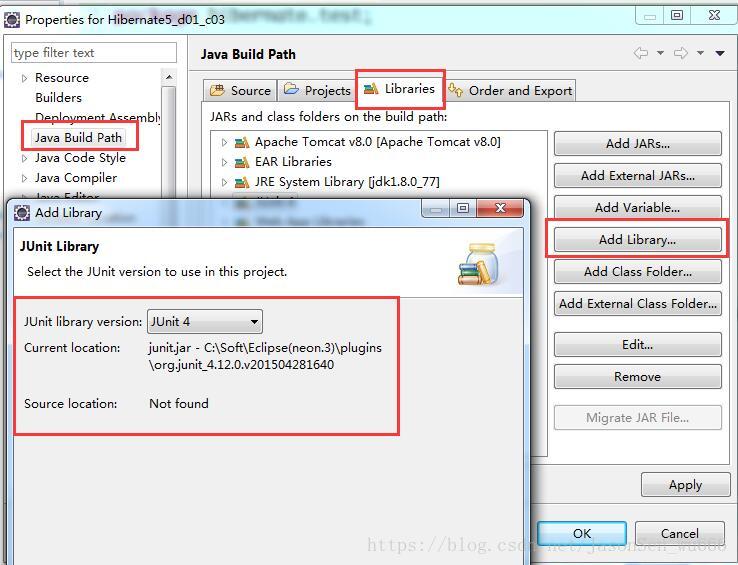
添加单元测试注解
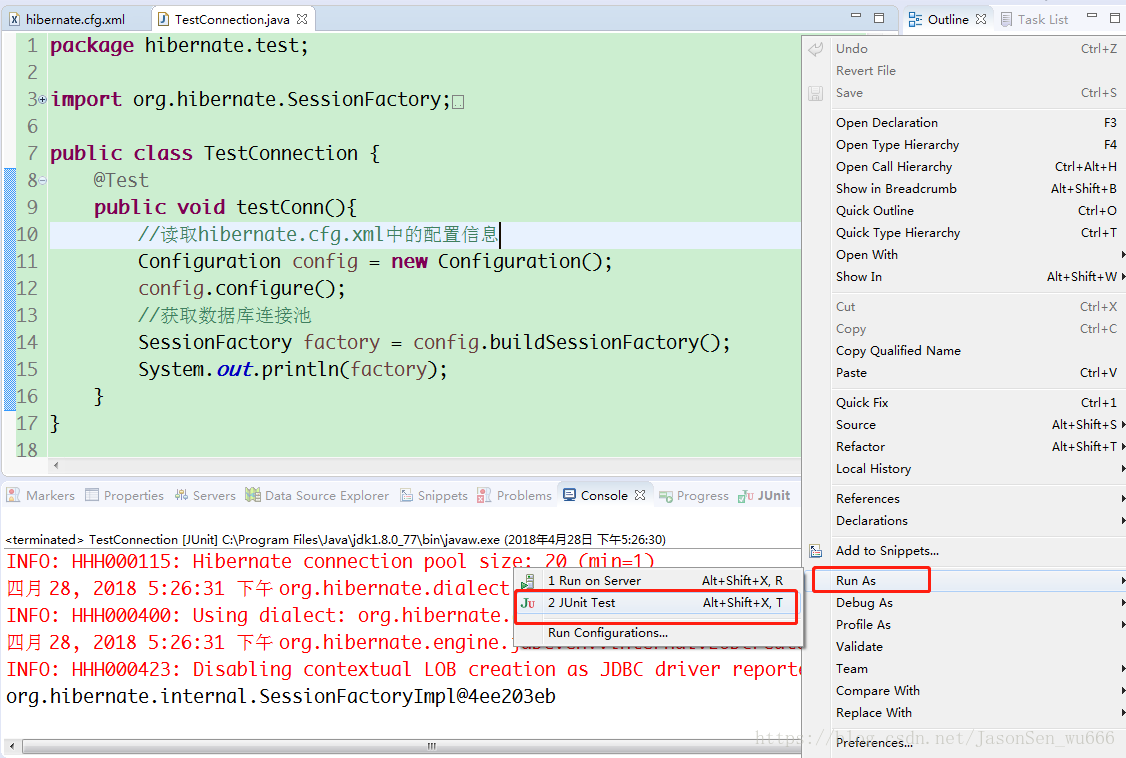
测试连接
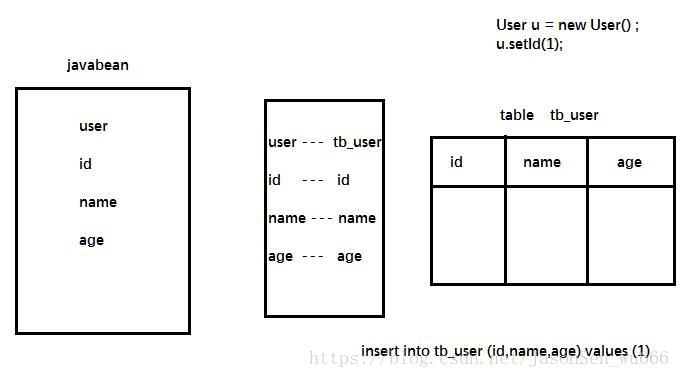
3、编写实体类和 ORM 映射文件
/Hibernate5_d01_c03/src/hibernate/domain/Customer.java
程序代码如下:
package hibernate.domain;

public class Customer {
    private Long cust_id;
    private String cust_name;
    private Long cust_user_id;
    private Long cust_create_id;
    private String cust_source;
    private String cust_industry;
    private String cust_level;
    private String cust_linkman;
    private String cust_phone;
    private String cust_mobile;

    public Long getCust_id() {
        return cust_id;
    }
    public void setCust_id(Long cust_id) {
        this.cust_id = cust_id;
    }
    public String getCust_name() {
        return cust_name;
    }
    public void setCust_name(String cust_name) {
        this.cust_name = cust_name;
    }
    public Long getCust_user_id() {
        return cust_user_id;
    }
    public void setCust_user_id(Long cust_user_id) {
        this.cust_user_id = cust_user_id;
    }
    public Long getCust_create_id() {
        return cust_create_id;
    }
    public void setCust_create_id(Long cust_create_id) {
        this.cust_create_id = cust_create_id;
    }
    public String getCust_source() {
        return cust_source;
    }
    public void setCust_source(String cust_source) {
        this.cust_source = cust_source;
    }
    public String getCust_industry() {
        return cust_industry;
    }
    public void setCust_industry(String cust_industry) {
        this.cust_industry = cust_industry;
    }
    public String getCust_level() {
        return cust_level;
    }
    public void setCust_level(String cust_level) {
        this.cust_level = cust_level;
    }
    public String getCust_linkman() {
        return cust_linkman;
    }
    public void setCust_linkman(String cust_linkman) {
        this.cust_linkman = cust_linkman;
    }
    public String getCust_phone() {
        return cust_phone;
    }
    public void setCust_phone(String cust_phone) {
        this.cust_phone = cust_phone;
    }
    public String getCust_mobile() {
        return cust_mobile;
    }
    public void setCust_mobile(String cust_mobile) {
        this.cust_mobile = cust_mobile;
    }
    @Override
    public String toString() {
        return "Custom [cust_id=" + cust_id + ", cust_name=" + cust_name + ", cust_user_id=" + cust_user_id
                + ", cust_create_id=" + cust_create_id + ", cust_source=" + cust_source + ", cust_industry="
                + cust_industry + ", cust_level=" + cust_level + ", cust_linkman=" + cust_linkman + ", cust_phone="
                + cust_phone + ", cust_mobile=" + cust_mobile + "]";
    }
}
1)在 JavaBean 所在的包下创建映射的配置文件
默认的命名规则为:实体类名.hbm.xml
在 xml 配置文件中引入约束(引入的是 hibernate3.0 的 dtd 约束,不要引入 4 的约束)
/Hibernate5_d01_c03/src/hibernate/domain/Customer.hbm.xml
程序代码如下:
<?xml version="1.0" encoding="UTF-8"?>
<!DOCTYPE hibernate-mapping PUBLIC
    "-//Hibernate/Hibernate Mapping DTD 3.0//EN"
    "http://www.hibernate.org/dtd/hibernate-mapping-3.0.dtd">
2)如果不能上网,编写配置文件是没有提示的,需要自己来配置
1、复制该信息http://www.hibernate.org/dtd/hibernate-mapping-3.0.dtd;
2、依次打开Eclipse中Window/Preferences/XML/XML Catalog;
3、选择的文件路径一般是XXX\hibernate-release-5.2.17.Final\project\hibernate-core\src\main\resources\org\hibernate
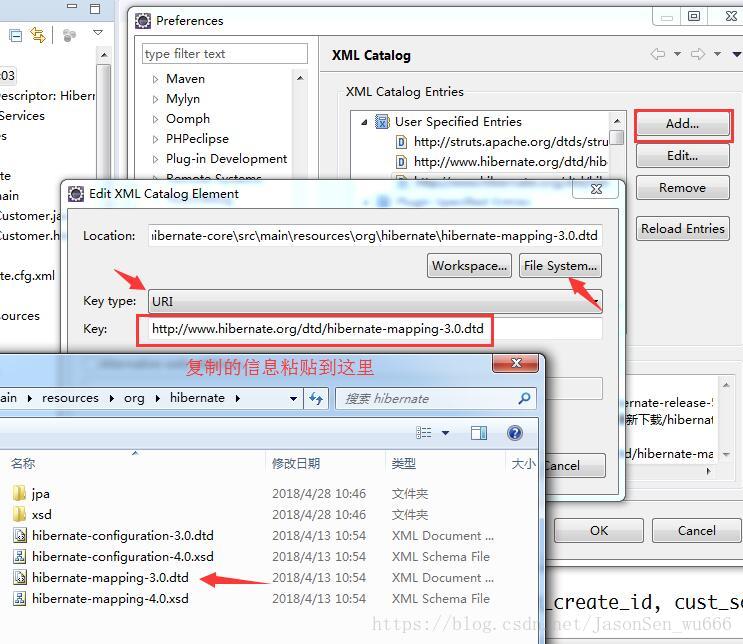
关联约束
3)编写映射的配置文件
/Hibernate5_d01_c03/src/hibernate/domain/Customer.hbm.xml
程序代码如下:
<?xml version="1.0" encoding="UTF-8"?>
<!DOCTYPE hibernate-mapping PUBLIC
    "-//Hibernate/Hibernate Mapping DTD 3.0//EN"
    "http://www.hibernate.org/dtd/hibernate-mapping-3.0.dtd">
<hibernate-mapping>
    <!-- javabean与表之间的对应关系 -->
    <class name="hibernate.domain.Customer" table="cst_customer">
        <!-- 主键对应 -->
        <id name="cust_id" column="cust_id">
            <!-- 主键策略(与自增长相关) -->
            <generator class="native"></generator>
        </id>
        <!-- 其他字段 -->
        <property name="cust_name" column="cust_name"></property>
        <property name="cust_user_id" column="cust_user_id"></property>
        <property name="cust_create_id" column="cust_create_id"></property>
        <property name="cust_source" column="cust_source"></property>
        <property name="cust_industry" column="cust_industry"></property>
        <property name="cust_level" column="cust_level"></property>
        <property name="cust_linkman" column="cust_linkman"></property>
        <property name="cust_phone" column="cust_phone"></property>
        <property name="cust_mobile" column="cust_mobile"></property>
    </class>
</hibernate-mapping>
4)在 hibernate.cfg.xml 中引入上述配置文件
/Hibernate5_d01_c03/src/hibernate.cfg.xml
程序代码如下:
<?xml version="1.0" encoding="UTF-8"?>

<!DOCTYPE hibernate-configuration PUBLIC
    "-//Hibernate/Hibernate Configuration DTD 3.0//EN"
    "http://www.hibernate.org/dtd/hibernate-configuration-3.0.dtd">

<hibernate-configuration>
    <session-factory>
        <!-- 必选配置 -->
        <property name="hibernate.connection.driver_class">com.mysql.jdbc.Driver</property>
                <!-- jdbc:mysql:///hibernate_day01 -->
        <property name="hibernate.connection.url">jdbc:mysql://127.0.0.1:3306/hibernate_day01</property>
        <property name="hibernate.connection.username">root</property>
        <property name="hibernate.connection.password">root</property>

                <!--数据库方言 使用的数据库类型  -->
        <property name="hibernate.dialect org.hibernate.dialect.MySQLDialect"></property>
        <!-- 可选配置 -->
                <!-- 在控制台输出sql语句 -->
        <property name="show_sql">true</property>
                <!-- 在控制台输出的sql语句格式化 -->
        <property name="hibernate.format_sql">true</property>
        <!-- 映射文件 -->
        <mapping resource="hibernate/domain/Customer.hbm.xml"/>
    </session-factory>
</hibernate-configuration>
3.保存(插入)数据
/Hibernate5_d01_c03/src/hibernate/test/TestCustomer.java
程序代码如下:
package hibernate.test;

import org.hibernate.Session;
import org.hibernate.SessionFactory;
import org.hibernate.Transaction;
import org.hibernate.cfg.Configuration;
import org.junit.Test;

import hibernate.domain.Customer;

public class TestCustomer {
    @Test
    public void testSave(){
        //1.新建一个用户
        Customer c = new Customer();
        c.setCust_name("jack");
        c.setCust_mobile("1381383838438");

        //分7个步骤操作数据
        //1.读取配置文件hibernate.cfg.xml
        Configuration config = new Configuration();
        config.configure();
        //2.获取连接池
        SessionFactory factory = config.buildSessionFactory();
        //3.从连接池中获取一个连接
        Session session = factory.openSession();
        //4.开启事务
        Transaction tr = session.beginTransaction();
        //5.保存数据
        session.save(c);
        //6.提交事务
        tr.commit();
        //7.关闭资源
        session.close();
        factory.close();
    }
}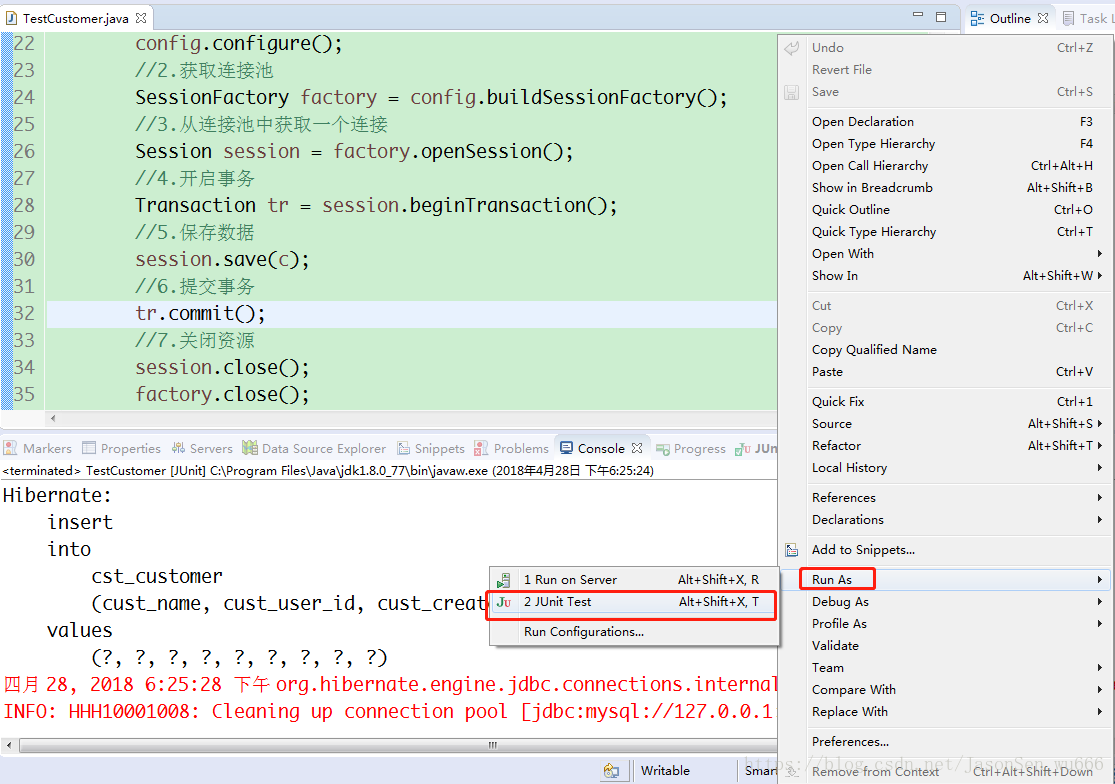
运行项目
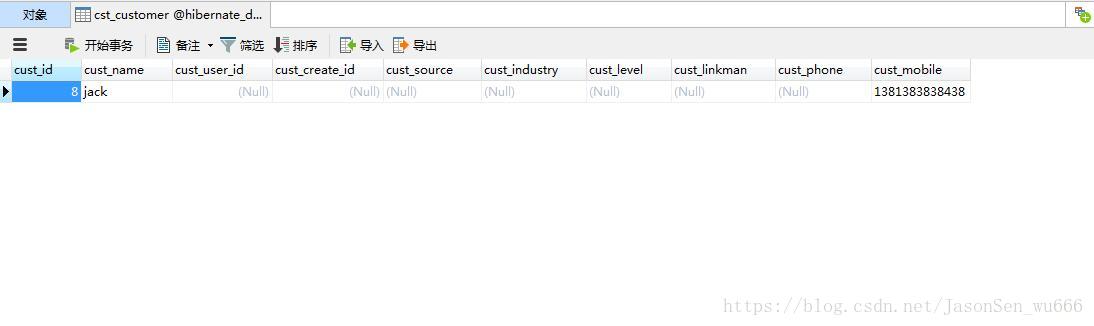
运行效果
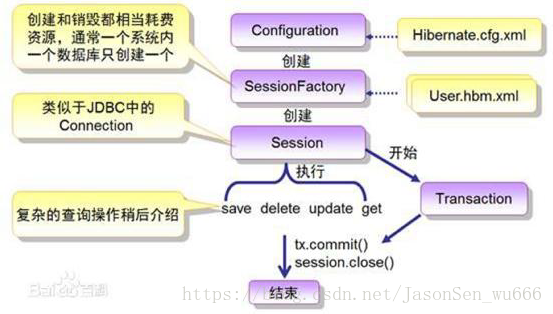 总结
总结


 130
130

 被折叠的 条评论
为什么被折叠?
被折叠的 条评论
为什么被折叠?
 到【灌水乐园】发言


