


目标:使用Java持久性API把数据库中的数据显示出来。
基本过程包括:
u 加载驱动程序
u 创建数据库以及表
u 在NetBeans中加载驱动程序
u 在NetBeans中创建连接
u 创建持久单元以及实体类
u 创建访问持久单元的会话Bean
u 创建Servlet客户端程序,访问会话Bean,并显示结果
1、放JDBC驱动程序到下面的目录
根据自己的安装目录进行修改。如果采用默认安装,应该放在下面的目录下。
C:/Sun/AppServer/domains/domain1/lib/ext
2、在MySQL数据库中添加数据库entity
create database entity
3、创建表userinfo
在entity数据库中创建表,表结构与书上25章的一样,插入几条测试数据。
create table userinfo
(
userid varchar(10) primary key not null,
username varchar(10) not null,
userpass varchar(10) not null,
usertype char(1) not null
)
插入如下测试数据:
insert into userinfo values('user001','zhangsan','zhangsan','0');
insert into userinfo values('user002','lisi','lisi','0');
insert into userinfo values('admin001','mishu','mishu','0');
4、在NetBeans中添加驱动程序
在Drivers上面点击右键,选择New Driver。选择JDBC驱动程序所在的jar压缩包。

5、添加连接
在上图的Databases上点击右键选择New Connection,在弹出的界面上选择前面添加的驱动程序,然后修改URL,修改后:jdbc:mysql://localhost:3306/entity。
其中:localhost表示主机,3306表示端口,entity表示数据库。
6、创建EJB Module
选择File
àNew Project,选择中间的Enterprise,然后选择右边的EJB Module。工程的名字是UserSession。
7、创建持久单元
在工程上面点击右键,选择New
àFile/Folder,选择中间的Persistence,右边选择Persistence Unit。在弹出的界面中,选择数据源:选择New DataSource。在弹出的界面中输入一个JNDI名字entity2,然后选择前面第5步创建好的连接。
生成的文件如下:
<?xml version="1.0" encoding="UTF-8"?>
<persistence version="1.0"
xmlns="http://java.sun.com/xml/ns/persistence"
xmlns:xsi="http://www.w3.org/2001/XMLSchema-instance"
xsi:schemaLocation="http://java.sun.com/xml/ns/persistence
http://java.sun.com/xml/ns/persistence/persistence_1_0.xsd">
<persistence-unit name="UserPU" transaction-type="JTA">
<provider>
oracle.toplink.essentials.ejb.cmp3.EntityManagerFactoryProvider
</provider>
<jta-data-source>entity2</jta-data-source>
<properties>
<property name="toplink.ddl-generation" value="create-tables"/>
</properties>
</persistence-unit>
</persistence>
8、创建持久类
在工程上面点击右键,选择New,然后选择Entity Class from DataBase。在DataSource中选择刚才配置好的数据源entity2。然后在左下方会出现表,选择中间的Add,添加到右边。选择下一步,然后完成即可。生成的文件如下:
/*
* Userinfo.java
*
* Created on 2007
年5月21日, 上午6:17
*
* To change this template, choose Tools | Template Manager
* and open the template in the editor.
*/
package jpa;
import java.io.Serializable;
import javax.persistence.Column;
import javax.persistence.Entity;
import javax.persistence.Id;
import javax.persistence.NamedQueries;
import javax.persistence.NamedQuery;
import javax.persistence.Table;
/**
* Entity class Userinfo
*
* @author Administrator
*/
@Entity
@Table(name = "userinfo")
@NamedQueries( {
@NamedQuery(name = "Userinfo.findByUserid",
query = "SELECT u FROM Userinfo u WHERE u.userid = :userid"),
@NamedQuery(name = "Userinfo.findByUsername",
query = "SELECT u FROM Userinfo u WHERE u.username = :username"),
@NamedQuery(name = "Userinfo.findByUserpass",
query = "SELECT u FROM Userinfo u WHERE u.userpass = :userpass"),
@NamedQuery(name = "Userinfo.findByUsertype",
query = "SELECT u FROM Userinfo u WHERE u.usertype = :usertype")
})
public class Userinfo implements Serializable {
@Id
@Column(name = "userid", nullable = false)
private String userid;
@Column(name = "username", nullable = false)
private String username;
@Column(name = "userpass", nullable = false)
private String userpass;
@Column(name = "usertype", nullable = false)
private char usertype;
/** Creates a new instance of Userinfo */
public Userinfo() {
}
/**
* Creates a new instance of Userinfo with the specified values.
* @param userid the userid of the Userinfo
*/
public Userinfo(String userid) {
this.userid = userid;
}
/**
* Creates a new instance of Userinfo with the specified values.
* @param userid the userid of the Userinfo
* @param username the username of the Userinfo
* @param userpass the userpass of the Userinfo
* @param usertype the usertype of the Userinfo
*/
public Userinfo(String userid, String username, String userpass, char usertype) {
this.userid = userid;
this.username = username;
this.userpass = userpass;
this.usertype = usertype;
}
/**
* Gets the userid of this Userinfo.
* @return the userid
*/
public String getUserid() {
return this.userid;
}
/**
* Sets the userid of this Userinfo to the specified value.
* @param userid the new userid
*/
public void setUserid(String userid) {
this.userid = userid;
}
/**
* Gets the username of this Userinfo.
* @return the username
*/
public String getUsername() {
return this.username;
}
/**
* Sets the username of this Userinfo to the specified value.
* @param username the new username
*/
public void setUsername(String username) {
this.username = username;
}
/**
* Gets the userpass of this Userinfo.
* @return the userpass
*/
public String getUserpass() {
return this.userpass;
}
/**
* Sets the userpass of this Userinfo to the specified value.
* @param userpass the new userpass
*/
public void setUserpass(String userpass) {
this.userpass = userpass;
}
/**
* Gets the usertype of this Userinfo.
* @return the usertype
*/
public char getUsertype() {
return this.usertype;
}
/**
* Sets the usertype of this Userinfo to the specified value.
* @param usertype the new usertype
*/
public void setUsertype(char usertype) {
this.usertype = usertype;
}
/**
* Returns a hash code value for the object. This implementation computes
* a hash code value based on the id fields in this object.
* @return a hash code value for this object.
*/
@Override
public int hashCode() {
int hash = 0;
hash += (this.userid != null ? this.userid.hashCode() : 0);
return hash;
}
/**
* Determines whether another object is equal to this Userinfo. The result is
* <code>true</code> if and only if the argument is not null and is a Userinfo object
that
* has the same id field values as this object.
* @param object the reference object with which to compare
* @return <code>true</code> if this object is the same as the argument;
* <code>false</code> otherwise.
*/
@Override
public boolean equals(Object object) {
// TODO: Warning - this method won't work in the case the id fields are not set
if (!(object instanceof Userinfo)) {
return false;
}
Userinfo other = (Userinfo)object;
if (this.userid != other.userid &&
(this.userid == null || !this.userid.equals(other.userid)))
return false;
return true;
}
/**
* Returns a string representation of the object. This implementation constructs
* that representation based on the id fields.
* @return a string representation of the object.
*/
@Override
public String toString() {
return "jpa.Userinfo[userid=" + userid + "]";
}
}
然后在Persistence.xml文件的设计界面的下面有 Add Class 按钮,点击该按钮,然后把刚创建好的实体类添加到持久单元中。
9、编写会话Bean访问该实体
在该工程中添加一个会话Bean,添加过程参考会话Bean的编写,Bean的名字是UserManager,提供Remote接口。
在该会话Bean中添加一个业务方法,下面是修改后的文件,红色部分是添加的。
9.1 接口文件
package jpa;
import javax.ejb.Remote;
import java.util.List;
/**
* This is the business interface for UserManager enterprise bean.
*/
@Remote
public interface UserManagerRemote {
public List<Userinfo> findAllUser();
}
9.2 Bean类
/*
* UserManagerBean.java
*
* Created on 2007
年5月21日, 上午6:18
*
* To change this template, choose Tools | Template Manager
* and open the template in the editor.
*/
package jpa;
import javax.ejb.Stateless;
import javax.persistence.PersistenceContext;
import javax.persistence.EntityManager;
import java.util.List;
/**
*
* @author Administrator
*/
@Stateless
public class UserManagerBean implements jpa.UserManagerRemote {
@PersistenceContext
EntityManager em;
/** Creates a new instance of UserManagerBean */
public UserManagerBean() {
}
public List<Userinfo> findAllUser(){
return em.createQuery("select u from Userinfo u").getResultList();
}
}
10
、编写
Servlet
客户端访问会话
Bean
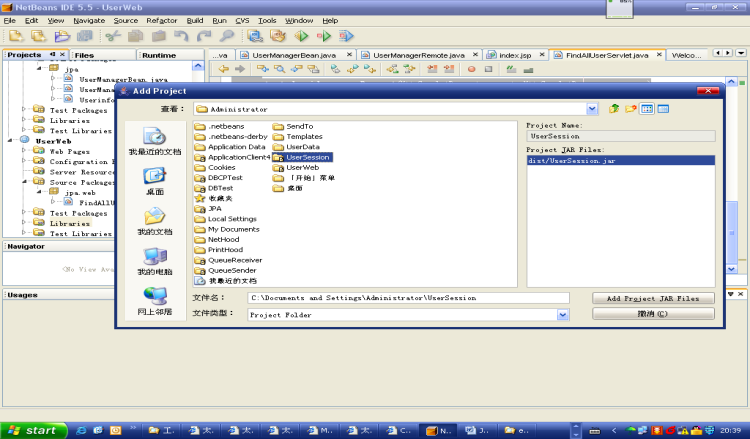
需要引入会话Bean的客户端程序,可以在Web应用的Liberaries上点击右键,选择Add Project,如下面的界面,选择前面创建的EJB模块,选择添加即可(这样就不用拷贝会话Bean的接口文件了)。
然后在工程里面添加一个Servlet,名字为FindAllUserServlet,修改后的代码如下(红色部分是添加的):
/*
* FindAllUserServlet.java
*
* Created on 2007
年5月21日, 上午6:27
*/
package jpa.web;
import java.io.*;
import java.net.*;
import javax.servlet.*;
import javax.servlet.http.*;
import javax.ejb.EJB;
import jpa.UserManagerRemote;
import jpa.Userinfo;
import java.util.List;
import java.util.Iterator;
/**
*
* @author Administrator
* @version
*/
public class FindAllUserServlet extends HttpServlet {
@EJB
UserManagerRemote user;
/** Processes requests for both HTTP <code>GET</code> and <code>POST</code> methods.
* @param request servlet request
* @param response servlet response
*/
protected void processRequest(HttpServletRequest request, HttpServletResponse response)
throws ServletException, IOException {
response.setContentType("text/html;charset=UTF-8");
PrintWriter out = response.getWriter();
List<Userinfo> list=user.findAllUser();
Iterator<Userinfo> i = list.iterator();
while(i.hasNext()){
Userinfo tmpUser = i.next();
out.print(tmpUser.getUserid()+"-"+tmpUser.getUsername()+"<br>");
}
out.close();
}
// <editor-fold defaultstate="collapsed" desc="HttpServlet methods. Click on the + sign on the left to edit the code.">
/** Handles the HTTP <code>GET</code> method.
* @param request servlet request
* @param response servlet response
*/
protected void doGet(HttpServletRequest request, HttpServletResponse response)
throws ServletException, IOException {
processRequest(request, response);
}
/** Handles the HTTP <code>POST</code> method.
* @param request servlet request
* @param response servlet response
*/
protected void doPost(HttpServletRequest request, HttpServletResponse response)
throws ServletException, IOException {
processRequest(request, response);
}
/** Returns a short description of the servlet.
*/
public String getServletInfo() {
return "Short description";
}
// </editor-fold>
}
11、运行测试
分别部署EJB模块和Web模块,访问Servlet可以得到用户列表。
更多内容可以参考本人的书《Java EE 5实用教程——基于WebLogic和Eclipse》


 被折叠的 条评论
为什么被折叠?
被折叠的 条评论
为什么被折叠?
 到【灌水乐园】发言


