


1.TXLcn介绍
TX-LCN 主要有两个模块,Tx-Client(TC) Tx-Manager™. TC作为微服务下的依赖,TM是独立的服务,主要作为事务管理的控制中心。
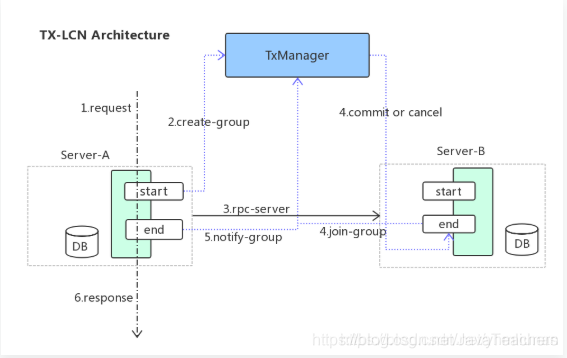
发起方发起会缓存事务的gtoupid到tx-manager中,根据最后的处理结果进行commit或者cancel操作。根据官网,tx-manager是支持集群服务的。
2.TXLcn使用
2.1 准备数据库
CREATE TABLE `t_tx_exception`  (
  `id` bigint(20) NOT NULL AUTO_INCREMENT,
  `group_id` varchar(64) CHARACTER SET utf8mb4 COLLATE utf8mb4_general_ci NULL DEFAULT NULL,
  `unit_id` varchar(32) CHARACTER SET utf8mb4 COLLATE utf8mb4_general_ci NULL DEFAULT NULL,
  `mod_id` varchar(128) CHARACTER SET utf8mb4 COLLATE utf8mb4_general_ci NULL DEFAULT NULL,
  `transaction_state` tinyint(4) NULL DEFAULT NULL,
  `registrar` tinyint(4) NULL DEFAULT NULL,
  `remark` varchar(4096) NULL DEFAULT  NULL,
  `ex_state` tinyint(4) NULL DEFAULT NULL COMMENT '0 未解决 1已解决',
  `create_time` datetime(0) NULL DEFAULT NULL,
  PRIMARY KEY (`id`) USING BTREE
) ENGINE = InnoDB AUTO_INCREMENT = 1 CHARACTER SET = utf8mb4 COLLATE = utf8mb4_general_ci ROW_FORMAT = Dynamic;
2.2 父pom
此处需要注意,如果夫pom中版本控制器细度化过高,注意是否与LCN官方版本是否一致(此处建议一致)
    <properties>
        <!-- project -setting -->
        <project.build.sourceEncoding>UTF-8</project.build.sourceEncoding>
        <project.reporting.outputEncoding>UTF-8</project.reporting.outputEncoding>
        <java.version>1.8</java.version>

        <codingapi.txlcn.version>5.0.2.RELEASE</codingapi.txlcn.version>
        <springcloud.version>Greenwich.RELEASE</springcloud.version>
        <lombok.version>1.18.0</lombok.version>
        <druid.version>1.1.12</druid.version>
        <mybatis.spring.version>2.1.1</mybatis.spring.version>

    </properties>

    <parent>
        <groupId>org.springframework.boot</groupId>
        <artifactId>spring-boot-starter-parent</artifactId>
        <version>2.1.2.RELEASE</version>
        <relativePath/>
    </parent>

    <dependencies>
        <dependency>
            <groupId>org.projectlombok</groupId>
            <artifactId>lombok</artifactId>
        </dependency>
    </dependencies>

    <dependencyManagement>
        <dependencies>
            <!-- spring cloud -->
            <dependency>
                <groupId>org.springframework.cloud</groupId>
                <artifactId>spring-cloud-dependencies</artifactId>
                <version>${springcloud.version}</version>
                <type>pom</type>
                <scope>import</scope>
            </dependency>

            <dependency>
                <groupId>com.github.pagehelper</groupId>
                <artifactId>pagehelper-spring-boot-starter</artifactId>
                <version>1.2.5</version>
            </dependency>
            <dependency>
                <groupId>org.projectlombok</groupId>
                <artifactId>lombok</artifactId>
                <version>${lombok.version}</version>
            </dependency>
            <!-- tx lcn 分布式事务 -->
            <dependency>
                <groupId>com.codingapi.txlcn</groupId>
                <artifactId>txlcn-tc</artifactId>
                <version>${codingapi.txlcn.version}</version>
            </dependency>
            <dependency>
                <groupId>com.codingapi.txlcn</groupId>
                <artifactId>txlcn-tm</artifactId>
                <version>${codingapi.txlcn.version}</version>
            </dependency>
            <dependency>
                <groupId>com.codingapi.txlcn</groupId>
                <artifactId>txlcn-txmsg-netty</artifactId>
                <version>${codingapi.txlcn.version}</version>
            </dependency>

        </dependencies>
    </dependencyManagement>
2.3 建立官方tx-lcn的demo
此处可以有两种方式,①下载官方jar包修改application.properties,使用java-jar实现 ②配置至自己项目中
2.3.1 启动类
package com.kim.tx.lcn;

import com.codingapi.txlcn.tm.config.EnableTransactionManagerServer;
import org.springframework.boot.SpringApplication;
import org.springframework.boot.autoconfigure.SpringBootApplication;

@SpringBootApplication
@EnableTransactionManagerServer
public class TransactionManagerApplication {

    public static void main(String[] args) {
        SpringApplication.run(TransactionManagerApplication.class, args);
    }
}
2.3.2 配置文件
如果redis本地存在不一致,需设置redis
##################
# 这个是启动本服务的配置文件,其它的application-xxx.properties 是开发者的个性化配置,不用关心。
# 你可以在 https://txlcn.org/zh-cn/docs/setting/manager.html 看到所有的个性化配置
#################

spring.application.name=TransactionManager
server.port=7970
spring.datasource.driver-class-name=com.mysql.jdbc.Driver
spring.datasource.url=jdbc:mysql://xxxxxxxx:3306/members?characterEncoding=UTF-8&serverTimezone=Asia/Shanghai
spring.datasource.username=root
spring.datasource.password=xxxxxxxx
spring.jpa.database-platform=org.hibernate.dialect.MySQL5InnoDBDialect
spring.jpa.hibernate.ddl-auto=update

mybatis.configuration.map-underscore-to-camel-case=true
mybatis.configuration.use-generated-keys=true
2.3.3 pom文件
    <dependencies>

        <dependency>
            <groupId>com.codingapi.txlcn</groupId>
            <artifactId>txlcn-tm</artifactId>
        </dependency>

    </dependencies>
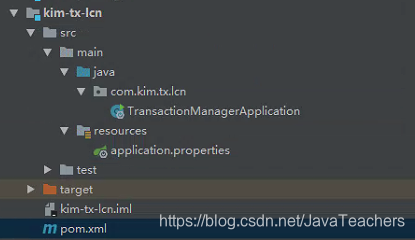
项目的目录结构如下图:
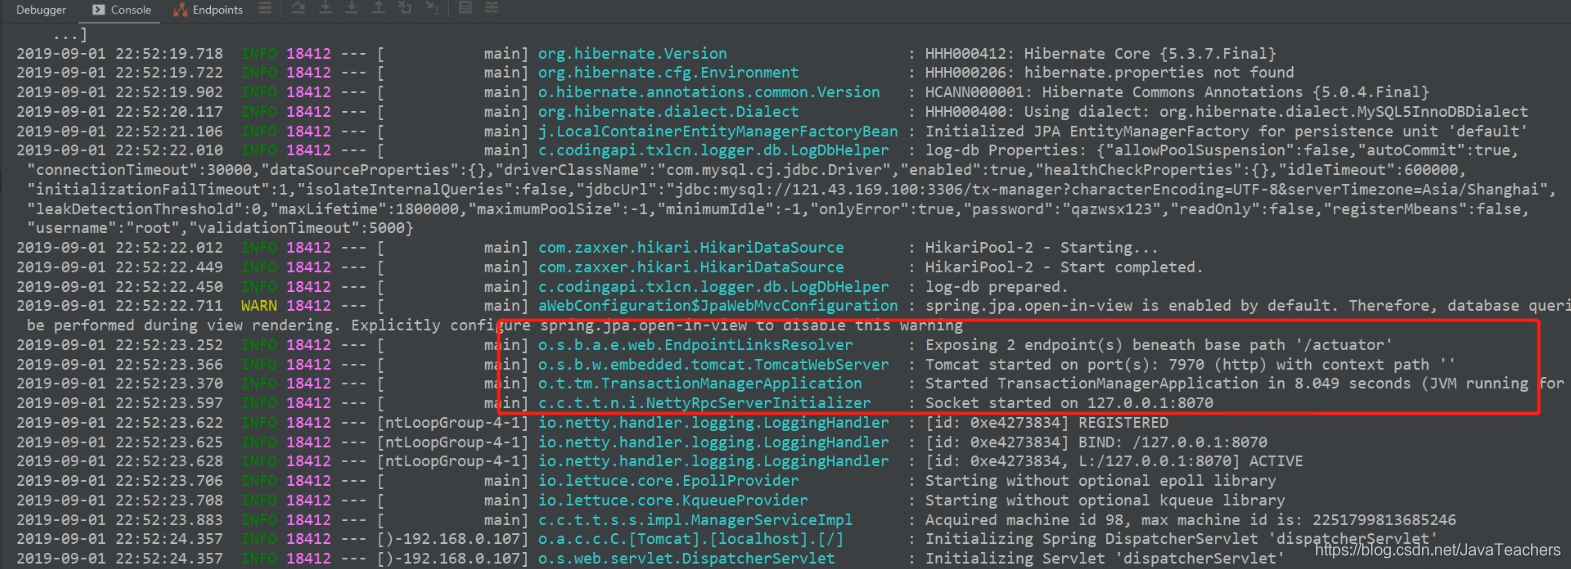
启动服务
访问 http://127.0.0.1:7970/admin/index.html进入管理后台,默认密码是:codingapi
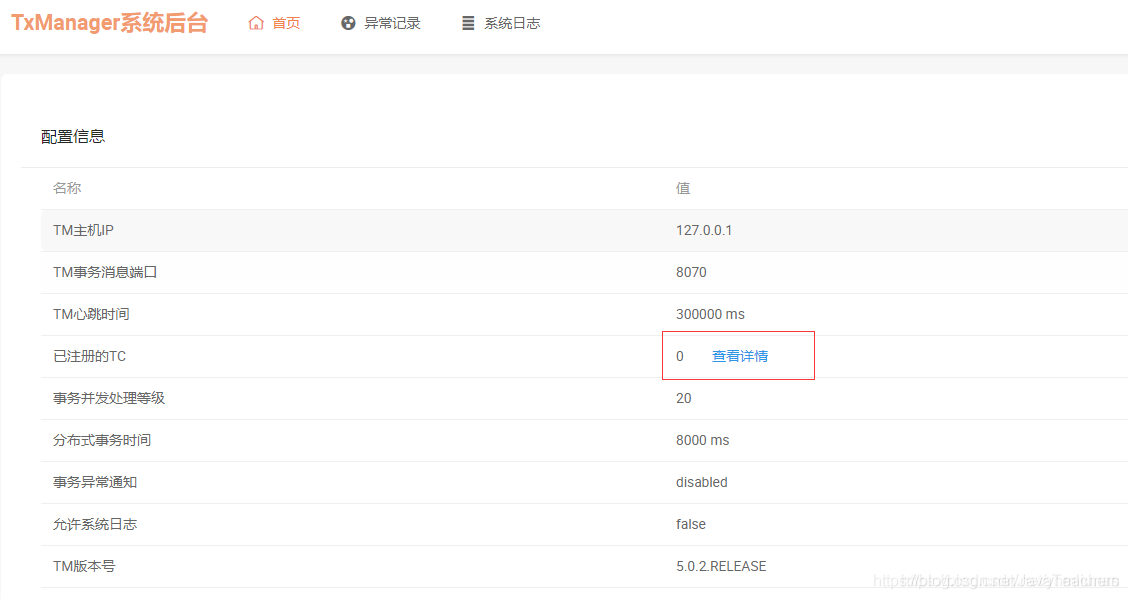
集成了TC的服务端启动成功后可以点这里查看服务的状态。
具体的Tx-Manager操作,看官网文档吧。
https://www.txlcn.org/zh-cn/docs/manageradmin.html
3 服务调用方
3.1 pom文件加入
加入这两个依赖
<dependency>
    <groupId>com.codingapi.txlcn</groupId>
    <artifactId>txlcn-tc</artifactId>
    <version>5.0.2.RELEASE</version>
</dependency>
<dependency>
    <groupId>com.codingapi.txlcn</groupId>
    <artifactId>txlcn-txmsg-netty</artifactId>
    <version>5.0.2.RELEASE</version>
</dependency>
    <dependencies>
-------------------------------------------------完整如下----------------------------------------
<dependency>
            <groupId>org.springframework.boot</groupId>
            <artifactId>spring-boot-starter-web</artifactId>
        </dependency>
        <dependency>
            <groupId>org.springframework.boot</groupId>
            <artifactId>spring-boot-starter-actuator</artifactId>
        </dependency>
        <!-- eureka -->
        <dependency>
            <groupId>org.springframework.cloud</groupId>
            <artifactId>spring-cloud-starter-netflix-eureka-client</artifactId>
        </dependency>
        <!-- feign -->
        <dependency>
            <groupId>org.springframework.cloud</groupId>
            <artifactId>spring-cloud-starter-openfeign</artifactId>
        </dependency>
        <!-- txlcn -->
        <dependency>
            <groupId>com.codingapi.txlcn</groupId>
            <artifactId>txlcn-tc</artifactId>
            <version>5.0.2.RELEASE</version>
        </dependency>
        <dependency>
            <groupId>com.codingapi.txlcn</groupId>
            <artifactId>txlcn-txmsg-netty</artifactId>
            <version>5.0.2.RELEASE</version>
        </dependency>
        <!-- mysql -->
        <dependency>
            <groupId>mysql</groupId>
            <artifactId>mysql-connector-java</artifactId>
        </dependency>
        <!-- druid -->
        <dependency>
            <groupId>com.alibaba</groupId>
            <artifactId>druid</artifactId>
            <version>1.1.12</version>
        </dependency>
        <dependency>
            <groupId>org.springframework.boot</groupId>
            <artifactId>spring-boot-starter-jdbc</artifactId>
        </dependency>

        <dependency>
            <groupId>com.kim</groupId>
            <artifactId>kim-user-common</artifactId>
            <version>1.0.0</version>
        </dependency>
        <dependency>
            <groupId>com.kim</groupId>
            <artifactId>kim-common-utils</artifactId>
            <version>1.0.0</version>
        </dependency>
        <dependency>
            <groupId>com.kim</groupId>
            <artifactId>kim-redis-starter</artifactId>
            <version>1.0.0</version>
        </dependency>
    </dependencies>
3.2 启动类增加注解
启动类增加
@EnableDistributedTransaction
-------------------------------------------------完整如下----------------------------------------

@SpringBootApplication
@EnableFeignClients(basePackages = {"com.kim.openfeign.feign"})
@EnableDiscoveryClient
@EnableEurekaClient
@EnableDistributedTransaction //分布式事务
public class FeignApplication {
    public static void main(String[] args) {
        SpringApplication.run(FeignApplication.class,args);
    }

    @Bean
    @ConditionalOnMissingBean
    public DefaultAdvisorAutoProxyCreator defaultAdvisorAutoProxyCreator() {
        DefaultAdvisorAutoProxyCreator daap = new DefaultAdvisorAutoProxyCreator();
        daap.setProxyTargetClass(true);
        return daap;
    }
}
3.3 加入本地事务配置类
@Configuration
@EnableTransactionManagement
@Scope(proxyMode = ScopedProxyMode.TARGET_CLASS)
public class AopTypeDTXConfiguration {

    /**
     * 本地事务配置
     *
     * @param transactionManager
     * @return
     */
    @Bean
    @ConditionalOnMissingBean
    public TransactionInterceptor transactionInterceptor(PlatformTransactionManager transactionManager) {
        Properties properties = new Properties();
        properties.setProperty("*", "PROPAGATION_REQUIRED,-Throwable");
        TransactionInterceptor transactionInterceptor = new TransactionInterceptor();
        transactionInterceptor.setTransactionManager(transactionManager);
        transactionInterceptor.setTransactionAttributes(properties);
        return transactionInterceptor;
    }

    /**
     * 分布式事务配置 设置为LCN模式
     *
     * @param dtxLogicWeaver
     * @return
     */
    @ConditionalOnBean(DTXLogicWeaver.class)
    @Bean
    public TxLcnInterceptor txLcnInterceptor(DTXLogicWeaver dtxLogicWeaver) {
        TxLcnInterceptor txLcnInterceptor = new TxLcnInterceptor(dtxLogicWeaver);
        Properties properties = new Properties();
        properties.setProperty(Transactions.DTX_TYPE, Transactions.LCN);
        properties.setProperty(Transactions.DTX_PROPAGATION, "REQUIRED");
        txLcnInterceptor.setTransactionAttributes(properties);
        return txLcnInterceptor;
    }

    @Bean
    public BeanNameAutoProxyCreator beanNameAutoProxyCreator() {
        BeanNameAutoProxyCreator beanNameAutoProxyCreator = new BeanNameAutoProxyCreator();
        beanNameAutoProxyCreator.setInterceptorNames("txLcnInterceptor", "transactionInterceptor");
        beanNameAutoProxyCreator.setBeanNames("*Impl");
        return beanNameAutoProxyCreator;
    }
}
3.4 feign实现类
@Component
@Slf4j
public class UserFeignImpl implements UserFeign {
    @Override
    public Result<SysUser> findByUsername(String username) {
        log.info("findByUsername Feign调用失败,事务回滚!");
        DTXUserControls.rollbackGroup(TracingContext.tracing().groupId());
        return Result.error(CodeMsg.TX_LCN_BACK);
    }

    @Override
    public Result<String> userInsert(String userName) {
        log.info("userInsert Feign调用失败,事务回滚!");
        DTXUserControls.rollbackGroup(TracingContext.tracing().groupId());
        return Result.error(CodeMsg.TX_LCN_BACK);
    }

    @Override
    public Result<String> roleInsert(String roleName) {
        log.info("roleInsert Feign调用失败,事务回滚!");
        DTXUserControls.rollbackGroup(TracingContext.tracing().groupId());
        return Result.error(CodeMsg.TX_LCN_BACK);
    }
}
3.5 配置文件
增加
logging:
  level:
    com:
      codingapi:
        txlcn: DEBUG
tx-lcn:
  ribbon:
    loadbalancer:
      dtx:
        enabled: true # 是否启动LCN负载均衡策略(优化选项,开启与否,功能不受影响)
  client:
    manager-address: 127.0.0.1:8070 #指定TM地址
  logger:
    enabled: true # 开启日志,默认为false
    driver-class-name: ${spring.datasource.driver-class-name}
    jdbc-url: ${spring.datasource.url}
    username: ${spring.datasource.username}
    password: ${spring.datasource.password}

#开启Feign的熔断Fallback
feign:
  hystrix:
    enabled: true
#关闭Ribbon重试机制:
ribbon:
  ConnectTimeout: 5000
  ReadTimeout: 60000
  MaxAutoRetries: 0
  MaxAutoRetriesNextServer: 0
  -------------------------------------------------完整如下----------------------------------------
  server:
  port: 31001
spring:
  application:
    name: kim-feign
  datasource:
    driver-class-name: com.mysql.jdbc.Driver
    type: com.alibaba.druid.pool.DruidDataSource
    url: jdbc:mysql://xxxxxxxx:3306/members?useSSL=false&autoReconnect=true&characterEncoding=utf-8
    username: root
    password: xxxxxxxx
#  jackson: #时间全局处理
#    date-format: yyyy-MM-dd HH:mm:ss
#    time-zone: GMT+8
  redis: #配置redis
    host: 127.0.0.1
    port: 6379
    timeout: 6000 # 连接超时时间(毫秒)
    jedis:
      pool:
        max-active: 8 # 连接池最大连接数(使用负值表示没有限制)
        max-wait: -1  # 连接池最大阻塞等待时间(使用负值表示没有限制)
        max-idle: 8 # 连接池中的最大空闲连接
        min-idle: 0 # 连接池中的最小空闲连接

eureka:
  client:
    register-with-eureka: true #表示注册到eureka
    fetch-registry: true #是否从eurekaServer抓取已有的注册信息,集群必须设置为true才能配合ribbon使用负载均衡
    service-url:
      defaultZone: http://localhost:17001/eureka
  #      defaultZone: http://eureka7001.com:7001/eureka,http://eureka7002.com:7002/eureka #集群版
  instance:
    instance-id: ${spring.application.name}
    prefer-ip-address: true #访问路径可以显示ip
  server: #关闭自我保护机制,保证不可用服务被及时剔除
    enable-self-preservation: false
    eviction-interval-timer-in-ms: 2000

## consul排错
management:
  endpoint:
    health:
      show-details: always

hystrix:
  command:
    default:
      execution:
        timeout:
          enabled: true
        isolation:
          thread:
            timeoutInMilliseconds: 300000
      fallback:
        isolation:
          semaphore:
            maxConcurrentRequests: 50 #设置ribbon的超时时间小于zuul的超时时间


logging:
  level:
    com:
      codingapi:
        txlcn: DEBUG
tx-lcn:
  ribbon:
    loadbalancer:
      dtx:
        enabled: true # 是否启动LCN负载均衡策略(优化选项,开启与否,功能不受影响)
  client:
    manager-address: 127.0.0.1:8070 #指定TM地址
  logger:
    enabled: true # 开启日志,默认为false
    driver-class-name: ${spring.datasource.driver-class-name}
    jdbc-url: ${spring.datasource.url}
    username: ${spring.datasource.username}
    password: ${spring.datasource.password}

#开启Feign的熔断Fallback
feign:
  hystrix:
    enabled: true
#关闭Ribbon重试机制:
ribbon:
  ConnectTimeout: 5000
  ReadTimeout: 60000
  MaxAutoRetries: 0
  MaxAutoRetriesNextServer: 0
3.6 方法调用方法上
新增@LcnTransaction注解
4 服务参与方
4.1 新增依赖
参考3.1
4.2 启动类注解
参考3.2
4.3 配置文件
参考3.5
4.4 调用方法上
新增@LcnTransaction,@Transactional注解
-------------------------------------------------完整如下---------------------------------------
@Override
    @LcnTransaction
    @Transactional
    public int insertRole(SysRole sysRole) {
        log.info("开始执行role insert方法");
        int i = roleMapper.insertSelective(sysRole);
        i = 1 / 0;
        log.info("执行成功");
        return i;
    }
至此,TXLcn搭建完毕,新增抛出异常时,方法内数据库操作都会回滚。TX-LCN就整合完成了!
项目git地址:
https://gitee.com/kim_wu94/kim-distributed-transaction.git
关注公众号

每周会更新干货知识


 3318
3318

 被折叠的 条评论
为什么被折叠?
被折叠的 条评论
为什么被折叠?
 到【灌水乐园】发言


