


我是小白之最简ActiveMQ入门操作
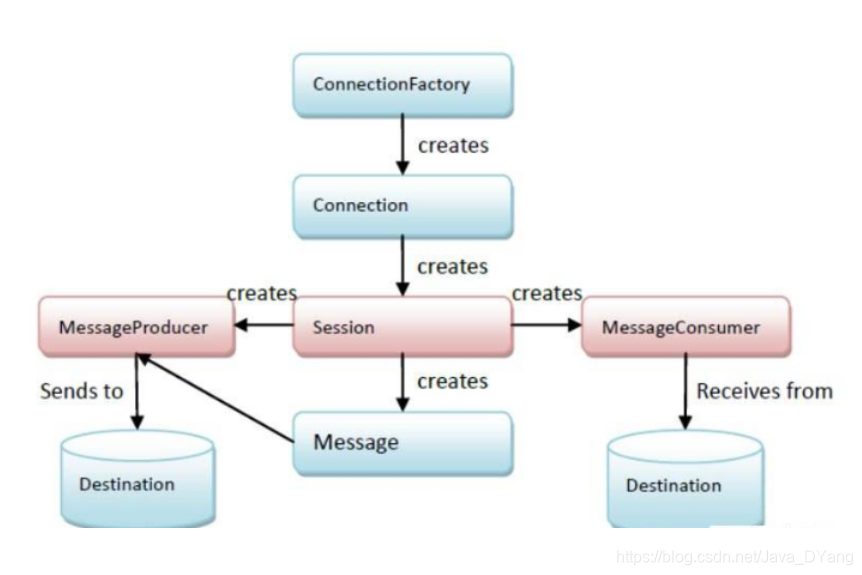
熟悉ActiveMQ的工作流程使得编写代码时思路更加明确
采用SpringBoot框架来实现ActiveMQ的P2P模式:
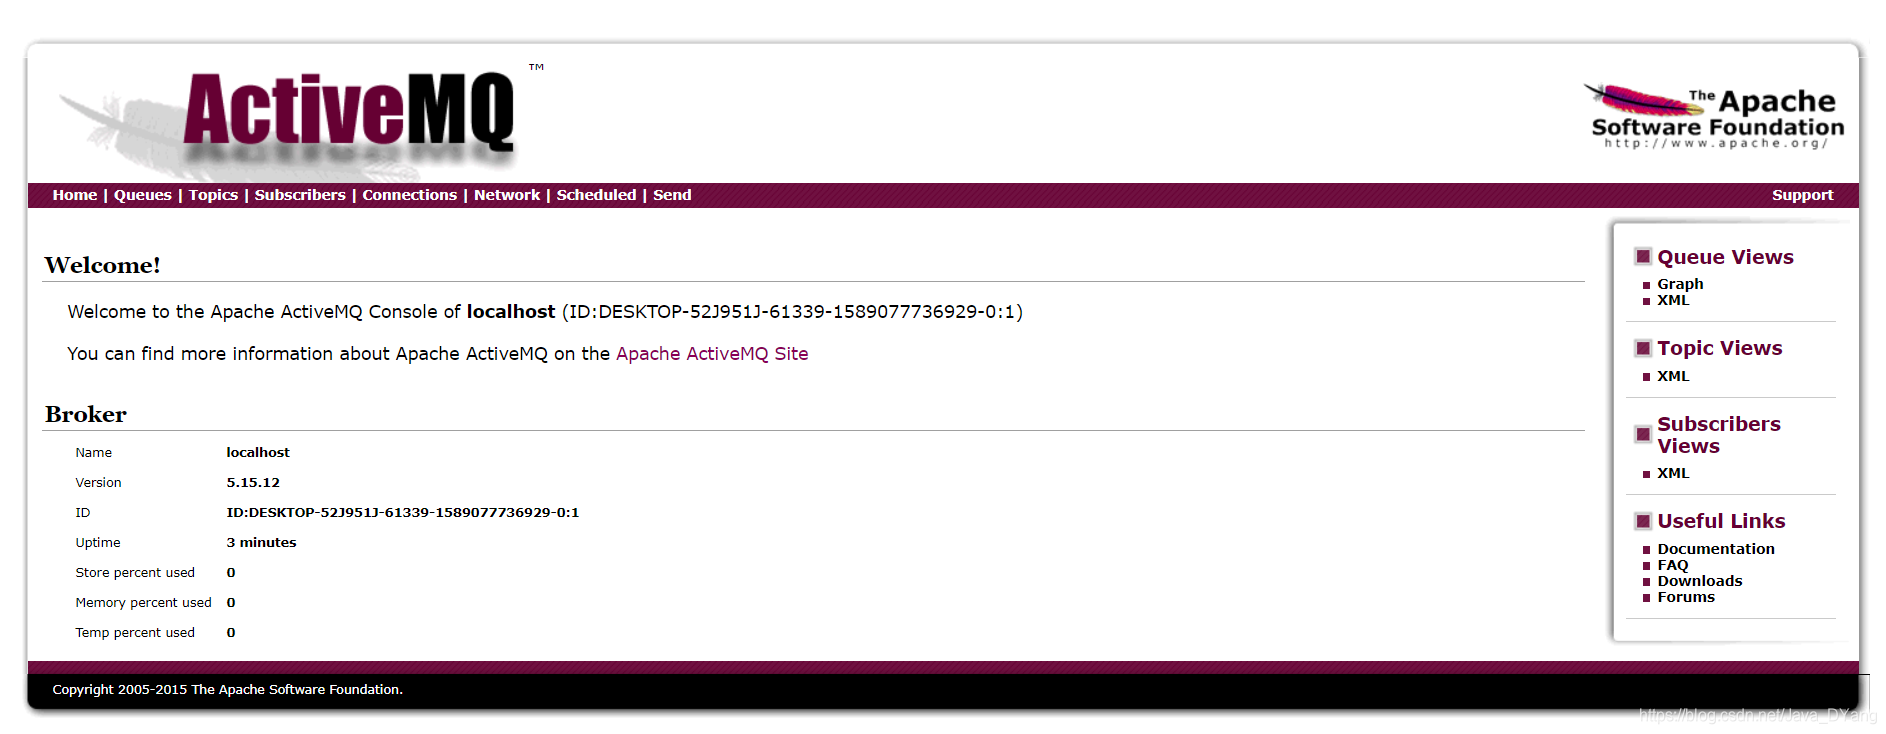
1、下载ActiveMQ:ActiveMQ官网下载完后解压到一个非中文目录的文件夹下,ActiveMQ免安装,启动bin/win64/activemq.bat,在浏览器地址栏中输入http://localhost:8161/admin进入ActiveMQ的可视化界面,输入用户名和密码登录。
successful
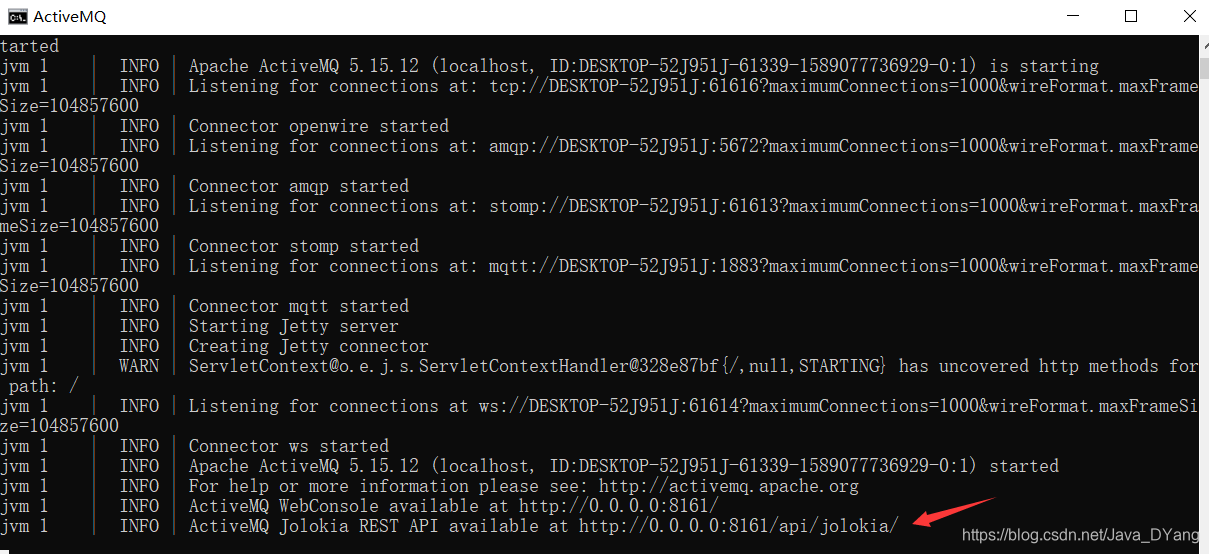
successful
2、创建一个SpringBoot项目,引入依赖:
                <dependency>
                    <groupId>org.springframework.boot</groupId>
                    <artifactId>spring-boot-starter-activemq</artifactId>
                    <version>2.1.5.RELEASE</version>
                </dependency>
3、创建生产者module,生产者module中的父依赖可以继承自springBoot项目中的依赖,继承完后生产者module中的依赖可以删掉,减少代码量
父依赖中的配置属性
    <parent>
        <groupId>org.springframework.boot</groupId>
        <artifactId>spring-boot-starter-parent</artifactId>
        <version>2.2.7.RELEASE</version>
        <relativePath/> <!-- lookup parent from repository -->
    </parent>
    <groupId>com.activemqdemo</groupId>
    <artifactId>activemqdemo</artifactId>
    <version>0.0.1-SNAPSHOT</version>
    <name>activemqdemo</name>
    <description>Demo project for Spring Boot</description>
生产者module中的pom.xml
    <parent>
        <groupId>com.activemqdemo</groupId>
        <artifactId>activemqdemo</artifactId>
        <version>0.0.1-SNAPSHOT</version>
        <relativePath/> <!-- lookup parent from repository -->
    </parent>
    <groupId>com.producerp2p</groupId>
    <artifactId>producerp2p</artifactId>
    <version>0.0.1-SNAPSHOT</version>
    <name>producerp2p</name>
    <description>Demo project for Spring Boot</description>
4、配置全局配置文件:
在resources资源目录下的application.properties文件中添加配置:
#每个module中的port端口要不一样
server.port=7777
#配置activemq连接
#ActiveMQ的两个端口之一:tcp协议通过Java代码访问:61616
spring.activemq.broker-url=tcp://127.0.0.1:61616
#ActiveMQ访问页面需要用户名和密码:admin/admin,可以在conf/user.properties文件中修改
spring.activemq.user=admin
spring.activemq.password=admin
#activemq的模式queue(false),topic(true)
spring.jms.pub-sub-domain=false
#队列名称
queue-boot-name=newqueue
5、添加配置类
package com.producerp2p.producerp2p;
import org.apache.activemq.command.ActiveMQQueue;
import org.springframework.beans.factory.annotation.Value;
import org.springframework.context.annotation.Bean;
import org.springframework.context.annotation.Configuration;
import org.springframework.jms.annotation.EnableJms;
import javax.jms.Queue;
//配置类--配置文件(spring的配置文件)
@Configuration
@EnableJms
public class ConfigBeanQueue {
    //属性注入方式
    @Value("newqueue")
    private String queueName;
    //创建队列Queue并设置队列名称
    @Bean
    public Queue createQueue(){
        return new ActiveMQQueue(queueName);
    }
}
6、发送消息
package com.producerp2p.producerp2p;
import org.springframework.beans.factory.annotation.Autowired;
import org.springframework.jms.core.JmsMessagingTemplate;
import org.springframework.scheduling.annotation.Scheduled;
import org.springframework.stereotype.Component;
import javax.jms.Queue;
@Component
public class QueueProducer {
    //属性注入
    @Autowired
    private JmsMessagingTemplate jmsMessagingTemplate;

    @Autowired
    private Queue queue;

    //发送消息
    public void sendMsg(){
        jmsMessagingTemplate.convertAndSend(queue,"QueueProducer发送消息到队列");
    }

    //定时发送消息:每隔3秒发送一条消息    微服务项目启动的时候自动执行@Scheduled修饰的方法
    @Scheduled(fixedDelay = 3000l)
    public void sendMsgScheduled(){
        //生成TextMessage对象
        jmsMessagingTemplate.convertAndSend(queue,"QueueProducer发送定时消息到队列");
        System.out.println("定时消息发送完成");
    }

}
其中用定时器发送消息要在**Application.java类前加入@EnableScheduling注解好使微服务项目启动的时候自动执行@Scheduled修饰的方法
@SpringBootApplication
//微服务项目启动的时候自动执行@Scheduled修饰的方法
@EnableScheduling
public class Producerp2pApplication {
    public static void main(String[] args) {
        SpringApplication.run(Producerp2pApplication.class, args);
    }
}
7、创建消费者module
消费者module创建好后的配置工作和生产者类似,先继承父依赖然后添加全局配置文件
消费者接收消息
package com.consumerp2p.consumerp2p;
import org.springframework.jms.annotation.JmsListener;
import org.springframework.stereotype.Component;
import javax.jms.JMSException;
import javax.jms.TextMessage;
@Component
public class QueueConsumer {
    //接收消息--设置消费者监听的目的地(队列),如果监听到队列中有消息,通过方法的形参表示接收到的消息
    @JmsListener(destination = "${queue-boot-name}")
    public void receiveMsg(TextMessage textMessage) throws JMSException {
        System.out.println("p2p模式下的消费者接收到队列中的消息:"+textMessage.getText());
    }
}
ActiveMQ的Publish/Subscribe模式:
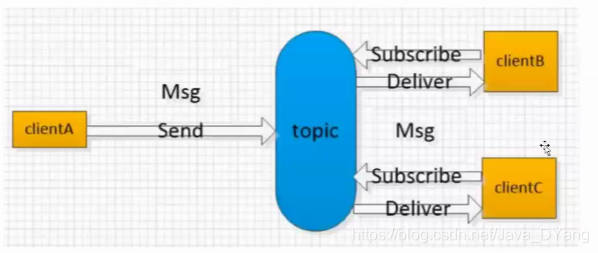
发布订阅模式特点:
- 每个消息可以有多个消费者;
- 发布者和订阅者之间有时间上的依赖性,一个主题的消费者只能消费自它订阅之后发布的消息;
- 订阅者必须保持运行的状态,才能接收到发布者发布的消息,需要先启动消费者再启动生产者。
发布订阅模式生产者:
发布订阅模式总体上的实现思路和P2P模式类似(全局配置文件中注意port端口和active的模式)
生产者配置类
package com.queueproducer.queueproducer;
import org.apache.activemq.command.ActiveMQTopic;
import org.springframework.beans.factory.annotation.Value;
import org.springframework.context.annotation.Bean;
import org.springframework.context.annotation.Configuration;
import javax.jms.Topic;
@Configuration
public class ConfigBeanTopic {
    //注入主题属性
    @Value("${topic-boot-name}")
    private String topicName;
    @Bean
    public Topic createTopic(){
        return new ActiveMQTopic(topicName);
    }
}
生产者发送消息
package com.queueproducer.queueproducer;
import org.springframework.beans.factory.annotation.Autowired;
import org.springframework.jms.core.JmsMessagingTemplate;
import org.springframework.scheduling.annotation.Scheduled;
import org.springframework.stereotype.Component;
import javax.jms.Topic;
@Component
public class ProductTopic {
    //注入属性
    @Autowired
    private JmsMessagingTemplate jmsMessagingTemplate;
    @Autowired
    private Topic topic;
    @Scheduled(fixedDelay = 2000l)
    public void sendMsg(){
        jmsMessagingTemplate.convertAndSend(topic,"发送定时消息到主题");
        System.out.println("----主题消息发送成功-----");
    }
}
消费者接收消息
package com.consumerpublish.consumerpublish;
import org.springframework.jms.annotation.JmsListener;
import org.springframework.stereotype.Component;
import javax.jms.JMSException;
import javax.jms.TextMessage;
@Component
public class ConsumerPublish {
    @JmsListener(destination = "${topic-boot-name}")
    public void receiveMsg(TextMessage textMessage) throws JMSException {
        System.out.println("--发布订阅模式下的消费者1接收到主题中的消息--"+textMessage.getText());
    }
}
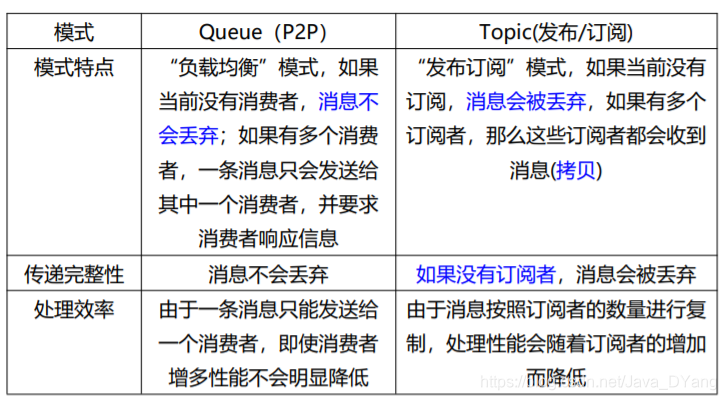
两种模式的特点对比
整体思路概括:
- 创建ConnectionFactory对象------ActiveMQConnectionFactory子类,设置url使用tcp协议:61616默认的用户名和密码(admin/admin)
- 通过ConnectionFactory来创建JMS Connection------createConnection()
- 启动JMS Connection------start()
- 创建JMS destination------session.createQueue()
- 创建JMS Producer并设置destination------session.createProducer/Comsumer
- 创建JMS Consumer
- 发送或接收JMS message------send(TextMessage) receive()
- 关闭JMS资源------生产者或消费者–session–connection
入门操作,路过的盆友们可指点一二


 1858
1858


 被折叠的 条评论
为什么被折叠?
被折叠的 条评论
为什么被折叠?
 到【灌水乐园】发言


