概要
- 滚动条嵌套
- 吸顶
-
CustomScrollView、SliverList
一、滚动条嵌套
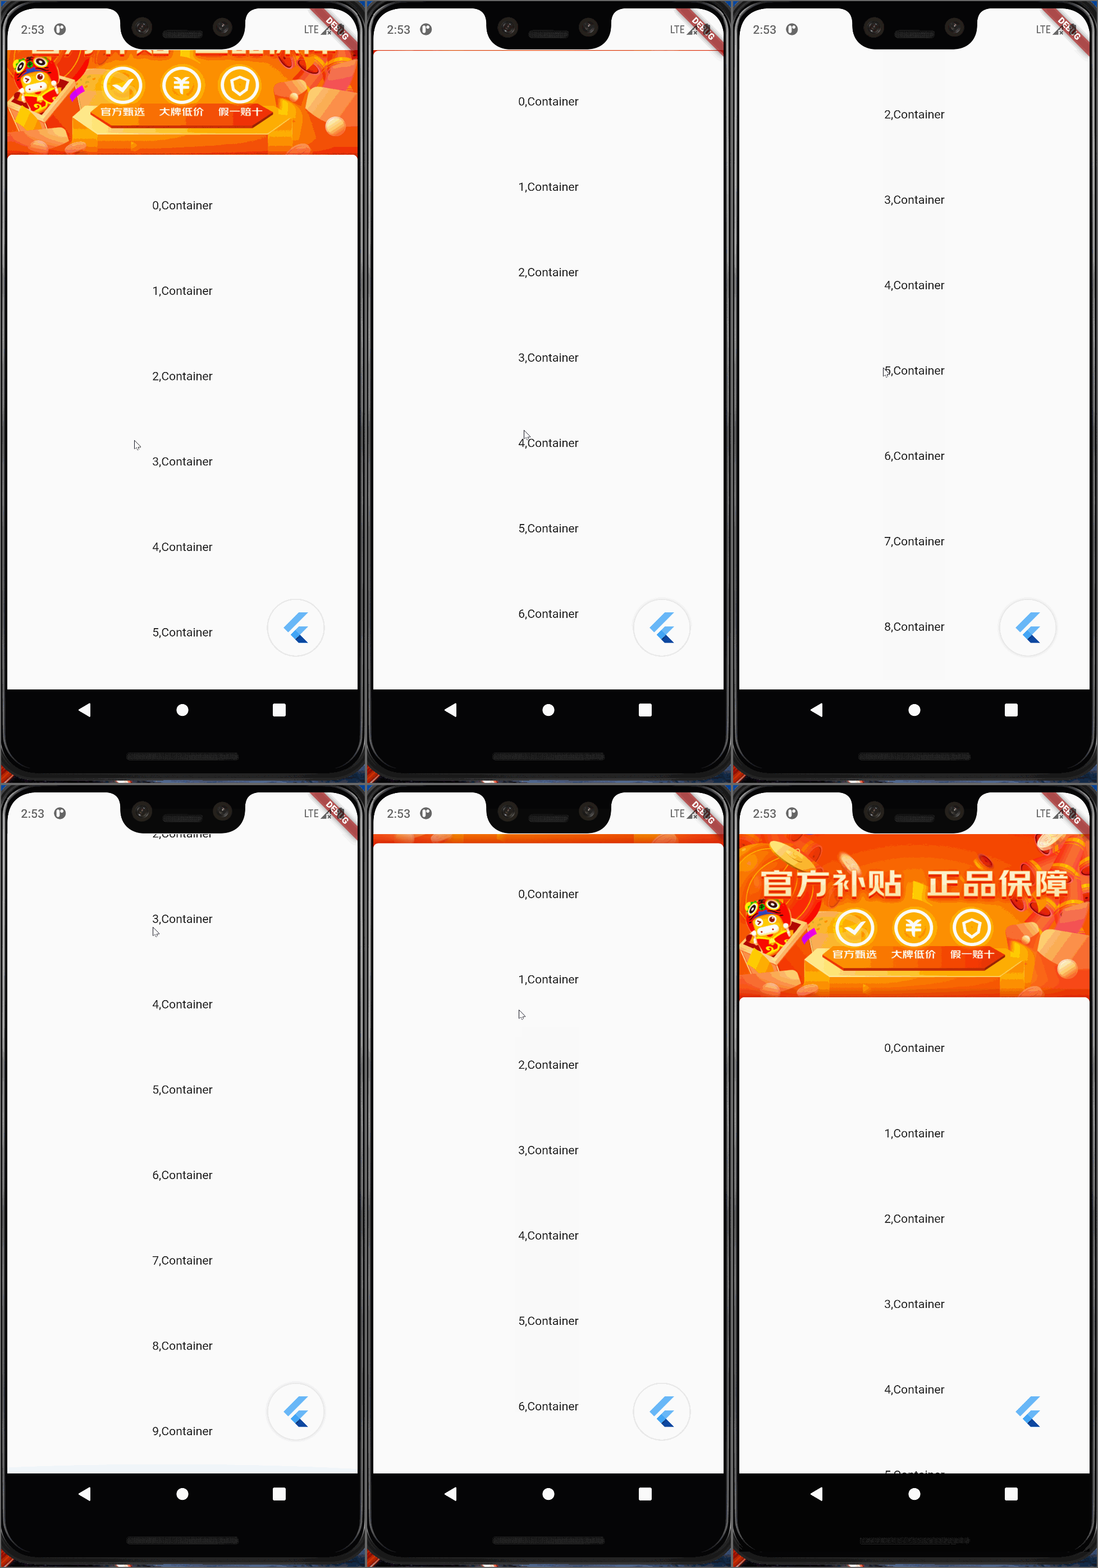
现实场景中可能会出现嵌套布局的情况,其实这种场景和吸顶基本是一致,可以采用同样是方法实现上述两种场景。
首先我们可以看下嵌套的效果。

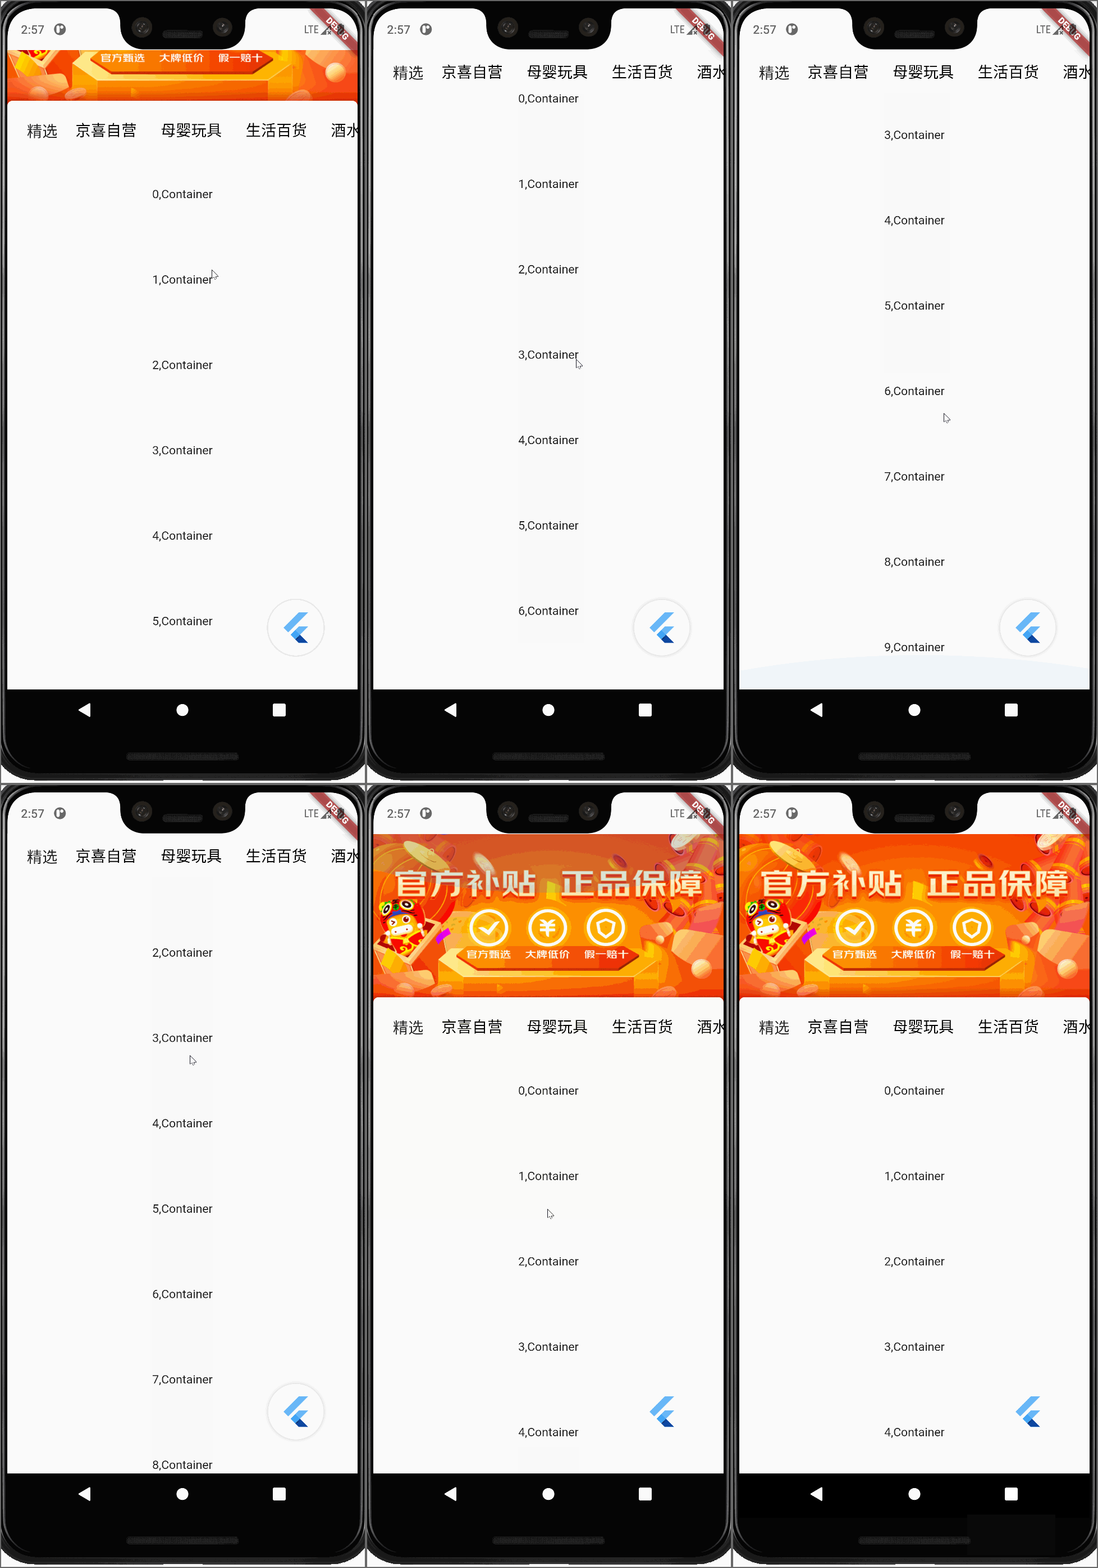
整个页面是一个滚动,白色部分其实是内嵌的滚动。当然我这样看可能和一般的滚动没什么区别。为了更直观的表现嵌套,可以加上吸顶的效果,这样就可以直观的看到嵌套的效果了。

二、完整代码
import 'dart:math';
import 'package:flutter/material.dart';
import './../../component/menu.tab.dart';

class Surprise extends StatefulWidget {
  const Surprise({Key? key}) : super(key: key);
  static const routeName = '/test3';
  @override
  State<Surprise> createState() => _SurpriseState();
}

class _SurpriseState extends State<Surprise> {


  @override
  Widget build(BuildContext context) {
    return Scaffold(
        appBar: AppBar(
          toolbarHeight: 0,
          backgroundColor: Colors.white,
          elevation: 0,
        ),
        backgroundColor:const Color(0xFFfafafa),
        body:CustomScrollView(
          slivers: <Widget>[
            _buildBanner(),
            _buildStickyBar(),
            _buildList(),
          ],
        )
      );
  }

  Widget _buildBanner() {
    return SliverToBoxAdapter(
      child:SizedBox(
        height: 200,
        child:Stack(
          children: [
            SizedBox(
              width: double.infinity,
              height: 200,
              child: Image.network(
                "https://img30.360buyimg.com/img/jfs/t1/92581/29/20454/374562/61de544fE1d5e1e34/f69d41d732f3fe81.jpg",
                height: double.infinity,
                fit: BoxFit.fill,
              ),
            ),
            Positioned(
              bottom: -1,
              width: MediaQuery.of(context).size.width,
              child: Container(
                height: 10,
                decoration:const BoxDecoration(
                  color:Color(0xFFfafafa),
                  borderRadius: BorderRadius.only(
                    topLeft: Radius.circular(6),
                    topRight: Radius.circular(6),
                  )
                ),
              )
            )
          ],
        ),
      )
    );
  }

  Widget _buildStickyBar() {
    return SliverPersistentHeader(
      pinned: true, //是否固定在顶部
      floating: true,
      delegate: _SliverAppBarDelegate(
          minHeight: 50, //收起的高度
          maxHeight: 50, //展开的最大高度
          child: Container(
            padding: const EdgeInsets.only(left: 16),
            color:const Color(0xFFfafafa),
            alignment: Alignment.centerLeft,
            child: Row(
              children: [
                Container(
                  width: 50,
                  alignment: Alignment.center,
                  child: const Text("精选", style: TextStyle(fontSize: 18)),
                ),
                Expanded(
                  child:MenuTab(
                    menuList:const [
                      {"value":"1","text":"京喜自营"},
                      {"value":"2","text":"母婴玩具"},
                      {"value":"3","text":"生活百货"},
                      {"value":"4","text":"酒水饮料"},
                      {"value":"5","text":"家清纸品"},
                      {"value":"6","text":"米面粮油"},
                      {"value":"7","text":"数码配件"},
                      {"value":"8","text":"大小家电"},
                      {"value":"9","text":"服饰鞋靴"},
                      {"value":"10","text":"美妆个护"},
                      {"value":"11","text":"休闲零食"},
                    ],
                    onPress: (e){
                      setState(() {
                      });
                    },
                  )
                )
              ],
            ),
          )),
    );
  }

  Widget _buildList() {
    return SliverList(
      delegate: SliverChildBuilderDelegate(
      (context, index) {

        return Container(
          height: 100,
          alignment: Alignment.center,
          child: Text("$index,Container"),
        );
      },
      childCount:10,
    ));
  }
}

class _SliverAppBarDelegate extends SliverPersistentHeaderDelegate {
  _SliverAppBarDelegate({
    required this.minHeight,
    required this.maxHeight,
    required this.child,
  });

  final double minHeight;
  final double maxHeight;
  final Widget child;

  @override
  double get minExtent => minHeight;

  @override
  double get maxExtent => max(maxHeight, minHeight);

  @override
  Widget build(BuildContext context, double shrinkOffset, bool overlapsContent) {
    return SizedBox.expand(child: child);
  }

  @override
  bool shouldRebuild(_SliverAppBarDelegate oldDelegate) {
    return maxHeight != oldDelegate.maxHeight ||
        minHeight != oldDelegate.minHeight ||
        child != oldDelegate.child;
  }
}
import 'package:flutter/material.dart';
class MenuTab extends StatefulWidget {
  final Function? onPress;
  final List<Map<String, dynamic>>  menuList;
  const MenuTab({Key? key,required this.menuList,this.onPress}) : super(key: key);

  @override
  State<MenuTab> createState() => _MenuTabState();
}

class _MenuTabState extends State<MenuTab> {
  final ScrollController _controller = ScrollController();
  late String currerValue = "";
  final GlobalKey menuTabListKey = GlobalKey();

  List<Widget> generateMenuTabList (){
    List<Widget> menuTabList = [];
    for(var i = 0; i < widget.menuList.length; i++){
      menuTabList.add(
        InkResponse(
          splashColor:Colors.transparent,
          splashFactory: NoSplash.splashFactory,
          child:Container(
            width: 100,
            alignment: Alignment.center,
            child: Column(
              mainAxisAlignment: MainAxisAlignment.center,
              children: [
                Text(
                  widget.menuList[i]["text"],
                  style: TextStyle(
                    fontWeight: currerValue== widget.menuList[i]["value"] as String?FontWeight.bold:FontWeight.normal,
                    fontSize: currerValue== widget.menuList[i]["value"] as String?20:18,
                    color: currerValue== widget.menuList[i]["value"] as String? const Color(0xFFf81818):const Color(0xFF000000)
                  )
                ),
                SizedBox(
                  width: 50,
                  height: 2,
                  child: DecoratedBox(
                    decoration: BoxDecoration(
                      color: currerValue== widget.menuList[i]["value"] as String?const Color(0xFFf81818):Colors.transparent
                    ),
                  )
                )
              ],
            )
          ),
          onTap: (){
            chosenTab(widget.menuList[i],i);
            if(widget.onPress!=null){
              widget.onPress!(widget.menuList[i]);
            }
          },
        ),
      );
    }
    return menuTabList;
  }


  void chosenTab(item,int index){
    double containerWidth =menuTabListKey.currentContext!.size!.width;
    if(containerWidth/2<((index+1)*100-50)){
      _controller.animateTo((index+1)*100-containerWidth/2,duration: const Duration(seconds: 1), curve: Curves.ease);
    }else{
      _controller.animateTo(0,duration: const Duration(seconds: 1), curve: Curves.ease);
    }
    setState(() {
      currerValue =item['value'] as String;
    });
  }
  @override
  Widget build(BuildContext context) {
    return ListView(
      key: menuTabListKey,
      scrollDirection: Axis.horizontal,
      controller: _controller,
      children: generateMenuTabList(),
    );
  }
}


 2454
2454


 被折叠的 条评论
为什么被折叠?


