


《Android自定义控件入门到精通》文章索引 ☞ https://blog.csdn.net/Jhone_csdn/article/details/118146683
《Android自定义控件入门到精通》所有源码 ☞ https://gitee.com/zengjiangwen/Code
文章目录
ColorFilter
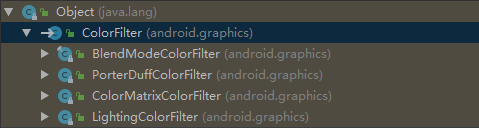
BlendModeColorFilter是Api29之后加入的,目前不作研究!
PorterDuffColorFilter
PorterDuffColorFilter(int color,PorterDuff.Mode mode)
- color : SRC(源)
- mode :混合模式
在前面学习Xfermode的时候,我们基本都是对两个图片应用混合效果
那如果,我只想用某种颜色去混合DST,或者说,我只想对DST上的某种颜色做混合,Xfermode实现起来就有点吃力了(当然有些情况你可以用纯色图片或者画一个纯色的矩形等方式去处理,但也是比较麻烦的),这就有了我们的ColorFilter系列
示例:
@Override
protected void onDraw(Canvas canvas) {
    Bitmap bitmap = BitmapFactory.decodeResource(getResources(), R.mipmap.paint_50);

    //方式一,使用PorterDuffColorFilter
    //设置PorterDuffColorFilter SRC和模式
    mPaint.setColorFilter(new PorterDuffColorFilter(0xffff0000, PorterDuff.Mode.MULTIPLY));
    //先将目标图片dst画到图层上
    canvas.drawBitmap(bitmap,0,0,mPaint);
    mPaint.setColorFilter(null);

    //方式二,使用PorterDuffXfermode
    canvas.translate(0,bitmap.getHeight()+10);
    canvas.drawBitmap(bitmap,0,0,mPaint);
    mPaint.setXfermode(new PorterDuffXfermode(PorterDuff.Mode.MULTIPLY));
    mPaint.setColor(0xffff0000);
    mPaint.setStyle(Paint.Style.FILL);
    canvas.drawRect(0,0,bitmap.getWidth(),bitmap.getHeight(),mPaint);
    mPaint.setXfermode(null);
}
以上两种方式,一种是用PorterDuffColorFilter,一种是用PorterDuffXfermode,分别通过红色颜色值和红色矩形去进行MULTIPLY操作
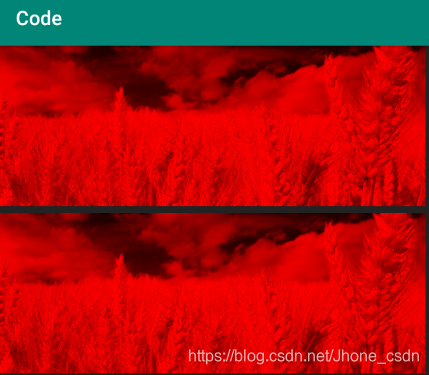
结果是一样的,但是使用PorterDuffColorFilter是最方便的,只需要三行代码。
LightingColorFilter
LightingColorFilter(int mul, int add)
- mul : 颜色值,multiply 的简写,做乘法的意思
- add:颜色值,做加法的意思
在上面示例代码中,我们用PorterDuff.Mode.MULTIPLY将0xffff0000红色混合到图片中,由于PorterDuff.Mode只有那么几种模式,完全满足不了我们的需求,那有没有自定义的模式(算法)给我们自由发挥呢?有,LightingColorFiter就是其中之一。
示例:
@Override
protected void onDraw(Canvas canvas) {
    Bitmap bitmap = BitmapFactory.decodeResource(getResources(), R.mipmap.paint_50);

    //方式一,使用PorterDuffColorFilter
    //设置PorterDuffColorFilter SRC和模式
    mPaint.setColorFilter(new PorterDuffColorFilter(0xffff0000, PorterDuff.Mode.MULTIPLY));
    //先将目标图片dst画到图层上
    canvas.drawBitmap(bitmap,0,0,mPaint);
    mPaint.setColorFilter(null);

    //方式二,使用PorterDuffXfermode
    canvas.translate(0,bitmap.getHeight()+10);
    canvas.drawBitmap(bitmap,0,0,mPaint);
    mPaint.setXfermode(new PorterDuffXfermode(PorterDuff.Mode.MULTIPLY));
    mPaint.setColor(0xffff0000);
    mPaint.setStyle(Paint.Style.FILL);
    canvas.drawRect(0,0,bitmap.getWidth(),bitmap.getHeight(),mPaint);
    mPaint.setXfermode(null);

    //方式三,使用LightingColorFilter
    canvas.translate(0,bitmap.getHeight()+10);
    mPaint.setColorFilter(new LightingColorFilter(0xff0000, 0x000000));
    canvas.drawBitmap(bitmap,0,0,mPaint);
    mPaint.setColorFilter(null);
}
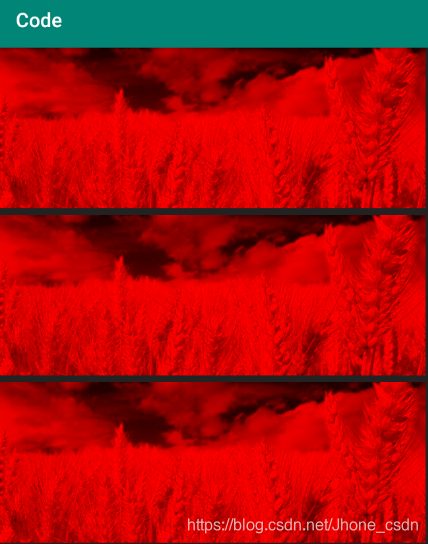
可以看到,三种方式实现的效果任然是一样的
方式一和方式二都是通过PorterDuff.Mode.MULTIPLY混合模式实现的,在这个例子中,本质是一样的
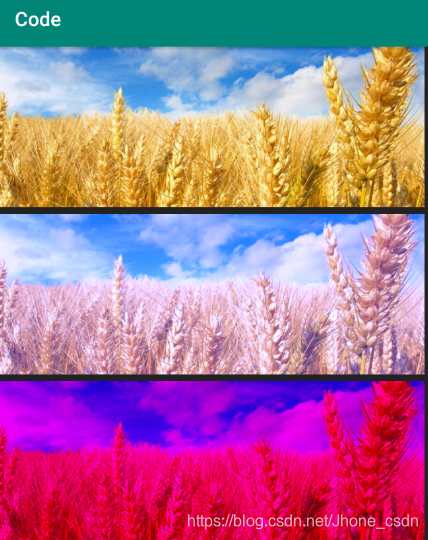
方式三,我们并没有使用到什么模式去混合,而是传递了两个颜色值,用LightingColorFilter的算法去实现的效果
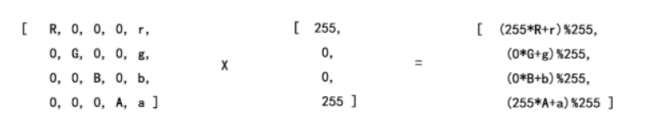
我们知道,对于一个颜色值 (如:0x20FF00AA),是由ARGB组成的:
- A:0x20 透明通道
- R:0xFF 红色通道
- G:0x00 绿色通道
- B:0xAA 蓝色通道
LightingColorFilter算法:
设目标图片(如上述例子中的大麦图)的最终效果颜色为result
设目标图片原图颜色为src
则有:
- result.R=(src.R*mul.R+add.R)%255
- result.G=(src.G*mul.G+add.G)%255
- result.B=(src.B*mul.B+add.B)%255
注:mul 和 add只对RGB通道起作用,A通道的透明度是不起作用的,所以传0x20ff0000和0xff0000效果是一样的,透明通道不参与计算
在上述例子中,我们使用的new LightingColorFilter(0xff0000, 0x000000)
- mul=0xff0000
- add=0x000000
代入公式可得:
- result.R=(src.R*0xff+0x00)%255=src.R
- result.G=(src.G*0x00+0x00)%255=0x00
- result.B=(src.B*0x00+0x00)%255=0x00
所以图像最终的结果就只保留了src.R(原图像的红色通道),result.G(绿色通过)和result.B(蓝色通道)都置为0x00了,所以,最终图片的效果为红色
再来看看PorterDuff.Mode.MULTIPLY的算法:
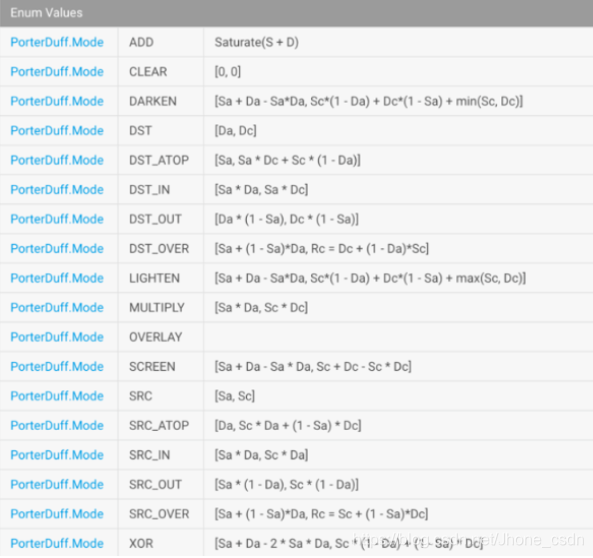
result=Sc*Dc,(Sa*Da为透明度的运算)
代入公式可得:
- result.R=(src.R*0xff)%255=src.R
- result.G=(src.G*0x00)%255=0x00
- result.B=(src.B*0x00)%255=0x00
最终的结果也是只保留了src.R(原图像的红色通道),这就是为什么这三种方式效果一致的原因了,知道了这个原因,相信你LightingColorFilter也就会使用了
结论,在LightingColorFilter的使用中
- 想保留某个通道的颜色,就使用0xff(0xff=255)
- 想过滤某个通道的颜色,就使用0x00
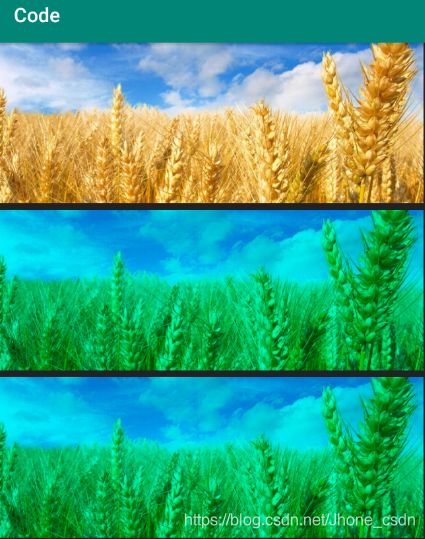
示例:
@Override
protected void onDraw(Canvas canvas) {
Bitmap bitmap = BitmapFactory.decodeResource(getResources(), R.mipmap.paint_50);
//原图
canvas.drawBitmap(bitmap,0,0,mPaint);
//蓝色通道加点蓝色0x77(对比用纯蓝色SRC去混合DST,看上去自然多了,因为它并没用改变红色和绿色通道)
canvas.translate(0,bitmap.getHeight()+10);
mPaint.setColorFilter(new LightingColorFilter(0xffffff, 0x000077));
canvas.drawBitmap(bitmap,0,0,mPaint);
mPaint.setColorFilter(null);
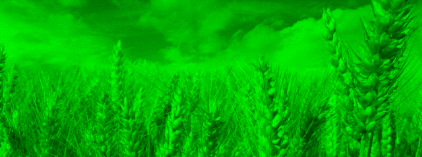
//过滤原图的绿色
canvas.translate(0,bitmap.getHeight()+10);
mPaint.setColorFilter(new LightingColorFilter(0xff00ff, 0x000000));
canvas.drawBitmap(bitmap,0,0,mPaint);
mPaint.setColorFilter(null);
}
示例,动画效果
@Override
protected void onDraw(Canvas canvas) {
    Bitmap bitmap = BitmapFactory.decodeResource(getResources(), R.mipmap.paint_50);
    //原图
    canvas.drawBitmap(bitmap,0,0,mPaint);

    canvas.translate(0,bitmap.getHeight()+10);
    mPaint.setColorFilter(new LightingColorFilter(mColor, 0x000000));
    canvas.drawBitmap(bitmap,0,0,mPaint);
    mPaint.setColorFilter(null);

}

private int mColor;
public void startAnimator(){
    ValueAnimator animator=ValueAnimator.ofInt(0xff00ff,0x00ff00);
    animator.setDuration(10000);
    animator.addUpdateListener(new ValueAnimator.AnimatorUpdateListener() {
        @Override
        public void onAnimationUpdate(ValueAnimator animation) {
            mColor= (int) animation.getAnimatedValue();
            invalidate();
        }
    });
    animator.start();
}
ColorMatrixColorFilter
学完LightingColorFiter之后,我觉得给我们自由处理颜色的算法还是太少,只有mul(乘)和add(加),有没有更酷的算法呢?有!
ColorMatrixColorFilter(ColorMatrix matrix)
- ColorMatrix 颜色矩阵
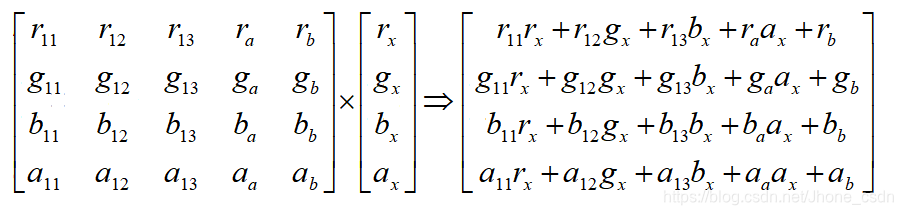
颜色的算法,可以通过矩阵来表示:
ColorMatrix(float[] src)
- src : 矩阵数组(4x5矩阵)
颜色矩阵由4x5的数组组成(4行5列),如:
 [  R, 0, 0, 0, 0,
    0, G, 0, 0, 0,
    0, 0, B, 0, 0,
    0, 0, 0, A, 0 ]
1到4行分别表示R、G、B、A通道
1到4列分别表示对应通道里的R、G、B、A值的倍速(做乘法,1表示原色),
第5列表示偏移量(做加减法,0~255)
比如图像上某个像素点的颜色值为0xffff0000(对应数组表示为[255,0,0,255])做矩阵运算(注意顺序是RGBA),给定一个颜色矩阵,求这个像素点最终的颜色值:
那这种算法不就是跟**LightingColorFilter(int mul, int add)**一样的吗?只不过多了一个透明通道的运算!
颜色矩阵公式
过滤颜色
那么过滤红色通道颜色,我们有两种方式:
方式一:
new LightingColorFilter(0x00ffff, 0x000000)//过滤红色
方式二:
//过滤红色的矩阵
 [  0, 0, 0, 0, 0,
    0, 1, 0, 0, 0,
    0, 0, 1, 0, 0,
    0, 0, 0, 1, 0 ]
代码:
@Override
protected void onDraw(Canvas canvas) {
    Bitmap bitmap = BitmapFactory.decodeResource(getResources(), R.mipmap.paint_50);
    //原图
    canvas.drawBitmap(bitmap,0,0,mPaint);

    //方式一:LightingColorFilter过滤红色
    canvas.translate(0,bitmap.getHeight()+10);
    mPaint.setColorFilter(new LightingColorFilter(0x00ffff, 0x000000));
    canvas.drawBitmap(bitmap,0,0,mPaint);
    mPaint.setColorFilter(null);

    //方式二:ColorMatrixColorFilter过滤红色
    canvas.translate(0,bitmap.getHeight()+10);
    float[] matrix=new float[]{
            0, 0, 0, 0, 0,
            0, 1, 0, 0, 0,
            0, 0, 1, 0, 0,
            0, 0, 0, 1, 0
    };
    mPaint.setColorFilter(new ColorMatrixColorFilter(matrix));
    canvas.drawBitmap(bitmap,0,0,mPaint);
    mPaint.setColorFilter(null);
}
反色
[  -1, 0, 0, 0, 255,//R通道:-1xR+255=255-R, 取反
    0, -1, 0, 0, 255,//G通道:-1xG+255=255-G, 取反
    0, 0, -1, 0, 255,//B通道:-1xB+255=255-B, 取反
    0, 0, 0, 1, 0 ]
代码:
@Override
protected void onDraw(Canvas canvas) {
    Bitmap bitmap = BitmapFactory.decodeResource(getResources(), R.mipmap.paint_50);
    //原图
    canvas.drawBitmap(bitmap,0,0,mPaint);

    //反色
    canvas.translate(0,bitmap.getHeight()+10);
    float[] matrix=new float[]{
            -1, 0, 0, 0, 255,
            0, -1, 0, 0, 255,
            0, 0, -1, 0, 255,
            0, 0, 0, 1, 0
    };
    mPaint.setColorFilter(new ColorMatrixColorFilter(matrix));
    canvas.drawBitmap(bitmap,0,0,mPaint);
    mPaint.setColorFilter(null);
}

去色
去色的原理是RGB通道上的RGB各向量数值之和相等
//正常明度:和是1f
[  0.2f, 0.2f, 0.6f, 0, 0,//1f
   0.2f, 0.2f, 0.6f, 0, 0,//1f
   0.2f, 0.2f, 0.6f, 0, 0,//1f
   0, 0, 0, 1, 0 ]
1f代表正常的明度(亮度),图片有色相 、饱和度 、明度三个维度
//明度减半:和是0.5f
[  0.2f, 0.2f, 0.1f, 0, 0,//0.5f
   0.2f, 0.2f, 0.1f, 0, 0,//0.5f
   0.2f, 0.2f, 0.1f, 0, 0,//0.5f
   0, 0, 0, 1, 0 ]
官方提出的去色矩阵(为什么这样分配比例,可能是这样看着最舒服吧,但是,和还是1f)
[  0.213f, 0.715f, 0.072f, 0, 0,//1f
   0.213f, 0.715f, 0.072f, 0, 0,//1f
   0.213f, 0.715f, 0.072f, 0, 0,//1f
   0, 0,0, 1, 0 ]
我们用代码把这三种去色实现下:
@Override
protected void onDraw(Canvas canvas) {
    Bitmap bitmap = BitmapFactory.decodeResource(getResources(), R.mipmap.paint_50);
    //原图
    canvas.drawBitmap(bitmap,0,0,mPaint);

    float[] matrix1=new float[]{
            0.2f, 0.2f, 0.6f, 0, 0,//1f
            0.2f, 0.2f, 0.6f, 0, 0,//1f
            0.2f, 0.2f, 0.6f, 0, 0,//1f
            0, 0, 0, 1, 0
    };
    float[] matrix2=new float[]{
            0.2f, 0.2f, 0.1f, 0, 0,//0.5f
            0.2f, 0.2f, 0.1f, 0, 0,//0.5f
            0.2f, 0.2f, 0.1f, 0, 0,//0.5f
            0, 0, 0, 1, 0
    };
    float[] matrix3=new float[]{
            0.213f, 0.715f, 0.072f, 0, 0,//1f
            0.213f, 0.715f, 0.072f, 0, 0,//1f
            0.213f, 0.715f, 0.072f, 0, 0,//1f
            0, 0,0, 1, 0
    };

    canvas.translate(0,bitmap.getHeight()+10);
    mPaint.setColorFilter(new ColorMatrixColorFilter(matrix1));
    canvas.drawBitmap(bitmap,0,0,mPaint);
    mPaint.setColorFilter(null);

    canvas.translate(0,bitmap.getHeight()+10);
    mPaint.setColorFilter(new ColorMatrixColorFilter(matrix2));
    canvas.drawBitmap(bitmap,0,0,mPaint);
    mPaint.setColorFilter(null);

    canvas.translate(0,bitmap.getHeight()+10);
    mPaint.setColorFilter(new ColorMatrixColorFilter(matrix3));
    canvas.drawBitmap(bitmap,0,0,mPaint);
    mPaint.setColorFilter(null);
}
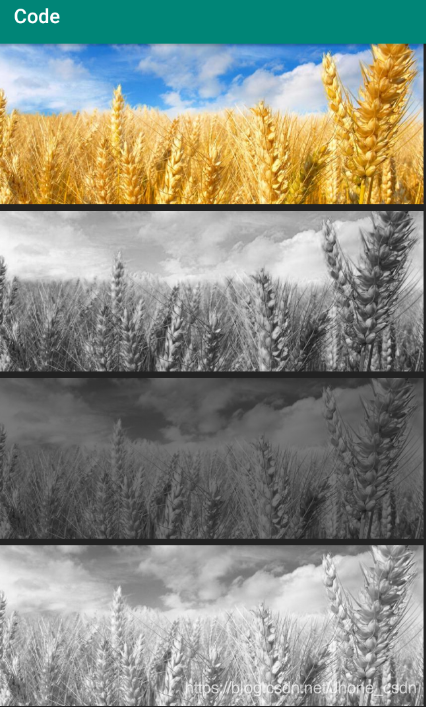
可以看到,最后一种去色矩阵效果是最好的,也是官方推荐的。
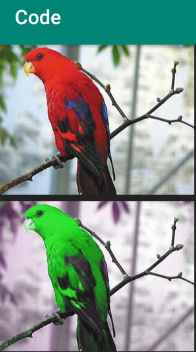
颜色互换
//红变绿  绿变红  蓝变绿
  [ 0, 1, 0, 0, 0,
    1, 0, 0, 0, 0,
    0, 1, 0, 0, 0,
    0, 0, 0, 1, 0 ]
@Override
protected void onDraw(Canvas canvas) {
    Bitmap bitmap = BitmapFactory.decodeResource(getResources(), R.mipmap.bird);
    //原图
    canvas.drawBitmap(bitmap,0,0,mPaint);
    float[] matrix=new float[]{
            0, 1, 0, 0, 0,
            1, 0, 0, 0, 0,
            0, 1, 0, 0, 0,
            0, 0, 0, 1, 0
    };
    canvas.translate(0,bitmap.getHeight()+10);
    mPaint.setColorFilter(new ColorMatrixColorFilter(matrix));
    canvas.drawBitmap(bitmap,0,0,mPaint);
    mPaint.setColorFilter(null);
}
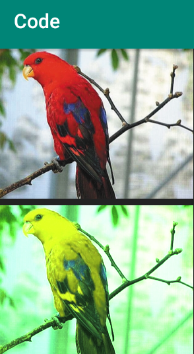
色相调整
通过颜色矩阵公式,我们知道,还可以改变单通道的某些向量达到变色的效果
例如:
[1, 0, 0, 0, 0,
 1, 1, 0, 0, 0,//在红色通道上增加等量的绿色
 0, 0, 1, 0, 0,
 0, 0, 0, 1, 0]
红色里面加绿色,可得黄色,那么整个图就会偏黄
@Override
protected void onDraw(Canvas canvas) {
    Bitmap bitmap = BitmapFactory.decodeResource(getResources(), R.mipmap.bird);
    //原图
    canvas.drawBitmap(bitmap,0,0,mPaint);
    float[] matrix=new float[]{
            1, 0, 0, 0, 0,
            1, 1, 0, 0, 0,//在红色通道上增加等量的绿色
            0, 0, 1, 0, 0,
            0, 0, 0, 1, 0
    };
    canvas.translate(0,bitmap.getHeight()+10);
    mPaint.setColorFilter(new ColorMatrixColorFilter(matrix));
    canvas.drawBitmap(bitmap,0,0,mPaint);
    mPaint.setColorFilter(null);
}


 被折叠的 条评论
为什么被折叠?
被折叠的 条评论
为什么被折叠?
 到【灌水乐园】发言


