


一、准备工作
目录
1、下载u-boot-2012.04.01.tar
Google搜索u-boot第一个网站就是u-boot网站了,这里我已经提供给大家了。
2、添加Source Insight工程方便阅读代码
具体添加方法请自行Google。最好用3.5的,可能个人习惯。
二、分析启动流程
1、分析启动过程之概述
- 每个u-boot入口函数都是start.S,可以编译查看lds链接文件,第一个被链接的就是start.S,怎么知道是这个文件呢。
- 编译过程中可以看到这么一句arm-linux-ld -pie -T u-boot.lds -Bstatic -Ttext 0x0,这里有点奇怪,链接地址竟然是0。
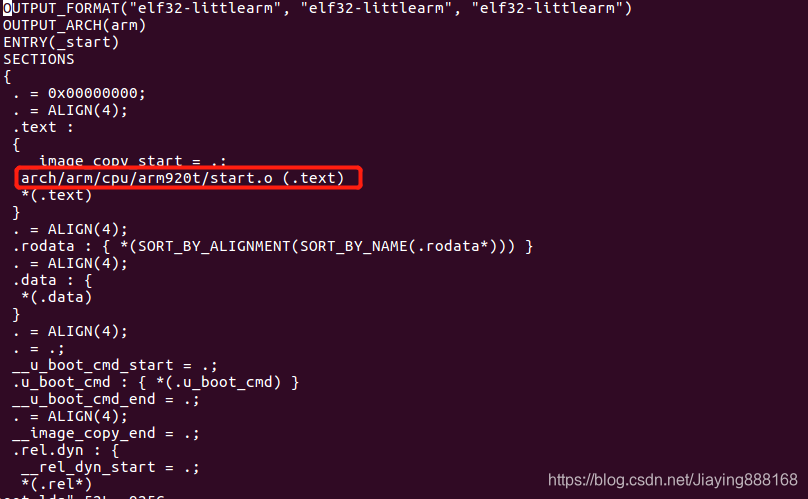
- 从start.S入手,其中会省略一些没有定义的宏
首先跳到start_code开始运行,设置管理模式,因为管理模式是特权模式
.globl _start
_start:	b	start_code                //起始地址
	ldr	pc, _undefined_instruction
	ldr	pc, _software_interrupt
	ldr	pc, _prefetch_abort
	ldr	pc, _data_abort
	ldr	pc, _not_used
	ldr	pc, _irq
	ldr	pc, _fiq

start_code:
	/*
	 * set the cpu to SVC32 mode    //设置CPU为管理模式
	 */
	mrs	r0, cpsr
	bic	r0, r0, #0x1f
	orr	r0, r0, #0xd3
	msr	cpsr, r0
关看门狗、关中断、设置时钟分频比例
#ifdef CONFIG_S3C24X0
	/* 关看门狗 */

#  define pWTCON	0x53000000
#  define INTMSK	0x4A000008	/* Interrupt-Controller base addresses */
#  define INTSUBMSK	0x4A00001C
#  define CLKDIVN	0x4C000014	/* clock divisor register */

	ldr	r0, =pWTCON
	mov	r1, #0x0
	str	r1, [r0]

	/*
	 * mask all IRQs by setting all bits in the INTMR - default
	 */
    /* 屏蔽所有的中断 */
	mov	r1, #0xffffffff
	ldr	r0, =INTMSK
	str	r1, [r0]
# if defined(CONFIG_S3C2410)
	ldr	r1, =0x3ff
	ldr	r0, =INTSUBMSK
	str	r1, [r0]
# endif

    /* 设置时钟比例 */
	/* FCLK:HCLK:PCLK = 1:2:4 */
	/* default FCLK is 120 MHz ! */
	ldr	r0, =CLKDIVN
	mov	r1, #3
	str	r1, [r0]
#endif	/* CONFIG_S3C24X0 */
初始化SDRAM
#ifndef CONFIG_SKIP_LOWLEVEL_INIT
	bl	cpu_init_crit
#endif

cpu_init_crit:
	/*
	 * flush v4 I/D caches
	 */
	mov	r0, #0
	mcr	p15, 0, r0, c7, c7, 0	/* flush v3/v4 cache */
	mcr	p15, 0, r0, c8, c7, 0	/* flush v4 TLB */

	/*
	 * disable MMU stuff and caches
	 */
	mrc	p15, 0, r0, c1, c0, 0
	bic	r0, r0, #0x00002300	@ clear bits 13, 9:8 (--V- --RS)
	bic	r0, r0, #0x00000087	@ clear bits 7, 2:0 (B--- -CAM)
	orr	r0, r0, #0x00000002	@ set bit 2 (A) Align
	orr	r0, r0, #0x00001000	@ set bit 12 (I) I-Cache
	mcr	p15, 0, r0, c1, c0, 0

	/*
	 * before relocating, we have to setup RAM timing
	 * because memory timing is board-dependend, you will
	 * find a lowlevel_init.S in your board directory.
	 */
	mov	ip, lr

	bl	lowlevel_init    /* 底层代码初始化 */

	mov	lr, ip
	mov	pc, lr
#endif /* CONFIG_SKIP_LOWLEVEL_INIT */

 /* 底层代码初始化 */
lowlevel_init:
	/* memory control configuration */
	/* make r0 relative the current location so that it */
	/* reads SMRDATA out of FLASH rather than memory ! */
	ldr     r0, =SMRDATA
	ldr	r1, _TEXT_BASE
	sub	r0, r0, r1
	ldr	r1, =BWSCON	/* Bus Width Status Controller */
	add     r2, r0, #13*4
0:
	ldr     r3, [r0], #4
	str     r3, [r1], #4
	cmp     r2, r0
	bne     0b

	/* everything is fine now */
	mov	pc, lr

	.ltorg
/* the literal pools origin */

SMRDATA:
    .word (0+(B1_BWSCON<<4)+(B2_BWSCON<<8)+(B3_BWSCON<<12)+(B4_BWSCON<<16)+(B5_BWSCON<<20)+(B6_BWSCON<<24)+(B7_BWSCON<<28))
    .word ((B0_Tacs<<13)+(B0_Tcos<<11)+(B0_Tacc<<8)+(B0_Tcoh<<6)+(B0_Tah<<4)+(B0_Tacp<<2)+(B0_PMC))
    .word ((B1_Tacs<<13)+(B1_Tcos<<11)+(B1_Tacc<<8)+(B1_Tcoh<<6)+(B1_Tah<<4)+(B1_Tacp<<2)+(B1_PMC))
    .word ((B2_Tacs<<13)+(B2_Tcos<<11)+(B2_Tacc<<8)+(B2_Tcoh<<6)+(B2_Tah<<4)+(B2_Tacp<<2)+(B2_PMC))
    .word ((B3_Tacs<<13)+(B3_Tcos<<11)+(B3_Tacc<<8)+(B3_Tcoh<<6)+(B3_Tah<<4)+(B3_Tacp<<2)+(B3_PMC))
    .word ((B4_Tacs<<13)+(B4_Tcos<<11)+(B4_Tacc<<8)+(B4_Tcoh<<6)+(B4_Tah<<4)+(B4_Tacp<<2)+(B4_PMC))
    .word ((B5_Tacs<<13)+(B5_Tcos<<11)+(B5_Tacc<<8)+(B5_Tcoh<<6)+(B5_Tah<<4)+(B5_Tacp<<2)+(B5_PMC))
    .word ((B6_MT<<15)+(B6_Trcd<<2)+(B6_SCAN))
    .word ((B7_MT<<15)+(B7_Trcd<<2)+(B7_SCAN))
    .word ((REFEN<<23)+(TREFMD<<22)+(Trp<<20)+(Trc<<18)+(Tchr<<16)+REFCNT)
    .word 0x32
    .word 0x30
    .word 0x30
设置栈,调用c函数初始化单板
/* Set stackpointer in internal RAM to call board_init_f */
call_board_init_f:
	ldr	sp, =(CONFIG_SYS_INIT_SP_ADDR)
	bic	sp, sp, #7 /* 8-byte alignment for ABI compliance */
	ldr	r0,=0x00000000
	bl	board_init_f        /* 单板初始化代码 */
board_init_f实在太长了,具体在内存分布分析详细列出,这里只列出关键的代码
这里主要是时钟和io等的初始化
	/* init_sequence是一个函数指针数组 */
    for (init_fnc_ptr = init_sequence; *init_fnc_ptr; ++init_fnc_ptr) {
		if ((*init_fnc_ptr)() != 0) {
			hang ();
		}
	}

    init_fnc_t *init_sequence[] = {
#if defined(CONFIG_BOARD_EARLY_INIT_F)
	board_early_init_f,                /* 单板早期的初始化 */
#endif

	timer_init,		/* initialize timer */

	env_init,		/* initialize environment */
	init_baudrate,		/* initialze baudrate settings */
	serial_init,		/* serial communications setup */
	console_init_f,		/* stage 1 init of console */
	display_banner,		/* say that we are here */
#if defined(CONFIG_DISPLAY_CPUINFO)
	print_cpuinfo,		/* display cpu info (and speed) */
#endif

	dram_init,		/* configure available RAM banks */
	NULL,
};

/* 单板早期初始化,初始化了时钟 */

int board_early_init_f(void)
{
	struct s3c24x0_clock_power * const clk_power =
					s3c24x0_get_base_clock_power();
	struct s3c24x0_gpio * const gpio = s3c24x0_get_base_gpio();

	/* to reduce PLL lock time, adjust the LOCKTIME register */
	writel(0xFFFFFF, &clk_power->locktime);

	/* configure MPLL */
	writel((M_MDIV << 12) + (M_PDIV << 4) + M_SDIV,
	       &clk_power->mpllcon);

	/* some delay between MPLL and UPLL */
	pll_delay(4000);

	/* configure UPLL */
	writel((U_M_MDIV << 12) + (U_M_PDIV << 4) + U_M_SDIV,
	       &clk_power->upllcon);

	/* some delay between MPLL and UPLL */
	pll_delay(8000);

	/* set up the I/O ports */
	writel(0x007FFFFF, &gpio->gpacon);
	writel(0x00044555, &gpio->gpbcon);
	writel(0x000007FF, &gpio->gpbup);
	writel(0xAAAAAAAA, &gpio->gpccon);
	writel(0x0000FFFF, &gpio->gpcup);
	writel(0xAAAAAAAA, &gpio->gpdcon);
	writel(0x0000FFFF, &gpio->gpdup);
	writel(0xAAAAAAAA, &gpio->gpecon);
	writel(0x0000FFFF, &gpio->gpeup);
	writel(0x000055AA, &gpio->gpfcon);
	writel(0x000000FF, &gpio->gpfup);
	writel(0xFF95FFBA, &gpio->gpgcon);
	writel(0x0000FFFF, &gpio->gpgup);
	writel(0x002AFAAA, &gpio->gphcon);
	writel(0x000007FF, &gpio->gphup);

	return 0;
}
重定位代码
relocate_code(addr_sp, id, addr);大致的流程总结:
⊙设置管理模式
⊙关看门狗
⊙关中断
⊙初始化SDRAM
⊙初始化时钟
⊙重定位
到这里的话,个人感觉这个u-boot优化的不是那么好,时钟应该一开始就初始化,这样可以跑的更快,重定位也太靠后了。
没事,后面我们把它修改了,嘻嘻嘻!!!
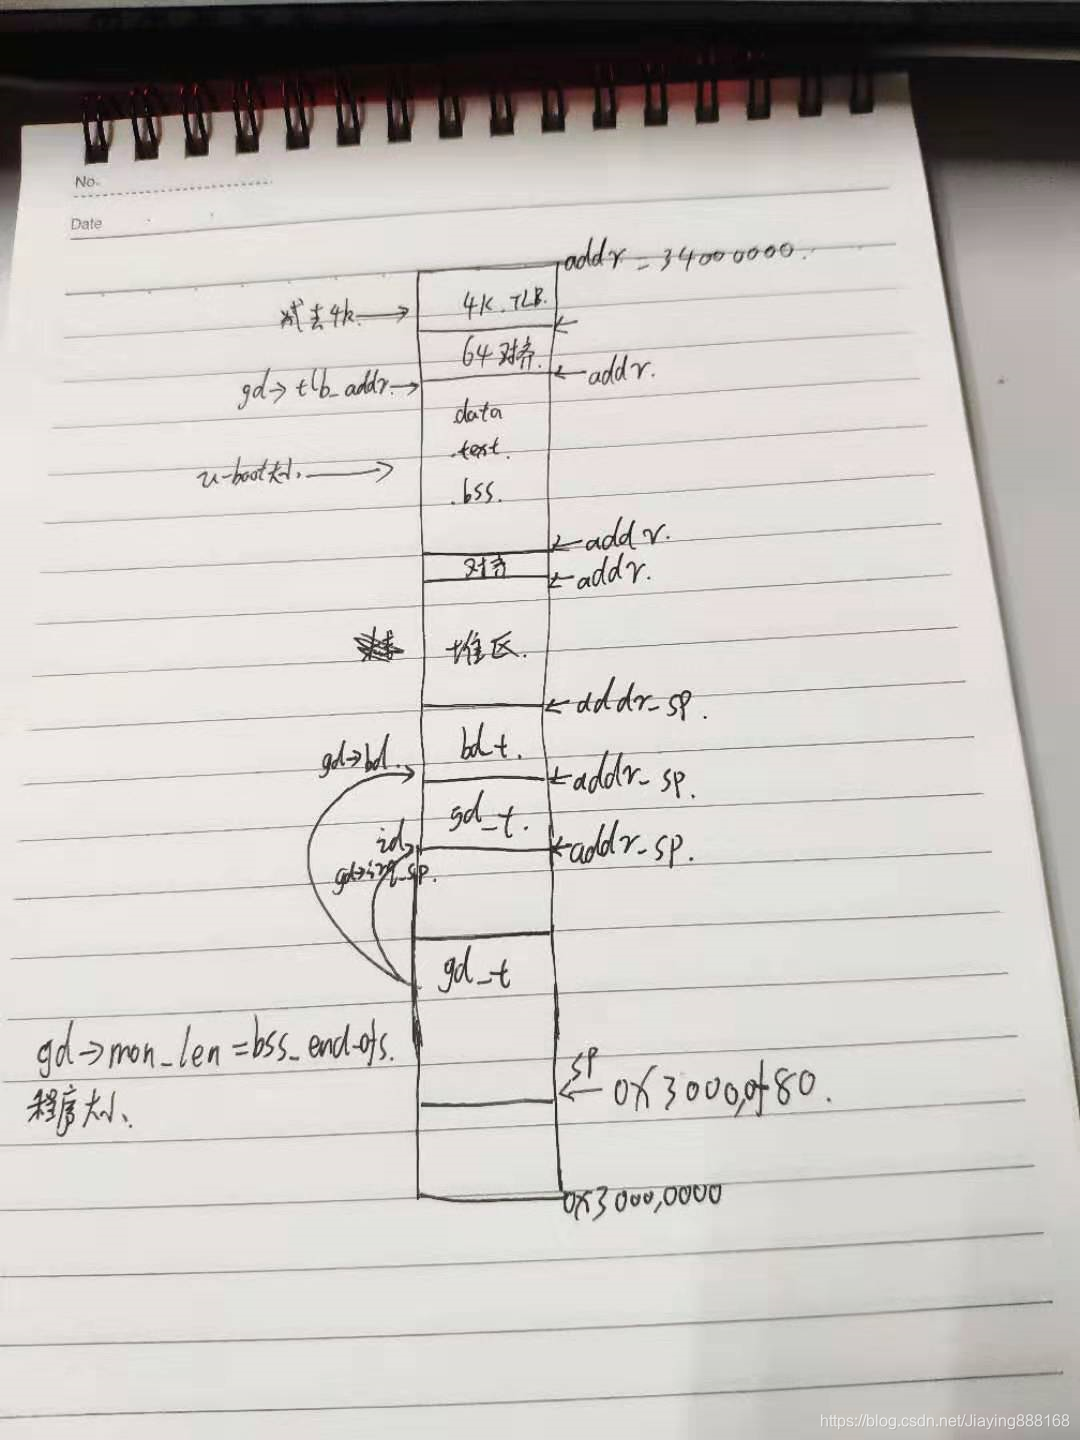
2、分析启动过程之内存分布
分析这个是因为后面重定位用到某些参数,不过内存图也比较清楚
- 在进入单板初始化时已经设置了栈了,我们找遍代码都找不到这个值,无奈之下只能通过反汇编得到sp为0x30000f80
/* Set stackpointer in internal RAM to call board_init_f */
call_board_init_f:
	ldr	sp, =(CONFIG_SYS_INIT_SP_ADDR)
	bic	sp, sp, #7 /* 8-byte alignment for ABI compliance */
	ldr	r0,=0x00000000
bl board_init_f- board_init_f设置了很多参数,手撸一张图表示
3、分析启动过程之重定位
这一段是汇编代码。
r0 == addr_sp这是新栈
r1 == gd结构体,一堆有趣的参数
r2 == addr,目标地址
relocate_code:
	mov	r4, r0	/* save addr_sp */
	mov	r5, r1	/* save addr of gd */
	mov	r6, r2	/* save addr of destination */

	/* Set up the stack						    */
stack_setup:
	mov	sp, r4

	adr	r0, _start
	cmp	r0, r6
	beq	clear_bss		/* skip relocation */
	mov	r1, r6			/* r1 <- scratch for copy_loop */
	ldr	r3, _bss_start_ofs
	add	r2, r0, r3		/* r2 <- source end address	    */

copy_loop:
	ldmia	r0!, {r9-r10}		/* copy from source address [r0]    */
	stmia	r1!, {r9-r10}		/* copy to   target address [r1]    */
	cmp	r0, r2			/* until source end address [r2]    */
	blo	copy_loop
ok,到这里,除了读取内核启动内核,没有分析之外,基本的u-boot初始化已经分析完毕


 514
514


 被折叠的 条评论
为什么被折叠?
被折叠的 条评论
为什么被折叠?
 到【灌水乐园】发言


