


目录
官方库:https://github.com/aio-libs
1.subprocess
用来异步的处理执行shell命令
Example:
import asyncio

async def run(cmd):
    proc = await asyncio.create_subprocess_shell(
        cmd,
        stdout=asyncio.subprocess.PIPE,
        stderr=asyncio.subprocess.PIPE)

    stdout, stderr = await proc.communicate()

    print(f'[{cmd!r} exited with {proc.returncode}]')
    if stdout:
        print(f'[stdout]\n{stdout.decode()}')
    if stderr:
        print(f'[stderr]\n{stderr.decode()}')

async def main():
    await asyncio.gather(
        run('ls /zzz'),
        run('sleep 1; echo "hello"'))

# asyncio.run(run('ls /zzz'))
# 因为本地的使用的是python36.而asyncio.run是更高版本才有的
# 所以这里需要这两行代码来代替asyncio.run
loop = asyncio.get_event_loop()
loop.run_until_complete(asyncio.ensure_future(main()))
这样就在shell中同时运行了两个命令
2.asyncssh
asyncssh是一个python包,在python+asyncio的基础上提供了一个异步的ssh协议的客户端和服务器实现
Example:
import asyncio, asyncssh, sys

async def run_client():
    async with asyncssh.connect('localhost') as conn:
        result = await conn.run('echo "Hello!"', check=True)
        print(result.stdout, end='')

try:
    asyncio.get_event_loop().run_until_complete(run_client())
except (OSError, asyncssh.Error) as exc:
    sys.exit('SSH connection failed: ' + str(exc))
更多例子参见:https://asyncssh.readthedocs.io/en/latest/
3.aiohttp
3.1简单使用aiohttp


add_route和add_routes实现结果一样,只不过实现方式不一样
3.2使用aiohttp中的websocket
client端代码:
import asyncio
import json
import pop.hub
import aiohttp
import asyncssh
from aiohttp import web
import json
import copy

class Handler:
    def __init__(self, hub):
        self.hub = hub


    async def start(self, data, ws):
        hub = self.hub
        remote = [{'host': '10.231.83.6', 'username': 'root', 'password': 'rootroot', 'id': 'centos6'}, {'host': '10.231.82.205', 'username': 'root', 'password': 'rootroot', 'id': 'centos7'}]
        '''
        Start the async loop and get the process rolling
        '''
        raw_opt = copy.copy(hub.OPT)
        raw_opt['heist'].update({'command': data['operation']})
        hub.OPT = hub.pop.data.imap(raw_opt)
        ret = getattr(hub, f'heist_mimas.mimas_{data["manager"]}.run')(remote)
#        ret = hub.heist_mimas.mimas_service.run(remote)
        print(hub.OPT, '222222222222')
        async for result in ret:
            await ws.send_json(json.dumps(result))

    async def websocket_handler(self, request):
        ws = web.WebSocketResponse()
        await ws.prepare(request)

        async for msg in ws:
            print(msg)
            if msg.type == aiohttp.WSMsgType.TEXT:
                if msg.data != 'close':
                    manager = request.match_info.get('name', 'service')
                    data = json.loads(msg.data)
                    data['manager'] = manager
                    print(data)
                    await self.start(data, ws)
                    await ws.close()

                else:
                    # await ws.send_str(msg.data + '/answer')
                    await ws.close()
            elif msg.type == aiohttp.WSMsgType.ERROR:
                print('ws connection closed with exception %s' %
                      ws.exception())

        print('websocket connection closed')

        return ws

def run(hub):
    handler = Handler(hub)
    app = web.Application()

    app.add_routes([web.get('/ws/{name}', handler.websocket_handler)])
    web.run_app(app)
一些注意的问题:
- 在使用websocket的时候,发现socket没有任何反应,后来发现要进行await ws.send_str(),websocket才会执行相应的动作,具体怎么send_str,无论是client还是server端,只需要有其中的一个:
await ws.send_str(“begin”)
await ws.send_str(“close”)
主要是为了把data给send到socket中,就可以进行操作了,比如本代码中,只要send_str不是“close”,websocket就不会close。
2.如何将hub传入mimas_api中的websocket_handler:使用类方法实现
class Handler:
    def __init__(self, hub):
        self.hub = hub

    async def start(self, data, ws):
        hub = self.hub
。。。。。。

def run(hub):
    handler = Handler(hub)
    app = web.Application()

    app.add_routes([web.get('/ws/{name}', handler.websocket_handler)])
    web.run_app(app)
# 由于websocket_handler中不能传入参数,所以这里使用类方法中的self.hub来传入start方法
3.websocket如何实现全双工的通信,即server处理一台机器,就给client发送处理的结果,实现全双工
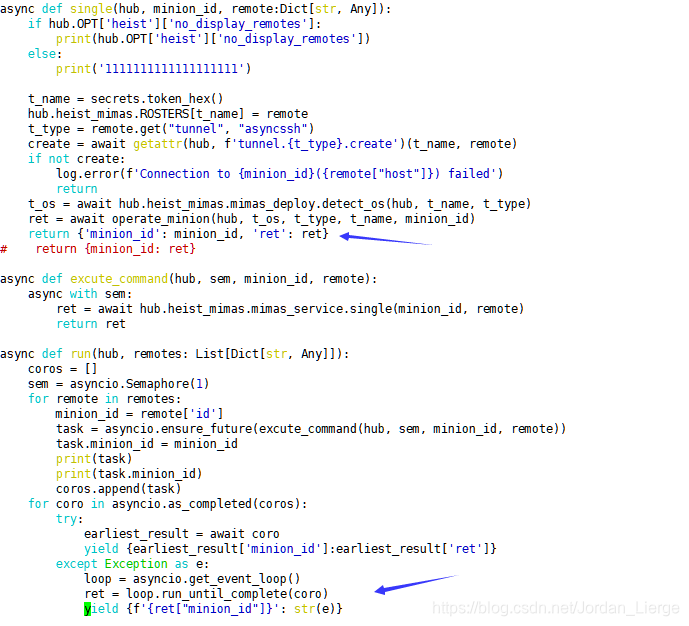
解析:这个是一开始的代码,使用asyncio.as_completed方法来实现全双工。as_completed原理是同时在coros这个可迭代器中运行 awaitable objects(可等待对象)。返回协程的迭代器。可以等待每个返回的协程从剩余可等待对象的可迭代对象中获得最早的next结果。
对于await 对象的迭代,使用yield来阻塞,就可以实现全双工的需求。
但是这里要给await coro做一个异常判断,异常是在ealiest_result = await coro这步产生的。
这里对于exception使用了loop.run_until_completed,一开始是想这个coro是一个generator object as_completed,所以使用loop.run_until_completed把他的内容取出来,但是这样是不可以的!!!因为run_unitl_complete执行完成后,会执行loop.stop(),直接导致aiohttp都停止工作了,所以对于这种服务型的项目,一定不能stop。这也就引出了对run_until_completed以及async.run的工作原理的学习:run_until_completed以及async.run的工作原理
改进方法:改进方法是用asyncio.wait,asyncio.wait原理:并发的运行可迭代的tasks中的await对象,并阻塞直到满足return_when的条件。链接:asyncio.wait
#改进方法是用asyncio.wait,先是进入循环体中,然后把tasks中的所有任务都阻塞,
#然后return_when是first_completed,对应的是completed(完成),执行成功或者抛异常,
#都是completed(完成),completed后,task.result()如果成功,则直接返回结果,
#如果task执行的时候产生异常,则直接raise异常出来。把tasks中的第一个task执行,执行完以后返回给done,
#不是说只返回一个, 有可能有多个, 这就是为什么要for task in done,
#当yield一个执行完的task就从tasks中把执行完了的task给remove掉,直到tasks完全执行完。就break跳出循环。
#示例代码:
    while tasks:
        done, pending = await asyncio.wait(tasks, return_when=FIRST_COMPLETED)
        for task in done:
            try:
                yield {task.minion_id: task.result()}
            except Exception as e:
                yield {task.minion_id: str(e)}
            # 这里设计为try,except,finally的原因是,如果single中没有create的话,会返回FALSE,
            # 也就是说,如果在某个时候,没有和目标主机建立连接的话,single就会returnFALSE了而run收到的这个FALSE,提示'bool' object is not subscriptable
            # 这个时候因为task即使抛出异常,也是完成(completed)的,需要在yield之后,移除task,
            # 要不然如果出现异常,也就是没有create,那就会成死循环,因为task没有移除,
            # 接下来await asyncio.wait的时候,依然能迭代出来这个task,会陷入一个死循环,一直create,一直FALSE
            finally:
                tasks.remove(task)
#asyncio.wait文档地址:https://docs.python.org/3/library/asyncio-task.html#asyncio.wait

# 对于yield的结果,应该使用async for来获取其值,ret是调用上面代码的yield的结果
async for result in ret:
    await ws.send_json(json.dumps(result))
client端代码:
import aiohttp
import json
import asyncio
async def main():
    timeout = aiohttp.ClientTimeout(sock_connect=10)

    async with aiohttp.ClientSession(timeout=timeout) as session:
        async with session.ws_connect('http://192.168.222.143:8080/ws/deploy') as ws:
        # 这里的await ws.send_str在client端代码中的data = json.loads(msg.data)做接收
            await ws.send_str('{"target":"hosts_pattern:status@running and name@{names_re}","operation":"stop"}')
            async for msg in ws:


                if msg.type == aiohttp.WSMsgType.TEXT:
                    if msg.data == 'close':
                        await ws.close()
                        break
                    else:
                        print(json.dumps(eval(msg.json()), sort_keys=True, indent=4, separators=(', ', ': ')))
                elif msg.type == aiohttp.WSMsgType.ERROR:
                    break


loop = asyncio.get_event_loop()
loop.run_until_complete(main())
4.asyncio中的同步元(synchronization primitives)学习
asyncio中的synchronization primitives(同步元)被设计为类似threading(线程)的模块,有两个重要注意事项:
1.asyncio primitives并不是线程安全的,
因此他们不应该用于OS的线程synchronization(同步),对于这种情况应该用threading
2.这些synchronization primitives不接受timeout参数,
需要使用asyncio.wait_for函数来执行超时操作
asyncio有以下几个基本的synchronization primitives(同步元)
1.Lock
class asyncio.Lock(*, loop=None)

为异步任务实现互斥锁,不是线程安全的
一个asyncio lock可以被用来保证对共享资源的独占访问

使用锁的首选方式是使用async with语句
lock = asyncio.Lock()
async with lock:
    # 访问共享状态

以上等于
lock = asyncio.Lock()

# ... later
await lock.acquire()
try:
    # 访问共享状态
finally:
    lock.release()
acquire():
·    获得lock
·    这个方法会一直等待直到lock被解锁,并将其设置为locked然后返回True
·    当多个协程在acquire()中被阻塞,等待lock被解锁时,最终只有一个协程会继续运行
·    获取一个lock是公平的。运行的协程将是开始等待该锁的第一个协程

总的来说就是把所有的协程先都给我锁了,然后按照顺序一个一个的执行(即解锁,这就要用到release)

release():
释放lock
当lock被锁了以后,将其设置为解锁并返回
而如果这个lock本来就是解锁的话,会引发一个RuntimeError错误

locked():
如果lock被锁定,返回True
2.Event
class asyncio.Event(*, loop=None)

·    一个event对象,非线程安全
·    一个asyncio event可以用来通知多个异步任务某个事件已经发生
·    一个event对象管理一个可以用set()方法将其设置为True,
	用clear()方法将其设置为FALSE的内部标记(flag)。wait()方法会阻塞标记,
	直到flag被设置为True为止,该标记最初设置为FALSE
Example:
async def waiter(event):
    print('waiting for it ...')
    # 将event对象先阻塞,等待set调用
    await event.wait()
    print('... got it!')

async def main():
    # 创建一个event对象
    event = asyncio.Event()

    # 衍生一个任务等待,直到event被set
    waiter_task = asyncio.create_task(waiter(event))

    # 等待一秒已经set这个event
    await asyncio.sleep(1)
    event.set()

    # 一直等待直到waiter任务结束
    await waiter_task

asyncio.run(main())
协程分析:
wait():
	等待直到event被set
	如果event已经被set,立即返回True,否则就阻塞,直到另一个任务调用set
set():
	set event,所有等待event set的任务被立即唤醒
clear():
	清除没有被set的event,等待wait的任务现在将阻塞,直到再次调用set方法
is_set():
	如果event已经set返回True
3.Condition
class asyncio.Condition(lock=None, *, loop, None)

·    一个condition对象,不是线程安全的
·    一个任务可以使用一个asyncio condition primitives来等待某个事件发生,然后独占访问共享资源
·    本质上,condition 对象结合了事件和锁的功能。可以让多个condition对象共享一个锁,
	从而允许在对共享资源的特定状态感兴趣的不同任务之间协调对共享资源的排他访问
·    可选的锁参数必须是一个锁对象,或者一个None,在第二种情况下,会自动创建一个新的锁对象

eg:
cond = asyncio.Condition()
async with cond:
      await cond.wait()
4.Semaphore(信号量)
class asyncio.Semaphore(value=1, *, loop=None)

·  一个Semaphore对象,不是线程安全的
·  Semaphore管理一个内部计数器,该计数器在每次调用acquire()的时候递减,在调用release()的时候递增。
	这个计数器永远不能小于0.当acquire发现它为0时,他就会阻塞,直到某个任务调用release
·  可选参数value提供内部计数器的初始值(如果不指定,默认情况下为1)。
	如果给定的值小于0,则会引发一个ValueError
·  不像BoundedSemaphore,Semaphore允许进行比acquire更多的release调用
Example1:
sem = asyncio.Semaphore(10)

# ... later
async with sem:
    # 使用共享资源进行工作

Example2:
from aiohttp import ClientSession
import asyncio

#  限制协程并发量
async def hello(sem, url):

    async with sem:
        async with ClientSession() as session:
            async with session.get(f'http://localhost:8080/{url}') as response:
                r = await response.read()
                print(r)
                await asyncio.sleep(1)


def main():
    loop = asyncio.get_event_loop()
    tasks = []
    sem = asyncio.Semaphore(5)  # this
    for i in range(100000):
        task = asyncio.ensure_future(hello(sem, i))
        tasks.append(task)

    feature = asyncio.ensure_future(asyncio.gather(*tasks))
    loop.run_until_complete(feature)

if __name__ == "__main__":
    main()
5.BoundedSemaphore(边界信号量)
class asyncio.BoundedSemaphore(value=1, *, loop=None)

他是Semaphore的一个版本,如果内部计数器的值超过初始值的话,
则会在release()中引发一个ValueError
5.Queue(队列)
首先弄明白什么是生产者->消费者模型
生产者消费者模式就是通过一个容器来解决生产者和消费者的强耦合问题。生产者和消费者彼此之间不直接通讯,而通过阻塞队列来进行通讯,所以生产者生产完数据之后不用等待消费者处理,直接扔给阻塞队列,消费者不找生产者要数据,而是直接从阻塞队列里取,阻塞队列就相当于一个缓冲区,平衡了生产者和消费者的处理能力。这个阻塞队列就是用来给生产者和消费者解耦的。
通俗的来讲,就是有两个角色,一个是生产者,用来生产数据,另一个是消费者,用来消费生产者生产出来的数据,二者不直接联系,而是通过一个阻塞队列来进行数据的交互。这就要引入我们下面的queue。
Queue
asyncio.Queue(maxsize=0, loop=None)
这是一个先入先出的队列。
如果maxsize小于或等于0,则队列大小是无限的。而如果是大于0的整数,则在队列达到maxsize的时候await put()来阻塞,直到调用get()的时候删除一个项

不像标准库中的线程化的queue,队列的大小总是已知的,并且可以通过调用qsize()方法返回

loop已经被弃用,这个类不是线程安全的
queue中的方法:
maxsize:
	队列中允许的项数

empty():
	如果队列为空,返回True,否则返回False

full():
	如果队列中有maxsize项,则返回True。如果队列中是用maxsize=0(默认值)初始化的,
	那么full()永远不会返回True,因为如果maxsize小于或等于0,则队列大小是无限的。

协程 get():
	从队列中移除并返回一个项,如果队列是空的,等待直到一个项可用

get_nowait():
	如果一个项立即可用,则返回该项,否则返回QueueEmpty

协程 join():
	阻塞,直到队列中所有的项都已经被接受和处理
	当一个项被添加到队列中时,未完成任务的计数就会增加。
	每当消费者的协程调用task_done()来表示检索了该项并完成了它的所有工作时,计数就会减少,
	当未完成任务的计数降为0的时候,join()就会解除阻塞。
	也就是说,join的功能和任务就是让所有的任务都执行完毕,等待阻塞的解除。

协程 put(item):
	将一个项放入队列中。如果队列已经满了,就要等待,直到有空闲的坑可以用,然后再添加项

put_nowait(item):
	在不阻塞的情况下将项放入队列
	如果队列中的坑位不够了不能立即把项放进去的话,就增加QueueFull。所以一般put_nowait()更常用一些

qsize():
	返回队列中的项的数量

task_done():
	指示先前入队的任务已经完成
	task_done由队列的消费者来使用。对于用于获取任务的每个get(),
	后续对task_done的调用将告诉队列,该任务的处理已经完成
	如果join当前处于阻塞状态,它将在所有项都已经处理完毕的时候恢复
	(这意味着,对于put到队列中的每一个项都收到了一个task_done调用)
	如果调用的次数超过队列中放置的项的次数,则会引发ValueError
Priority Queue(优先队列)
asyncio.PriorityQueue
	是上面队列中的一种变体,按照优先级顺序检索条目(最低优先级)
	条目通常是表单(prority_number, data)中的元祖
LIFO Queue(后进先出队列)
asyncio.LifoQueue
	队列的一种变体,首先检索最近添加的条目(后进先出)。
Exception-异常
exception asyncio.QueueEmpty
	在空队列上调用get_nowait()方法时引发此异常。说明队列是空的
exception asyncio.QueueFull
	当put_nowait()方法在已达到其maxsize的队列上调用时引发异常。
	说明队列的坑已经满了,放不下了
代码示例:
queue的这个example的逻辑:
1.首先创建队列
2.把worker中要使用到的数据put到队列里面
3.由于队列中已经有数据了,所以现在就可以起worker来并发的执行队列中所对应的任务了
4.等待队列处理完毕
5.取消worker任务
6.等待所有的worker任务被取消
import asyncio
import random
import time


async def worker(name, queue):
    while True:
        # get用来从队列中把我们的项取出来.
        sleep_for = await queue.get()

        # 这里就是使用队列中的项进行操作
        await asyncio.sleep(sleep_for)

        # 这里调用task_down必须由消费者调用,用来通知队列该任务处理完成
        queue.task_done()

        print(f'{name} has slept for {sleep_for:.2f} seconds')


async def main():
    # 创建一个用来存储消费者要使用的项的队列.
    queue = asyncio.Queue()

    # 生成一个随机的时间(float型),并将其放入队列中
    total_sleep_time = 0
    for _ in range(20):
        sleep_for = random.uniform(0.05, 1.0)
        total_sleep_time += sleep_for
        # 这里用到put_nowait就是把项put到队列中的用法
        queue.put_nowait(sleep_for)

    # 创建三个worker任务来并发的处理队列中的项
    tasks = []
    for i in range(3):
        # 这里就是调用消费者worker
        task = asyncio.ensure_future(worker(f'worker-{i}', queue))
        tasks.append(task)


    started_at = time.monotonic()
    # 这里的join的作用就是等待,让所有的任务都执行完毕,然后解除阻塞
    await queue.join()
    total_slept_for = time.monotonic() - started_at

    # 取消掉工作任务,这里的cancel应该就是让worker中的while True循环终止.
    for task in tasks:
        task.cancel()
    # 等待直到所有的工作任务都被取消.
    await asyncio.gather(*tasks, return_exceptions=True)

    print('====')
    print(f'3 workers slept in parallel for {total_slept_for:.2f} seconds')
    print(f'total expected sleep time: {total_sleep_time:.2f} seconds')


# 这里只需要这两行代码就可以代替asyncio.run
loop = asyncio.get_event_loop()
loop.run_until_complete(asyncio.ensure_future(main()))
实例example:
# 在执行本脚本之前应该先进入py_env虚拟环境方可执行
# 本脚本中,有两个worker,mimas_worker消费的数据由main中产生并put到mimas_queue中,然后mimas_worker来消费
# heist_worker消费的数据由mimas_worker将产生的数据put到heist_queue中,然后heist_worker来消费
import asyncssh
import asyncio
async def mimas_worker(mimas_queue, heist_queue):
        while True:
            # 这里使用try except的方式来解决cancellederror的问题,当碰到这个error就说明任务都已经被cancelled了,所以跳出循环即可
            try:
                role = await mimas_queue.get()
                async with asyncssh.connect('10.69.65.107') as conn:
                    result = await conn.run(f'sudo salt-run mimas_manage.down role={role}', check=True)
                    ret = result.stdout
                    machine_list = []
                    for i in ret.split('\n'):
                        if i.startswith('- '):
                            machine_list.append(i.split()[-1])
                    if machine_list:
                        # 对于mimas_queue中的数据处理完毕以后,把结果直接put到heist_queue中去,启动heist_worker的事情应该交给main去做而不是消费者
                        await heist_queue.put(machine_list)
                    # task_done的操作应该在所有的操作(包括把消费结果put到别的queue中的操作)都结束以后再调用
                    mimas_queue.task_done()
            except asyncio.CancelledError:
                break


async def heist_worker(heist_queue):
        while True:
            try:
                content = await heist_queue.get()

                names_re = f'({"|".join(content)})'

                cmd = f"heist_mimas --target 'hosts_pattern:status@running and name@{names_re}' service -c restart --not_display_remotes"
                print(cmd)
                proc = await asyncio.create_subprocess_shell(
                    cmd,
                    stdout=asyncio.subprocess.PIPE,
                    stderr=asyncio.subprocess.PIPE)

                stdout, stderr = await proc.communicate()

                print(f'[{cmd!r} exited with {proc.returncode}]')
                if stdout:
                    print(f'[stdout]\n{stdout.decode()}')
                if stderr:
                    print(f'[stderr]\n{stderr.decode()}')

                heist_queue.task_done()

            except asyncio.CancelledError:
                break

async def main():
    mimas_queue = asyncio.Queue()
    heist_queue = asyncio.Queue()
    role_list = ['cache', 'relay', 'live']
    for role in role_list:
        await mimas_queue.put(role)

    # 因为这里考虑到mimas_manage.down的压力问题,所以不启动多个worker来执行,只启动一个worker即可,
    # 因为只启动了一个worker,所以也不需要多个task了,只需要一个task即可
    # 并且,启动worker的这个操作只能在这里做,不能在worker中启动另一个worker
    loop = asyncio.get_event_loop()
    mimas_task = loop.create_task(mimas_worker(mimas_queue, heist_queue))
    heist_task = loop.create_task(heist_worker(heist_queue))

    await mimas_queue.join()
    await heist_queue.join()

    mimas_task.cancel()
    heist_task.cancel()

    # 这里是解决cancellederror的一个方式,就是用gather,另一种是在worker的while循环中使用try except
    # tasks = [mimas_task, heist_task]
    # await asyncio.gather(*tasks, return_exceptions=True)

    await mimas_task
    await heist_task


loop = asyncio.get_event_loop()
loop.run_until_complete(main())


 2280
2280

 被折叠的 条评论
为什么被折叠?
被折叠的 条评论
为什么被折叠?
 到【灌水乐园】发言


