


自定义控件的学习流程:
View的测量->View的绘制->ViewGroup的测量->ViewGroup的绘制->自定义ViewGroup->自定义控件的三种方式说明->事件拦截机制说明
View的测量:
Android系统绘制View是需要我们精确地告诉它该如何去画,它才能绘制出你想要的图形。
那么Android在绘制View之前,我们必须对View进行测量,即告诉系统该画一个多大的View。这个过程是在onMeasure()方法中进行的。
Android系统有一个功能强大的类---MeasureSpec类,通过它来帮我们测量View,测量模式有以下三种:
EXACTLY:精确值模式,当我们将控件的layout_width属性或layout_height属性指定为具体数字时,例如:android:layout_width="100dp",或指定为match_parent属性(填充父窗体)时,系统就会使用EXACTLY模式。
AT_MOST:最大值模式,当控件的layout_width属性或layout_height属性指定为wrap_content时,控件大小一般随着子控件或内容变化而变化,此时控件的尺寸只要不超过父控件允许的最大尺寸即可。
UNSPECIFIED:这个属性比较奇怪---它不指定其大小测量模式,View想多大就多大,通常情况下在绘制自定义View时才会使用。
如果不重写onMeasure()方法来指定属性的大小,那么View默认的就只支持EXACTLY模式。
View的测量方式:
/**
* Created by Layne_Yao on 2017-11-17 上午11:38:38.
* CSDN:http://blog.csdn.net/Jsagacity
*/
public class DragView extends View {
public DragView(Context context) {
super(context);
ininView();
}
public DragView(Context context, AttributeSet attrs, int defStyleAttr) {
super(context, attrs, defStyleAttr);
ininView();
}
public DragView(Context context, AttributeSet attrs) {
super(context, attrs);
ininView();
}
private void ininView() {
setBackgroundColor(Color.BLUE);
}
// View的测量
@Override
protected void onMeasure(int widthMeasureSpec, int heightMeasureSpec) {
super.onMeasure(widthMeasureSpec, heightMeasureSpec);
setMeasuredDimension(measuredWidth(widthMeasureSpec),
measuredHeight(heightMeasureSpec));
}
private int measuredHeight(int heightMeasureSpec) {
int result = 0;
// 从MeasureSpec对象中提取出具体的测量模式和大小
int specMode = MeasureSpec.getMode(heightMeasureSpec);
int specSize = MeasureSpec.getSize(heightMeasureSpec);
if (specMode == MeasureSpec.EXACTLY) {// 如果精确值模式,直接就是指定值
result = specSize;
} else {
// 最大值模式给定一个不大的值
result = 200;
if (specMode == MeasureSpec.AT_MOST) {
result = Math.min(result, specSize);
}
}
return result;
}
private int measuredWidth(int widthMeasureSpec) {
int result = 0;
int specMode = MeasureSpec.getMode(widthMeasureSpec);
int specSize = MeasureSpec.getSize(widthMeasureSpec);
if (specMode == MeasureSpec.EXACTLY) {
result = specSize;
} else {
result = 200;
if (specMode == MeasureSpec.AT_MOST) {
result = Math.min(result, specSize);
}
}
return result;
}
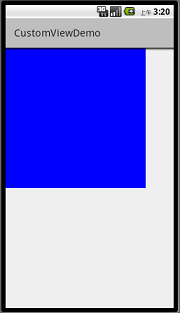
}布局情况:
    <com.itman.customviewdemo.DragView
        android:layout_width="wrap_content"
        android:layout_height="wrap_content" />
如果layout_width属性或layout_height属性指定为wrap_content时那么就是最大值模式,我们给定了一个值。如果layout_width属性或layout_height属性指定为100dp,或者是match_parent属性时,就是精确值模式,那么就指定的显示大小。
显示结果:
View的绘制:
当测量好了一个View之后,我们就可以简单地重写onDraw()方法,并在Canvas对象上来绘制所需要的图形。
要想在Android的界面中绘制相应的图像,就必须在Canvas上进行绘制。Canvas就像是一个画板,使用Paint就可以在上面作画了。通常需要通过继承View并重写onDraw()方法来完成绘图。
ViewGroup的测量:
ViewGroup会去管理其子View,其中一个管理项目就是负责子View 的显示大小,ViewGroup大小为wrap_content时,就需要获取View的大小来决定自己的大小。其他情况就是指定值。
ViewGroup测量子View时,就是调用子View的onMeasure()来测量子View自身。
测量完了,就会调用子View的onLayout()来决定View的显示位置。
ViewGroup的绘制:
ViewGroup其实没有需要绘制的东西,onDraw()也只是修改一下背景。
但是ViewGroup使用dispatchDraw()方法可以绘制其子View,其过程同样是通过遍历所有子View,并调用View的绘制方法来完成绘制工作。
自定义View:
在自定义View时,我们通常会去重写onDraw()方法来绘制View的显示内容。
自定义View中,通常有以下一些比较重要的View的回调方法
1.onFinishInflate():从XML加载组建后回调
2.onSizeChanged():组件大小改变后回调
3.onMeasure():回调该方法来进行测量
4.onLayout():回调该方法来确定显示的位置
5.onTouchEvent():监听触摸事件时回调
自定义控件的三种方式:
1.对现有控件进行拓展
2.通过组合来实现新的控件
3.重写View来实现全新的控件
1、对现有控件进行拓展
一般来说,可以通过onDraw()方法对原生控件行为进行拓展,增加新的功能,修改显示的UI等。
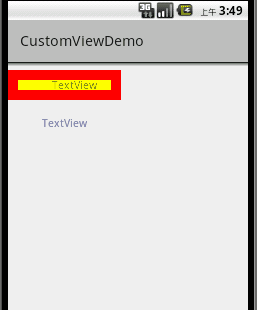
先来个简单的:
/**
 * Created by Layne_Yao on 2017-11-17 上午11:50:38.
 * CSDN:http://blog.csdn.net/Jsagacity
 */
public class CustomTextView extends TextView {

    private Paint paint1, paint2;

	public CustomTextView(Context context) {
		super(context);
		// TODO Auto-generated constructor stub
		 initPaint();
	}

    public CustomTextView(Context context, AttributeSet attrs) {
        super(context, attrs);
        initPaint();
    }

    public CustomTextView(Context context, AttributeSet attrs, int defStyleAttr) {
		super(context, attrs, defStyleAttr);
		// TODO Auto-generated constructor stub
		 initPaint();
	}

	/**
     * 初始化画笔
     */
    private void initPaint() {
        paint1 = new Paint();
        paint1.setColor(Color.RED);
        paint1.setStyle(Paint.Style.FILL);
        paint2 = new Paint();
        paint2.setColor(Color.YELLOW);
        paint2.setStyle(Paint.Style.FILL);
    }

    @Override
    protected void onDraw(Canvas canvas) {
        //绘制外层矩形
        canvas.drawRect(0, 0, getMeasuredWidth(), getMeasuredHeight(), paint1);
        //绘制内层矩形
        canvas.drawRect(10, 10, getMeasuredWidth() - 10, getMeasuredHeight() - 10, paint2);
        canvas.save();
        //绘制文字前平移10像素
        canvas.translate(10, 0);
        //父类完成的方法,即绘制文本
        super.onDraw(canvas);
        canvas.restore();
    }
}
来个复杂点的:
/**
 * Created by Layne_Yao on 2017-11-18 上午9:47:25.
 * CSDN:http://blog.csdn.net/Jsagacity
 */
public class DynamicsTextView extends TextView{

	 int mViewWidth = 0;
	    private Paint mPaint;
	    private LinearGradient mLinearGradient;
	    private Matrix matrix;
	    private int mTranslate;

	public DynamicsTextView(Context context) {
		super(context);

	}

	public DynamicsTextView(Context context, AttributeSet attrs,
			int defStyleAttr) {
		super(context, attrs, defStyleAttr);
		// TODO Auto-generated constructor stub
	}

	public DynamicsTextView(Context context, AttributeSet attrs) {
		super(context, attrs);
		// TODO Auto-generated constructor stub
	}

	@Override
	protected void onSizeChanged(int w, int h, int oldw, int oldh) {
		// TODO Auto-generated method stub
		super.onSizeChanged(w, h, oldw, oldh);
        if (mViewWidth == 0) {
            mViewWidth = getMeasuredWidth();
            if (mViewWidth > 0) {
                mPaint = getPaint();
                mLinearGradient = new LinearGradient(0, 0, mViewWidth, 0, new int[]{Color.BLUE, 0xffffffff, Color.BLUE},
                        null, Shader.TileMode.CLAMP);
                mPaint.setShader(mLinearGradient);
                matrix = new Matrix();
            }
        }

	}

	 @Override
	    protected void onDraw(Canvas canvas) {
	        super.onDraw(canvas);
	        if (matrix != null) {
	            mTranslate += mViewWidth + 5;
	            if (mTranslate > 2 * mViewWidth / 5) {
	                mTranslate = -mViewWidth;
	            }
	            matrix.setTranslate(mTranslate, 0);
	            mLinearGradient.setLocalMatrix(matrix);
	            postInvalidateDelayed(500);
	        }
	    }
}
运行结果:
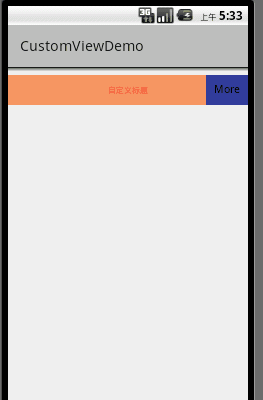
2、创建复合控件
创建复合控件可以很好地创建出具有重用功能的控件集合。这种方式通常需要继承一个合适的ViewGroup,再添加指定功能的控件,从而组合成新的复合控件。通过这种方式创建的控件,我们一般会给它指定一些可配置的属性,让她具有更强的拓展性。
复合控件:
/**
 * Created by Layne_Yao on 2017-11-18 上午10:36:12.
 * CSDN:http://blog.csdn.net/Jsagacity
 */
public class ToolBar extends RelativeLayout {
	  // 包含topbar上的元素:左按钮、右按钮、标题
    private Button mLeftButton, mRightButton;
    private TextView mTitleView;

    // 布局属性,用来控制组件元素在ViewGroup中的位置
    private LayoutParams mLeftParams, mTitlepParams, mRightParams;

    // 左按钮的属性值,即我们在atts.xml文件中定义的属性
    private int mLeftTextColor;
    private Drawable mLeftBackground;
    private String mLeftText;
    // 右按钮的属性值,即我们在atts.xml文件中定义的属性
    private int mRightTextColor;
    private Drawable mRightBackground;
    private String mRightText;
    // 标题的属性值,即我们在atts.xml文件中定义的属性
    private float mTitleTextSize;
    private int mTitleTextColor;
    private String mTitle;

    // 映射传入的接口对象
    private topbarClickListener mListener;

    public ToolBar(Context context, AttributeSet attrs, int defStyle) {
        super(context, attrs, defStyle);
    }

    public ToolBar(Context context) {
        super(context);
    }

    public ToolBar(Context context, AttributeSet attrs) {
        super(context, attrs);
        // 设置topbar的背景
        setBackgroundColor(0xFFF59563);
        // 通过这个方法,将你在atts.xml中定义的declare-styleable
        // 的所有属性的值存储到TypedArray中
        TypedArray ta = context.obtainStyledAttributes(attrs,
                R.styleable.TopBar);
        // 从TypedArray中取出对应的值来为要设置的属性赋值
        mLeftTextColor = ta.getColor(
                R.styleable.TopBar_leftTextColor, 0);
        mLeftBackground = ta.getDrawable(
                R.styleable.TopBar_leftBackground);
        mLeftText = ta.getString(R.styleable.TopBar_leftText);

        mRightTextColor = ta.getColor(
                R.styleable.TopBar_rightTextColor, 0);
        mRightBackground = ta.getDrawable(
                R.styleable.TopBar_rightBackground);
        mRightText = ta.getString(R.styleable.TopBar_rightText);

        mTitleTextSize = ta.getDimension(
                R.styleable.TopBar_titleTextSize, 10);
        mTitleTextColor = ta.getColor(
                R.styleable.TopBar_titleTextColor, 0);
        mTitle = ta.getString(R.styleable.TopBar_title_text);

        // 获取完TypedArray的值后,一般要调用
        // recyle方法来避免重新创建的时候的错误
        ta.recycle();

        mLeftButton = new Button(context);
        mRightButton = new Button(context);
        mTitleView = new TextView(context);

        // 为创建的组件元素赋值
        // 值就来源于我们在引用的xml文件中给对应属性的赋值
        mLeftButton.setTextColor(mLeftTextColor);
        mLeftButton.setBackgroundDrawable(mLeftBackground);
        mLeftButton.setText(mLeftText);

        mRightButton.setTextColor(mRightTextColor);
        mRightButton.setBackgroundDrawable(mRightBackground);
        mRightButton.setText(mRightText);

        mTitleView.setText(mTitle);
        mTitleView.setTextColor(mTitleTextColor);
        mTitleView.setTextSize(mTitleTextSize);
        mTitleView.setGravity(Gravity.CENTER);

        // 为组件元素设置相应的布局元素
        mLeftParams = new LayoutParams(
                LayoutParams.WRAP_CONTENT,
                LayoutParams.MATCH_PARENT);
        mLeftParams.addRule(RelativeLayout.ALIGN_PARENT_LEFT, TRUE);
        // 添加到ViewGroup
        addView(mLeftButton, mLeftParams);

        mRightParams = new LayoutParams(
                LayoutParams.WRAP_CONTENT,
                LayoutParams.MATCH_PARENT);
        mRightParams.addRule(RelativeLayout.ALIGN_PARENT_RIGHT, TRUE);
        addView(mRightButton, mRightParams);

        mTitlepParams = new LayoutParams(
                LayoutParams.WRAP_CONTENT,
                LayoutParams.MATCH_PARENT);
        mTitlepParams.addRule(RelativeLayout.CENTER_IN_PARENT, TRUE);
        addView(mTitleView, mTitlepParams);
}
运行结果:
3、重写View来实现全新的控件
自定义一个View时通常需要继承View类,并重写它的onDraw(),onMeasure()等方法来实现绘制逻辑,同时通过重写onTouchEvent()等触控时间来实现交互逻辑。
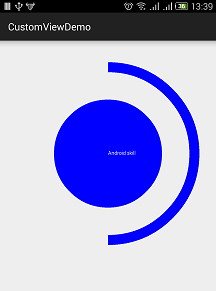
案例一:
/**
 * Created by Layne_Yao on 2017-11-18 上午11:08:23.
 * CSDN:http://blog.csdn.net/Jsagacity
 */
public class CircleProgressView extends View {

	private int mCircleXY;
	private int length;
	private float mRadius;

	private Paint mCirclePaint;
	private Paint mArcPaint;
	private Paint mTextPaint;
	private String mShowText = "Android skill";

	private int mTextSize = 25;
	private float mSweepValue = 270;

	public CircleProgressView(Context context, AttributeSet attrs) {
		super(context, attrs);
		// TODO Auto-generated constructor stub
		// 获取屏幕高宽
		WindowManager wm = (WindowManager) getContext().getSystemService(
				Context.WINDOW_SERVICE);
		length = wm.getDefaultDisplay().getWidth();
		init();
	}

	private void init() {
		mCircleXY = length / 2;
		mRadius = (float) (length * 0.5 / 2);

		mCirclePaint = new Paint();
		mCirclePaint.setColor(Color.BLUE);

		mArcPaint = new Paint();
		mArcPaint.setStrokeWidth(50);
		mArcPaint.setStyle(Paint.Style.STROKE);
		mArcPaint.setColor(Color.BLUE);

		mTextPaint = new Paint();
		mTextPaint.setColor(Color.WHITE);
		mTextPaint.setTextSize(mTextSize);
	}

	@Override
	protected void onDraw(Canvas canvas) {
		super.onDraw(canvas);
		// 矩形
		RectF mArcRectF = new RectF((float) (length * 0.1),
				(float) (length * 0.1), (float) (length * 0.9),
				(float) (length * 0.9));
		// 绘制圆
		canvas.drawCircle(mCircleXY, mCircleXY, mRadius, mCirclePaint);
		// 绘制弧线
		canvas.drawArc(mArcRectF, 270, mSweepValue, false, mArcPaint);
		// 绘制文字
		canvas.drawText(mShowText, 0, mShowText.length(), mCircleXY, mCircleXY
				+ (mTextSize / 4), mTextPaint);
	}

	public void setSweepValue(float sweepValue) {
		if (sweepValue != 0) {
			mSweepValue = sweepValue;
		} else {
			mSweepValue = 25;
		}
		invalidate();
	}

}
案例二:
/**
 * Created by Layne_Yao on 2017-11-20 上午11:29:02.
 * CSDN:http://blog.csdn.net/Jsagacity
 */
public class VolumeView extends View {
	private int mWidth;
	private int mRectWidth;
	private int mRectHeight;
	private Paint mPaint;
	private int mRectCount;
	private int offset = 5;
	private double mRandom;
	private LinearGradient mLinearGradient;

	public VolumeView(Context context) {
		super(context);
		initView();
	}

	public VolumeView(Context context, AttributeSet attrs) {
		super(context, attrs);
		initView();
	}

	public VolumeView(Context context, AttributeSet attrs, int defStyleAttr) {
		super(context, attrs, defStyleAttr);
		initView();
	}

	private void initView() {
		mPaint = new Paint();
		mPaint.setColor(Color.BLUE);
		mPaint.setStyle(Paint.Style.FILL);
		mRectCount = 12;
	}

	@Override
	protected void onSizeChanged(int w, int h, int oldw, int oldh) {
		super.onSizeChanged(w, h, oldw, oldh);
		mWidth = getWidth();
		mRectHeight = getHeight();
		mRectWidth = (int) (mWidth * 0.6 / mRectCount);
		mLinearGradient = new LinearGradient(0, 0, mRectWidth, mRectHeight,
				Color.YELLOW, Color.BLUE, Shader.TileMode.CLAMP);
		mPaint.setShader(mLinearGradient);
	}

	@Override
	protected void onDraw(Canvas canvas) {
		super.onDraw(canvas);
		for (int i = 0; i < mRectCount; i++) {
			mRandom = Math.random();
			float currentHeight = (float) (mRectHeight * mRandom);
			canvas.drawRect(
					(float) (mWidth * 0.4 / 2 + mRectWidth * i + offset),
					currentHeight, (float) (mWidth * 0.4 / 2 + mRectWidth
							* (i + 1)), mRectHeight, mPaint);
		}
		postInvalidateDelayed(300);
	}
}
运行结果:
自定义ViewGroup:
ViewGroup存在的目的就是为了对其子View进行管理,为其子View添加显示、相应的规则。因此,自定义ViewGroup通常需要重写onMeasure()方法来对子View进行测量,重写onLayout()方法来确定子View的位置,重写onTouchEvent()方法增加相应事件,下面看看如何自定义ViewGroup。

/**
 * Created by Layne_Yao on 2017-11-18 下午3:59:32.
 * CSDN:http://blog.csdn.net/Jsagacity
 */
public class CustomScrollView extends ViewGroup {
	private int mScreenHeight;
	private Scroller mScroller;
	private int mLastY;
	private int mStart;
	private int mEnd;

	public CustomScrollView(Context context, AttributeSet attrs) {
		super(context, attrs);
		// 获取屏幕高宽
		WindowManager wm = (WindowManager) getContext().getSystemService(
				Context.WINDOW_SERVICE);
		mScreenHeight = wm.getDefaultDisplay().getHeight();
		mScroller = new Scroller(getContext());
	}

	@Override
	protected void onLayout(boolean b, int i, int i1, int i2, int i3) {
		int childCount = getChildCount();
		MarginLayoutParams mlp = (MarginLayoutParams) getLayoutParams();
		mlp.height = mScreenHeight * childCount;
		setLayoutParams(mlp);

		for (int j = 0; j < childCount; j++) {
			View child = getChildAt(j);
			if (child.getVisibility() != View.GONE) {
				child.layout(i, j * mScreenHeight, i2, (j + 1) * mScreenHeight);
			}
		}
	}

	@Override
	protected void onMeasure(int widthMeasureSpec, int heightMeasureSpec) {
		super.onMeasure(widthMeasureSpec, heightMeasureSpec);
		int count = getChildCount();
		for (int i = 0; i < count; ++i) {
			View childView = getChildAt(i);
			measureChild(childView, widthMeasureSpec, heightMeasureSpec);
		}
	}

	@Override
	public boolean onTouchEvent(MotionEvent event) {
		int y = (int) event.getY();
		switch (event.getAction()) {
		case MotionEvent.ACTION_DOWN:
			mLastY = y;
			mStart = getScrollY();
			break;
		case MotionEvent.ACTION_MOVE:
			if (!mScroller.isFinished()) {
				mScroller.abortAnimation();
			}
			int dy = mLastY - y;
			if (getScrollY() < 0) {
				dy = 0;
			}
			if (getScrollY() > getHeight() - mScreenHeight) {
				dy = 0;
			}
			scrollBy(0, dy);
			mLastY = y;
			break;
		case MotionEvent.ACTION_UP:
			mEnd = getScrollY();
			int dScrollY = mEnd - mStart;
			if (dScrollY > 0) {
				if (dScrollY < mScreenHeight / 3) {
					mScroller.startScroll(0, getScrollY(), 0, -dScrollY);
				} else {
					mScroller.startScroll(0, getScrollY(), 0, mScreenHeight
							- dScrollY);
				}
			} else {
				if (-dScrollY < mScreenHeight / 3) {
					mScroller.startScroll(0, getScrollY(), 0, -dScrollY);
				} else {
					mScroller.startScroll(0, getScrollY(), 0, -mScreenHeight
							- dScrollY);
				}
			}
			break;
		}
		postInvalidate();
		return true;
	}

	@Override
	public void computeScroll() {
		super.computeScroll();
		if (mScroller.computeScrollOffset()) {
			scrollTo(0, mScroller.getCurrY());
		}
	}
}
运行结果:
事件拦截机制分析
要了解事件拦截机制,首先要了解一下触摸事件。
触摸事件就是捕获触摸屏幕后产生的时间。当点击一个按钮时,通过会产生两个或者三个时间---按钮按下,这是事件一;如果不小心滑动了,这是事件二;当手抬起,这是事件三。
触摸事件其实就是一个动作类型加坐标而已,但是Android的View结构是属性结构的,也就是说,View可以放在ViewGroup里面,通过不同的组合来实现不同的样式。
那么问题来了,View放在一个ViewGroup里面,这个ViewGroup又放在另一个ViewGroup里面,甚至还有可能继续嵌套,一层层地叠起来。可是触摸事件就一个到底分给谁?同一个时间,子View和父ViewGroup都有可能想要进行处理。因此就产生了“事件拦截”这个“霸气”的称呼。
我们定义两个ViewGroup,两个都重写以下方法:
@Override
	public boolean dispatchTouchEvent(MotionEvent ev) {
		Log.e("MyView", "MyViewGroupA-dispatchTouchEvent:"+ev.getAction());
		return super.dispatchTouchEvent(ev);
	}

	@Override
	public boolean onInterceptTouchEvent(MotionEvent ev) {
		Log.e("MyView", "MyViewGroupA-onInterceptTouchEvent:"+ev.getAction());
		return super.onInterceptTouchEvent(ev);
	}


	@Override
	public boolean onTouchEvent(MotionEvent event) {
		Log.e("MyView", "MyViewGroupA-onTouchEvent:"+event.getAction());
		return super.onTouchEvent(event);
	}
定义一个View,重写以下方法
	@Override
	public boolean onTouchEvent(MotionEvent event) {
		Log.e("MyView", "MyView-onTouchEvent:"+event.getAction());
		return super.onTouchEvent(event);
	}


	@Override
	public boolean dispatchTouchEvent(MotionEvent event) {
		Log.e("MyView", "MyView-dispatchTouchEvent:"+event.getAction());
		return super.dispatchTouchEvent(event);
	}
布局情况:
<RelativeLayout xmlns:android="http://schemas.android.com/apk/res/android"
    xmlns:tools="http://schemas.android.com/tools"
    android:layout_width="match_parent"
    android:layout_height="match_parent"
    tools:context="com.itman.customviewdemo.intercept.MyViewActivity" >

    <com.itman.customviewdemo.intercept.MyViewGroupA
        android:layout_width="match_parent"
        android:layout_height="match_parent" >

        <com.itman.customviewdemo.intercept.MyViewGroupB
            android:layout_width="300dp"
            android:layout_height="300dp" >

            <com.itman.customviewdemo.intercept.MyView
                android:layout_width="100dp"
                android:layout_height="100dp" />
        </com.itman.customviewdemo.intercept.MyViewGroupB>
    </com.itman.customviewdemo.intercept.MyViewGroupA>

</RelativeLayout>
正常的情况下,时间的传递顺序是:
ViewGroupA->ViewGroupB->View
事件传递的时候,先执行dispatchTouchEvent()方法,再执行onInterceptTouchEvent()方法。
事件的处理顺序是:
View->ViewGroupB->ViewGroupA
事件处理都是执行onTouchEvent()方法。
事件传递的返回值非常容易理解:true,拦截,不继续;false不拦截,继续流程。
时间处理的返回值也类似:true,处理了,不用审核;false,继续执行。
初始情况下,返回值都是false。
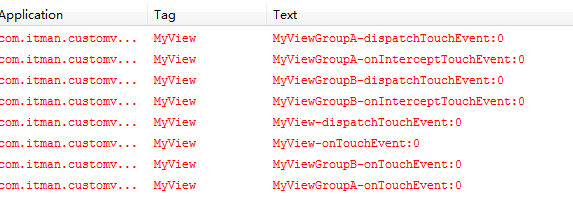
默认情况下运行,打印的Log如下:
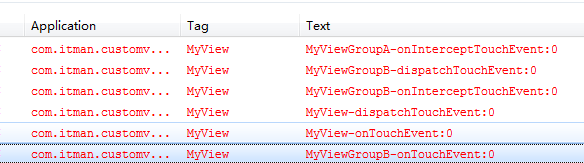
把MyViewGroupA的onInterceptTouchEvent(MotionEvent ev)返回值改为true,打印的Log如下:

把MyViewGroupB的onTouchEvent(MotionEvent event)返回值修改为true,打印Log如下:


 819
819


 被折叠的 条评论
为什么被折叠?
被折叠的 条评论
为什么被折叠?
 到【灌水乐园】发言


