


一、安装docker
1.环境配置
curl -o /etc/yum.repos.d/CentOS-Base.repo https://mirrors.aliyun.com/repo/Centos-7.repo

wget -O /etc/yum.repos.d/epel.repo http://mirrors.aliyun.com/repo/epel-7.repo

yum clean all

yum makecache

yum install -y bash-completion lrzsz expect net-tools nc nmap dos2unix htop iftop iotop unzip telent sl psmisc nethogs glances bc ntpdate openldop-devel tree
2.安装docker
docker必须安装CentOS7平台,且内核版本不低于3.10
uname -r //查看内核版本开启Linux内核的流量转发
cat  <<EOF > /etc/sysctl.d/docker.conf
net.bridge.bridge-nf-call-ip6tables = 1
net.bridge.bridge-nf-call-iptables = 1
net.ipv4.conf.default.rp_filter = 0
net.ipv4.conf.all.rp_filter = 0
net.ipv4.ip_forward = 1
EOF
修改后加载配置文件
modprobe br_netfilter

sysctl -p /etc/sysctl.d/docker.conf
利用yum安装docker
//查看当前仓库有没有docker-ce的软件包
yum list docker-ce --showduplicates | sort -f

//下载docker专属仓库
curl -o /etc/yum.repos.d/docker-ce.repo http://mirrors.aliyun.com/docker-ce/linux/centos/docker-ce.repo

//下载阿里云仓库(前面安装过了可以不装)
curl -o /etc/yum.repos.d/CentOS-7.repo http://mirrors.aliyun.com/repo/Centos-7.repo

//更新yum缓存
yum clean all
yum makecache

//安装   建议指定client和server版本,不指定版本默认安装最新版
yum install docker-ce-20.10.6 docker-ce-cli-20.10.6 containerd.io
二、配置docker
配置docker加速器
docker默认镜像文件下载是在Docker Hub,但是Docker Hub的国内下载速度太慢了,所以我们使用国内云服务器厂商提供的docker的镜像加速器服务
我这里使用了阿里云镜像加速器(只需要注册一个阿里云账号),在阿里云 -> 容器镜像服务 -> 镜像工具 -> 镜像加速器里获取自己加速器地址
mkdir -p /etc/docker
tee /etc/docker/daemon.json <<-'EOF'
{
  "registry-mirrors": ["https://加速器地址"]
}
EOF

systemctl daemon-reload

systemctl restart docker
三、docker常用命令
1.搜索镜像
以nginx为例,在配置好的镜像仓库中查找镜像并以STARS排列
docker search nginx2.获取镜像
获取nginx镜像,不加版本信息默认为最新版本
[root@xyy ~]#docker pull nginx
获取后通过docker images 查看本地镜像
[root@xyy ~]#docker images
REPOSITORY   TAG       IMAGE ID       CREATED         SIZE
nginx        latest    605c77e624dd   22 months ago   141MB
redis        latest    7614ae9453d1   23 months ago   113MB
centos       latest    5d0da3dc9764   2 years ago     231MB
格式化显示
#  --format是指定用什么规则显示  table 表格    \t制表符
[root@xyy ~]#docker images --format "table {{.ID}}\t{{.Repository}}\t{{.Tag}}"
IMAGE ID       REPOSITORY   TAG
605c77e624dd   nginx        latest
7614ae9453d1   redis        latest
5d0da3dc9764   centos       latest
3.运行镜像
运行该nginx镜像,运行后容器里就跑着一个nginx镜像了
docker run 参数 镜像的名字或者ID
// -d 后台运行容器
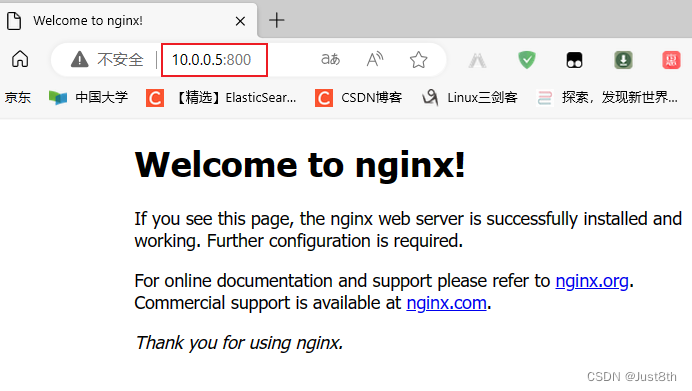
// -p 800:80 端口映射 宿主机端口:容器端口 访问宿主机800端口就相当于访问容器80端口
[root@xyy ~]# docker run -d -p 800:80 nginx
acc783e2d59a4e0ef30ba573c0e749002204e607f67f7f57773b5d806b37cd55
4.查看容器运行
[root@xyy ~]#docker ps
CONTAINER ID   IMAGE     COMMAND                  CREATED          STATUS          PORTS                                 NAMES
acc783e2d59a   nginx     "/docker-entrypoint.…"   29 seconds ago   Up 25 seconds   0.0.0.0:800->80/tcp, :::800->80/tcp   flamboyant_euler
此时在宿主机浏览器访问800端口就可以看到nginx了
5.停止运行容器和二次启动
docker stop 容器进程ID

[root@xyy ~]#docker ps
CONTAINER ID   IMAGE     COMMAND                  CREATED         STATUS         PORTS                                 NAMES
acc783e2d59a   nginx     "/docker-entrypoint.…"   8 minutes ago   Up 7 minutes   0.0.0.0:800->80/tcp, :::800->80/tcp   flamboyant_euler
[root@xyy ~]#docker stop acc783e2d59a
[root@xyy ~]#docker ps
CONTAINER ID   IMAGE     COMMAND   CREATED   STATUS    PORTS     NAMES
[root@xyy ~]#


//再次启动容器可以用docker start 容器进程id
[root@xyy ~]#docker start acc783e2d59a
acc783e2d59a
为什么再次启动容器用docker start 不用docker run呢?
docker run 只用于第一次启动容器时,它做了两步:先将镜像放在容器中再启动镜像(镜像不存在就会在线下载)
docker start是再次启动已经存在的镜像
6.删除镜像
查看本地下载的docker镜像,获取镜像ID
[root@xyy ~]# docker image ls
REPOSITORY   TAG       IMAGE ID       CREATED         SIZE
nginx        latest    605c77e624dd   22 months ago   141MB
删除本地镜像
docker rmi 605c77e624dd(镜像ID  前三位即可)
docker rmi 镜像名称
7.删除容器
有时候想要删除镜像的时候,就会报错
[root@xyy ~]#docker rmi hello-world
Error response from daemon: conflict: unable to remove repository reference "hello-world" (must force) - container ff7855764237 is using its referenced image feb5d9fea6a5
这个报错就是说,hello-world这个镜像正在被 ff7855764237这个容器使用,不能删除。这时候通过docker ps查看正在运行中的容器又没有看到 ff7855764237 这个容器。docker ps只能查看正在运行的容器,对于停止的容器是看不到的,所以使用docker ps -a命令查看所有的容器。找到这个容器然后删除它

#删除容器   docker rm 容器ID
[root@xyy ~]#docker rm ff7855764237
ff7855764237
[root@xyy ~]#docker rmi hello-world
Untagged: hello-world:latest
Untagged: hello-world@sha256:2498fce14358aa50ead0cc6c19990fc6ff866ce72aeb5546e1d59caac3d0d60f
Deleted: sha256:feb5d9fea6a5e9606aa995e879d862b825965ba48de054caab5ef356dc6b3412
Deleted: sha256:e07ee1baac5fae6a26f30cabfe54a36d3402f96afda318fe0a96cec4ca393359
删除占用镜像的容器后再使用docker rmi 删除镜像就不会报错了
8.进入正在运行的镜像
进入正在运行的镜像使用exec命令
#在容器中开启一个交互模式的终端:
docker exec -it 容器ID bash
9.批量删除
慎用!!!
#批量删除镜像
docker rmi $(docker images -aq)

#批量删除容器
docker rm $(docker ps -qa)
10.导出镜像
默认运行的centos镜像不提供vim功能,可自行安装vim,安装后提交该镜像再导出该镜像。
#导出镜像  save
[root@xyy ~]#docker image save centos:7.8.2003  > /opt/centos7.8.2003.tgz
[root@xyy ~]#ls /opt
centos7.8.2003.tgz
11.导入镜像
#     docker image load -i 指定路径

[root@xyy ~]#docker image load -i /opt/centos7.8.2003.tgz
fb82b029bea0: Loading layer [==================================================>]  211.1MB/211.1MB
Loaded image: centos:7.8.2003
12.拷贝文件docker cp
通过docker cp命令在宿主机和容器之间拷贝文件,在容器的路径前需要加上容器ID
#docker cp 需要拷贝的文件路径   目标文件路径

docker cp /www/runoob 96f7f14e99ab:/www/
13.容器的提交
docker commit 容器ID 新的镜像名

[root@xyy ~]#docker commit f604a9ece320 xyy/centos-vim-7.8.2003
sha256:a241059ad1735d72f1ea44da5f274edc9e7662d3363801270882f3f6370bf6bf
[root@xyy ~]#docker images
REPOSITORY                TAG        IMAGE ID       CREATED         SIZE
xyy/centos-vim-7.8.2003   latest     a241059ad173   8 seconds ago   488MB
nginx                     latest     605c77e624dd   23 months ago   141MB
redis                     latest     7614ae9453d1   23 months ago   113MB
centos                    7.8.2003   afb6fca791e0   3 years ago     203MB
[root@xyy ~]#docker run -it xyy/centos-vim-7.8.2003 bash
[root@81c47cd1f000 /]# vim
[root@81c47cd1f000 /]#
使用提交后的镜像创建容器,就会带有之前容器修改的内容
四、运行Ubuntu镜像
通过docker,我们就可以在同一套内核上运行不同的发行版系统。这里就试试在centos宿主机的容器中运行Ubuntu镜像
[root@xyy ~]#docker pull ubuntu
Using default tag: latest
latest: Pulling from library/ubuntu
7b1a6ab2e44d: Pull complete
Digest: sha256:626ffe58f6e7566e00254b638eb7e0f3b11d4da9675088f4781a50ae288f3322
Status: Downloaded newer image for ubuntu:latest
docker.io/library/ubuntu:latest
进入容器
[root@xyy ~]#docker images
REPOSITORY   TAG       IMAGE ID       CREATED         SIZE
nginx        latest    605c77e624dd   22 months ago   141MB
redis        latest    7614ae9453d1   23 months ago   113MB
ubuntu       latest    ba6acccedd29   2 years ago     72.8MB

#      -i:交互式操作  -t:开启一个终端   bash:进入容器的命令 开启bash解释器
[root@xyy ~]#docker run -it  ba6acccedd29 bash
root@bcfd89b467dc:/#
查看发行版本
root@bcfd89b467dc:/# cat /etc/lsb-release
DISTRIB_ID=Ubuntu
DISTRIB_RELEASE=20.04
DISTRIB_CODENAME=focal
DISTRIB_DESCRIPTION="Ubuntu 20.04.3 LTS"
完整的系统是通过linux内核+发行版组成的,通过docker容器,可以获得不同的发行版镜像,也就可以运行不同发行版系统
五、镜像原理
docker的镜像原理
[root@xyy /]# docker pull redis
Using default tag: latest
latest: Pulling from library/redis
a2abf6c4d29d: Already exists
c7a4e4382001: Pull complete
4044b9ba67c9: Pull complete
c8388a79482f: Pull complete
413c8bb60be2: Pull complete
1abfd3011519: Pull complete
Digest: sha256:db485f2e245b5b3329fdc7eff4eb00f913e09d8feb9ca720788059fdc2ed8339
Status: Downloaded newer image for redis:latest
docker.io/library/redis:latest
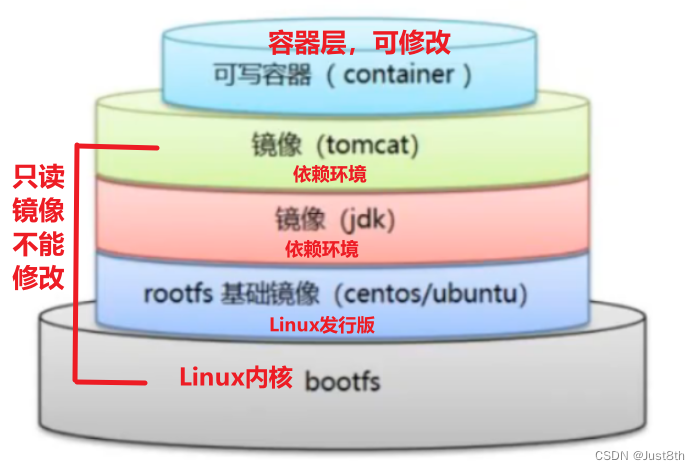
docker镜像本质是基于UnionFS管理的分层文件系统
Docker镜像是由特殊的文件系统叠加而成:最底端是bootfs, 共同使用宿主机的bootfs,第二层是root文件系统rootfs,称为base image,然后再往上可以叠加其他的镜像文件(运行容器所依赖的环境),统一文件系统(Union File System) 技术能够将不同的层整合成一个文件系统, 为这些层提供了一个统一的视角,这样就隐藏了多层的存在,在用户的角度看来,只存在一个文件系统。
docker为什么要分层镜像
镜像分层的好处就是资源共享,例如有多个镜像都基于同一个base镜像,那么在docker host只需要存储一份base镜像。内存也只需加载一份host,即可为多个容器服务。即使多个容器共享一个base镜像,某个容器修改了base镜像的内容,例如修改了/etc/的配置文件,其他容器的配置文件是不会修改的,修改只会局限于单个容器内,这就是容器的写入时复制特性(Copy-on-write)。
可写的容器层
容器启动后,一个全新的可写层被加载到镜像的顶部,这一层被称为容器层,容器层以下的都称镜像层。修改的文件都是修改的容器层的文件。读取和修改文件时,docker会从上层镜像开始依次寻找目标文件,复制到容器层再读取修改。删除文件也是从上到下在镜像层中查找文件,删除时也仅仅记录下删除操作,不会影响到base镜像。
六、容器管理
#    -it 开启一个交互式终端   --rm 容器退出时删除该容器进程记录
[root@xyy ~]#docker run -it --rm centos bash
容器的进程必须处于前台运行状态,否则容器会直接退出。
果容器内,什么事也没做,容器也会挂掉,容器内必须有一个进程在前台运行
七、查看docker详细信息
docker镜像目录
[root@xyy lol]#docker info |grep Root
 Docker Root Dir: /var/lib/docker

/var/lib/docker/image/overlay2/imagedb/content/sha256/目录下的文件都是json文件,记录了镜像和容器之间的配置关系
docker服务信息
#docker image inspect 镜像ID

[root@xyy ~]#docker image inspect afb
docker容器日志信息
docker logs -f 容器ID容器的详细信息
docker container inspect 容器ID八、dockerfile
dockerfile的作用是自定义构建docker镜像。Dockerfile 是一个用来构建镜像的文本文件,文本内容包含了一条条构建镜像所需的指令和说明。
dockerfile主要组成部分
- 基础镜像信息 FROM centos:7.9
- 制作镜像操作指令 RUN yum install openssh-server -y
- 容器启动时执行指令 CMD
dockerfile常用参数
- FROM 指定基础镜像 如centos 、Ubuntu等
- MAINTAINER 指定维护者信息,可以不写
- RUN 指定运行shell命令
- ADD 添加宿主机的文件到容器内(类似docker cp 命令的效果),若源文件是URL链接,docker引擎会下载URL链接中的文件保存到目标路径,权限自动设置为600.若下载的URL链接文件为压缩包,不会自动解压,需要单独使用RUN命令。若直接添加一个压缩文件,且文件类型为gzip,bzip2,xz,tar,ADD才会自动解压该文件到目标路径
- COPY 只拷贝文件到容器中(能保留源文件的元数据:权限,访问时间)
- WORKDIR 指定当前工作目录
- VOLUME 设置存储卷,挂载主机目录(将容器的数据映射到宿主机的目录上) 容器在运行时,应该保证在存储层不写入任何数据,运行在容器内产生的数据,推荐是挂载写入宿主机上,进行维护。
- EXPOSE 指定对外的端口,在容器内暴露一个窗口
- CMD 指定容器启动后需要做的事 CMD[“参数1”,“参数2”] 如 CMD["cat","/etc/os-release"]
dockerfile实践
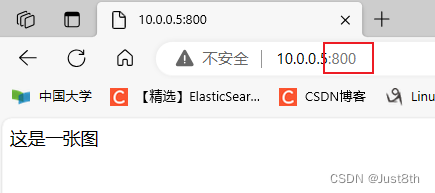
做一个简单的实践:通过dockerfile,构建一个nginx镜像,并且运行后自定义输出一段话
创建一个文件名为dockerfile的文件(文件名不能自定义)基于nginx镜像,执行echo命令输出一句话到index.html文件。在当前文件目录使用docker build . 命令创建镜像。
[root@xyy dockerfile]#touch Dockerfile
[root@xyy dockerfile]#cat Dockerfile
FROM nginx
RUN echo '<meta charset=utf8>这是一张图' > /usr/share/nginx/html/index.html

[root@xyy dockerfile]#docker build .
Sending build context to Docker daemon  2.048kB
Step 1/2 : FROM nginx
 ---> 605c77e624dd
Step 2/2 : RUN echo '<meta charset=utf8>这是一张图' > /usr/share/nginx/html/index.html
 ---> Running in 84e68ff1474e
Removing intermediate container 84e68ff1474e
 ---> 72095f38ed48
Successfully built 72095f38ed48
[root@xyy dockerfile]#docker images
REPOSITORY                TAG        IMAGE ID       CREATED             SIZE
<none>                    <none>     72095f38ed48   About an hour ago   141MB
修改镜像名
[root@xyy dockerfile]#docker tag 72095f38ed48 my_nginx
[root@xyy dockerfile]#docker images
REPOSITORY                TAG        IMAGE ID       CREATED         SIZE
my_nginx                  latest     72095f38ed48   2 hours ago     141MB
运行镜像
[root@xyy dockerfile]#docker run -d -p 800:80 my_nginx
6b7984b573c0d828b90276cd21193e51b238c9bc93ac1d368ac023103452cd3c
如果进入还是nginx默认界面使用ctrl+F5强制刷新一下
ENTRYPOINT与CMD的区别
ENTRYPOINT和RUN指令一样,分为两种格式
- exec
- shell
和CMD一样效果,都是在指定容器启动程序以及参数。 如果使用ENTRYPOINT,CMD指令的内容就会作为参数传递给ENTRYPOINT指令。
[root@xyy dockerfile]#cat Dockerfile
FROM centos:7.8.2003
RUN rpm --rebuilddb && yum install epel-release vim -y
RUN rpm --rebuilddb && yum install curl -y
CMD ["curl","-s","http://ipinfo.io/ip"]
这个时候如果我想基于CMD的命令再加其他的参数,就必须重新输入整条语句,相当于重新覆盖dockerfile中的CMD指令。但是若我将CMD指令改成ENTRYPOINT指令,阁下又该如何应对呢?
[root@xyy dockerfile]#cat Dockerfile
FROM centos:7.8.2003
RUN rpm --rebuilddb && yum install epel-release vim -y
RUN rpm --rebuilddb && yum install curl -y
ENTRYPOINT ["curl","-s","http://ipinfo.io/ip"]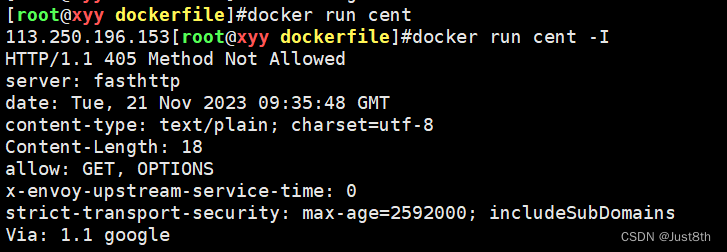
加了-I参数,相当于执行了curl -s -I http://ipinfo.io/ip这个命令
ARG和ENV指令
ENV是提前设置好变量
ENV NAME="MySQL"
ENV VERSION=5.6
之后所有的操作(ADD,RUN.....),通过$NAME,$VERSION可以直接换取变量值,需要更改时更方便
ARG和ENV一样也是设置环境变量,之间的区别是ENV指令不止能在镜像构建时能用,容器运行时变量也能使用。ARG却是只能在构建镜像时使用,容器运行时就禁用了。
WORKDIR
用于在dockerfile中,目录的切换,更改工作目录,进入容器时默认在此目录
WORKDIR /opt
USER
进入容器的默认用户是root,有时候想使用普通用户进行操作时就可以用这个更改
FROM centos:7.8.2003
RUN rpm --rebuilddb && yum install epel-release -y
RUN rpm --rebuilddb && yum install curl -y
WORKDIR /opt
RUN useradd -m xyy
USER xyy
EXPOSE
在dockerfile中指定容器的端口,在run容器时可以用-p参数指定端口
EXPOSE 8080COPY
在dockerfile中选择需要拷贝的文件,文件前不加路径表示和dockerfile文件同级
COPY xxx.py
实操:dockerfile生成centos镜像部署nginx
Dockerfile文件如下:
FROM centos:7.8.2003
RUN mv /etc/yum.repos.d/CentOS-Base.repo{,.bak}
RUN curl -o /etc/yum.repos.d/epel.repo http://mirrors.aliyun.com/repo/epel-7.repo
RUN curl -o /etc/yum.repos.d/CentOS-Base.repo https://mirrors.aliyun.com/repo/Centos-7.repo
RUN yum clean all && yum makecache
RUN rpm --rebuilddb && yum install pcre pcre-devel vim openssl openssl-devel zlib zlib-devel -y
RUN rpm --rebuilddb && yum install nginx -y
WORKDIR /etc/nginx
EXPOSE 8080
RUN useradd -m www
build生成镜像 -t可以直接更改容器名称
[root@xyy1 dockerfile]#docker build . -t centos_nginx
运行容器
[root@xyy1 dockerfile]#docker run -it -p 90:80 centos_nginx bash修改nginx.conf,添加配置文件,静态网页文件
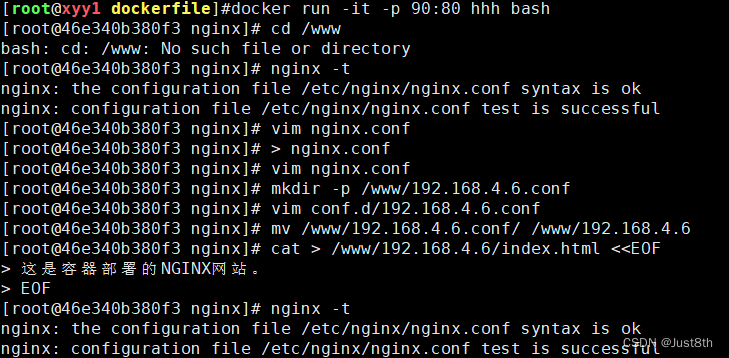
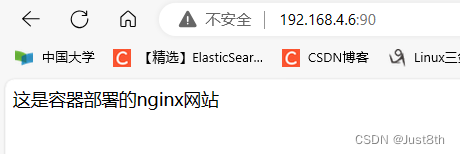
浏览器访问宿主机地址:90端口就能访问到


 3174
3174


 被折叠的 条评论
为什么被折叠?
被折叠的 条评论
为什么被折叠?
 到【灌水乐园】发言


