封装一个全局使用的二次确认弹窗

背景二次弹窗举例
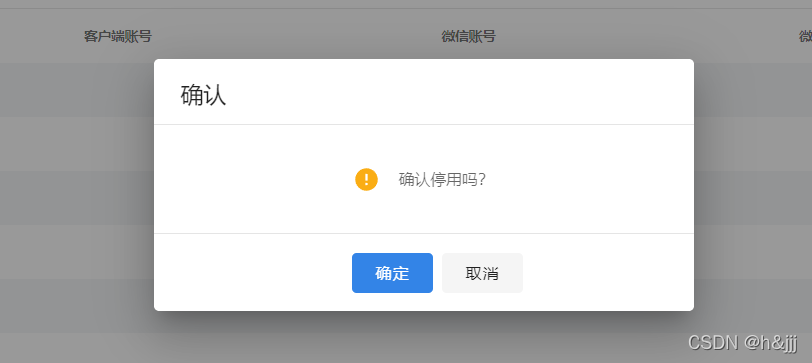
如图所示,在项目中进行删除、取消、停用等等操作的时候,出于考虑误操作等,我们通常会需要用户进行二次确认,然后再进行操作。对于这种使用比较多的公共功能,我们如何才能保持一致并且简单的使用呢?出于这些考虑,我们选择封装一个全局的二次弹窗组件。
分析
对于上述的弹窗,标题、提示内容,以及确定的方法都是不相同的,因此组件需要动态接收这些参数。
实现步骤
1、首先封装一个弹窗组件ConfirmBox
这里采用Vuetify的弹窗组件v-dialog来进行二次封装。
组件template如下:

<template>
    <v-dialog v-model="show" width="480px" persistent>
        <v-card>
            <v-card-title>{{ title }}</v-card-title>
            <v-divider></v-divider>
            <v-card-text class="d-flex align-center flex-column py-9 ">
                <div class="d-flex align-center">
                    <v-icon size="24px" color="#FAAD14" class="mr-4">{{ $icon.mdiAlertCircle }}</v-icon>
                    <span v-if="content">{{ content }}</span>
                </div>
                <div v-if="options.subContent" style="font-size:12px;" v-html="options.subContent"></div>
            </v-card-text>
            <v-divider></v-divider>
            <v-card-actions class="d-flex align-center justify-center px-3 py-4">
                <div v-if="options.extraBtns && options.extraBtns.length > 0">
                    <v-btn v-for="(item, index) in options.extraBtns" :key="index" depressed color="primary" @click="handleClick(item)">
                        {{ item.text }}
                    </v-btn>
                </div>
                <v-btn depressed class="ml-6" min-width="72" :loading="confirming" color="primary" @click="sure">{{ options.sureBtnName || '确定' }}</v-btn>
                <v-btn v-if="!options.hideCancel" depressed min-width="72" @click="cancel">取消</v-btn>
            </v-card-actions>
        </v-card>
    </v-dialog>
</template>

逻辑如下:

<script>
export default {
    name: 'ConfirmBox',
    data() {
        return {
            title: '',
            content: '',
            sureBtnName: '',
            params: null,
            promiseStatus: null,
            show: false,
            confirming: false,
            hideCancel: false
        };
    },
    methods: {
        handleClick(item) {
            this[item.method](item);
        },
        async sure() {
            if (this.confirmFunc) {
                this.confirming = true;
                try {
                    await this.confirmFunc();
                } catch (e) {
                    this.confirming = false;
                    console.log(e);
                    return;
                }
                this.confirming = false;
            }
            this.show = false;
            this.promiseStatus && this.promiseStatus.resolve();
        },
        cancel() {
            this.show = false;
            this.promiseStatus && this.promiseStatus.reject();
        },
        confirm() {
            this.show = true;
            return new Promise((resolve, reject) => {
                this.promiseStatus = {
                    resolve: resolve,
                    reject: reject
                };
            });
        }
    }
};
</script>

其中options作为拓展,如果有别的一些按钮需要加入,可以进行传参。
2、公共方法$confirm封装

import Vue from 'vue';
import vuetify from './vuetify';
import Confirm from '@/components/common/ConfirmBox';
const ConfirmBox = Vue.extend(Confirm);

Vue.use({
    install: function(Vue) {
        // 新增一个options对象
        Vue.prototype.$confirm = (title, content, confirmFunc, options = {}) => {
            const instance = new ConfirmBox({
                data: {
                    title: title,
                    content: content,
                    // sureBtnName: sureBtnName,
                    confirmFunc: confirmFunc,
                    // hideCancel: hideCancel,
                    options: options
                },
                vuetify
            }).$mount();
            document.getElementById('app').appendChild(instance.$el);
            return instance.confirm();
        };
    }
});

:这里的app是整个页面。
使用:
在自定义函数里

await this.$confirm('删除', '确认删除该账号?');
// 需要进行的操作
......

如果需要reject进行操作,可以这样写:

this.$confirm('XXXX',async()=>{}).catch(e=>{
	//自定义操作
	......
})
  • 1
    点赞
  • 3
    收藏
    觉得还不错? 一键收藏
  • 0
    评论
好的,我可以为您提供一个简单的全局vue弹窗封装方法: 1. 首先,在您的Vue项目中创建一个名为"GlobalDialog"的组件,该组件应该包含一个弹窗的HTML结构和相应的样式。 2. 在您的Vue项目中创建一个名为"DialogPlugin"的插件,该插件应该包含一个全局方法,用于在任何组件中调用弹窗。 3. 在"DialogPlugin"插件中,使用Vue.prototype.$dialog = GlobalDialog来将"GlobalDialog"组件注册为全局方法。 4. 在任何组件中,您现在可以使用this.$dialog来调用弹窗,例如:this.$dialog.show()。 下面是示例代码: // GlobalDialog.vue <template> <div class="dialog"> <div class="dialog-overlay" v-show="visible"></div> <div class="dialog-content" v-show="visible"> <slot></slot> </div> </div> </template> <script> export default { data() { return { visible: false }; }, methods: { show() { this.visible = true; }, hide() { this.visible = false; } } }; </script> <style> .dialog { position: fixed; top: 0; left: 0; width: 100%; height: 100%; z-index: 9999; } .dialog-overlay { position: absolute; top: 0; left: 0; width: 100%; height: 100%; background-color: rgba(0, 0, 0, 0.5); } .dialog-content { position: absolute; top: 50%; left: 50%; transform: translate(-50%, -50%); background-color: #fff; padding: 20px; border-radius: 5px; } </style> // DialogPlugin.js import GlobalDialog from "./GlobalDialog.vue"; export default { install(Vue) { Vue.prototype.$dialog = GlobalDialog; } }; // main.js import Vue from "vue"; import DialogPlugin from "./DialogPlugin.js"; Vue.use(DialogPlugin); // Example.vue <template> <div> <button @click="showDialog">Show Dialog</button> <global-dialog> <h2>Hello World!</h2> <p>This is a global dialog.</p> <button @click="hideDialog">Close</button> </global-dialog> </div> </template> <script> export default { methods: { showDialog() { this.$dialog.show(); }, hideDialog() { this.$dialog.hide(); } } }; </script>

“相关推荐”对你有帮助么?

  • 非常没帮助
  • 没帮助
  • 一般
  • 有帮助
  • 非常有帮助
提交
评论
添加红包

请填写红包祝福语或标题

红包个数最小为10个

红包金额最低5元

当前余额3.43前往充值 >
需支付:10.00
成就一亿技术人!
领取后你会自动成为博主和红包主的粉丝 规则
hope_wisdom
发出的红包
实付
使用余额支付
点击重新获取
扫码支付
钱包余额 0

抵扣说明:

1.余额是钱包充值的虚拟货币,按照1:1的比例进行支付金额的抵扣。
2.余额无法直接购买下载,可以购买VIP、付费专栏及课程。

余额充值