


在说AlertDialog之前先捎带提一下Log日志:
1.Log.e(tag,message)//打印error信息,颜色为红色。
2.Log.w(tag,message)//打印warn信息,颜色为橙色。
3.Log.i(tag,message)//打印info通知信息,颜色为绿色。
4.Log.d(tag,message)//打印debug信息,颜色为蓝色。
5.Log.v(tag,message)//打印verbose信息,颜色为黑色。
日志级别一次递减,日志的输出量从少到多。
首先先明确一下什么是AlertDialog:
对话框是在当前界面弹出的一个小窗口,用于显示重要的提示信息。提示用户输入信息,确认信息,或者显示某种状态,如下载进度退出提示等等。一般情况下,一般情况下,用户要与对话框进行交互,然后返回到被遮盖的界面以继续运行当前的应用程序。
好了接下来说一下第一种对话框的形式:

在layout中activity_main中先引入一个button控件,贴上代码:<LinearLayout xmlns:android="http://schemas.android.com/apk/res/android"
xmlns:tools="http://schemas.android.com/tools"
android:id="@+id/container"
android:layout_width="match_parent"
android:layout_height="match_parent"
android:orientation="vertical"
tools:context="com.example.alertdialog_demo.MainActivity"
tools:ignore="MergeRootFrame" >
<Button
android:layout_width="match_parent"
android:layout_height="wrap_content"
android:layout_marginTop="10dp"
android:id="@+id/dialog_btn1"
android:text="确认对话框"
/>
</LinearLayout>
package com.example.alertdialog_demo;

import android.support.v7.app.ActionBarActivity;
import android.support.v7.app.ActionBar;
import android.support.v4.app.Fragment;
import android.app.AlertDialog;
import android.content.DialogInterface;
import android.os.Bundle;
import android.view.LayoutInflater;
import android.view.Menu;
import android.view.MenuItem;
import android.view.View;
import android.view.View.OnClickListener;
import android.view.ViewGroup;
import android.widget.Button;
import android.widget.Toast;
import android.os.Build;
public class MainActivity extends ActionBarActivity {

	private Button button;
    @Override
    protected void onCreate(Bundle savedInstanceState) {
        super.onCreate(savedInstanceState);
        setContentView(R.layout.activity_main);

        initEvent();
    }
	private void initEvent() {
		// TODO Auto-generated method stub

		button = (Button) findViewById(R.id.dialog_btn1);
		button.setOnClickListener(new OnClickListener() {

			@Override
			public void onClick(View v) {
				// TODO Auto-generated method stub
				showAlertDialog();
			}
		});

	}
	protected void showAlertDialog() {

		AlertDialog.Builder builder = new AlertDialog.Builder(MainActivity.this);
		builder.setIcon(R.drawable.ic_launcher);
		builder.setTitle("确认对话框信息:");
		builder.setMessage("你确定要退出?");
<span style="white-space:pre"> </span>此处的OnclickListener不是android.view.View.OnClickListener而是android.content.DialogInterface.OnClickListener
builder.setPositiveButton("确认",new DialogInterface.OnClickListener() {
@Override
public void onClick(DialogInterface dialog, int which) {
// TODO Auto-generated method stub
Toast.makeText(MainActivity.this, "点击了确认按钮",Toast.LENGTH_SHORT).show();
}
});
builder.setNegativeButton("取消", new DialogInterface.OnClickListener() {
@Override
public void onClick(DialogInterface dialog, int which) {
// TODO Auto-generated method stub
Toast.makeText(MainActivity.this, "点击了取消按钮",Toast.LENGTH_SHORT).show();
}
});
AlertDialog dialog = builder.create();
dialog.show();
}
}
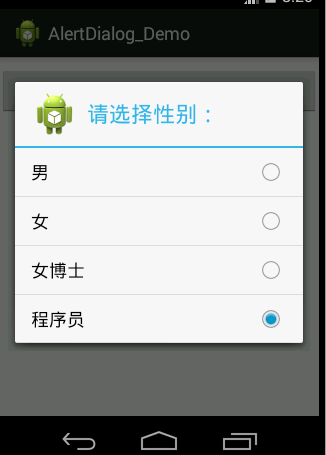
protected void showAlertDialog2() {

		AlertDialog.Builder builder = new AlertDialog.Builder(MainActivity.this);
		builder.setIcon(R.drawable.ic_launcher);
		builder.setTitle("请选择性别:");
//		builder.setMessage("你确定要退出?");

		builder.setSingleChoiceItems(sex, 3, new DialogInterface.OnClickListener() {

			@Override
			public void onClick(DialogInterface dialog, int which) {
				// TODO Auto-generated method stub
				Toast.makeText(MainActivity.this,"你的性别是:"+sex[which],1000).show();
			}
		});


		AlertDialog dialog = builder.create();
		dialog.show();
}第三种是多选按钮对话框,代码只是把initEvent方法中的Onclick方法中的showAlertDialog();换成showAlertDialog3();即可.下面贴上showAlertDialog3();的代码:
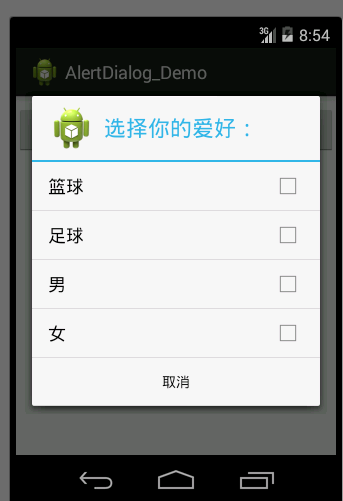
protected void showAlertDialog3() {

		AlertDialog.Builder builder = new AlertDialog.Builder(MainActivity.this);
		builder.setIcon(R.drawable.ic_launcher);
		builder.setTitle("选择你的爱好:");
//		builder.setMessage("你确定要退出?");

		//此处监听器使用的是多选按钮对话框
		builder.setMultiChoiceItems(hobby, null, new OnMultiChoiceClickListener() {

			@Override
			public void onClick(DialogInterface dialog, int which, boolean isChecked) {
				// TODO Auto-generated method stub

				if(isChecked){
					Toast.makeText(MainActivity.this,"你的爱好是:"+hobby[which], 500).show();
				}else {
					Toast.makeText(MainActivity.this,"你不感兴趣的是:"+hobby[which], 500).show();
				}

			}
		});
		builder.setNegativeButton("取消",new DialogInterface.OnClickListener() {

			@Override
			public void onClick(DialogInterface dialog, int which) {
				// TODO Auto-generated method stub
整个对话框就会隐藏掉
dialog.dismiss();
}
});
AlertDialog dialog = builder.create();
dialog.show();
}protected void showAlertDialog4() {
AlertDialog.Builder builder = new AlertDialog.Builder(MainActivity.this);
builder.setIcon(R.drawable.ic_launcher);
builder.setTitle("学校老师:");
builder.setItems(school, new DialogInterface.OnClickListener() {
@Override
public void onClick(DialogInterface dialog, int which) {
// TODO Auto-generated method stub
Toast.makeText(MainActivity.this, "我喜欢"+school[which], 1000).show();
}
});
AlertDialog dialog = builder.create();
dialog.show();
}此外需要自己自定义一个layout布局,然后通过LayoutInflater inflater = LayoutInflater.from(this);
View view = inflater.inflate(R.layout.user_defined, null);把layout布局转成View 对象,然后把view对象添加到AlertDialog对
话框的builder对象中:先看一下效果图:
贴上代码:

protected void showAlertDialog5() {
		LayoutInflater inflater = LayoutInflater.from(this);
		View view = inflater.inflate(R.layout.user_defined, null);
		AlertDialog.Builder builder = new AlertDialog.Builder(MainActivity.this);
		builder.setIcon(R.drawable.ic_launcher);
		setTitle("自定义布局");
		builder.setView(view);
		AlertDialog dialog = builder.create();
		dialog.show();
	 }


 787
787

 被折叠的 条评论
为什么被折叠?
被折叠的 条评论
为什么被折叠?
 到【灌水乐园】发言


