


使用 Angular 进行项目开发的程序员应该都很熟悉 Angular Animation。这是一个 Angular 原生的动画库,它可以替代或者辅助完成原本需要使用 css 的动画功能。
Angular 在国内的运用是很有限的,可借鉴的文档并不很丰富。尤其对于 Angular 动画模块的应用类文档更是少见。我认为原因可能是大家普遍认为动画应当是由 css 去实现的,毕竟它有非常完善并且兼容性极强的动画功能。而且作为前端工程师,精通 css 是基本功,使用 css 完成页面的动画功能成本低、效率高。
下面是我模仿项目中的功能写的一个例子。我会罗列出所遇到的问题,并且逐一阐述我的解决方案。
代码环境:
{
  "name": "blog-angular-animation",
  "version": "0.0.0",
  "scripts": {
    "ng": "ng",
    "start": "ng serve",
    "build": "ng build",
    "watch": "ng build --watch --configuration development",
    "test": "ng test"
  },
  "private": true,
  "dependencies": {
    "@angular/animations": "^17.1.0",
    "@angular/common": "^17.1.0",
    "@angular/compiler": "^17.1.0",
    "@angular/core": "^17.1.0",
    "@angular/forms": "^17.1.0",
    "@angular/platform-browser": "^17.1.0",
    "@angular/platform-browser-dynamic": "^17.1.0",
    "@angular/router": "^17.1.0",
    "lodash": "^4.17.21",
    "rxjs": "~7.8.0",
    "tslib": "^2.3.0",
    "zone.js": "~0.14.3"
  },
  "devDependencies": {
    "@angular-devkit/build-angular": "^17.1.0",
    "@angular/cli": "^17.1.0",
    "@angular/compiler-cli": "^17.1.0",
    "@types/jasmine": "~5.1.0",
    "@types/lodash": "^4.14.202",
    "jasmine-core": "~5.1.0",
    "karma": "~6.4.0",
    "karma-chrome-launcher": "~3.2.0",
    "karma-coverage": "~2.2.0",
    "karma-jasmine": "~5.1.0",
    "karma-jasmine-html-reporter": "~2.1.0",
    "typescript": "~5.3.2"
  }
}
Demo 效果如下所示,这是一个简单的列表元素添加删除功能:

Animation Demo
现在我们为这两个行为添加一些动画。下面是对动画过程的详细描述:
1. add
添加节点动画分为3个步骤
1.高度从0变为标准节点高度
2.宽度从1%增加到100%
这三个步骤可以使用一个transition来完成,请看下面的代码:
trigger('addNode', [
    transition(':enter', [
        style({ height: '0px', width: '1%' }),
        query('.list-item-index', [style({ opacity: 0 })], { optional: true }),
        query('.list-item-value', [style({ opacity: 0 })], { optional: true }),
        query('.list-item-btn', [style({ opacity: 0 })], { optional: true }),
        group([
            style({ height: '0px', width: '1%' }),
            animate('0.2s ease-in-out', style({ height: '50px' }))
        ]),
        group([
            style({ width: '1%' }),
            animate('0.2s 0.1s ease-in-out', style({ width: '100%' }))
        ]),
        group([
            query('.list-item-index', [
                style({ opacity: 0 }),
                animate('0.2s 0.3s ease-in-out', style({ opacity: 1 }))
            ], { optional: true }),
            query('.list-item-value', [
                style({ opacity: 0 }),
                animate('0.2s 0.3s ease-in-out', style({ opacity: 1 }))
            ], { optional: true }),
            query('.list-item-btn', [
                style({ opacity: 0 }),
                animate('0.2s 0.3s ease-in-out', style({ opacity: 1 }))
            ], { optional: true })
        ])
    ])
])
typescript
style({ height: '0px', width: '1%' }),
query('.list-item-index', [style({ opacity: 0 })], { optional: true }),
query('.list-item-value', [style({ opacity: 0 })], { optional: true }),
query('.list-item-btn', [style({ opacity: 0 })], { optional: true }),
它们的作用就是设定动画开始时的各个元素的初始状态。目的是防止动画开始时的抖动。
因为触发动画的状态是:enter,所以当第一次渲染整个列表时,所有的节点都会触发动画。这可能不是我们需要看到的。此时我们需要其它的参数来标识出不需要动画的节点
如下所示,当我刷新了页面后,所有节点的 add animation 都执行了

我们可以利用 Angular animation 的 disabled 属性来禁用非必要动画
<div class="my-animation-container">
    <div class="list-container" [@fadeIndexMarke]="fadeIndexMarkeStatus" (@fadeIndexMarke.done)="fadeIndexMarkeDone()">

        <div class="list-item-container"
            *ngFor="let item of list"
            [@.disabled]="animationNodeIndex !== item.index"
            [@addNode]
            [@deleteNode]
            (@addNode.done)="addAnimationDone()"
            (@deleteNode.done)="deleteAnimationDone()">
            <div class="list-item-index" [ngStyle]="{ opacity: animationRunning ? 0 : 1 }">{{item.index}}</div>
            <div class="list-item-value">{{item.value}}</div>
            <div class="list-item-btn" (click)="handleDelete(item.index)">Delete</div>
        </div>

    </div>
    <div class="list-active" (click)="handleAdd()">Add</div>
</div>
handleAdd() {
  this.animationNodeIndex = this.list?.length || 0;
  this.addNode(); // Push a node in list
}

addAnimationDone() {
    if (this.animationNodeIndex >= 0) {
        this.animationNodeIndex = -1;
    }
}
2. delete
这个动画看似与 add animation 相似,但是过程却比它要复杂一些。下面是完整的动画:

这一组动画有很强的顺序性,必须是上一个动画执行完后才能执行下一个动画。特别要注意的是删除节点的操作需要在第二步完成,所以我们需要监听第一个步骤完成时的回调。
这在 css 中很难实现,可能需要借助 setTimeout。在 Angular 中,定时器并非是解决问题的一个好的选择。
Angular Animation 为我们提供了一个更好的方案。我们可以将动画拆分成两部分绑定在不同的元素上
animations: [
        trigger('fadeIndexMarke', [
            transition('fadeIn => fadeOut', [
                query('.list-item-index', [
                    style({ opacity: 1 }),
                    animate('0.2s ease-in-out', style({ opacity: 0 }))
                ], { optional: true })
            ]),
            transition('fadeOut => fadeIn', [
                query('.list-item-index', [
                    style({ opacity: 0 }),
                    animate('0.2s ease-in-out', style({ opacity: 1 }))
                ], { optional: true })
            ])
        ]),
        trigger('deleteNode', [
            transition(':leave', [
                style({ width: '100%', height: '50px', overflow: 'hidden' }),
                query('.list-item-index', style({ opacity: 0 }), { optional: true }),
                group([
                    query('.list-item-value', [
                        style({ opacity: 1 }),
                        animate('0.2s ease-in-out', style({ opacity: 0 }))
                    ], { optional: true }),
                    query('.list-item-btn', [
                        style({ opacity: 1 }),
                        animate('0.2s ease-in-out', style({ opacity: 0 }))
                    ], { optional: true })
                ]),
                group([
                    animate('0.2s 0.2s ease-in-out', style({ width: '0%' })),
                    animate('0.2s 0.3s ease-in-out', style({ height: '0px' }))
                ])
            ])
        ])
    ]
html
<div class="list-container" [@fadeIndexMarke]="fadeIndexMarkeStatus"
    (@fadeIndexMarke.done)="fadeIndexMarkeDone()">

    <div class="list-item-container"
        *ngFor="let item of list"
        [@deleteNode]
        (@deleteNode.done)="deleteAnimationDone()">
...
我们可以先执行隐藏索引的动画,然后监听 animation.done,此时再删除指定节点。
typescript
fadeIndexMarkeDone() {
    if (this.fadeIndexMarkeStatus === 'fadeOut') {
        // Step 2
        this.animationRunning = true;
        this.fadeIndexMarkeCallBack();
    }
}

handleDelete(index: number) {
    // Step 1
    this.fadeIndexMarkeCallBack = () => {
        // Step 3
        this.deleteNode(index);
    };
    this.fadeIndexMarkeStatus = 'fadeOut';
    this.animationNodeIndex = index;
}

deleteAnimationDone() {
    // Step 4
    if (this.animationRunning) {
        this.animationRunning = false;
        this.fadeIndexMarkeStatus = 'fadeIn';
        this.animationNodeIndex = -1;
        this.fadeIndexMarkeCallBack = () => {};
    }
}
这样动画的执行顺序就可以按照我们的需求来规划了。下面是完整的代码:
<div class="my-animation-container">

    <div class="list-container" [@fadeIndexMarke]="fadeIndexMarkeStatus" (@fadeIndexMarke.done)="fadeIndexMarkeDone()">

        <div class="list-item-container"
            *ngFor="let item of list"
            [@.disabled]="animationNodeIndex !== item.index"
            [@addNode]
            [@deleteNode]
            (@addNode.done)="addAnimationDone()"
            (@deleteNode.done)="deleteAnimationDone()">
            <div class="list-item-index" [ngStyle]="{ opacity: animationRunning ? 0 : 1 }">{{item.index}}</div>
            <div class="list-item-value">{{item.value}}</div>
            <div class="list-item-btn" (click)="handleDelete(item.index)">Delete</div>
        </div>

    </div>

    <div class="list-active" (click)="handleAdd()">Add</div>

</div>
.my-animation-container {
    width: 100%;
    height: 100%;
    overflow: hidden;
    display: flex;
    flex-flow: column;
    justify-content: center;
    align-items: center;
    .list-container {
        width: 400px;
        height: 600px;
        border: 2px solid gray;
        overflow-x: hidden;
        overflow-y: auto;
        padding: 20px;
        .list-item-container {
            width: 100%;
            height: 50px;
            border: 1px solid #CCCCCC;
            display: flex;
            flex-flow: row nowrap;
            justify-content: space-between;
            align-items: center;
            padding: 0 20px;
            .list-item-index {
                font-size: 24px;
                font-weight: 800;
                color: #666666;
                opacity: 1;
                &.hide-index {
                    opacity: 0;
                }
            }
            .list-item-value {
                font-size: 20px;
                font-weight: 500;
                color: #666666;
            }
            .list-item-btn {
                font-size: 14px;
                font-weight: 500;
                color: #666666;
                border: 2px solid skyblue;
                border-radius: 5px;
                padding: 5px;
                cursor: pointer;
                &:hover {
                    background-color: skyblue;
                    color: white;
                }
                &:active {
                    background-color: white;
                    color: skyblue;
                }
            }
        }
    }
    .list-active {
        font-size: 20px;
        font-weight: 500;
        color: #666666;
        border: 2px solid skyblue;
        border-radius: 5px;
        padding: 5px;
        cursor: pointer;
        margin-top: 20px;
        &:hover {
            background-color: skyblue;
            color: white;
        }
        &:active {
            background-color: white;
            color: skyblue;
        }
    }
}
import { Component, OnInit } from '@angular/core';
import { animate, style, transition, trigger, state, group, query } from '@angular/animations';

import * as _ from 'lodash';

@Component({
    selector: 'my-animation',
    templateUrl: './animation.component.html',
    styleUrls: ['./animation.component.less'],
    animations: [
        trigger('fadeIndexMarke', [
            transition('fadeIn => fadeOut', [
                query('.list-item-index', [
                    style({ opacity: 1 }),
                    animate('0.2s ease-in-out', style({ opacity: 0 }))
                ], { optional: true })
            ]),
            transition('fadeOut => fadeIn', [
                query('.list-item-index', [
                    style({ opacity: 0 }),
                    animate('0.2s ease-in-out', style({ opacity: 1 }))
                ], { optional: true })
            ])
        ]),
        trigger('addNode', [
            transition(':enter', [
                style({ height: '0px', width: '1%' }),
                query('.list-item-index', [style({ opacity: 0 })], { optional: true }),
                query('.list-item-value', [style({ opacity: 0 })], { optional: true }),
                query('.list-item-btn', [style({ opacity: 0 })], { optional: true }),
                group([
                    style({ height: '0px', width: '1%' }),
                    animate('0.2s ease-in-out', style({ height: '50px' }))
                ]),
                group([
                    style({ width: '1%' }),
                    animate('0.2s 0.1s ease-in-out', style({ width: '100%' }))
                ]),
                group([
                    query('.list-item-index', [
                        style({ opacity: 0 }),
                        animate('0.2s 0.3s ease-in-out', style({ opacity: 1 }))
                    ], { optional: true }),
                    query('.list-item-value', [
                        style({ opacity: 0 }),
                        animate('0.2s 0.3s ease-in-out', style({ opacity: 1 }))
                    ], { optional: true }),
                    query('.list-item-btn', [
                        style({ opacity: 0 }),
                        animate('0.2s 0.3s ease-in-out', style({ opacity: 1 }))
                    ], { optional: true })
                ])
            ])
        ]),
        trigger('deleteNode', [
            transition(':leave', [
                style({ width: '100%', height: '50px', overflow: 'hidden' }),
                query('.list-item-index', style({ opacity: 0 }), { optional: true }),
                group([
                    query('.list-item-value', [
                        style({ opacity: 1 }),
                        animate('0.2s ease-in-out', style({ opacity: 0 }))
                    ], { optional: true }),
                    query('.list-item-btn', [
                        style({ opacity: 1 }),
                        animate('0.2s ease-in-out', style({ opacity: 0 }))
                    ], { optional: true })
                ]),
                group([
                    animate('0.2s 0.2s ease-in-out', style({ width: '0%' })),
                    animate('0.2s 0.3s ease-in-out', style({ height: '0px' }))
                ])
            ])
        ])
    ]
})

export class MyAnimationComponent implements OnInit {

    list: { index: number; value: string; }[] = [];
    animationRunning = false;
    animationNodeIndex: number = -1;
    fadeIndexMarkeStatus = 'fadeIn';

    fadeIndexMarkeCallBack = () => {};

    ngOnInit() {
        this.list = _.chain(3).range().map((num) => ({ index: num, value: `This is the ${num + 1}'s item` })).value();
    }

    fadeIndexMarkeDone() {
        if (this.fadeIndexMarkeStatus === 'fadeOut') {
            // Step 2
            this.animationRunning = true;
            this.fadeIndexMarkeCallBack();
        }
    }

    handleAdd() {
        this.animationNodeIndex = this.list?.length || 0;
        this.addNode();
    }

    handleDelete(index: number) {
        // Step 1
        this.fadeIndexMarkeCallBack = () => {
            // Step 3
            this.deleteNode(index);
        };
        this.fadeIndexMarkeStatus = 'fadeOut';
        this.animationNodeIndex = index;
    }

    addAnimationDone() {
        if (this.animationNodeIndex >= 0) {
            this.animationNodeIndex = -1;
        }
    }

    deleteAnimationDone() {
        // Step 4
        if (this.animationRunning) {
            this.animationRunning = false;
            this.fadeIndexMarkeStatus = 'fadeIn';
            this.animationNodeIndex = -1;
            this.fadeIndexMarkeCallBack = () => {};
        }
    }

    private addNode() {
        const targetIndex = (this.list?.length || 0);
        this.list = _.concat(this.list, [{ index: targetIndex, value: `This is the ${targetIndex + 1}'s item` }]);
    }

    private deleteNode(index: number) {
        this.list = _.reduce(this.list, (result: { index: number; value: string; }[], curr, currIndex) => {
            if (currIndex > index) {
                curr.index -= 1;
                curr.value = `This is the ${curr.index + 1}'s item`;
                result.push(curr);
            } else if (currIndex < index) {
                result.push(curr);
            } else {
                // currIndex === index, exclude node
            }
            return result;
        }, []);
    }
}
下面还有一些在后期优化时所遇到的问题:
动画的回调函数的时机
Angular Animation 的 done 可以监听动画完成时的回调。这是官方文档的说法,但实际上它监听的是 animation state 的改变。组件在初始化后动画的状态就会改变,如下所示:
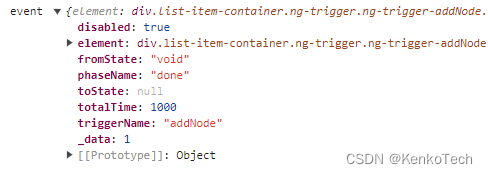
我没有执行任何操作但是 done 就被调用了,所以在监听这个回调的时候我们需要额外的参数来进行判断。
过多的 DOM 元素导致过多的渲染
列表中的节点越多,重新渲染的性能就越低。甚至当组件过于复杂或者嵌套的子组件过多的时候,动画会出现卡顿。
解决的方法是对组件进行优化,尽量减少 DOM 元素。或者降低子组件数量和嵌套层数。Angular 在渲染时会解析组件中所有的子组件,这在性能上会造成极大的损耗,所以应当尽量减少动画所影响到的组件。
节点宽高不定时,如何设定动画宽高的变化值
如果节点的宽高是自适应的,那么我们动画关键帧的 style 就最好使用百分比来表示。或者使用 transform: scale 来进行缩放。
简单的动画细节使用 animation 过于繁琐
定义一个动画需要 trigger, state, style 等一系列属性,即便完成一个很细节的动画也需要写很多代码。这时可以使用 transition 来替代动画,减少代码量。


 7531
7531


 被折叠的 条评论
为什么被折叠?
被折叠的 条评论
为什么被折叠?
 到【灌水乐园】发言


