


准备工作
-
本次只准备了两台电脑,一个
orderer一个peer,修改两台电脑的hosts,194为orderer,109为peer:192.168.2.194 orderer.flt.cn 192.168.2.109 peer0.dev.flt.cn -
新建一个文件夹
a_test,用来存放生成的文件(之后用的) -
将bin文件夹和
configtx.yaml和crypto-config.yaml拷进来,并新建crypto-config文件夹存放生成的文件 -
生成证书等文件:
./bin/cryptogen generate --config=./crypto-config.yaml --output ./crypto-config
crypto-config下出现ordererOrganizations和peerOrganizations文件夹
-
生成创世块
gensisblock:./bin/configtxgen -configPath=./ -profile SampleInsecureSolo -channelID gm-orderer-syschannel -outputBlock ./genesisblock -
生成通道配置文件
gmchannel.tx:./bin/configtxgen -configPath=./ -profile SampleSingleMSPChannel -outputCreateChannelTx gmchannel.tx -channelID gmchannel``` -
生成锚节点配置文件
DevMSPanchors.tx:./bin/configtxgen -configPath=./ -profile SampleSingleMSPChannel -outputAnchorPeersUpdate DevMSPanchors.tx -channelID gmchannel -asOrg DevMSP``` -
最终
a_test目录如下:binconfigtx.yamlcrypto-config.yamlcrypto-configgenesisblockgmchannel.txDevMSPanchors.tx
配置orderer
-
新建一个
orderer文件夹,我的建在/opt/orderer,之后的操作都在这个目录下 -
将
a_test/crypto-config/ordererOrganizations/flt.cn/orderers/orderer.flt.cn目录下的msp文件夹和tls文件夹拷贝进来,将a_test下的创世块genesisblock和a_test/bin下的orderer二进制文件拷贝进来 -
将
orderer.yaml拷进来,其中几个路径需要修改

这是之后生成的数据路径
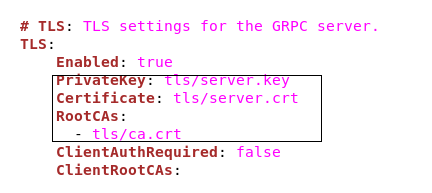
tls证书文件路径,指定orderer目录下的tls

创世块,MSP,都指定为orderer目录下的,当前为orderer节点,MSPID为OrdererMSP
- 然后就可以启动
orderer:./orderer
配置 peer0.dev.flt.cn
-
在另一台机器上新建
peer目录:opt/peer -
将
a_test/crypto-config/peerOrganizations/dev.flt.cn/peers/peer0.dev.flt.cn下的msp和tls,以及bin目录下的peer二进制文件拷贝进来 -
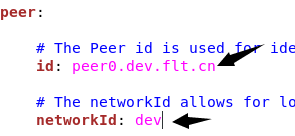
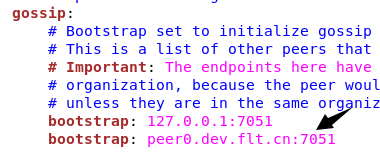
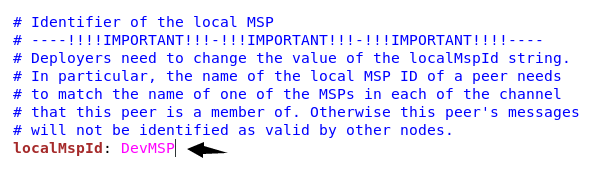
将
core.yaml拷进来,依然是注意文件路径:


- id要对应:

-
最后
peer目录有:

-
配置无误,就可启动
peer:./peer node start
配置client
-
我将
client放在了peer机器上,路径/opt/Admin@dev.flt.cn -
将
client用的msp和tls复制过来,在a_test/crypto-config/peerOrganizations/dev.flt.cn/users/Admin@dev.flt.cn -
将
peer二进制文件复制过来,将a_test/crypto-config/ordererOrganizations/flt.cn/tlsca复制过来 -
复制过来一个
core.yaml,还需要a_test下的DevMSPanchors.tx,gmchannel.tx -
新建一个
peer.sh脚本,在里面写一些配置参数:#!/bin/bash PATH=`pwd`:$PATH export FABRIC_CFG_PATH=`pwd` export CORE_PEER_ADDRESS=peer0.dev.flt.cn:7051 export CORE_PEER_LOCALMSPID=DevMSP export CORE_PEER_MSPCONFIGPATH=msp export CORE_PEER_TLS_ENABLED=true export CORE_PEER_TLS_CERT_FILE=tls/client.crt export CORE_PEER_TLS_KEY_FILE=tls/client.key export CORE_PEER_TLS_ROOTCERT_FILE=tls/ca.crt export CORE_LOGGING_LEVEL=DEBUG peer $* -
新建一个
channel,只需要启动一个orderer节点,执行后会生成gmchannel.block:./peer.sh channel create \ --orderer orderer.flt.cn:7050 \ --channelID gmchannel \ --file gmchannel.tx \ --tls true \ --cafile tlsca/tlsca.flt.cn-cert.pem -
将peer加入到channel中:
./peer.sh channel join -b gmchannel.block -
设置org的锚节点:
./peer.sh channel update \ --orderer orderer.flt.cn:7050 \ --channelID gmchannel \ --file DevMSPanchors.tx \ --tls true \ --cafile tlsca/tlsca.flt.cn-cert.pem -
安装智能合约(此处安装的是fabric-sample中的例子):
./peer.sh chaincode install \ -n mycc -v 1.0 \ -p github.com/hyperledger/fabric-samples/chaincode/fabcar/go -
初始化合约:
./peer.sh chaincode instantiate \ -o orderer.flt.cn:7050 \ --tls true \ --cafile tlsca/tlsca.flt.cn-cert.pem \ -C gmchannel \ -n mycc -v 1.0 \ -c '{"Args":[""]}' -P "OR('DevMSP.member','MarketMSP.member')" -
可以执行查询:
./peer chaincode invoke \
-o orderer.flt.cn:7050 \
--tls true \
--cafile tlsca/tlsca.flt.cn-cert.pem \
-C gmchannel \
-n mycc \
--peerAddresses peer0.dev.flt.cn:7051 \
--tlsRootCertFiles tls/ca.crt \
-c '{"function":"initLedger","Args":[""]}'


 752
752


 被折叠的 条评论
为什么被折叠?
被折叠的 条评论
为什么被折叠?
 到【灌水乐园】发言


