


一、案例准备
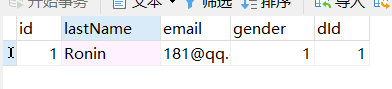
1.创建数据表(employee表)
2.创建Employee实体类封装数据库中的数据
@AllArgsConstructor
@NoArgsConstructor
@Data
@ToString
public class Employee {

    private Integer id;
    private String lastName;
    private String email;
    private Integer gender;     //1.男   2.女
    private Integer dId;
}
3.编写EmployeeMapper接口(DAO测通)
@Mapper
public interface EmployeeMapper {

    @Select("select * from employee where id=#{id}")
    Employee getEmpById(Integer id);
}
4.编写EmployeeService接口及其EmployeeServiceImpl实现类
@Service
public class EmployeeServiceImpl implements EmployeeService {

    @Autowired
    private EmployeeMapper employeeMapper;

    @Override
    @Cacheable(cacheNames = "emp",key = "#id",condition = "#id>0")
    public Employee getEmp(Integer id) {
        System.out.println("正在查询id为"+id+"号的员工");
        Employee emp = employeeMapper.getEmpById(id);
        return emp;
    }
}
5.编写EmployeeController类
@RestController
public class EmpController {

    @Autowired
    private EmployeeService employeeService;

    @GetMapping("/emp/{id}")
    public Employee getEmployee(@PathVariable("id") Integer id){
        Employee emp = employeeService.getEmp(id);
        return emp;
    }
}
6.启动访问http://localhost:8080/emp/1
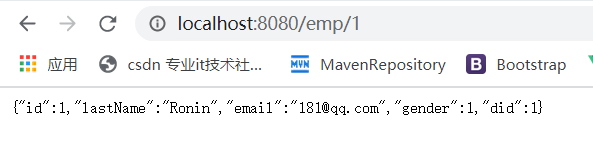
成功!
-----------------------------------------------分割线-------------------------------------------------------------
二、工作原理分析
1.查看springboot启动时,导入了哪些缓存组件
通过以往springboot相关的自动配置类可知与缓存相关的自动配置类为CacheAutoConfiguration

@Import:向容器中导入一些组件(通常导入的选择器以ImportSelector结尾)
ctrl+右键查看CacheConfigurationImportSelector源码
	static class CacheConfigurationImportSelector implements ImportSelector {

		@Override
		public String[] selectImports(AnnotationMetadata importingClassMetadata) {
			CacheType[] types = CacheType.values();
			String[] imports = new String[types.length];
			for (int i = 0; i < types.length; i++) {
				imports[i] = CacheConfigurations.getConfigurationClass(types[i]);
			}
			return imports;
		}

	}

}
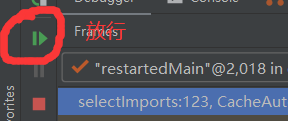
打上断点,debug模式下运行

放行,查看return imports的结果

导入的组件如下
 	* "org.springframework.boot.autoconfigure.cache.GenericCacheConfiguration"
     * "org.springframework.boot.autoconfigure.cache.JCacheCacheConfiguration"
     * "org.springframework.boot.autoconfigure.cache.EhCacheCacheConfiguration"
     * "org.springframework.boot.autoconfigure.cache.HazelcastCacheConfiguration"
     * "org.springframework.boot.autoconfigure.cache.InfinispanCacheConfiguration"
     * "org.springframework.boot.autoconfigure.cache.CouchbaseCacheConfiguration"
     * "org.springframework.boot.autoconfigure.cache.RedisCacheConfiguration"
     * "org.springframework.boot.autoconfigure.cache.CaffeineCacheConfiguration"
     * "org.springframework.boot.autoconfigure.cache.NoOpCacheConfiguration"
     * "org.springframework.boot.autoconfigure.cache.SimpleCacheConfiguration"
2.是哪个缓存配置类生效呢?根据当前的场景进行分析
有两种方法可以得出哪个缓存配置类生效
第一种:源码分析(该方法只做简单说明)
随便打开一个缓存配置类,例如第一个GenericCacheConfiguration,查看源码如下
@Configuration(proxyBeanMethods = false)
@ConditionalOnBean(Cache.class)
@ConditionalOnMissingBean(CacheManager.class)
@Conditional(CacheCondition.class)
class GenericCacheConfiguration {

	@Bean
	SimpleCacheManager cacheManager(CacheManagerCustomizers customizers, Collection<Cache> caches) {
		SimpleCacheManager cacheManager = new SimpleCacheManager();
		cacheManager.setCaches(caches);
		return customizers.customize(cacheManager);
	}

}
根据类上的
@ConditionalOnBean(Cache.class)
@ConditionalOnMissingBean(CacheManager.class)
@Conditional(CacheCondition.class)
注解进行判断该类是否生效
这些都是@Conditional注解的衍生注解,该注解是Spring4新推出的注解,判断是否满足某种条件,如果满足则给容器注册bean
第二种:查看自动配置报告
在application.properties配置文件中添加
debug=true
运行发现这几个组件中只有SimpleCacheConfiguration生效了

3.分析核心类的作用
进去查看SimpleCacheConfiguration的源码
@Configuration(proxyBeanMethods = false)
@ConditionalOnMissingBean(CacheManager.class)
@Conditional(CacheCondition.class)
class SimpleCacheConfiguration {

	@Bean
	ConcurrentMapCacheManager cacheManager(CacheProperties cacheProperties,
			CacheManagerCustomizers cacheManagerCustomizers) {
		ConcurrentMapCacheManager cacheManager = new ConcurrentMapCacheManager();
		List<String> cacheNames = cacheProperties.getCacheNames();
		if (!cacheNames.isEmpty()) {
			cacheManager.setCacheNames(cacheNames);
		}
		return cacheManagerCustomizers.customize(cacheManager);
	}

}
可以看出给容器中注册了一个ConcurrentMapCacheManager缓存管理器
查看源码分析创建Cache的具体细节

这一段代码是创建Cache的核心
#首先通过该类中的cacheMap属性获取缓存,参数为缓存名字(key-value)
#然后进行判断,如果cache为null,则上锁;再次获取如果为null,则根据本类中的createConcurrentMapCache方法创建Cache,然后将其放到缓存中

  protected Cache createConcurrentMapCache(String name) {
        SerializationDelegate actualSerialization = this.isStoreByValue() ? this.serialization : null;
        return new ConcurrentMapCache(name, new ConcurrentHashMap(256), this.isAllowNullValues(), actualSerialization);
    }
}
可以看出返回时创建了ConcurrentMapCache对象,进去查看源码
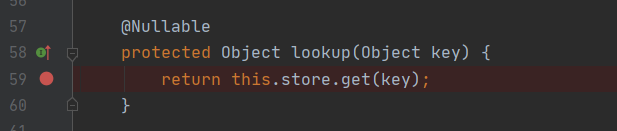
lookup方法的作用是从缓存中获取数据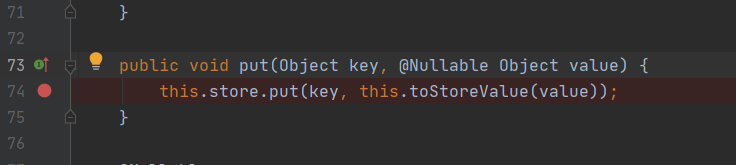
put方法的作用是是保存数据到缓存中
自此我们可以猜一下,ConcurrentMapCache该类的作用就是对缓存中的数据进行操作,如果缓存中没有数据,则从数据库查询,一并放到缓存中
总的来说ConcurrentMapCacheManager类的作用就是,先判断是否有某缓存,如果没有就创建该缓存,ConcurrentMapCache类从数据库中进行查询,一并将数据存储到ConcurrentMap集合中
4.运行流程

根据上面打上的四个断点,debug模式下启动

发现程序刚开始并没有走EmployeeServiceImpl的断点,而是走到了这个getCache方法,寻找name=emp的缓存

因为没有名为emp的缓存,所以会创建名为emp的缓存,继续放行
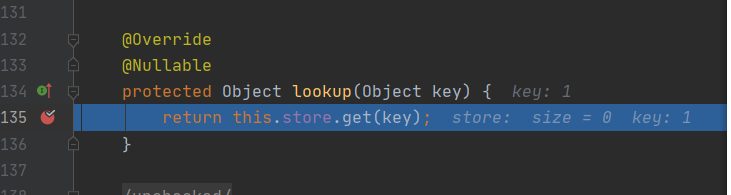
使用key去缓存中查找内容(key默认是方法的参数,浏览器访问的是1号员工信息,id=1即key=1),size=0,缓存中的数据为空

继续放行

直接调用业务方法去数据库中查询数据了,这是为什么呢,因为上个步骤在缓存中没有查询到数据,所以需要向数据库中要数据;继续放行

上一步从数据库中查询出数据之后,将数据传回前端页面展示并使用put方法将其放入到缓存中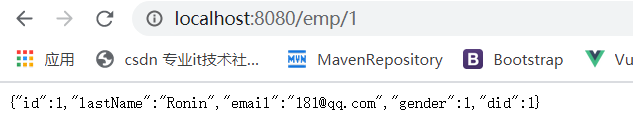
此时缓存中已经有数据了,当我再次debug运行 就不会再从数据库中查询数据了
该博客仅为了记录自己的学习过程,理清技术点思路


 172
172


 被折叠的 条评论
为什么被折叠?
被折叠的 条评论
为什么被折叠?
 到【灌水乐园】发言


