


一、windows部署
如果已经使用过,删除其中的data和logs文件夹中的内容
新建一个es-cluster文件夹,用于存放集群中的三个ES结点

1.结点1(master)配置
首先打开node-1文件夹->config目录下-》bin目录下的elasticsearch.yml文件

2.改变以下内容
不要在配置文件中加入中文注释,启动会失败
# ======================== Elasticsearch Configuration =========================
#
# NOTE: Elasticsearch comes with reasonable defaults for most settings.
#       Before you set out to tweak and tune the configuration, make sure you
#       understand what are you trying to accomplish and the consequences.
#
# The primary way of configuring a node is via this file. This template lists
# the most important settings you may want to configure for a production cluster.
#
# Please consult the documentation for further information on configuration options:
# https://www.elastic.co/guide/en/elasticsearch/reference/index.html
#
# ---------------------------------- Cluster -----------------------------------
#
# Use a descriptive name for your cluster:
#
cluster.name: my-application    //集群名
#
# ------------------------------------ Node ------------------------------------
#
# Use a descriptive name for the node:
#
node.name: node-1		//结点名
node.master: true			//既做为master
node.data: true				//也做为data
#
# Add custom attributes to the node:
#
#node.attr.rack: r1
#
# ----------------------------------- Paths ------------------------------------
#
# Path to directory where to store the data (separate multiple locations by comma):
#
#path.data: /path/to/data
#
# Path to log files:
#
#path.logs: /path/to/logs
#
# ----------------------------------- Memory -----------------------------------
#
# Lock the memory on startup:
#
#bootstrap.memory_lock: true
#
# Make sure that the heap size is set to about half the memory available
# on the system and that the owner of the process is allowed to use this
# limit.
#
# Elasticsearch performs poorly when the system is swapping the memory.
#
# ---------------------------------- Network -----------------------------------
#
# Set the bind address to a specific IP (IPv4 or IPv6):
#
network.host: localhost    //ip地址,我在本地搭建
#
# Set a custom port for HTTP:
#
http.port: 9200				//ES启动端口
transport.tcp.port: 9201	//通信端口,因为各个结点之间要进行通信
#
# For more information, consult the network module documentation.
#
# --------------------------------- Discovery ----------------------------------
#
# Pass an initial list of hosts to perform discovery when this node is started:
# The default list of hosts is ["127.0.0.1", "[::1]"]
#
#discovery.seed_hosts: ["host1", "host2"]
#
# Bootstrap the cluster using an initial set of master-eligible nodes:
#
#cluster.initial_master_nodes: ["node-1", "node-2"]
#
# For more information, consult the discovery and cluster formation module documentation.
#
# ---------------------------------- Gateway -----------------------------------
#
# Block initial recovery after a full cluster restart until N nodes are started:
#
#gateway.recover_after_nodes: 3
#
# For more information, consult the gateway module documentation.
#
# ---------------------------------- Various -----------------------------------
#
# Require explicit names when deleting indices:
#
#action.destructive_requires_name: true
http.cors.enabled: true			//跨域设置
http.cors.allow-origin: "*"
2.结点2配置
打开node-2文件夹-》conf-》elasticsearch.yml文件
# ======================== Elasticsearch Configuration =========================
#
# NOTE: Elasticsearch comes with reasonable defaults for most settings.
#       Before you set out to tweak and tune the configuration, make sure you
#       understand what are you trying to accomplish and the consequences.
#
# The primary way of configuring a node is via this file. This template lists
# the most important settings you may want to configure for a production cluster.
#
# Please consult the documentation for further information on configuration options:
# https://www.elastic.co/guide/en/elasticsearch/reference/index.html
#
# ---------------------------------- Cluster -----------------------------------
#
# Use a descriptive name for your cluster:
#
cluster.name: my-application  //集群名要一致
#
# ------------------------------------ Node ------------------------------------
#
# Use a descriptive name for the node:
#
node.name: node-2		//结点名不一致
node.master: true
node.data: true
#
# Add custom attributes to the node:
#
#node.attr.rack: r1
#
# ----------------------------------- Paths ------------------------------------
#
# Path to directory where to store the data (separate multiple locations by comma):
#
#path.data: /path/to/data
#
# Path to log files:
#
#path.logs: /path/to/logs
#
# ----------------------------------- Memory -----------------------------------
#
# Lock the memory on startup:
#
#bootstrap.memory_lock: true
#
# Make sure that the heap size is set to about half the memory available
# on the system and that the owner of the process is allowed to use this
# limit.
#
# Elasticsearch performs poorly when the system is swapping the memory.
#
# ---------------------------------- Network -----------------------------------
#
# Set the bind address to a specific IP (IPv4 or IPv6):
#
network.host: localhost
#
# Set a custom port for HTTP:
#
http.port: 9300
transport.tcp.port: 9301
discovery.seed_hosts: ["localhost:9201"]  //这是为了发现其他结点
discovery.zen.fd.ping_timeout: 1m	//9201代表了master(node-1)的通信端口
discovery.zen.fd.ping_retries: 5
#
# For more information, consult the network module documentation.
#
# --------------------------------- Discovery ----------------------------------
#
# Pass an initial list of hosts to perform discovery when this node is started:
# The default list of hosts is ["127.0.0.1", "[::1]"]
#
#discovery.seed_hosts: ["host1", "host2"]
#
# Bootstrap the cluster using an initial set of master-eligible nodes:
#
#cluster.initial_master_nodes: ["node-1", "node-2"]
#
# For more information, consult the discovery and cluster formation module documentation.
#
# ---------------------------------- Gateway -----------------------------------
#
# Block initial recovery after a full cluster restart until N nodes are started:
#
#gateway.recover_after_nodes: 3
#
# For more information, consult the gateway module documentation.
#
# ---------------------------------- Various -----------------------------------
#
# Require explicit names when deleting indices:
#
#action.destructive_requires_name: true
http.cors.enabled: true
http.cors.allow-origin: "*"
3.结点3配置
# ======================== Elasticsearch Configuration =========================
#
# NOTE: Elasticsearch comes with reasonable defaults for most settings.
#       Before you set out to tweak and tune the configuration, make sure you
#       understand what are you trying to accomplish and the consequences.
#
# The primary way of configuring a node is via this file. This template lists
# the most important settings you may want to configure for a production cluster.
#
# Please consult the documentation for further information on configuration options:
# https://www.elastic.co/guide/en/elasticsearch/reference/index.html
#
# ---------------------------------- Cluster -----------------------------------
#
# Use a descriptive name for your cluster:
#
cluster.name: my-application
#
# ------------------------------------ Node ------------------------------------
#
# Use a descriptive name for the node:
#
node.name: node-3
node.master: true
node.data: true
#
# Add custom attributes to the node:
#
#node.attr.rack: r1
#
# ----------------------------------- Paths ------------------------------------
#
# Path to directory where to store the data (separate multiple locations by comma):
#
#path.data: /path/to/data
#
# Path to log files:
#
#path.logs: /path/to/logs
#
# ----------------------------------- Memory -----------------------------------
#
# Lock the memory on startup:
#
#bootstrap.memory_lock: true
#
# Make sure that the heap size is set to about half the memory available
# on the system and that the owner of the process is allowed to use this
# limit.
#
# Elasticsearch performs poorly when the system is swapping the memory.
#
# ---------------------------------- Network -----------------------------------
#
# Set the bind address to a specific IP (IPv4 or IPv6):
#
network.host: localhost
#
# Set a custom port for HTTP:
#
http.port: 9400
transport.tcp.port: 9401
discovery.seed_hosts: ["localhost:9201","localhost:9301"]  //发现结点1和结点2(9201是node-1的通信端口,9301是node-2的通信端口
discovery.zen.fd.ping_timeout: 1m
discovery.zen.fd.ping_retries: 5
#
# For more information, consult the network module documentation.
#
# --------------------------------- Discovery ----------------------------------
#
# Pass an initial list of hosts to perform discovery when this node is started:
# The default list of hosts is ["127.0.0.1", "[::1]"]
#
#discovery.seed_hosts: ["host1", "host2"]
#
# Bootstrap the cluster using an initial set of master-eligible nodes:
#
#cluster.initial_master_nodes: ["node-1", "node-2"]
#
# For more information, consult the discovery and cluster formation module documentation.
#
# ---------------------------------- Gateway -----------------------------------
#
# Block initial recovery after a full cluster restart until N nodes are started:
#
#gateway.recover_after_nodes: 3
#
# For more information, consult the gateway module documentation.
#
# ---------------------------------- Various -----------------------------------
#
# Require explicit names when deleting indices:
#
#action.destructive_requires_name: true
http.cors.enabled: true
http.cors.allow-origin: "*"
4.使用postman进行测试
依次启动node-1,node-2,node-3


二、Linux单节点部署
(1)cd到/usr/local目录下,新建es文件夹,cd到es文件夹下
cd /usr/local/
mkdir es
cd es
(2)下载ElasticSearch
wget https://artifacts.elastic.co/downloads/elasticsearch/elasticsearch-7.10.1-linux-x86_64.tar.gz
ES下载教程:https://blog.csdn.net/Kevinnsm/article/details/120604537?spm=1001.2014.3001.5501

(3)解压缩
tar -zxvf elasticsearch-7.10.1-linux-x86_64.tar.gz

(4)改变文件名为es
mv elasticsearch-7.10.1 es

(5)🌞新建ES用户
📜Linux环境下ElasticSearch不能以root用户启动,所以需要新建用户
🧊创建用户名为es的用户,输入useradd es
🧊为es用户设置密码,passwd es(密码要满足大于8位且含有大小写字母已经数字,否者会匹配失败)


(6)🌞修改文件目录的所有者
chown:表示修改文件的所有者和所属组
chown [-R] 所有者:所属组 文件或目录
chown -R es:es /usr/local/es/es

(7)🌞修改elasticsearch.yml文件内容
在文件末尾加入以下内容
cluster.name: elasticsearch
node.name: node-1
network.host: 0.0.0.0
http.port: 9200
cluster.initial_master_nodes: [“node-1”]

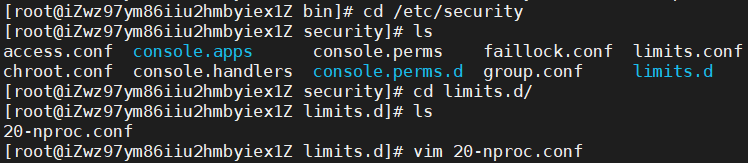
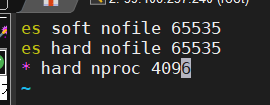
(8)🌞修改 /etc/security/limits.conf中的内容
由于es生成得内容比较多,所以需要修改相关配置

在文件末尾加入
es soft nofile 65535
es hard nofile 65535

加粗样式(9)🌞修改20-nproc.conf文件
vim /etc/security/limits.d/20-nproc.conf
(10)🌞修改/etc/sysctl.conf文件
vim /etc/sysctl.conf
在文件底部加入vm.max_map_count = 655360
重新加载
sysctl -p

(11)🌞切换到es用户下,启动ElasticSearch
启动脚本在bin目录下


在es用户下启动报错是因为ElasticSearch在第一次启动过程中,会动态的生成一些文件,因为是刚生成的,所以es用户没有相应权限。则需要再次设置文件所有权
1.切换到root用户下(在es用户下是无法改变文件所有权的)
2.执行chown -R es:es /usr/local/es/es/

(12)🌞再次切换到es目录,启动即可

(13)🌞访问ip:9200即可
如果是云服务器需要开放9200端口

三、Linux集群部署
持续更新中…


 1万+
1万+


 被折叠的 条评论
为什么被折叠?
被折叠的 条评论
为什么被折叠?
 到【灌水乐园】发言


