


目录
1.直连交换机(Direct)
直连交换机通过routingKey绑定交换机和队列,同时在发送消息时,也是通过routingKey找到相对应的队列,特点是一对一发送
生产者代码示例
import com.rabbitmq.client.BuiltinExchangeType;
import com.rabbitmq.client.Channel;
import com.rabbitmq.client.Connection;
import com.rabbitmq.client.ConnectionFactory;

import java.io.IOException;
import java.util.concurrent.TimeoutException;

public class DirectProducer {


    public static void main(String[] args) throws IOException, TimeoutException {


        ConnectionFactory connectionFactory = new ConnectionFactory();

        connectionFactory.setHost("xxx.xxx.xxx.xxx");// 这里写上你自己的ip

        connectionFactory.setUsername("admin");  // 这里写上你的MQ服务器对应的账号

        connectionFactory.setPassword("123456");// 这里写上你的MQ服务器对应的密码

        connectionFactory.setPort(5672);

        Connection connection = connectionFactory.newConnection();

        Channel channel = connection.createChannel();


        // 创建交换机,名称为"direct_exchange_test", 并交换机类型为direct(即下面第二个参数)
        channel.exchangeDeclare("direct_exchange_test", BuiltinExchangeType.DIRECT,true,false,null);


        // 创建队列,名称为“direct_queue_test”
        channel.queueDeclare("direct_queue_test",true,false,false,null);

        // 绑定队列,并设置routingKey的名称为 “direct_routing”
        channel.queueBind("direct_queue_test","direct_exchange_test","direct_routing");

        String message = "消息发送成功!";

        //开启监听
        channel.basicPublish("direct_exchange_test","direct_routing",null,message.getBytes());

        channel.close();

        connection.close();

    }


}
消费者代码示例
import com.rabbitmq.client.*;

import java.io.IOException;

public class DirectConsumer {

    public static void main(String[] args) throws Exception{

        ConnectionFactory connectionFactory = new ConnectionFactory();

        connectionFactory.setHost("xxx.xxx.xxx.xxx");

        connectionFactory.setUsername("admin");

        connectionFactory.setPassword("123456");

        connectionFactory.setPort(5672);

        Connection connection = connectionFactory.newConnection();

        Channel channel = connection.createChannel();


        //deliverCallback  消息接收后的回调

        DeliverCallback deliverCallback = (new DeliverCallback() {
            @Override
            public void handle(String s, Delivery delivery) throws IOException {

                System.out.println("接收到的消息:" + new String(delivery.getBody(),"UTF-8"));

            }
        });


        //cancelCallback  消费者取消时的回调
        CancelCallback cancelCallback = (new CancelCallback() {
            @Override
            public void handle(String s) throws IOException {

                System.out.println("消息被拒绝");
            }
        });

        channel.basicConsume("direct_queue_test",true,deliverCallback,cancelCallback);

        channel.close();

        connection.close();

    }

}
2.RabbitMQ连接工具类
可以看到,我们在上面编写direct类型的交换机代码时,无论是生产者还是消费者的一方,都需要先连接上RabbitMQ服务器,并再最后关闭信道和连接,对于每次都需要连接和关闭的重复性代码,我们可以将其封装,打包成工具类:
import com.rabbitmq.client.Channel;
import com.rabbitmq.client.Connection;
import com.rabbitmq.client.ConnectionFactory;

import java.io.IOException;
import java.util.concurrent.TimeoutException;

public class RabbitUtil {

     private final static String ip = "xxx.xxx.xxx.xxx";  // 你的RabbitMQ服务器ip

     private final static String username = "admin";  //  你的RabbitMQ服务器的用户名

     private final static String password = "123456"; // 你的RabbitMQ服务器的密码

     private final static String port = "5672"; // 你的RabbitMQ服务器的端口

    // 获取连接工厂
    public static Connection getConnectionFactory() throws IOException, TimeoutException {

        ConnectionFactory connectionFactory = new ConnectionFactory();

        connectionFactory.setHost(ip);

        connectionFactory.setPort(Integer.parseInt(port));

        connectionFactory.setUsername(username);

        connectionFactory.setPassword(password);

        Connection connection = connectionFactory.newConnection();


        return connection;
    }

    // 创建通道
    public static Channel getChannel(Connection connection){

        try {
            return connection.createChannel();
        } catch (Exception e) {
            e.printStackTrace();
        }
        return null;
    }

     // 关闭信道和连接
    public static void close(Channel channel, Connection connection) {
        try {
            channel.close();
            connection.close();
        } catch (IOException e) {
            e.printStackTrace();
        } catch (TimeoutException e) {
            e.printStackTrace();
        }
    }

}
3.Fanout交换机(扇出交换机,广播)
Fanout交换机如其名,特点是会广播,即只要发送消息到其中一个交换机中的一个队列,则同个交换机中的其它队列也会收到消息,因此就减少了routingKey设置的必要
生产者
import com.rabbitmq.client.*;
import org.Utils.RabbitUtil;

import java.io.IOException;
import java.util.concurrent.TimeoutException;

public class FanoutProducer {

    public static void main(String[] args) throws IOException, TimeoutException {


        Connection connection = RabbitUtil.getConnectionFactory();

        Channel channel = RabbitUtil.getChannel(connection);

        channel.exchangeDeclare("fanout_exchange_test", BuiltinExchangeType.FANOUT,true, false, null);


        // 创建队列
        channel.queueDeclare("fanout_queue_test",true,false,false,null);
        channel.queueDeclare("fanout_queue_test2",true,false,false,null);

        channel.queueBind("fanout_queue_test","fanout_exchange_test", "");
        channel.queueBind("fanout_queue_test2","fanout_exchange_test", "");

        String message = "这条消息来自Fanout交换机中的队列!";


        // 发送消息到交换机(广播到所有队列)
        channel.basicPublish("fanout_exchange_test","fanout_queue_test",null,message.getBytes("UTF-8"));
        // 上面我把消息指定发送到
        // fanout_queue_test队列,所以这条消息发送到了所有的队列!等价于

       //  channel.basicPublish("fanout_exchange_test","",null,message.getBytes("UTF-8"));


        RabbitUtil.close(channel,connection);

    }

}
消费者
import com.rabbitmq.client.*;
import org.Utils.RabbitUtil;

import java.io.IOException;
import java.util.concurrent.TimeoutException;

public class FanoutConsumer {

    public static void main(String[] args) throws IOException, TimeoutException {


        Connection connection = RabbitUtil.getConnectionFactory();

        Channel channel = RabbitUtil.getChannel(connection);

        DeliverCallback deliverCallback = (new DeliverCallback() {
            @Override
            public void handle(String s, Delivery delivery) throws IOException {

                System.out.println("接收到的消息是:" + new String(delivery.getBody(),"UTF-8"));
            }
        });

        CancelCallback cancelCallback = (new CancelCallback() {
            @Override
            public void handle(String s) throws IOException {

                System.out.println("消息被取消消费了!");
            }
        });


        // 测试是否两个队列都可以收到消息
        channel.basicConsume("fanout_queue_test",true,deliverCallback,cancelCallback);
        channel.basicConsume("fanout_queue_test2",true,deliverCallback,cancelCallback);

        channel.close();

        connection.close();

    }

}
4.Topic交换机(主题交换机)
Topic交换机与Direct交换机是相对的,direct通过routingKey做到了一对一消息发送,而topic交换机更像是通过routingKey的设置来做模糊查询
- Topic中,将routingkey通过"."来分为多个部分
- "*":代表一个部分(不能为空)
- "#":代表0个或多个部分(如果绑定的路由键为 "#" 时,则接受所有消息,因为路由键所有都匹配)
例如:
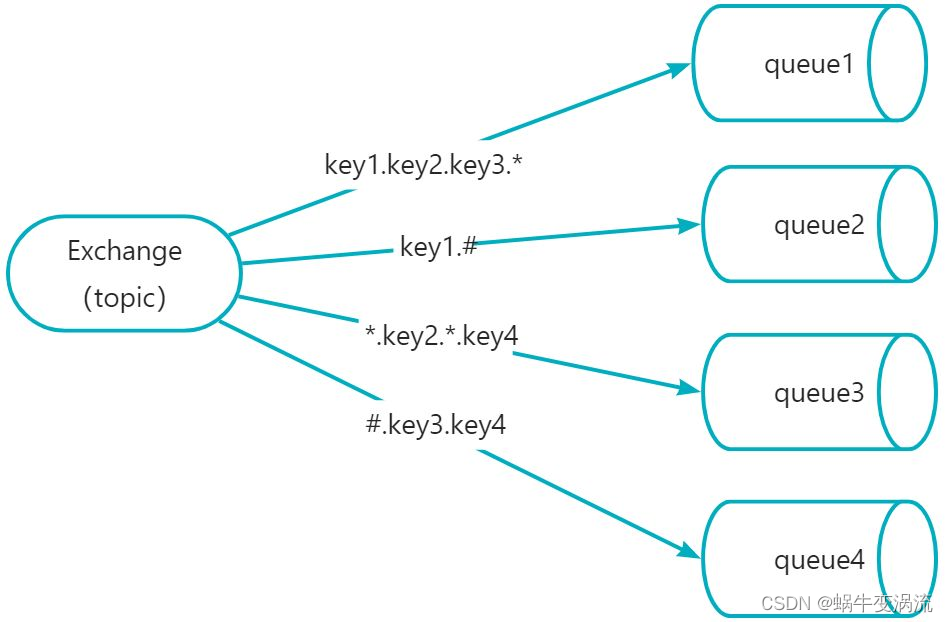
然后发送一条信息,routingkey为"key1.key2.key3.key4",那么根据"."将这个路由键分为了4个部分,此条路由键,将会匹配:
1.key1.key2,key3.* 成功匹配 2.key1.# 成功匹配
3.*.key2.*.key4 成功匹配 4.#.key3.key4 成功匹配
如果发送消息routingkey为"key1",那么将只能匹配中key1.#,#可以代表0个部分
生产者
import com.rabbitmq.client.BuiltinExchangeType;
import com.rabbitmq.client.Channel;
import com.rabbitmq.client.Connection;
import com.rabbitmq.client.ConnectionFactory;
import org.Utils.RabbitUtil;

import java.io.IOException;
import java.util.concurrent.TimeoutException;

public class TopicProducer {

    public static void main(String[] args) throws IOException, TimeoutException {

        Connection connection = RabbitUtil.getConnectionFactory();

        Channel channel = RabbitUtil.getChannel(connection);

        // 创建交换机

        channel.exchangeDeclare("topic_exchange_test", BuiltinExchangeType.TOPIC,true, false, false, null);

        String routingKey = "*.com.zhan";

        String routingKey2 = "#.zhan";

        String routingkey3 = "zhan.com";

        // 创建队列

        channel.queueDeclare("topic_queue_test1",true,false,false,null);

        channel.queueDeclare("topic_queue_test2",true,false,false,null);

        channel.queueDeclare("topic_queue_test3",true,false,false,null);

        // 队列绑定到交换机上

        channel.queueBind("topic_queue_test1", "topic_exchange_test", routingKey);

        channel.queueBind("topic_queue_test2", "topic_exchange_test", routingKey2);

        channel.queueBind("topic_queue_test3", "topic_exchange_test", routingkey3);

        String message = "这条消息来自Fanout交换机";

        // 发送消息到交换机,routingKeyzhan
        channel.basicPublish("topic_exchange_test", "com.com.zhan", null, message.getBytes());
        // 预期结果:
        // topic_queue_test1 接收到消息
        // topic_queue_test2 接收到消息

        // topic_queue_test3 接收不能到消息

       RabbitUtil.close(channel,connection);

    }

}
消费者
import com.rabbitmq.client.*;
import org.Utils.RabbitUtil;

import java.io.IOException;
import java.util.concurrent.TimeoutException;

public class TopicConsumer {

    public static void main(String[] args) throws IOException, TimeoutException {

        Connection connection = RabbitUtil.getConnectionFactory();

        Channel channel = RabbitUtil.getChannel(connection);

        DeliverCallback deliverCallback = (new DeliverCallback() {
            @Override
            public void handle(String s, Delivery delivery) throws IOException {
                System.out.println("接收到的消息"+new String(delivery.getBody()));
            }
        });

        CancelCallback cancelCallback = (new CancelCallback() {
            @Override
            public void handle(String s) throws IOException {
                System.out.println("消息被拒绝");
            }
        });

        channel.basicConsume("topic_queue_test1",true,deliverCallback,cancelCallback);

        channel.basicConsume("topic_queue_test2",true,deliverCallback,cancelCallback);

        channel.basicConsume("topic_queue_test3",true,deliverCallback,cancelCallback);

        // 预期结果:
        // test1 和  test2 队列里都会消息

        // test3 不会收到

        RabbitUtil.close(channel,connection);

    }

}
5.Header交换机(头部交换机)
Header交换机与Direct交换机的区别在于,前者使用map来作为消息发送的标识,类似于HTTP协议中的消息头,而后者是通过routingKey,此外 基本没区别,但Header交换机性能差很多,如今基本用不上
消费方指定的headers中必须包含一个"x-match"的键。
键"x-match"的值有2个
x-match = all :表示所有的键值对都匹配才能接受到消息
x-match = any :表示只要有键值对匹配就能接受到消息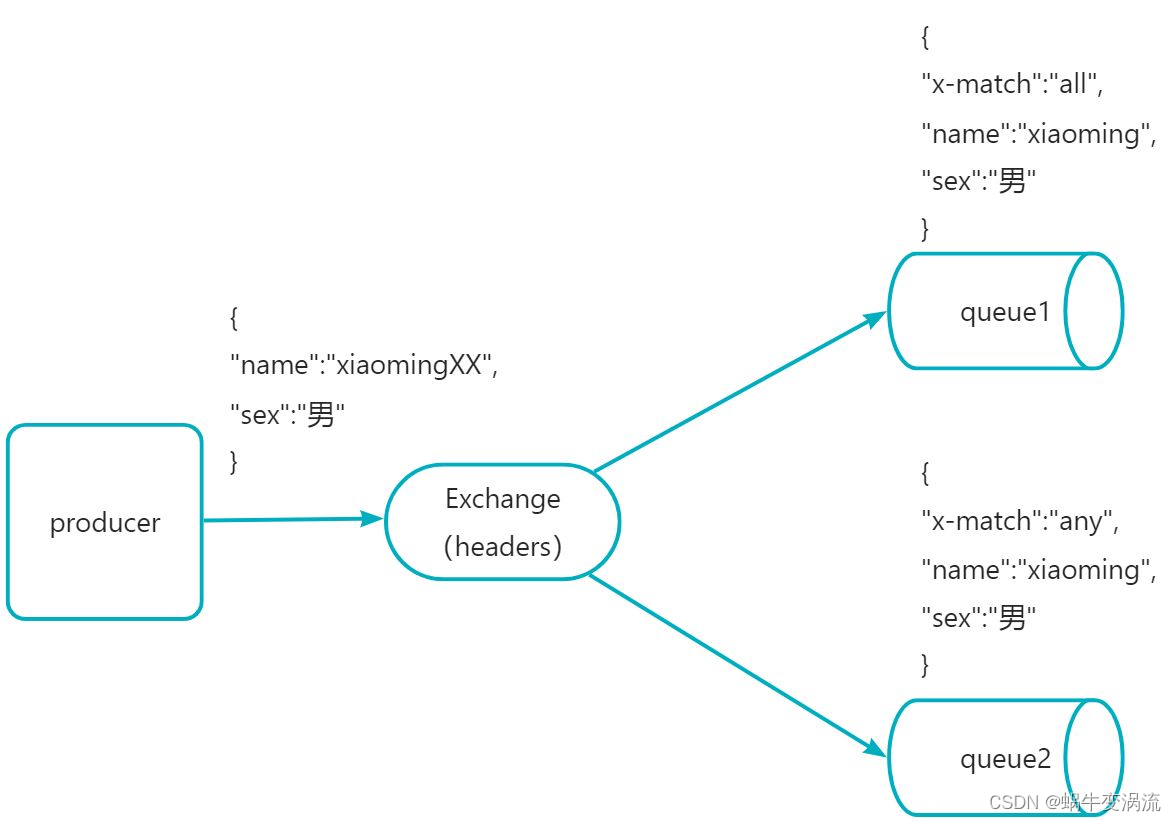
假设现在发送消息,携带的参数是{"name":"xiaomingXX"}想一想上述queue1和queue2哪个能收到消息?
答案是queue2
虽然queue1和queue的map中要求的参数信息基本一致,但匹配规则不同,queue1是“x-match:all” ,即需要完全匹配,而后者是“x-match:any”,即只要一个满足就可发送到,从图中可以看到queue2里 " "sex":男" "可以匹配到的。
生产者
import com.rabbitmq.client.*;
import org.Utils.RabbitUtil;

import java.io.IOException;
import java.util.HashMap;
import java.util.concurrent.TimeoutException;

public class HeaderProducer {

    public static void main(String[] args) throws IOException, TimeoutException {

        Connection connection = RabbitUtil.getConnectionFactory();

        Channel channel = RabbitUtil.getChannel(connection);

        channel.exchangeDeclare("header_exchange_test", BuiltinExchangeType.HEADERS,true, false, false, null);

        channel.queueDeclare("header_queue_test1",true,false,false,null);

        channel.queueDeclare("header_queue_test2",true,false,false,null);

        channel.queueDeclare("header_queue_test3",true,false,false,null);

        HashMap<String, Object> map = new HashMap<>();

        map.put("x-match","all");

        map.put("name","zhangsan");

        map.put("age","20");

        AMQP.BasicProperties.Builder properties = new AMQP.BasicProperties.Builder().headers(map);

        String message = "这条消息来自Header交换机";

        channel.basicPublish("header_exchange_test","header_queue_test1",properties.build(),message.getBytes());

        RabbitUtil.close(channel,connection);

    }

}
消费者
import com.rabbitmq.client.*;
import org.Utils.RabbitUtil;

import java.io.IOException;
import java.util.concurrent.TimeoutException;

public class HeaderConsumer {

    public static void main(String[] args) throws IOException, TimeoutException {

        Connection connection = RabbitUtil.getConnectionFactory();

        Channel channel = connection.createChannel();

        DeliverCallback deliverCallback = (consumerTag, delivery) -> {

            System.out.println("Header Consumer 收到消息:" + new String(delivery.getBody()));

        };

        CancelCallback cancelCallback = (consumerTag) -> {
            System.out.println("消息消费被中断");
        };


        channel.basicConsume("header_queue_test1", true, deliverCallback, cancelCallback);


        RabbitUtil.close(channel, connection);
    }


}
6.附录说明
相关依赖
    <dependency>
      <groupId>com.rabbitmq</groupId>
      <artifactId>amqp-client</artifactId>
      <version>5.12.0</version>
    </dependency>


 265
265

 被折叠的 条评论
为什么被折叠?
被折叠的 条评论
为什么被折叠?
 到【灌水乐园】发言


