


小引
- 引入两个扩展:
Flask-SQLAlchemy和Flask-Migrate - 引入 Database Migration 的概念
- 利用SQLAlchemy,完成 db Model
- 引入 shell context 的概念
注: SQLite is used (no need to run a database server like MySQL and PostgreSQL), each
database is stored in a single file on disk
Extensions 安装
- Flask-SQLAlchemy
(venv) $ pip install flask-sqlalchemy
- Flask-Migrate
This extension is a Flask wrapper for Alembic, a database migration framework for SQLAlchemy.
(venv) $ pip install flask-migrate
Configuration of Flask-SQLAlchemy
- Flask_microblog / config.py (Configuration of Flask-SQLAlchemy)
import os
basedir = os.path.abspath(os.path.dirname(__file__))

class Config(object):
    # ...
    SQLALCHEMY_DATABASE_URI = os.environ.get('DATABASE_URL') or \
        'sqlite:///' + os.path.join(basedir, 'app.db')
    SQLALCHEMY_TRACK_MODIFICATIONS = False
注:SQLALCHEMY_TRACK_MODIFICATIONS:to signal the application every time a change is about to be made in the database.
- app / _init_.py (Initialization of Flask-SQLAlchemy & Flask-Migrate)
from flask import Flask
from config import Config
from flask_sqlalchemy import SQLAlchemy
from flask_migrate import Migrate

app = Flask(__name__)
app.config.from_object(Config)
db = SQLAlchemy(app)
migrate = Migrate(app, db)

from app import routes, models
注: bottom imports 中的 models , 将会定义 db 的结构 (structure or schema)。
Database Models
注:可以用WWW SQL Designer 在线进行db designes,并能导出 SQL 脚本 (wiki)。
- app / models.py
from datetime import datetime
from app import db

class User(db.Model):
    id = db.Column(db.Integer, primary_key=True)
    username = db.Column(db.String(64), index=True, unique=True)
    email = db.Column(db.String(120), index=True, unique=True)
    password_hash = db.Column(db.String(128))
    posts = db.relationship('Post', backref='author', lazy='dynamic')

    def __repr__(self):
        return '<User {}>'.format(self.username)

class Post(db.Model):
    id = db.Column(db.Integer, primary_key=True)
    body = db.Column(db.String(140))
    timestamp = db.Column(db.DateTime, index=True, default=datetime.utcnow)
    user_id = db.Column(db.Integer, db.ForeignKey('user.id'))

    def __repr__(self):
        return '<Post {}>'.format(self.body)
其中,
- Post 中的 user_id,为 User 中的 id 外键。
- User 中的 posts 属性,为 User 的 virtual field,真实的 db user表 中不会显示。
- 类似的,User 中 通过
db.relationship('Post', backref='author', lazy='dynamic')定义virtual field 的 posts时,同时定义了Post 的 virtual field,即 author (亦不在 真实的 db post表 中显示)。 - 虚拟的virtual field,虽不显示,但可正常调用(
User.posts,Post.author;对应各自class的object,亦可调用)。 db.relationship()中,用的是 model class的名字(如: ‘Post’), 而db.ForeignKey()中,用的是model class对应的 db table 名 (如user.id中的 user)。- 如果未特别定义
__tablename__,则model class的 db table 名 采用 “snake case”方式 .
For the User model above, the corresponding table in the database will be named user. For a AddressAndPhone model class, the table would be named address_and_phone.
Database Relationships
注: “one” to “many” 类型, {“one”: User, “many”; Post} 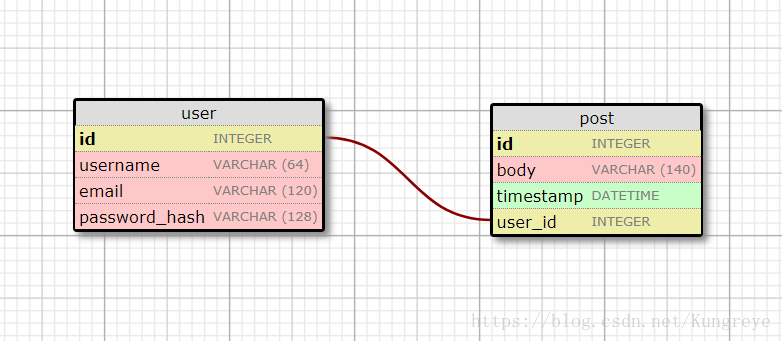Creating Migration Repository
注:Flask-Migrate exposes its commands through the flask command.flask run, a sub-command native to Flask.flask db, a sub-command added by Flask-Migrate to manage everything related to db migrations.
Create the migration repository for microblog by flask db init:
命令执行位置,同 flask run(即设定环境变量 `export FLASK_APP = microblog.py` 的项目根目录下)。
(venv) $ flask db init
  Creating directory /home/miguel/microblog/migrations ... done
  Creating directory /home/miguel/microblog/migrations/versions ... done
  Generating /home/miguel/microblog/migrations/alembic.ini ... done
  Generating /home/miguel/microblog/migrations/env.py ... done
  Generating /home/miguel/microblog/migrations/README ... done
  Generating /home/miguel/microblog/migrations/script.py.mako ... done
  Please edit configuration/connection/logging settings in
'/home/miguel/microblog/migrations/alembic.ini' before proceeding.The First Database Migration
`(venv) $ flask db migrate -m “users table”`(venv) $ flask db migrate -m "users table"
INFO [alembic.runtime.migration] Context impl SQLiteImpl.
INFO [alembic.runtime.migration] Will assume non-transactional DDL.
INFO [alembic.autogenerate.compare] Detected added table 'user'
INFO [alembic.autogenerate.compare] Detected added index 'ix_user_email' on '['email']'
INFO [alembic.autogenerate.compare] Detected added index 'ix_user_username' on '['username']'
Generating /home/miguel/microblog/migrations/versions/e517276bb1c2_users_table.py ... doneDatabase Upgrade and Downgrade
(venv) $ flask db upgrade
(venv) $ flask db upgrade
INFO  [alembic.runtime.migration] Context impl SQLiteImpl.
INFO  [alembic.runtime.migration] Will assume non-transactional DDL.
INFO  [alembic.runtime.migration] Running upgrade  -> e517276bb1c2, users table
(venv) $ flask db downgrade
When to undo the last migration, we can downgrade the database, delete the migration script, and then generate a new one to replace it.
Shell Context
flask shell, to complete pre-imports, so we can start a Python interpreter in the context of the application, without having to repeat some imports every time we want to test things out in a Python shell.
from app import app, db
from app.models import User, Post

@app.shell_context_processor
def make_shell_context():
return {'db': db, 'User': User, 'Post': Post}- 通过@app.shell_context_processor, 将函数注册 为 shell context function.
- 运行命令
flask shell时,激活注册的函数,并将返回的 items 注册到 shell session 中. - 返回的是 dict 而不是 list,是因为需要通过 keys 给每个 item 赋名称,以便在 shell session 中调用。
- After adding the shell context processor function, we can work with db entities without having to import them:
(venv) $ flask shell
>>> db
<SQLAlchemy engine=sqlite:////Users/migu7781/Documents/dev/flask/microblog2/app.db>
>>> User
<class 'app.models.User'>
>>> Post
<class 'app.models.Post'>
注:since Flask 1.0 there is an easy way to make Flask remember the FLASK_APP environment variable, so you do not need to export FLASK_APP=microblog.py each time in virtual environment to get access to “db”, “User” and “Post” in shell.
Find info about the .flaskenv file in Flask documentation.


 2万+
2万+

 被折叠的 条评论
为什么被折叠?
被折叠的 条评论
为什么被折叠?
 到【灌水乐园】发言


