


1 说明
因为 SpirngBoot, SpringCloud 的各个版本之间差异还是挺大的, 所以在参照本博客进行学习时, 有可能出现因为版本不一致, 而出现不同的问题。
如果可以和本项目使用的环境保持一致, 即使不一致, 也尽可能不要跨大版本。
环境清单
| 框架 | 版本 |
|---|---|
| JDK | 1.8 |
| Spring Boot | 2.1.4.RELEASE |
| Spring Cloud | Greenwich.SR1 |
2 准备
2.1 Maven 父模块配置
- 先建立一个 Maven 的父模块, 也就是整个项目里面只有一个 pom 文件
- 在父 pom 里面添加一些共用的配置, 比如 SpringBoot, SpringCloud 的依赖
<?xml version="1.0" encoding="UTF-8"?>
<project xmlns="http://maven.apache.org/POM/4.0.0"
         xmlns:xsi="http://www.w3.org/2001/XMLSchema-instance"
         xsi:schemaLocation="http://maven.apache.org/POM/4.0.0 http://maven.apache.org/xsd/maven-4.0.0.xsd">
    <modelVersion>4.0.0</modelVersion>

    <!-- 手动引入 spring boot 版本依赖-->
    <parent>
        <groupId>org.springframework.boot</groupId>
        <artifactId>spring-boot-starter-parent</artifactId>
        <version>2.1.4.RELEASE</version>
        <relativePath/>
    </parent>

    <groupId>lcn29.github.io</groupId>
    <artifactId>spring-cloud-eureka</artifactId>
    <packaging>pom</packaging>
    <version>1.0-SNAPSHOT</version>

    <dependencyManagement>
        <dependencies>
            <!-- 手动引入 spring cloud 对应的配置 -->
            <dependency>
                <groupId>org.springframework.cloud</groupId>
                <artifactId>spring-cloud-dependencies</artifactId>
                <version>Greenwich.SR1</version>
                <type>pom</type>
                <scope>import</scope>
            </dependency>
        </dependencies>
    </dependencyManagement>

    <!-- 手动 引入 spring cloud 的基础模块-->
    <dependencies>
        <dependency>
            <groupId>org.springframework.cloud</groupId>
            <artifactId>spring-cloud-starter</artifactId>
        </dependency>
    </dependencies>

    <!-- 省略一些打包相关的配置 -->
</project>
2.2 启动 2 个服务端 (注册中心)
- 在父模块里面新建一个子模块, 模块名
eureka-server - 在子模块引入 Eureka 服务端需要的依赖
<dependencies>
    <!-- eureka 服务端的依赖-->
    <dependency>
        <groupId>org.springframework.cloud</groupId>
        <artifactId>spring-cloud-starter-netflix-eureka-server</artifactId>
    </dependency>
</dependencies>
- 在启动类上加上注解
@EnableEurekaServer
@EnableEurekaServer
@SpringBootApplication
public class EurekaServe {
    public static void main(String[] args) {
        SpringApplication.run(EurekaServe.class, args);
    }
}
-
在 src/main/resources 里面新建 3 个配置文件, 分别是
application.yml,application-8081.yml,application-8081.yml -
在
application.yml里面加上这 2 个配置
# eureka 服务端的通用配置
spring:
  application:
    name: server-eureka

eureka:
  instance:
    instance-id: ${spring.application.name}:${server.port}
- 在
application-8081.yml里面加上这 2 个配置
# eureka 服务端 1 的配置
server:
  port: 8081
eureka:
  instance:
    hostname: eureka-8081.com
  client:
    service-url:
      defaultZone: http://eureka-8082.com:8082/eureka/
- 在
application-8082.yml里面加上这 2 个配置
# eureka 服务端 1 的配置
server:
  port: 8082
eureka:
  instance:
    hostname: eureka-8082.com
  client:
    service-url:
      defaultZone: http://eureka-8081.com:8081/eureka/
- 在电脑的 hosts 文件里面添加这 2 行映射
127.0.0.1 eureka-8081.com
127.0.0.1 eureka-8082.com
- 为了让我们的子模块能够启动为 2 个服务端, 需要我们做一下启动的配置
- Idea 找到右上角的这个
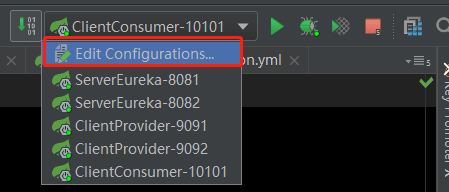
- 点一下左边的 +, 找到 SpringBoot 项, 配置一下下面的三项
(如果 Program arguments 没有的话, 可以在绿色区域搜索添加)
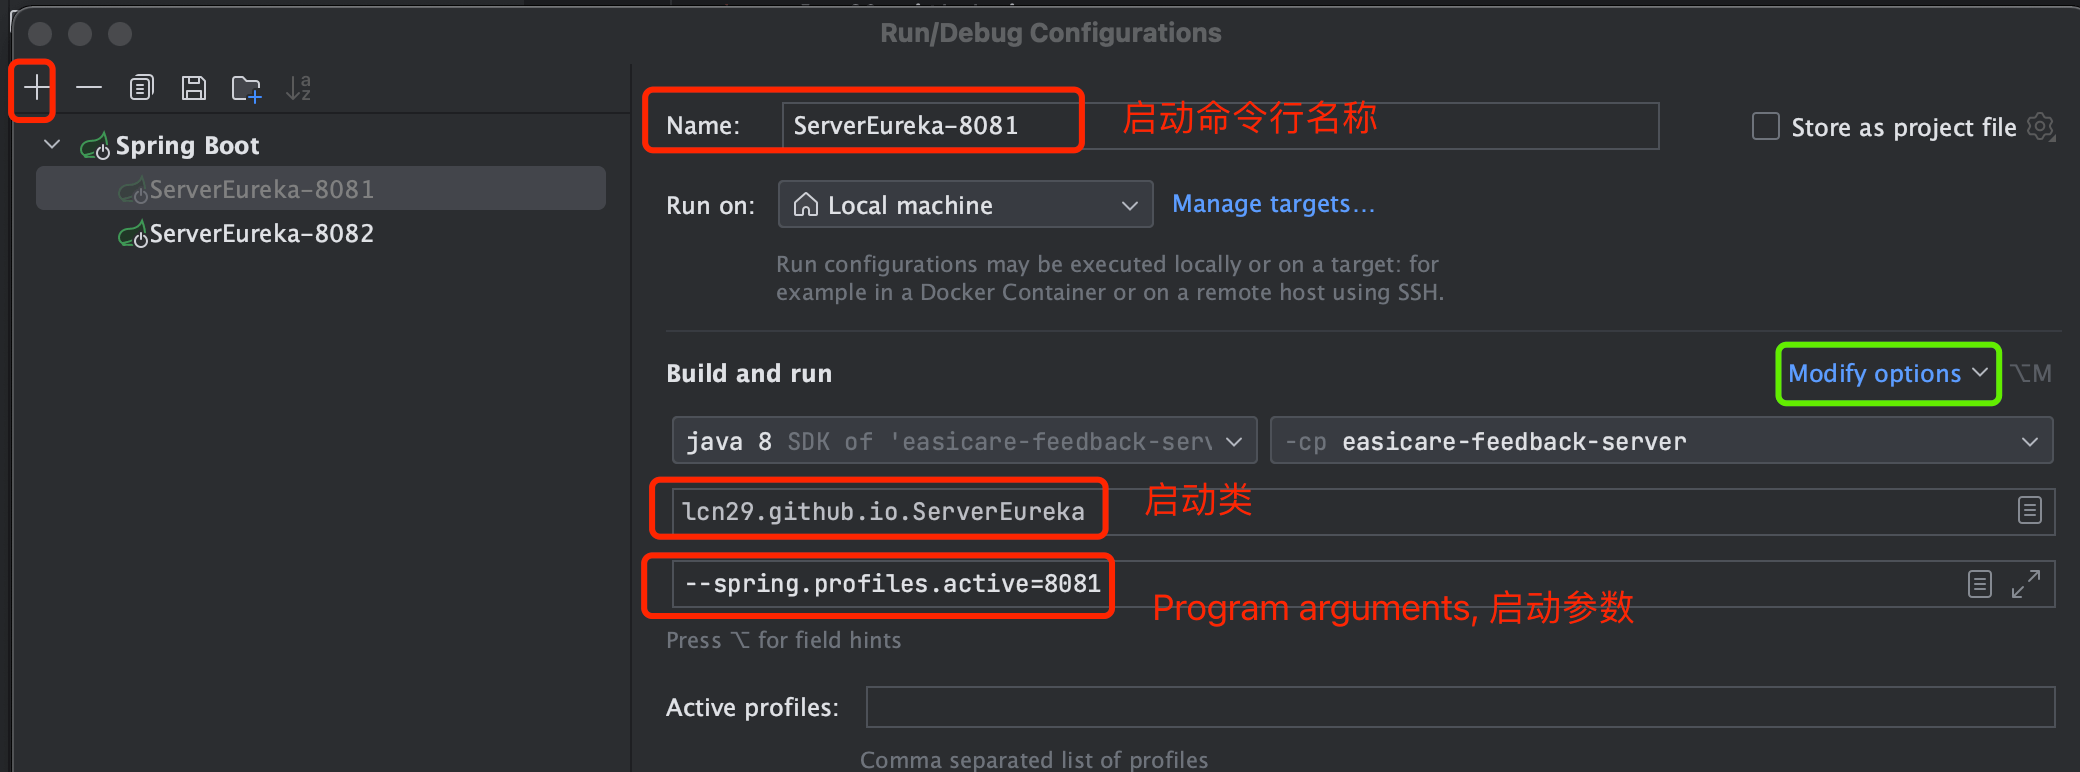
- Program arguments 配置的内容为
--spring.profiles.active=8081, 作用是启动这个 SpringBoot 应用时使用8081环境, 也就是对应application-8081.yml里面的配置
- 同理, 在配置多一条
8082环境的启动命令, 这样子模块就能启动 2 个程序了
2.3 搭建 1 个服务提供方
-
在父模块里面新建一个子模块, 模块名
client-provider -
在模块里面添加如下依赖
<!-- eureka 服务端的依赖-->
<dependency>
    <groupId>org.springframework.cloud</groupId>
    <artifactId>spring-cloud-starter-netflix-eureka-client</artifactId>
</dependency>

<!-- web 功能的支持, 没有这个 客户端就会启动完就结束程序 -->
<dependency>
    <groupId>org.springframework.boot</groupId>
    <artifactId>spring-boot-starter-web</artifactId>
</dependency>
- 然后在启动类上加上注解
@EnableEurekaClient
@EnableEurekaClient
@SpringBootApplication
public class EurekaClientOne {
    public static void main(String[] args){
        SpringApplication.run(EurekaClientOne.class, args);
    }
}
-
同样在 src/main/resources 里面新建 1 个配置文件,
application.yml -
在
application.yml里面加上这 2 个配置
spring:
  application:
    name: client-provider

server:
  port: 9091

eureka:
  instance:
    instance-id: ${spring.application.name}:${server.port}
  client:
    service-url:
      # 向服务端的注册地址
      defaultZone: http://eureka-8081.com:8081/eureka/,http://eureka-8082.com:8082/eureka
- 服务提供方新增一个的 Rest Api
@RestController
public class ProviderController {

    @GetMapping("/hello/{delay}")
    public String hello(@PathVariable("delay")int delay) {
        // 传递的参数为1, 让线程睡5s, 让调用方超时
        if (delay == 1) {
            try {
                Thread.sleep(5000);
            } catch (InterruptedException e) {
                e.printStackTrace();
            }
        }
        //打印请求的地址
        String resp = "当前响应来自于服务提供方";
        return resp;
    }
}
2.4 搭建 1 个服务调用方
- 在父模块里面再建立一个子模块, 模块名
client-consumer, 作为服务的调用方 - 在模块里面添加如下依赖
<!-- eureka 服务端的依赖-->
<dependency>
    <groupId>org.springframework.cloud</groupId>
    <artifactId>spring-cloud-starter-netflix-eureka-client</artifactId>
</dependency>

<!-- web 功能的支持, 没有这个 客户端就会启动完就结束程序 -->
<dependency>
    <groupId>org.springframework.boot</groupId>
    <artifactId>spring-boot-starter-web</artifactId>
</dependency>

<!--远程调用-->
<dependency>
    <groupId>org.springframework.cloud</groupId>
    <artifactId>spring-cloud-starter-openfeign</artifactId>
</dependency>
- 然后在启动类上加上注解
@EnableEurekaClient
@EnableFeignClients
@EnableEurekaClient
@SpringBootApplication
public class ClientConsumer {
    public static void main(String[] args){
        SpringApplication.run(ClientConsumer.class, args);
    }
}
- 在
application.yml中添加配置
spring:
  application:
    name: client-consumer
server:
  port: 10101

eureka:
  instance:
    instance-id: ${spring.application.name}:${server.port}
  client:
    service-url:
      # 向服务端的注册地址
      defaultZone: http://eureka-8081.com:8081/eureka/,http://eureka-8082.com:8082/eureka
- 创建一个接口, 用于远程调用
// name 是服务提供方的应用名
@FeignClient(name = "client-provider")
public interface ProviderRemote {
    @GetMapping("/hello")
    String hello();
}
- 声明一个 Controller (用于测试), 注入刚声明的接口
@RestController
public class HystrixController {

    @Resource
    private ProviderRemote providerRemote;

    @GetMapping("/hystrix/{delay}")
    public String hystrix(@PathVariable("delay")int delay) {
        String resp = providerRemote.hystrix(delay);
        return resp;
    }
}
- 依次启动服务端 (注册中心), 服务提供方, 服务调用方
至此, 我们的环境就搭好了, 项目如果正常的话, 这时候访问 http://localhost:10101/ribbon, 服务调用方是可以调用到服务提供方的。
3 Hystrix 开始使用
- 在服务调用方的依赖里面加入 Hystrix 的依赖
<!-- 熔断器 -->
<dependency>
    <groupId>org.springframework.cloud</groupId>
    <artifactId>spring-cloud-starter-netflix-hystrix</artifactId>
</dependency>
- 启动类加上 @EnableCircuitBreaker 注解, 启动熔断功能
@EnableFeignClients
@EnableEurekaClient
@EnableCircuitBreaker
@SpringBootApplication
public class ClientConsumer {
    public static void main(String[] args) {
        SpringApplication.run(ClientConsumer.class, args);
    }
}
- 为服务调用方的 Feign 接口创建一个实现类, 并注入容器, 同时设置 @FeignClient 的 fallback 选项为我们的实现类
// 在原本的 ProviderRemote 接口的 @FeignClient 注解里面加上对应的实现类
@FeignClient(name = "client-provider", fallback = ProviderRemoteImpl.class)
public interface ProviderRemote {

   /**
    * 远程接口
    * @param delay 是否进入延迟 1:开启
    * @return
    */
   @GetMapping("/hello/{delay}")
   String hystrix(@PathVariable("delay")int delay);
}

// ProviderRemote 接口实现类
@Component
public class ProviderRemoteImpl implements ProviderRemote {
    @Override
    public String hystrix(int delay) {
        return "服务提供方出现异常, 不进行调用, 直接返回了";
    }
}
- 在 在
application.yml里面加上启动 Hystrix 的配置
feign:
  hystrix:
    # 开启熔断器功能
    enabled: true
这时通过请求调用方的提供 HystrixController 声明的接口
- 入参为 1, 响应结果为: 服务提供方出现异常, 不进行调用, 直接返回了
- 入参为非 1 的其他参数, 响应结果为: 当前响应来自于服务提供方
4 通过 Hystrix-dashboard 进行监控
Hystrix 提供了一套实时监控的工具: HystrixDashboard。
通过 HystrixDashboard 我们可以在直观地看到各 Hystrix Command 的请求响应时间, 请求成功率等数据。下面就介绍一下怎么使用。
- 我们的 Hystrix 项目需要提供一个注册一个 Servlet, 提供给监控项目使用, 也就是在我们的服务调用方添加下面的逻辑
/**
 * 新增一个配置类
 * 提供一个 Servlet 供监控项目使用
 */
@Configuration
public class MetricsStreamServletConfigration {

    @Bean
    public ServletRegistrationBean getServlet(){
        HystrixMetricsStreamServlet streamServlet = new HystrixMetricsStreamServlet();
        ServletRegistrationBean registrationBean = new ServletRegistrationBean(streamServlet);
        registrationBean.setLoadOnStartup(1);
        registrationBean.addUrlMappings("/actuator/hystrix.stream");
        registrationBean.setName("HystrixMetricsStreamServlet");
        return registrationBean;
    }
}
-
在父模块里面新建一个子模块, 模块名
monitor-dashboard -
在模块里面添加如下依赖
<dependency>
    <groupId>org.springframework.cloud</groupId>
    <artifactId>spring-cloud-starter-netflix-hystrix</artifactId>
</dependency>

<dependency>
    <groupId>org.springframework.boot</groupId>
    <artifactId>spring-boot-starter-actuator</artifactId>
</dependency>

<!-- hystrix 监控 -->
<dependency>
    <groupId>org.springframework.cloud</groupId>
    <artifactId>spring-cloud-starter-hystrix-dashboard</artifactId>
    <version>1.4.7.RELEASE</version>
</dependency>
- 在启动类添加注解 @EnableHystrixDashboard
@SpringBootApplication
@EnableHystrixDashboard
public class MonitorDashBoard {
    public static void main(String[] args) {
        SpringApplication.run(MonitorDashBoard.class, args);
    }
}
- 启动项目后, 在浏览器输入 http://localhost:你设置的端口/hystrix, 链接打开后的样子如下:
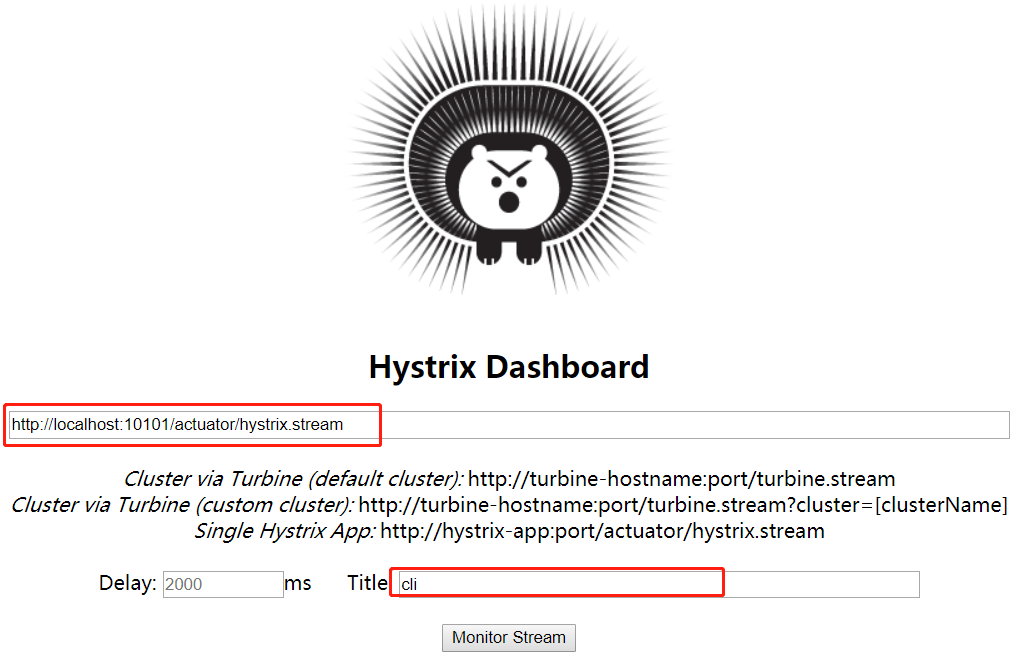
在第一个空格输入你的要监控的 hystrix 项目, 一般是服务调用者的 http 地址 + 端口 + /actuator/hystrix.stream, 下面的 Title 随意输
- 输入后打开, 可以看到这个界面 (如果界面一直在 loading, 手动调用一次 服务调用者的接口就可以了)
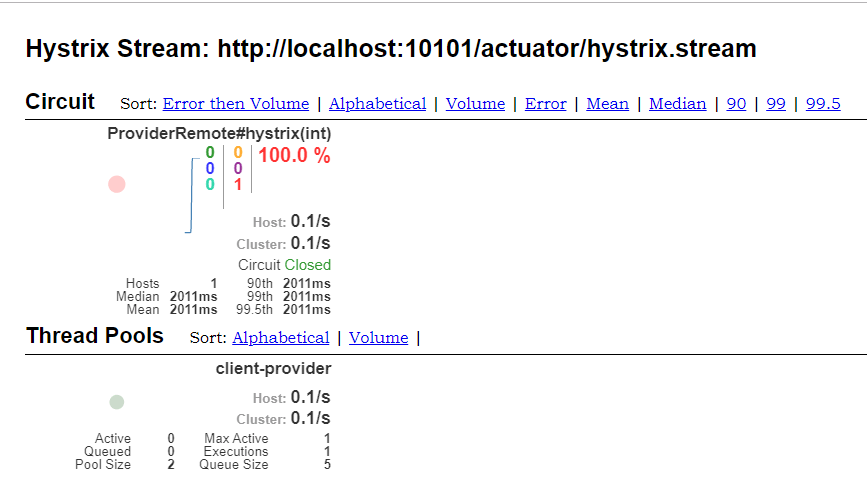
- Hystrix-dashboard 可以查看每个应用的信息, 但是每次都只能查看一个, 有时我们需要了解这个集群的情况, Hystrix-dashboard 就满足不了了, 这时可以使用 Turbine, 这里就不做更多的说明了


 2341
2341


 被折叠的 条评论
为什么被折叠?
被折叠的 条评论
为什么被折叠?
 到【灌水乐园】发言


