


BeanPostProcessor官方定义为工厂钩子,我们也俗称后置处理器。它允许自定义修改新的bean实例,例如检查标记接口或用代理包装它们。应用程序上下文可以在其bean定义中自动检测BeanPostProcessor bean,并将它们应用于随后创建的任何bean。
一、BeanPostProcessor
BeanPostProcessor类是spring的原生接口
Factory hook that allows for custom modification of new bean instances
允许自定义修改新bean实例的工厂钩子
postProcessBeforeInitialization bean初始化之前执行的方法
postProcessAfterInitialization bean初始化之后执行的方法
public interface BeanPostProcessor {
    @Nullable
    default Object postProcessBeforeInitialization(Object bean, String beanName) throws BeansException {
        return bean;
    }

    @Nullable
    default Object postProcessAfterInitialization(Object bean, String beanName) throws BeansException {
        return bean;
    }
}
二、源码
在spring源码类org.springframework.beans.factory.support.AbstractAutowireCapableBeanFactory的方法initializeBean中,我们可以看到为什么会这样执行。
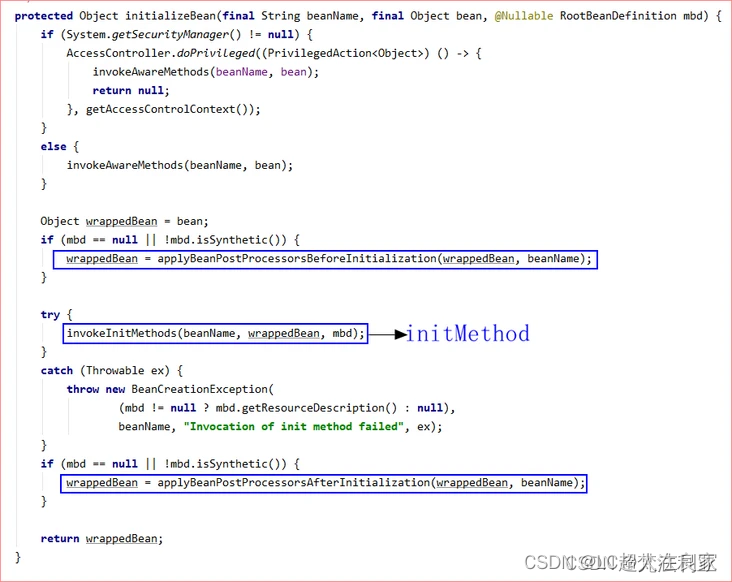
根据以上代码,我们得知,在invokeInitMethods的执行前后,spring会分别调用所有的BeanPostProcessor,执行其中的方法,那么invokeInitMethods的具体内容我们仍需要看下,发现此方法主要作用有两个:1、判断bean是否继承了InitializingBean,如果继承接口,执行afterPropertiesSet()方法,2、获得是否设置了init-method属性,如果设置了,就执行设置的方法
以上就是spring的后置处理器的简单的使用方法以及执行时机。
————————————————
版权声明:本文为CSDN博主「梵法利亚」的原创文章,遵循CC 4.0 BY-SA版权协议,转载请附上原文出处链接及本声明。
原文链接:https://blog.csdn.net/wg22222222/article/details/122879915
三、使用
BeanPostProcessor是接口,我们就可以创建一个类(比如SimpleBeanPostProcessor )来实现这个接口重写他的方法;
@Component
public class SimpleBeanPostProcessor implements BeanPostProcessor {
 @Override
    public Object postProcessBeforeInitialization(Object bean, String beanName) throws BeansException {
        System.out.println("==========前置开启postProcessBeforeInitialization=========");
        System.out.println("=====================" + bean.getClass().getName() + " - " + beanName);
        return null;
    }

    @Override
    public Object postProcessAfterInitialization(Object bean, String beanName) throws BeansException {
        System.out.println("============后置开启postProcessBeforeInitialization==============");
        System.out.println("=====================" + bean.getClass().getName() + " - " + beanName);
        return null;
}
但想要我们自己定义的bean的后置处理器起作用,需要我们把其放入spring容器,所以记得加@Component注解
定义一个bean,为mybean
package com.example.flowdemo.pojo;

import lombok.Data;

/**
 * @author lc
 * @version 1.0
 * @date 2022/10/11 11:38
 */
@Data
public class MyBean {
    private String beanName;
    private String className;
    public MyBean() {
        System.out.println("MyBean constructor");
    }
    public void init() {
        System.out.println("MyBean is init");
    }
}
启动类
@SpringBootApplication
@EnableWebMvc
public class FlowdemoApplication {

    public static void main(String[] args) {
        SpringApplication.run(FlowdemoApplication.class, args);
    }
/**
     * 通过@Bean的方式可以指定initMethod
     * @return
     */
    @Bean(initMethod = "init")
    public MyBean mybean() {
        return new MyBean();
    }
}
启动会发现
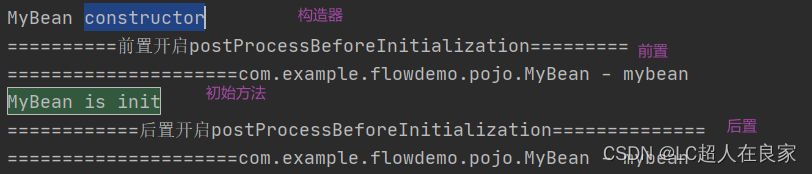
从打打印结果可以看出,后置处理器在bean的构造方法执行之后执行。而且后置处理器的方法postProcessBeforeInitialization和postProcessAfterInitialization分别在Bean的init方法前后执行。并且BeanPostProcessor后置处理器会对spring中所有的bean起作用
四、实战
我们可以结合业务场景来设置,比如,每一个bean都要有不重复的唯一id;
首先自定义一个注解,可以定义一个value属性,作为隔离业务的标识:
@Retention(RetentionPolicy.RUNTIME)
@Target({ElementType.FIELD, ElementType.METHOD})
public @interface IdGeneratorClient {
    /**
     * ID 生成器名称
     *
     * @return
     */
    String value() default "DEFAULT";
}
定义 ID 生成器接口
public interface IdGenerator {
    String groupName();

    long nextId();
}
实现 ID 生成器接口,偷懒使用AtomicLong实现自增,同时考虑 ID 生成器是分组的,通过ConcurrentHashMap实现 ID 生成器的持有
class DefaultIdGenerator implements IdGenerator {
    private static final Map<String, AtomicLong> ID_CACHE = new ConcurrentHashMap<>(new HashMap<>());
    private final String groupName;

    DefaultIdGenerator(final String groupName) {
        this.groupName = groupName;
        synchronized (ID_CACHE) {
            ID_CACHE.computeIfAbsent(groupName, key -> new AtomicLong(1));
        }
    }

    @Override
    public String groupName() {
        return this.groupName;
    }

    @Override
    public long nextId() {
        return ID_CACHE.get(this.groupName).getAndIncrement();
    }
}
如前面设计的,我们需要一个工厂类来创建 ID 生成器
public enum IdGeneratorFactory {
    INSTANCE;

    private static final Map<String, IdGenerator> ID_GENERATOR_MAP = new ConcurrentHashMap<>(new HashMap<>());

    public synchronized IdGenerator create(final String groupName) {
        return ID_GENERATOR_MAP.computeIfAbsent(groupName, key -> new DefaultIdGenerator(groupName));
    }
}
前面都是属于基本操作,这里才是扩展的核心。我们的实现逻辑是:
扫描 bean 的所有属性,然后找到定义了IdGeneratorClient注解的属性
获取注解的value值,作为 ID 生成器的分组标识
使用IdGeneratorFactory这个工厂类生成 ID 生成器实例,这里会返回新建的或已经定义的实例
通过反射将 ID 生成器实例写入 bean
定义 BeanPostProcessor
public class IdGeneratorBeanPostProcessor implements BeanPostProcessor {

    @Override
    public Object postProcessBeforeInitialization(final Object bean, final String beanName) throws BeansException {
        return bean;
    }

    @Override
    public Object postProcessAfterInitialization(final Object bean, final String beanName) throws BeansException {
        parseFields(bean);
        return bean;
    }

    private void parseFields(final Object bean) {
        if (bean == null) {
            return;
        }
        Class<?> clazz = bean.getClass();
        parseFields(bean, clazz);

        while (clazz.getSuperclass() != null && !clazz.getSuperclass().equals(Object.class)) {
            clazz = clazz.getSuperclass();
            parseFields(bean, clazz);
        }
    }

    private void parseFields(final Object bean, Class<?> clazz) {
        if (bean == null || clazz == null) {
            return;
        }

        for (final Field field : clazz.getDeclaredFields()) {
            try {
                final IdGeneratorClient annotation = AnnotationUtils.getAnnotation(field, IdGeneratorClient.class);
                if (annotation == null) {
                    continue;
                }

                final String groupName = annotation.value();

                final Class<?> fieldType = field.getType();
                if (fieldType.equals(IdGenerator.class)) {
                    final IdGenerator idGenerator = IdGeneratorFactory.INSTANCE.create(groupName);
                    invokeSetField(bean, field, idGenerator);
                    continue;
                }

                throw new RuntimeException("未知字段类型无法初始化,bean: " + bean + ",field: " + field);
            } catch (Throwable t) {
                throw new RuntimeException("初始化字段失败,bean=" + bean + ",field=" + field, t);
            }
        }
    }

    private void invokeSetField(final Object bean, final Field field, final Object param) {
        ReflectionUtils.makeAccessible(field);
        ReflectionUtils.setField(field, bean, param);
    }
}
测试用例,验证我们的实现是否生效
 <dependency>
            <groupId>junit</groupId>
            <artifactId>junit</artifactId>
        </dependency>
        <dependency>
            <groupId>org.springframework.boot</groupId>
            <artifactId>spring-boot-starter-test</artifactId>
        </dependency>
import cn.hutool.core.lang.Assert;
import org.junit.jupiter.api.Test;
import org.springframework.beans.factory.annotation.Autowired;
import org.springframework.boot.test.context.SpringBootTest;

@SpringBootTest
class SpringBeanPostProcessorApplicationTests {
    private IdGenerator defaultIdGenerator = new DefaultIdGenerator("defualt");
    private IdGenerator group1IdGenerator = new DefaultIdGenerator("group1");

    @Test
    void contextLoads() {
        Assert.notNull(defaultIdGenerator, "注入失败");
        System.out.println(defaultIdGenerator.groupName() + " => " + defaultIdGenerator.nextId());

        Assert.notNull(group1IdGenerator, "注入失败");
        for (int i = 0; i < 5; i++) {
            System.out.println(defaultIdGenerator.groupName() + " => " + defaultIdGenerator.nextId());
            System.out.println(group1IdGenerator.groupName() + " => " + group1IdGenerator.nextId());
        }
    }

}


 790
790


 被折叠的 条评论
为什么被折叠?
被折叠的 条评论
为什么被折叠?
 到【灌水乐园】发言


