


背景
自己构思一个好的项目到github,然后发布到maven,供别人通过maven进行依赖使用。然后写点文档什么的,就可以到github骗小星星了。
实际操作
- 到网站https://issues.sonatype.org/,注册账号,该网是外网,需要自备小梯子。。注册时需要设置密码,看别人的博客说密码要求挺高,我一般都是用chrome浏览器自动生成的,然后用小本子记下来,看着是挺复杂的,强烈建议密码用小本子记下来。
- 注册完以后,登陆网站。
- 点击网站导航上的Create 创建一个Issue。
Project: Community Support - Open Source Project Repository Hosting (OSSRH)
Issue TypeRequired: New Project
Summary: 概述
Group Id:io.github.thirdparty-core
Project URL:项目站点,如:https://github.com/thirdparty-core/kernel
SCM url:项目源码仓库,如:https://github.com/thirdparty-core/kernel.git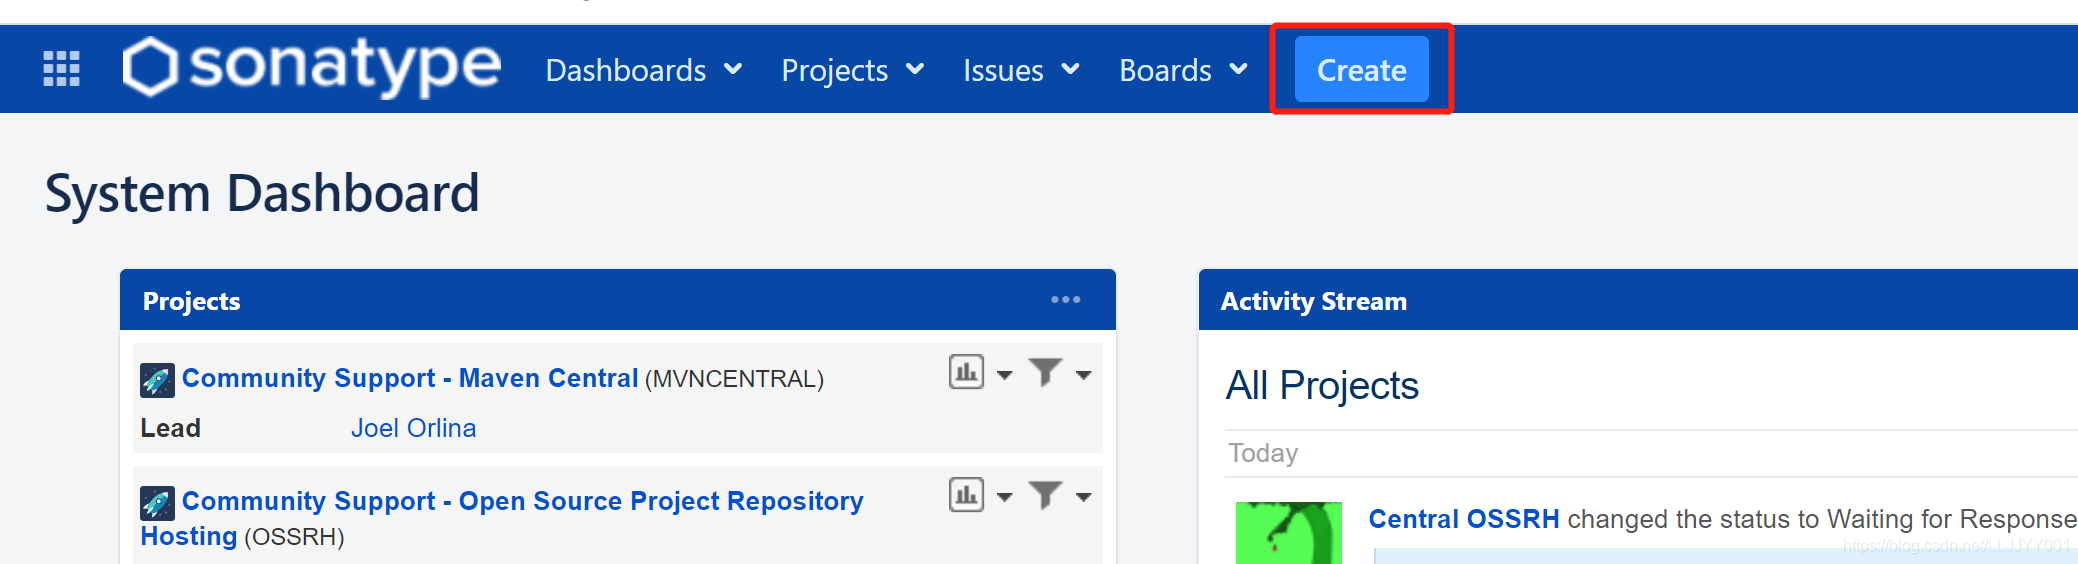
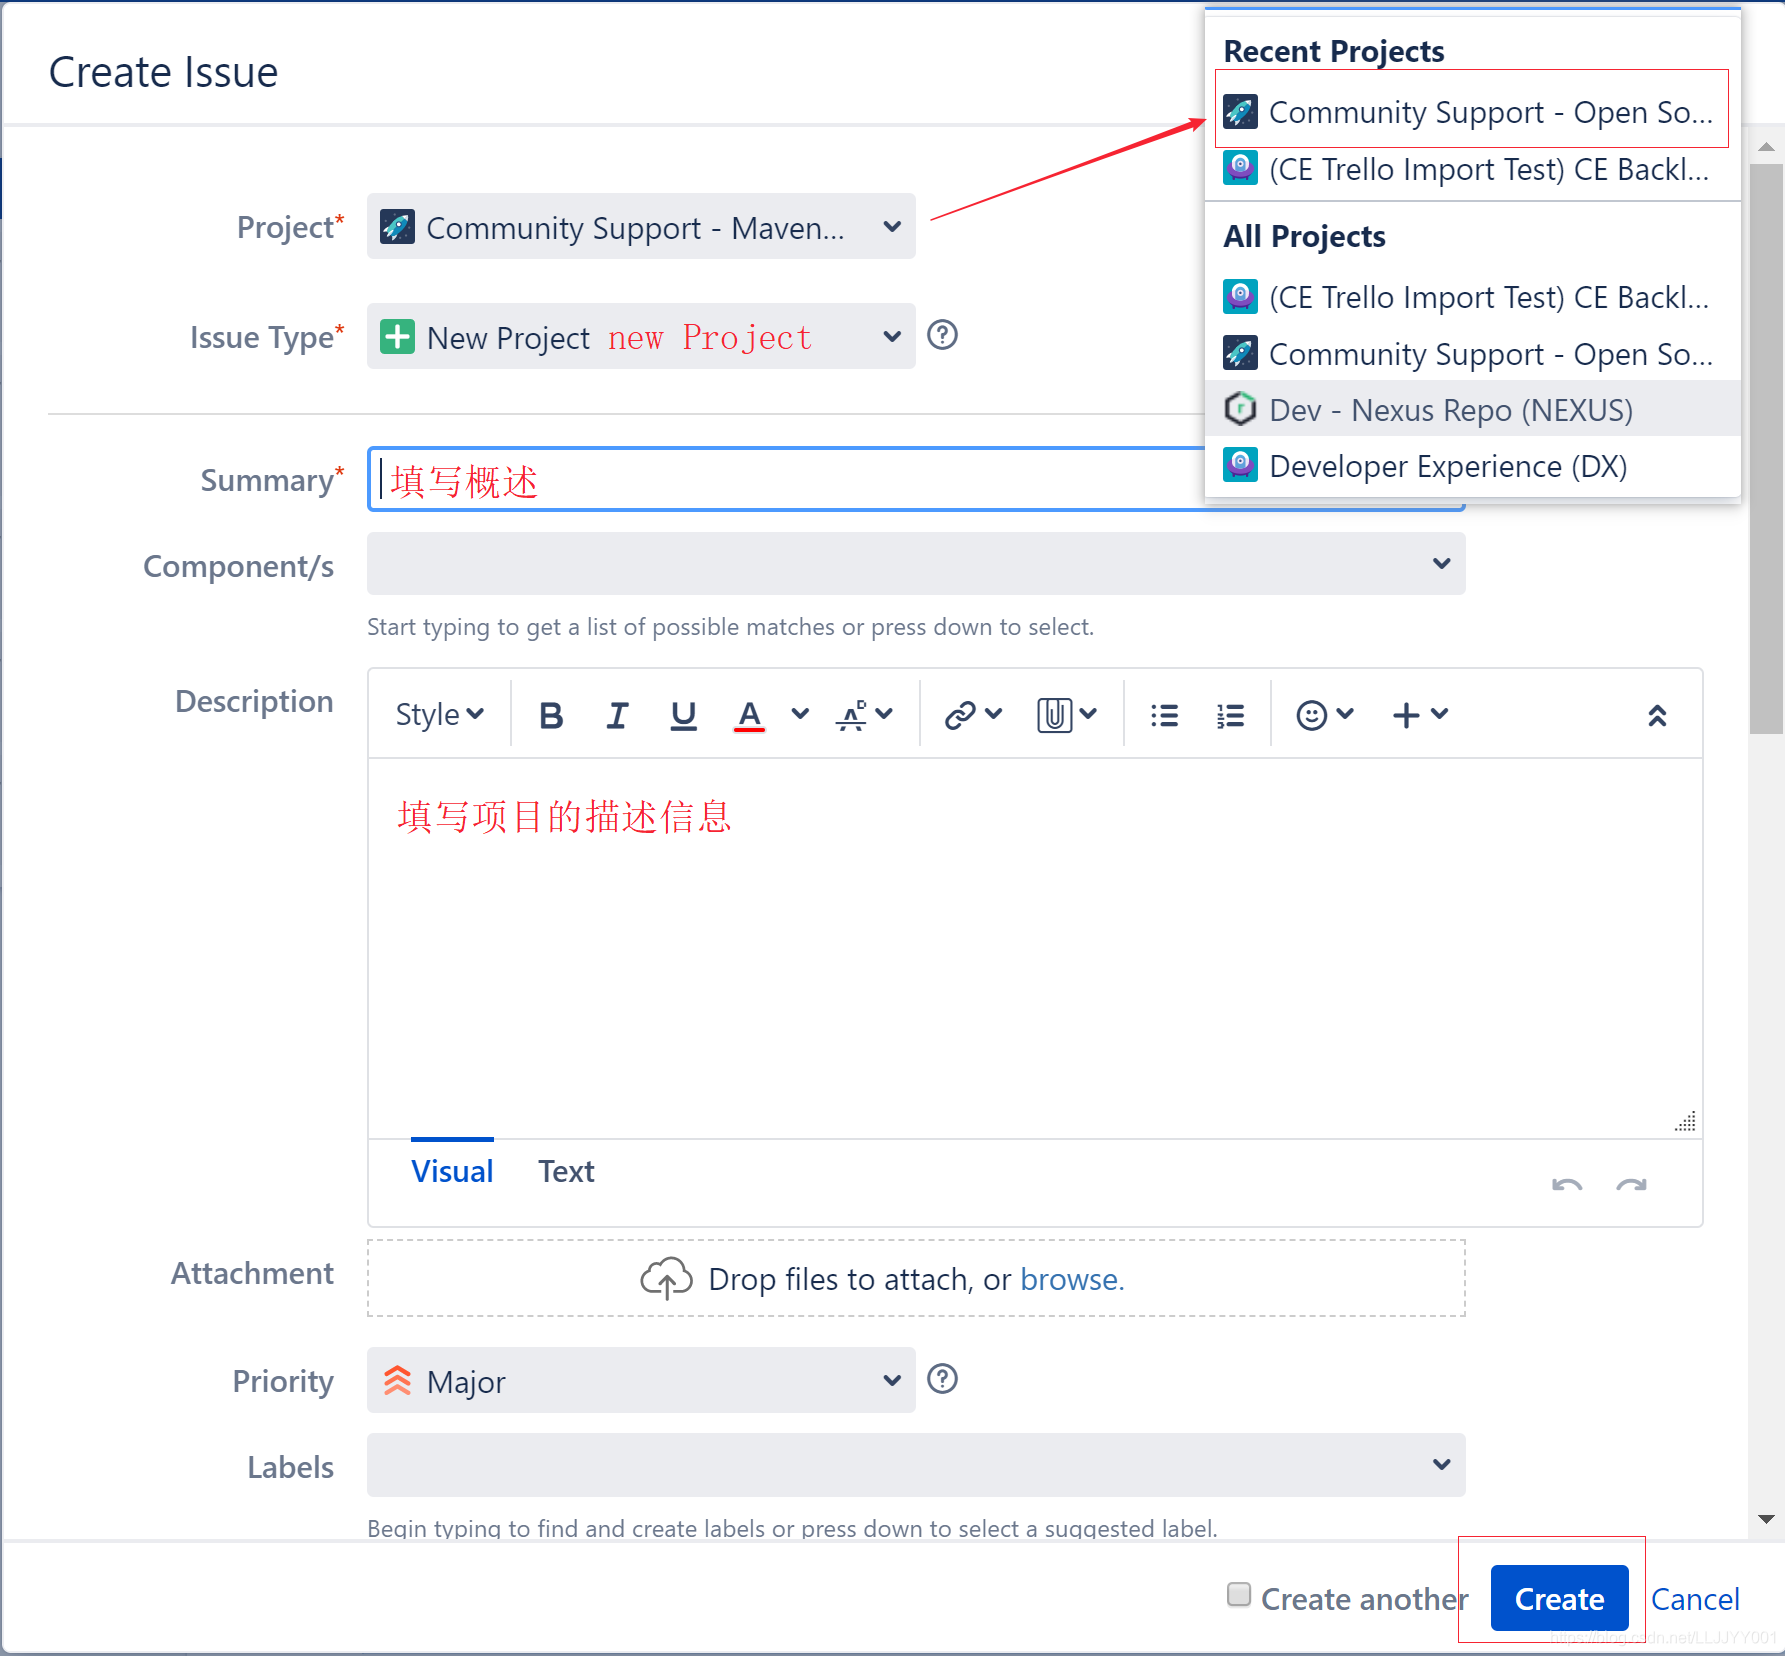
创建完后还可以再修改的。 - 创建完后,具体如下:
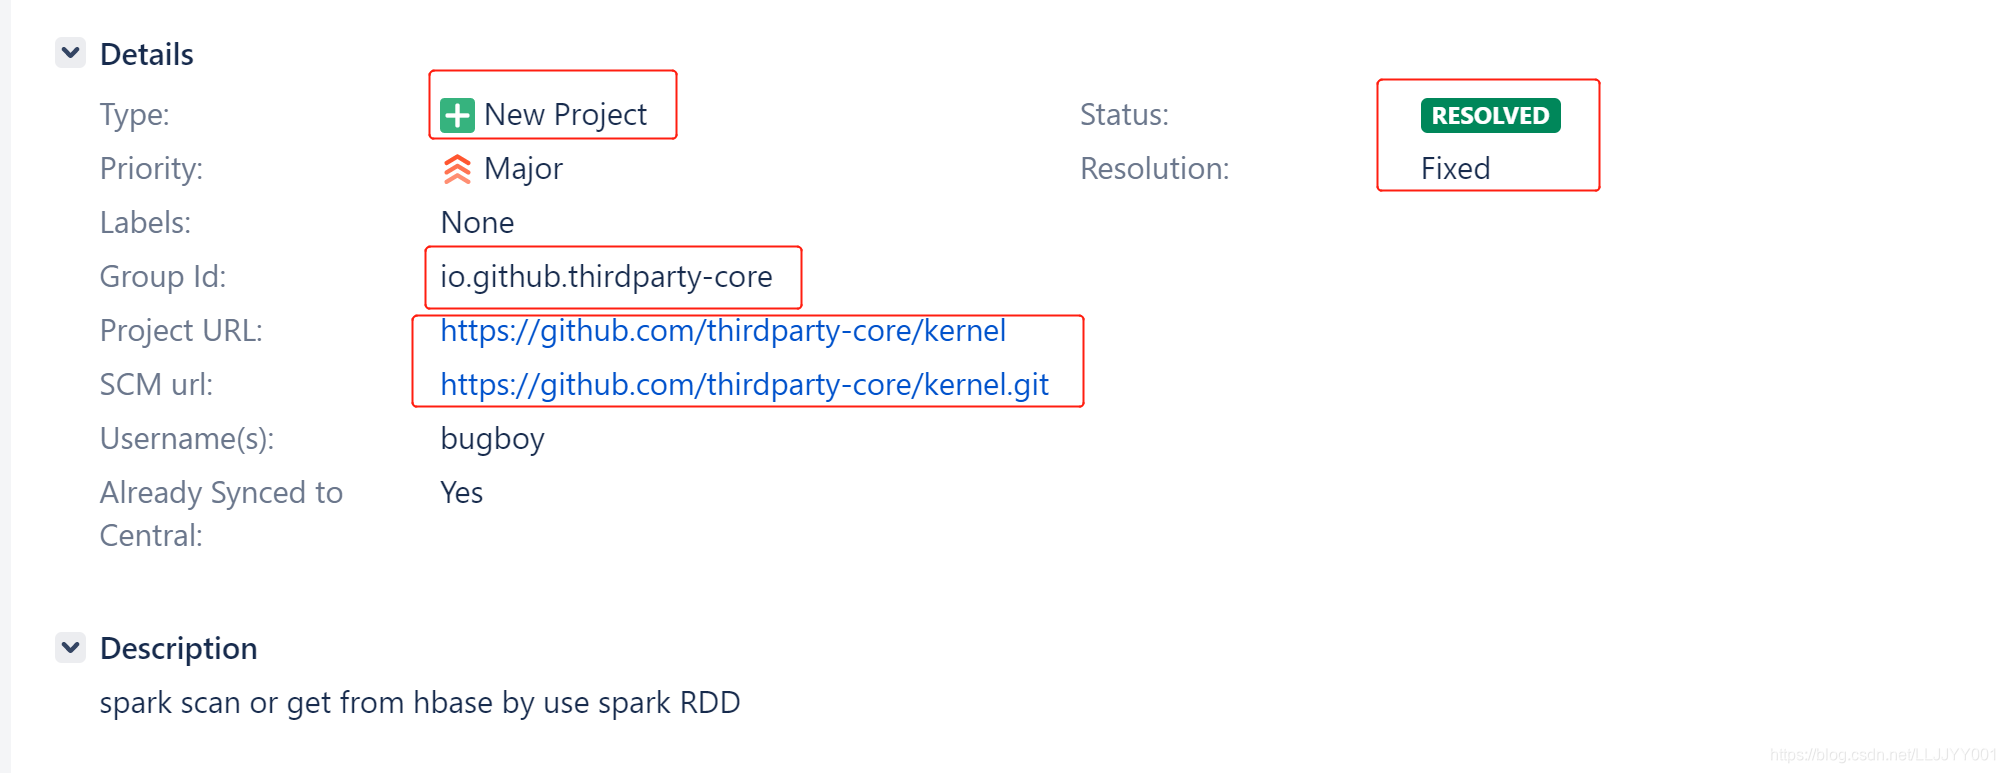
- 创建过程中会与工作人员有交流,比如确保Group Id是你所有,如果不是你所有,他也会给你提供解决方案,直到他回复你:
io.github.thirdparty-core has been prepared, now user(s) bugboy can:

Deploy snapshot artifacts into repository https://oss.sonatype.org/content/repositories/snapshots
Deploy release artifacts into the staging repository https://oss.sonatype.org/service/local/staging/deploy/maven2
Release staged artifacts into repository 'Releases'
please comment on this ticket when you promoted your first release, thanks
到这,说明你可以进行release你的项目了。
-
准备pgp的公私钥。
- 安装gpg。gpg(GunPG)是一款用于生成秘钥的加密软件。下载地址https://www.gnupg.org/download/,可以根据自己的系统选择对应的版本下载。我是用的是window,所以我选择Gpg4win。

- 下载完成后进行安装。安装完成后进入到cmd,运行
gpg --version校验是否安装成功。 - 运行
gpg --gen-key生成密钥对,生成时会让你提示输入用户名密码邮箱,输入的密码需要记住,后续Release时会用到,建议使用注册https://issues.sonatype.org/网站用户时的密码,并用小本子记录好。 - 运行
gpg --list-keys查看公钥。 gpg --keyserver hkp://keyserver.ubuntu.com:11371 --send-keys <公钥key>将公钥信息发送到ubuntu.com服务器,后续推送maven仓库会做校验。gpg --keyserver hkp://keyserver.ubuntu.com:11371 --recv-keys <公钥key>查询公钥是否推送成功。
- 安装gpg。gpg(GunPG)是一款用于生成秘钥的加密软件。下载地址https://www.gnupg.org/download/,可以根据自己的系统选择对应的版本下载。我是用的是window,所以我选择Gpg4win。
-
准备要发布的项目。下面以我自己的项目为例。
-
项目结构如下:
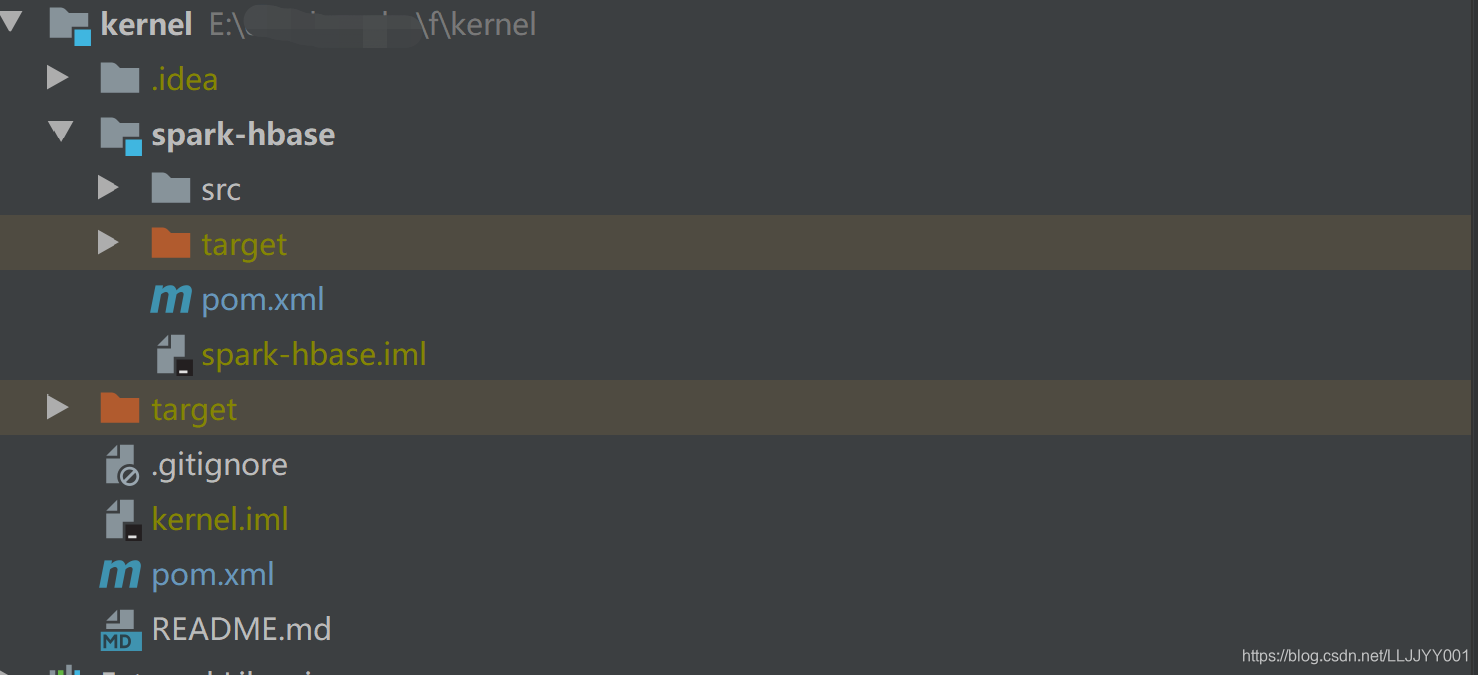
我的项目结构是多module的,其中spark-hbase为scala项目。 -
parent pom配置如下:
<?xml version="1.0" encoding="UTF-8"?> <project xmlns="http://maven.apache.org/POM/4.0.0" xmlns:xsi="http://www.w3.org/2001/XMLSchema-instance" xsi:schemaLocation="http://maven.apache.org/POM/4.0.0 http://maven.apache.org/xsd/maven-4.0.0.xsd"> <modelVersion>4.0.0</modelVersion> <groupId>io.github.thirdparty-core</groupId> <artifactId>kernel</artifactId> <packaging>pom</packaging> <version>1.0.1-pre</version> <name>kernel</name> <description>Some core third-party implementations</description> <url>https://github.com/thirdparty-core/kernel</url> <modules> <module>spark-hbase</module> </modules> <!--pom example https://central.sonatype.org/pages/requirements.html#a-complete-example-pom--> <distributionManagement> <snapshotRepository> <id>sonatype-nexus-snapshots</id> <name>Sonatype Nexus Snapshots</name> <url>https://oss.sonatype.org/content/repositories/snapshots</url> </snapshotRepository> <repository> <id>sonatype-nexus-staging</id> <name>Nexus Release Repository</name> <url>https://oss.sonatype.org/service/local/staging/deploy/maven2</url> </repository> </distributionManagement> <licenses> <license> <name>The Apache Software License, Version 2.0</name> <url>http://www.apache.org/licenses/LICENSE-2.0.txt</url> <distribution>repo</distribution> </license> </licenses> <scm> <url>https://github.com/thirdparty-core/kernel.git</url> <connection>scm:git:git://github.com/thirdparty-core/kernel.git</connection> <developerConnection>scm:git:ssh://github.com/thirdparty-core</developerConnection> </scm> <developers> <developer> <name>bugboy</name> <email>lijiayan_mail@163.com</email> <url>https://github.com/thirdparty-core</url> </developer> </developers> <build> <plugins> <plugin> <groupId>org.apache.maven.plugins</groupId> <artifactId>maven-gpg-plugin</artifactId> <version>1.6</version> <executions> <execution> <id>sign-artifacts</id> <phase>verify</phase> <goals> <goal>sign</goal> </goals> </execution> </executions> </plugin> <!--https://oss.sonatype.org/#stagingRepositories--> <plugin> <groupId>org.apache.maven.plugins</groupId> <artifactId>maven-release-plugin</artifactId> <version>2.5.3</version> <configuration> <autoVersionSubmodules>true</autoVersionSubmodules> <useReleaseProfile>false</useReleaseProfile> <releaseProfiles>release</releaseProfiles> <goals>deploy</goals> </configuration> </plugin> </plugins> </build> </project> -
spark-hbase的pom如下:
<?xml version="1.0" encoding="UTF-8"?>
<project xmlns="http://maven.apache.org/POM/4.0.0"
         xmlns:xsi="http://www.w3.org/2001/XMLSchema-instance"
         xsi:schemaLocation="http://maven.apache.org/POM/4.0.0 http://maven.apache.org/xsd/maven-4.0.0.xsd">
    <parent>
        <artifactId>kernel</artifactId>
        <groupId>io.github.thirdparty-core</groupId>
        <version>1.0.1-pre</version>
    </parent>
    <modelVersion>4.0.0</modelVersion>

    <artifactId>spark-hbase</artifactId>
    <version>1.0.1-pre</version>
    <packaging>jar</packaging>
    <name>spark-hbase</name>
    <properties>
        <spark.version>2.4.4</spark.version>
        <hadoop.version>2.8.5</hadoop.version>
        <hbase.version>2.2.2</hbase.version>
        <scala.version>2.11.12</scala.version>
        <scala.lib.version>2.11</scala.lib.version>
        <project.build.sourceEncoding>UTF-8</project.build.sourceEncoding>
        <scope>provided</scope>
        <!--<scope>compile</scope>-->
    </properties>

    <dependencyManagement>
        <dependencies>
            <dependency>
                <groupId>org.glassfish</groupId>
                <artifactId>javax.el</artifactId>
                <version>3.0.1-b08</version>
            </dependency>
        </dependencies>
    </dependencyManagement>
    <dependencies>
        <dependency>
            <groupId>org.scala-lang</groupId>
            <artifactId>scala-library</artifactId>
            <version>${scala.version}</version>
            <scope>provided</scope>
        </dependency>

        <dependency>
            <groupId>org.apache.spark</groupId>
            <artifactId>spark-core_${scala.lib.version}</artifactId>
            <version>${spark.version}</version>
            <scope>${scope}</scope>
            <exclusions>
                <exclusion>
                    <artifactId>org.scala-lang</artifactId>
                    <groupId>scala-library</groupId>
                </exclusion>
            </exclusions>
        </dependency>

        <dependency>
            <groupId>org.apache.spark</groupId>
            <artifactId>spark-sql_${scala.lib.version}</artifactId>
            <version>${spark.version}</version>
            <scope>${scope}</scope>
            <exclusions>
                <exclusion>
                    <artifactId>org.scala-lang</artifactId>
                    <groupId>scala-library</groupId>
                </exclusion>
            </exclusions>
        </dependency>

        <dependency>
            <groupId>org.apache.hadoop</groupId>
            <artifactId>hadoop-client</artifactId>
            <version>${hadoop.version}</version>
            <scope>${scope}</scope>
        </dependency>

        <dependency>
            <groupId>org.apache.hbase</groupId>
            <artifactId>hbase-client</artifactId>
            <version>${hbase.version}</version>
            <scope>${scope}</scope>
        </dependency>

        <dependency>
            <groupId>org.apache.hbase</groupId>
            <artifactId>hbase-server</artifactId>
            <version>${hbase.version}</version>
            <scope>${scope}</scope>
        </dependency>

        <dependency>
            <groupId>org.apache.hbase</groupId>
            <artifactId>hbase-mapreduce</artifactId>
            <version>${hbase.version}</version>
            <scope>${scope}</scope>
        </dependency>

        <dependency>
            <groupId>org.apache.hbase</groupId>
            <artifactId>hbase-common</artifactId>
            <version>${hbase.version}</version>
            <scope>${scope}</scope>
        </dependency>

        <dependency>
            <groupId>org.apache.hbase</groupId>
            <artifactId>hbase-testing-util</artifactId>
            <version>${hbase.version}</version>
            <scope>test</scope>
        </dependency>
    </dependencies>
    <build>
        <plugins>
            <!--
            scala编译,d打scala源码包等的插件
            scala doc:
            1. mvn scala:doc create scala doc in into target/site
            2. create dir target/apidocs
            3. mv target/site/scaladocs to target/apidocs
            4. mvn install deploy
            -->
            <plugin>
                <groupId>net.alchim31.maven</groupId>
                <artifactId>scala-maven-plugin</artifactId>
                <version>3.2.0</version>
                <configuration>
                    <charset>${project.build.sourceEncoding}</charset>
                    <scalaVersion>${scala.version}</scalaVersion>
                    <args>
                        <arg>-feature</arg>
                        <!--The target.jvm variable gets set above by the groovy
                             snippet in the gmaven-plugin.-->
                        <arg>-target:jvm-1.8</arg>
                    </args>
                    <source>1.8</source>
                    <target>1.8</target>
                </configuration>
                <executions>
                    <execution>
                        <id>scala-compile-first</id>
                        <phase>process-resources</phase>
                        <goals>
                            <goal>add-source</goal>
                            <goal>compile</goal>
                        </goals>
                    </execution>
                    <execution>
                        <id>scala-test-compile</id>
                        <phase>process-test-resources</phase>
                        <goals>
                            <goal>testCompile</goal>
                        </goals>
                    </execution>
                </executions>
            </plugin>
            <!--生成javadoc包的插件-->
            <plugin>
                <groupId>org.apache.maven.plugins</groupId>
                <artifactId>maven-javadoc-plugin</artifactId>
                <version>2.9.1</version>
                <executions>
                    <execution>
                        <phase>package</phase>
                        <goals>
                            <goal>jar</goal>
                        </goals>
                    </execution>
                </executions>
            </plugin>
            <!--生成java源码包插件(仅对java有用,对scala不管用) source-->
            <plugin>
                <groupId>org.apache.maven.plugins</groupId>
                <artifactId>maven-source-plugin</artifactId>
                <version>3.0.1</version>
                <executions>
                    <execution>
                        <id>attach-sources</id>
                        <goals>
                            <goal>jar-no-fork</goal>
                        </goals>
                    </execution>
                </executions>
            </plugin>
            <!--源码编译插件 Compiler-->
            <plugin>
                <groupId>org.apache.maven.plugins</groupId>
                <artifactId>maven-compiler-plugin</artifactId>
                <version>3.6.0</version>
                <configuration>
                    <encoding>utf-8</encoding>
                    <source>1.8</source>
                    <target>1.8</target>
                </configuration>
            </plugin>
        </plugins>
    </build>
</project>
注意,进行发布的时候,必须要有发布包,源码包,文档包。
-
配置项目maven,如下:
-
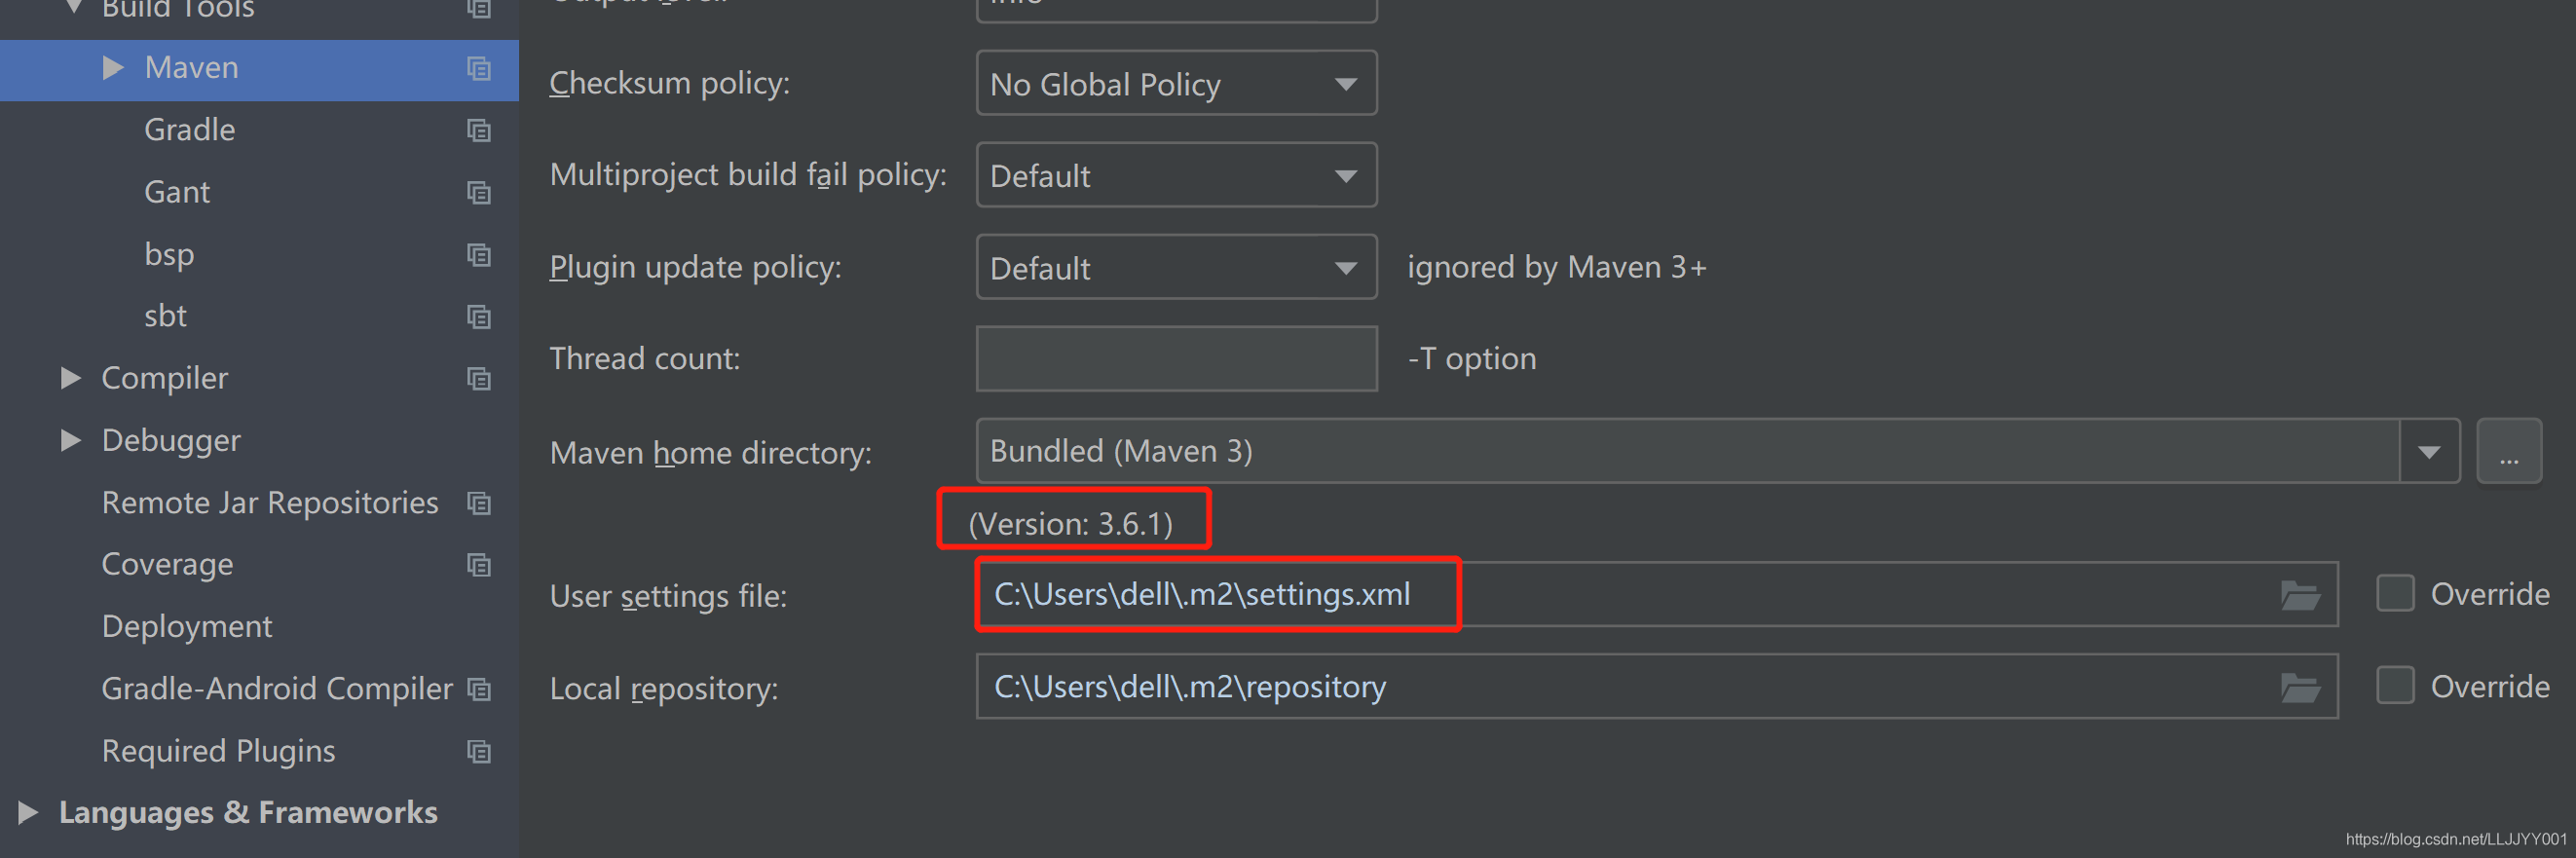
修改maven的setting.xml文件,看到我maven在我自己目录下的.m2/setting.xml,该文件我没有找到,我是下载的maven安装包中,将安装包中的conf下的setting.xml拷贝过来放这的。编辑该文件,在services节点下添加:
<servers>
   <!--添加-->
    <server>
      <id>sonatype-nexus-snapshots</id>
      <username>bugboy</username>
      <password>上文中网站注册时的密码</password>
    </server>
    <server>
      <id>sonatype-nexus-staging</id>
      <username>bugboy</username>
      <password>上文中网站注册时的密码</password>
    </server>
  </servers>
因为要用到好多密码,所以为了方便不混淆,整个过程都用注册时的密码,所以用小本子记录下来。
-
-
编译项目,打包。
- 命令行进入到root pom所在的目录,运行
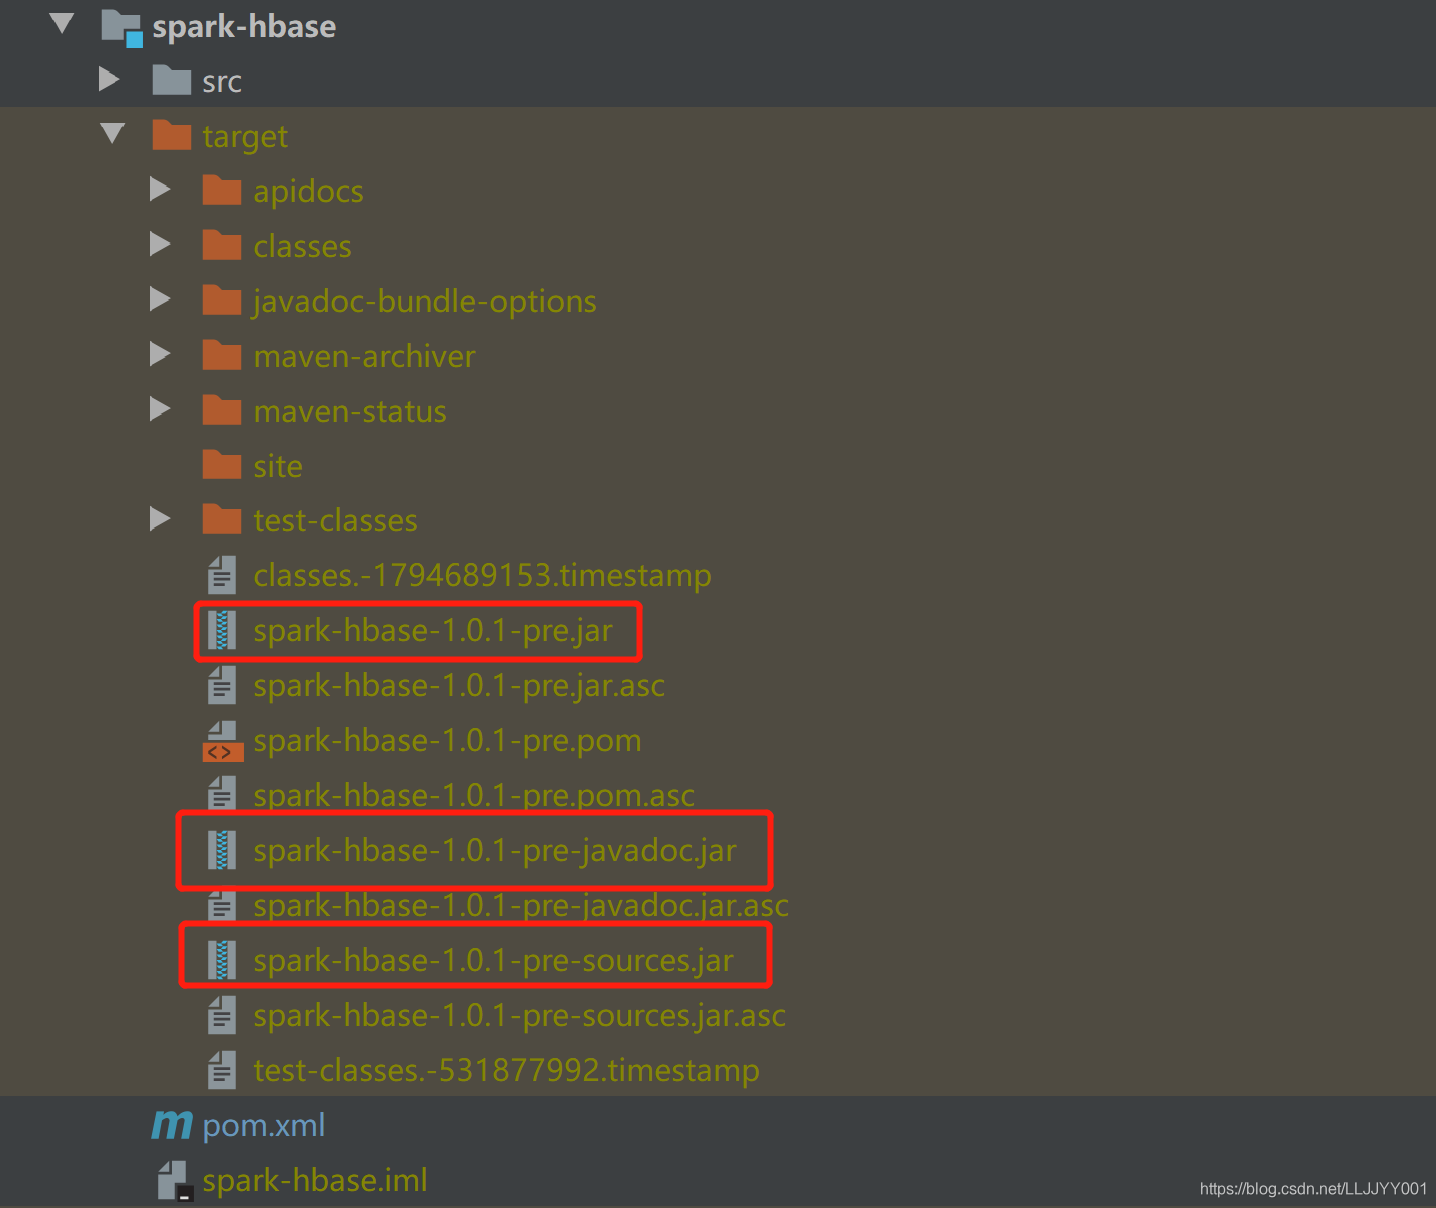
mvn install - 1运行完后,会在root 的target临时目录下看到最后结果的pom。以及在spark-hbase的target下会看到相关包,包括要不发的包,源码包,但是我这是scala项目,所以并不会自动生成scala的文档包。解决方案是命令行进入到spark-hbase pom所在的目录,运行
mvn scala:doc,之后会看到在spark-hbase的target目录下生成一个site目录,里面有一个scaladocs文件夹。此时,在target目录下新建一个名为apidocs的目录,并将site目录中的scaladocs拷贝到apidocs目录下,注意目录名不更更改。 - 再root pom所在的目录下运行一遍
mvn install,结束后会在spark-hbase的target目录下看到*-javadoc.jar,*-sources.jar,*.jar等文件,此时要发布的文件都已经准备好了。
- 命令行进入到root pom所在的目录,运行
-
发布。运行
mvn deploy,会看到发布过程中会进行相关文件的上传。外网,有点慢。 -
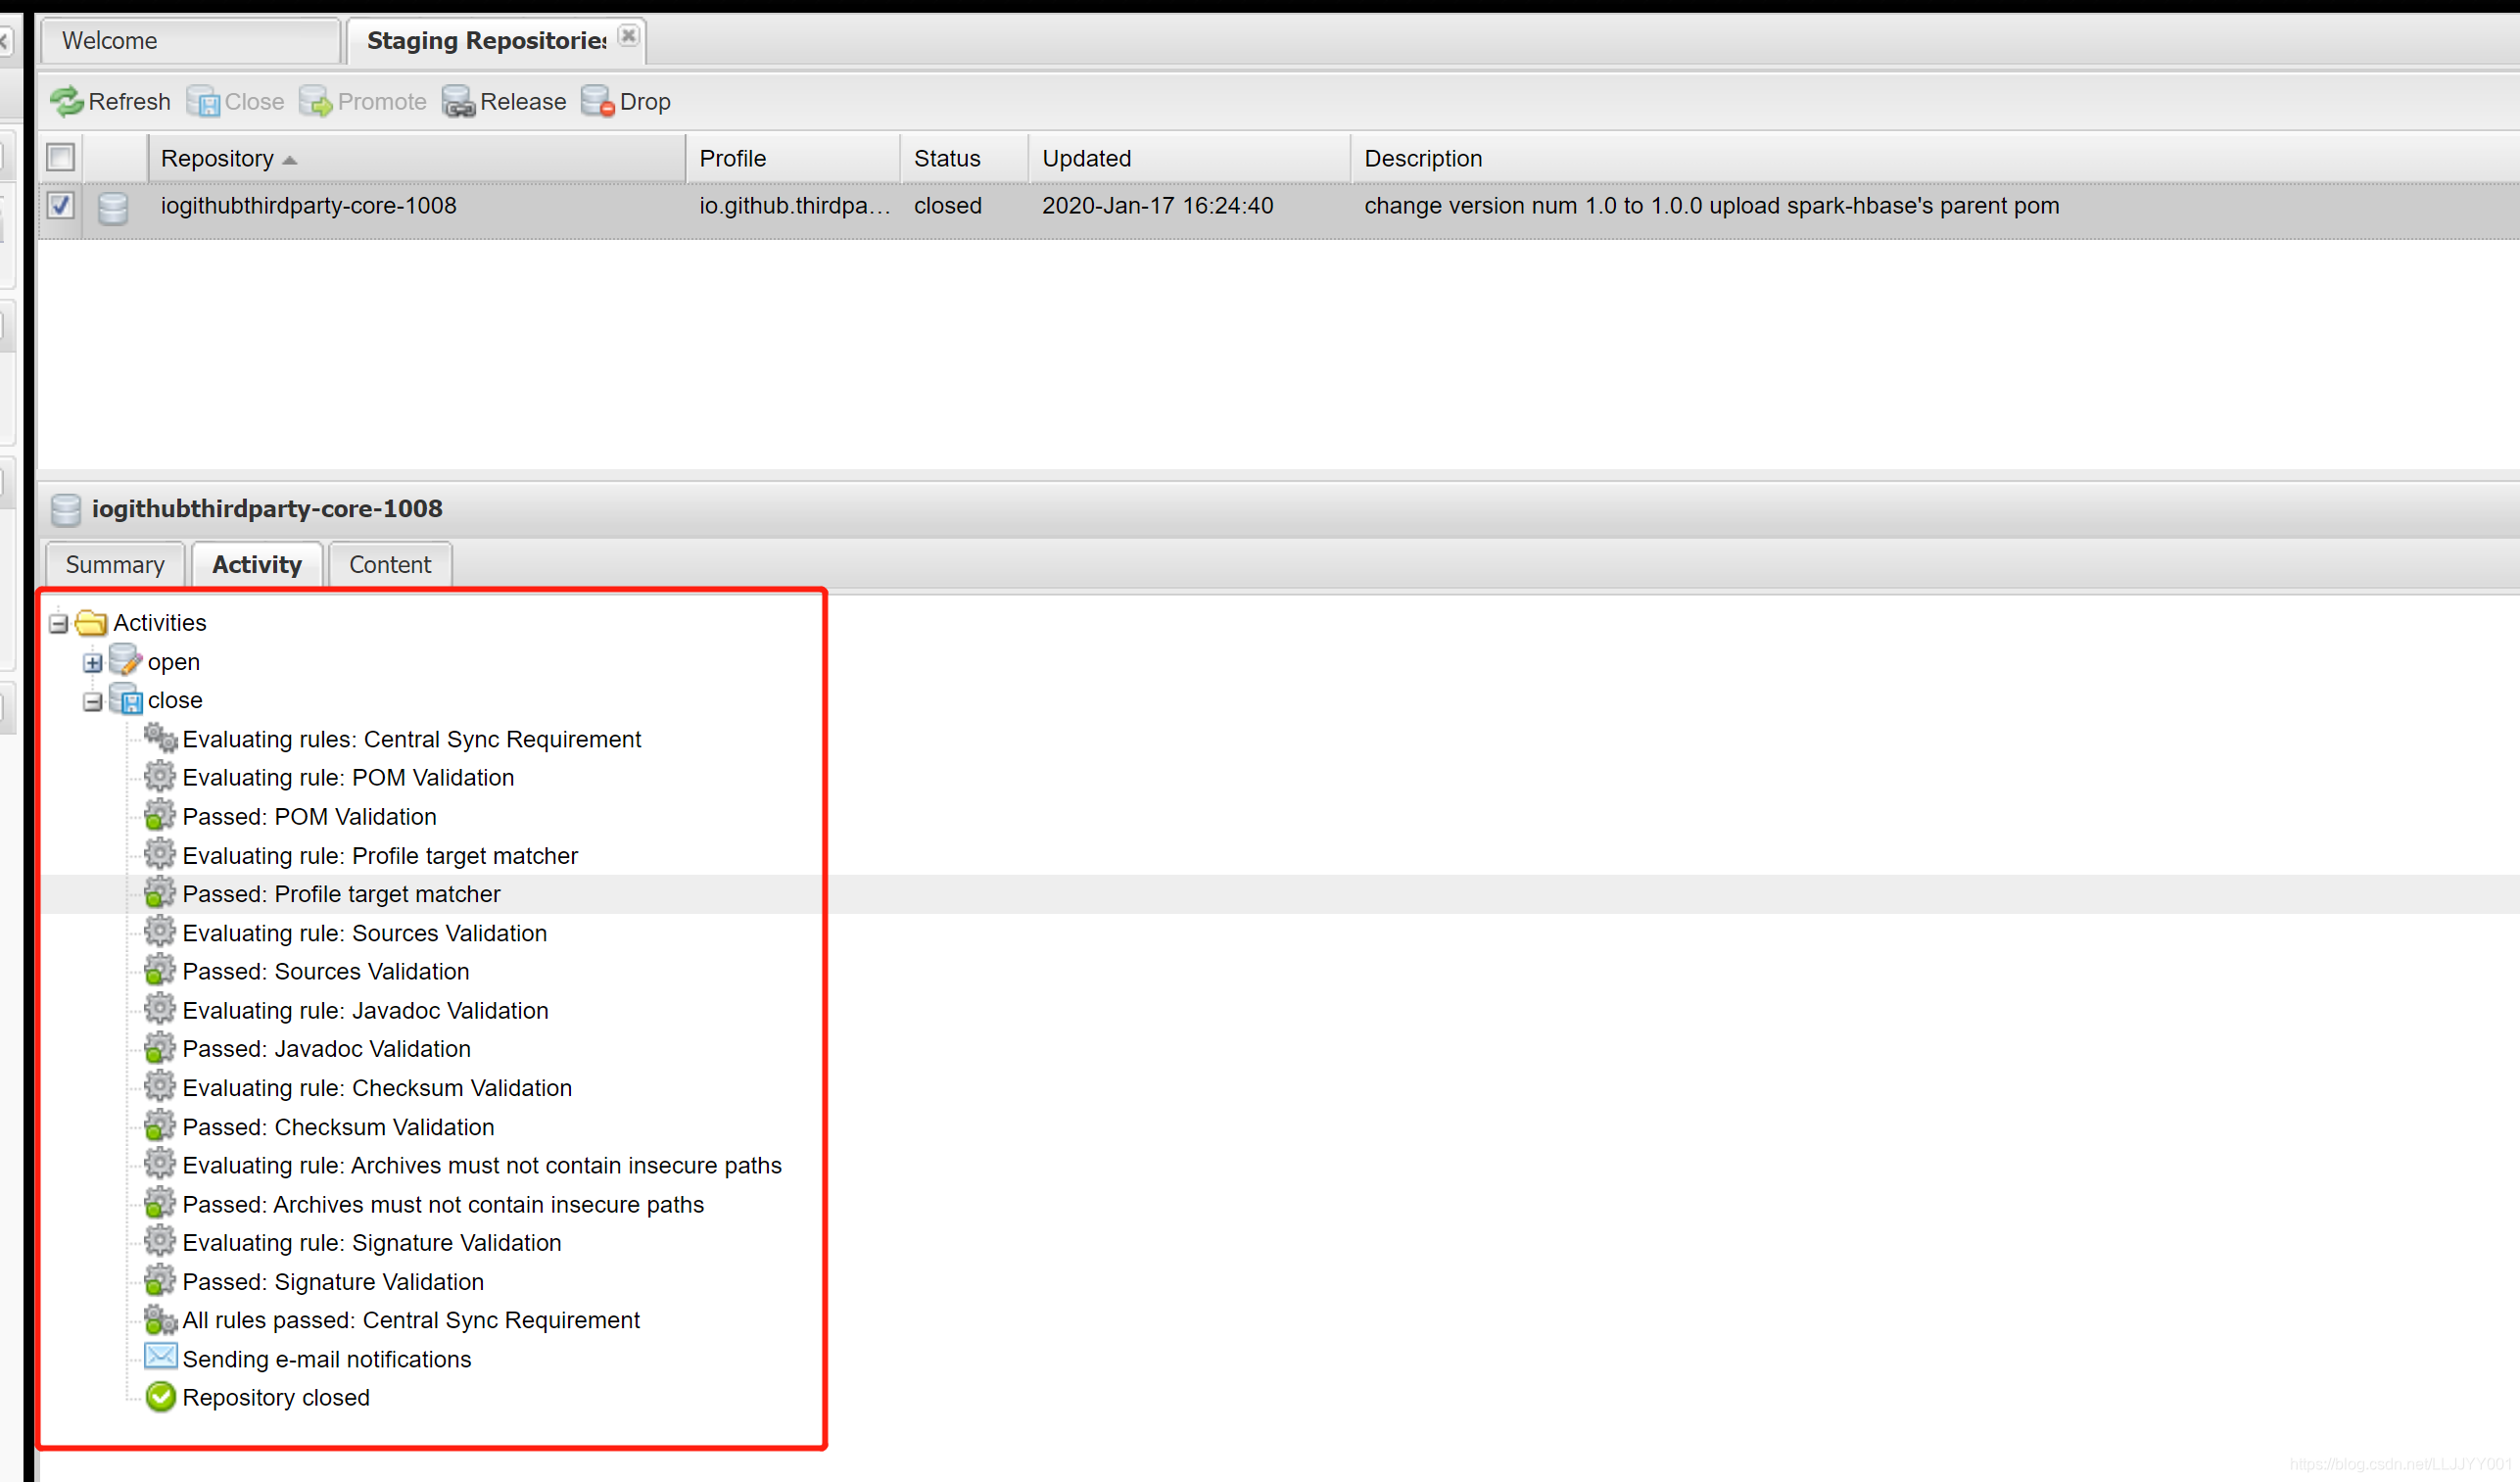
上传结束后,访问https://oss.sonatype.org/#stagingRepositories查看发布好的构件,点击左侧的Staging Repositories,会看到你发布的构建,其根据group-id-1001来命名的,并且每成功上传一次,后面的编号自增一次。选择最大的编号即为最新发布的。选择要发布的构建,此时状态为Open
-
选中构件,并点击上方的 Close–>Confirm 在下边的Activity选项卡中查看状态。注意,Close时会分步骤检查你发布的构建是否都包含它要求需要的东西,其中root pom必须要有
 <name>kernel</name>
 <description>Some core third-party implementations</description>
 <url>https://github.com/thirdparty-core/kernel</url>
否则检查不通过,会报没有相关信息的错误。对于如果module发布的是jar,则必须有发布包,源码包,文档包
-
Close结束后,可查看页面底部的检查信息,如下表示检查通过,
-
当状态变成closed后,执行 Release–>Confirm 并在下边的Activity选项卡中查看状态。成功后构件自动删除,一小段时间(约1-2个小时)后即可同步到maven的中央仓库。届时会有邮件通知。
-
之后到Issue增加Comment,留言致谢并表示发布已经完成,请工作人员关闭Issue。
-
搜索自己发布的包:
https://search.maven.org/
或者新建一个maven项目,依赖测试以下。
参考文章:https://blog.csdn.net/sinat_23290725/article/details/85018092
致谢!


 被折叠的 条评论
为什么被折叠?
被折叠的 条评论
为什么被折叠?
 到【灌水乐园】发言


