


上一篇我们已经学习了默认的交换机,其实默认的交换机也是Direct 直连交换机,只是使用了系统默认的,这一篇我们来学习Direct 交换机,内容和上一篇大致相同,稍微有些不同的地方我会说明。
首先我们还是先定义一个queue,和Direct 交换机,以及通过路由key将这个queue绑定到Direct 交换机上
import org.springframework.amqp.core.Binding;
import org.springframework.amqp.core.BindingBuilder;
import org.springframework.amqp.core.DirectExchange;
import org.springframework.amqp.core.Queue;
import org.springframework.context.annotation.Bean;
import org.springframework.context.annotation.Configuration;

import com.lwl.rabbitmq.constant.Constants;

/**
 * 发送消息 配置发送消息的队列queue
 * @author lwl
 * @create 2018年8月10日 下午2:37:38
 * @version 1.0
 */
@Configuration
public class SendMessageConfig {

	/**
	 * 定义一个队列,queue
	 * @return
	 * @author lwl
	 * @create 2019年6月20日 下午2:04:36
	 */
    @Bean
    public Queue DirectQueue() {
    	return new Queue(Constants.DIRECT_QUEUE);
    }

    /**
     * 定义Direct 直连交换机
     * @return
     * @author lwl
     * @create 2019年6月20日 下午2:04:57
     */
    @Bean
    DirectExchange exchange() {
        return new DirectExchange(Constants.DIRECT_NAME);
    }

    /**
     * 使用Direct 直连接,routekey 为 direct.queue.exchange
     * @param queueMessage
     * @param exchange
     * @return
     * @author lwl
     * @create 2019年6月14日 上午10:51:21
     */
    @Bean
    Binding bindingExchangeMessage(Queue DirectQueue, DirectExchange exchange) {
        return BindingBuilder.bind(DirectQueue).to(exchange).with(Constants.ROUTING_KEY);
    }

    /**
     * 定义第二个queue
     * @return
     * @author lwl
     * @create 2019年6月20日 下午2:05:36
     */
    @Bean
    public Queue DirectQueue2() {
    	return new Queue(Constants.DIRECT_QUEUE_TWO);
    }

    /**
     * 使用同样的路由key,将第二个queue绑定到同一个exchange上
     * @param DirectQueue2
     * @param exchange
     * @return
     * @author lwl
     * @create 2019年6月20日 下午2:05:52
     */
    @Bean
    Binding bindingExchangeMessage2(Queue DirectQueue2, DirectExchange exchange) {
        return BindingBuilder.bind(DirectQueue2).to(exchange).with(Constants.ROUTING_KEY);
    }
}
这里有点特殊,我们定义了2个queue,使用同一个路由key,绑定到同一个exchange,接下来我会告诉你们这样做有什么效果
接下来我们来看一下生产者:
import org.springframework.amqp.core.AmqpTemplate;
import org.springframework.beans.factory.annotation.Autowired;
import org.springframework.stereotype.Component;

import com.lwl.rabbitmq.constant.Constants;

/**
 * 生成者
 * @author lwl
 * @create 2019年6月14日 上午10:56:41
 * @version 1.0
 */
@Component
public class Producer {

	@Autowired
    private AmqpTemplate template;

    /**
     * 带有路由key的直连交换机
     * @param message
     * @author lwl
     * @create 2019年6月14日 上午10:54:54
     */
    public void sendDirect(Object message){
    	template.convertAndSend(Constants.DIRECT_NAME,Constants.ROUTING_KEY,message);
    }


}这里我们看一下这个方法template.convertAndSend(Constants.DIRECT_NAME,Constants.ROUTING_KEY,message);
/**
	 * Convert a Java object to an Amqp {@link Message} and send it to a specific exchange
	 * with a specific routing key.
	 *
	 * @param exchange the name of the exchange
	 * @param routingKey the routing key
	 * @param message a message to send
	 * @throws AmqpException if there is a problem
	 */
	void convertAndSend(String exchange, String routingKey, Object message) throws AmqpException;
第一个参数就是我们之前定义的exchange 名称,第二个是路由key,第三个参数就是我们想要发送的消息内容
接下来看看消费者:
import org.springframework.amqp.rabbit.annotation.RabbitHandler;
import org.springframework.amqp.rabbit.annotation.RabbitListener;
import org.springframework.stereotype.Component;

import com.lwl.rabbitmq.constant.Constants;

/**
 * 消费者
 * @author lwl
 * @create 2019年6月14日 上午10:57:11
 * @version 1.0
 */
@Component
@RabbitListener(queues = Constants.DIRECT_QUEUE)
public class DirectConsumer {

	@RabbitHandler
    public void process(String hello) {
		System.out.println();
		System.out.println("-----------------------客户端  1  收到数据 -----------------------");
        System.out.println(Constants.DIRECT_QUEUE+ " --> Receiver1  : " + hello);
        System.out.println();
    }

}
package com.lwl.rabbitmq.consumer;

import org.springframework.amqp.rabbit.annotation.RabbitHandler;
import org.springframework.amqp.rabbit.annotation.RabbitListener;
import org.springframework.stereotype.Component;

import com.lwl.rabbitmq.constant.Constants;

/**
 * 消费者
 * @author lwl
 * @create 2019年6月14日 上午10:57:11
 * @version 1.0
 */
@Component
@RabbitListener(queues = Constants.DIRECT_QUEUE_TWO)
public class DirectConsumer4 {

	@RabbitHandler
    public void process(String hello) {
		System.out.println();
		System.out.println("-----------------------客户端 4  收到数据 -----------------------");
        System.out.println(Constants.DIRECT_QUEUE_TWO+ " --> Receiver4  : " + hello);
        System.out.println();
    }

}
刚才我们定义了2个队列Queue,所以我们要分别写2 个类去接收数据。
接下来我们写一个测试用例:
/**
	 * 发送消息(此时把DirectConsumer,DirectConsumer2 ,DirectConsumer3, DirectConsumer4  注释掉)
	 * @author lwl
	 * @create 2019年6月20日 下午2:16:54
	 */
	@Test
	public void sendMessage() {
		String message = "我是Direct 发送的消息33333333";
		producer.sendDirect(message);
		System.out.println("--------------------------------发送完毕--------------------------------");
		System.out.println();
	}
我们看一下运行结果:

2个队列Queue都收到了,为什么会都接收到呢?
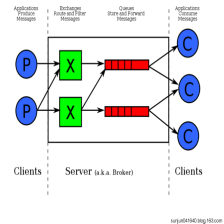
如果有两个接收程序用了各自的queue,但使用相同的routingKey去绑定direct exchange的话,分发的行为是复制的,也就是说每个程序都会收到这个消息的副本。行为相当于fanout类型的exchange。
看一下接收测试:
/**
	 * 接收消息(此时把DirectConsumer, DirectConsumer4 打开)
	 * @author lwl
	 * @create 2019年6月20日 下午2:16:54
	 */
	@Test
	public void getMessage() {

	}
运行结果:
-----------------------客户端  1  收到数据 -----------------------
direct_queue --> Receiver1  : 我是Direct 发送的消息33333333


-----------------------客户端 4  收到数据 -----------------------
direct_queue_2 --> Receiver4  : 我是Direct 发送的消息33333333
我们看到消息都已经被消费掉了,直连接其实很简单,默认的也是使用这样的,所以默认的效果,直连接是一样的。


 3079
3079

 被折叠的 条评论
为什么被折叠?
被折叠的 条评论
为什么被折叠?
 到【灌水乐园】发言


