


一、课程最终发布信息展示 – 后端
1、实体类—用于封装页面显示的数据
@ApiModel(value = "课程最终发布")
@Data
public class CoursePublishVo implements Serializable {
    private static final long serialVersionUID = 1L;

    //课程标题
    private String title;
    //课程封面
    private String cover;
    //课时数
    private Integer lessonNum;
    //一级分类
    private String subjectLevelOne;
    //二级分类
    private String subjectLevelTwo;
    //讲师名称
    private String teacherName;
    //课程价格
    private String price;//只用于显示
}
2、编写Controller类
//课程发布
//根据课程id查询课程的发布信息
@ApiOperation("查询课程发布信息")
@GetMapping("getPublishCourseInfo/{id}")
public R getPublishCourseInfo(@PathVariable String id){
    CoursePublishVo courseInfo =  courseService.getPublishCourseInfo(id);
    return R.ok().data("courseInfo",courseInfo);
}
3、编写Service类
//根据id查询课程发布信息
@Override
public CoursePublishVo getPublishCourseInfo(String id) {
    CoursePublishVo coursePublishVo = this.baseMapper.getPublishCourseInfo(id);
    return coursePublishVo;
}
由于我们最终发布页面显示的数据是来源于四张表(课程表、课程描述表、讲师表、分类表),所以我们需要手动写SQL语句实现。
4、编写mapper接口
public interface EduCourseMapper extends BaseMapper<EduCourse> {
    public CoursePublishVo getPublishCourseInfo(String id);
}
5、编写mapper类xml配置文件
<?xml version="1.0" encoding="UTF-8"?>
<!DOCTYPE mapper PUBLIC "-//mybatis.org//DTD Mapper 3.0//EN" "http://mybatis.org/dtd/mybatis-3-mapper.dtd">
<mapper namespace="com.rg.eduservice.mapper.EduCourseMapper">

    <select id="getPublishCourseInfo" resultType="com.rg.eduservice.entity.vo.CoursePublishVo" parameterType="string">
        SELECT ec.id,ec.`title`,ec.`price`,ec.`lesson_num` AS lessonNum,ec.`cover`,
        et.`name` teacherName,
        es1.`title` AS subjectLevelOne,
        es2.`title` AS subjectLevelTwo
        FROM edu_course ec LEFT OUTER JOIN edu_subject es1 ON ec.`subject_parent_id`= es1.`id`
        LEFT OUTER JOIN edu_subject es2 ON ec.`subject_id` = es2.`id`
        LEFT OUTER JOIN edu_teacher et ON ec.`teacher_id` = et.`id`
        WHERE ec.id=#{id}
    </select>
</mapper>
项目创建mapper接口,编写xml文件sql语句,执行出现错误
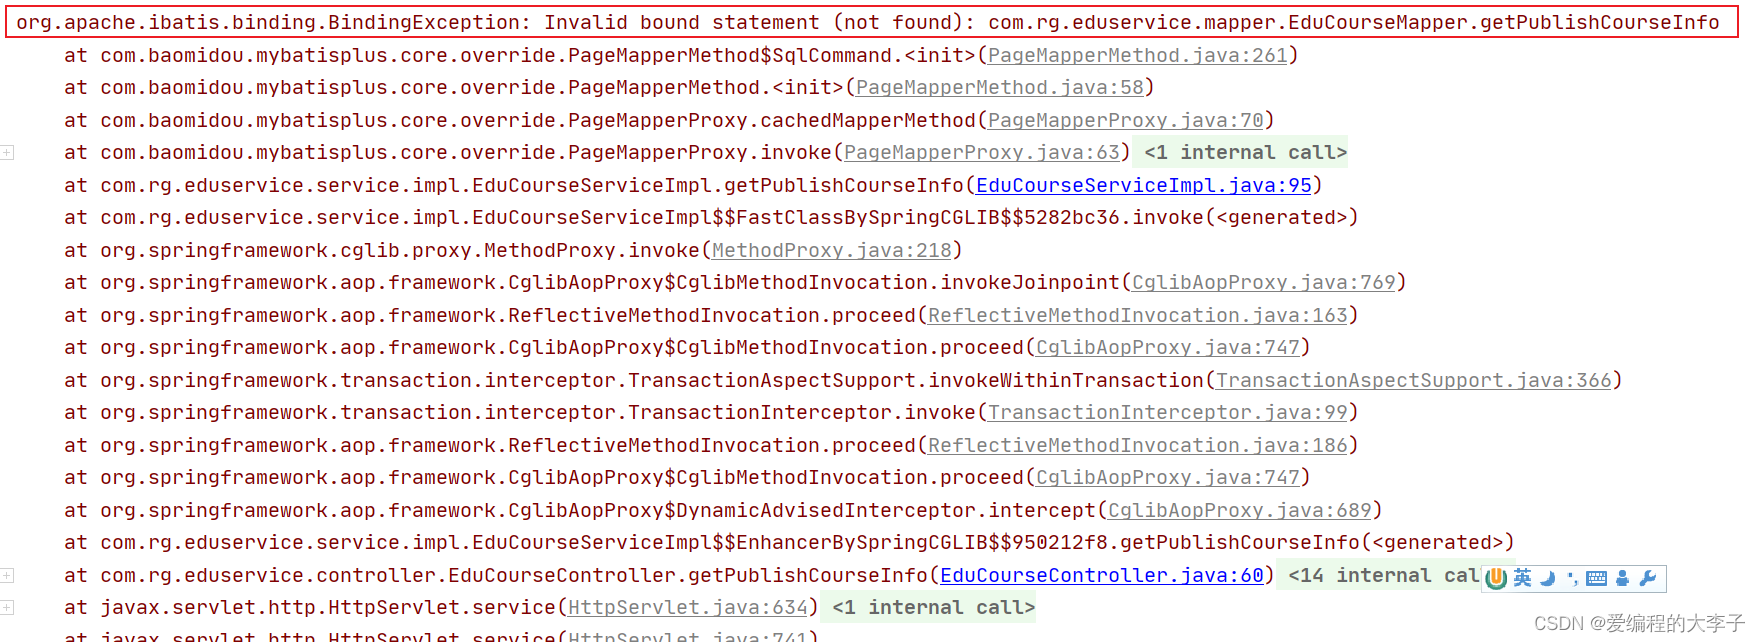
这个错误是由maven默认加载机制造成问题。maven加载时候,把java文件夹里面 .java 类型文件进行编译,如果其他类型文件,不会加载。
解决方式:
1、复制xml到target目录中
2、把xml文件放在resources目录中
3、推荐使用:通过配置文件实现
(1)pom.xml
(2)项目application.properties
<build>
    <resources>
        <resource>
            <directory>src/main/java</directory>
            <includes>
                <include>**/*.xml</include>
            </includes>
            <filtering>false</filtering>
        </resource>
    </resources>
</build>
在service模块的application.properties中
# 配置mapper xml文件的路径
mybatis-plus.mapper-locations=classpath:com/kuang/eduservice/mapper/xml/*.xml
重新启动服务即可运行成功!
二、课程最终发布信息展示 – 前端
1、定义api接口
//根据课程id查询课程发布的基本信息
getPublishCourseInfo(id) {
    return request({
        url: `/eduservice/course/getPublishCourseInfo/${id}`,
        method: 'get'
    })
}
2、前端页面和样式
<template>

  <div class="app-container">

    <h2 style="text-align: center;">发布新课程</h2>

    <el-steps :active="3" process-status="wait" align-center style="margin-bottom: 40px;">
      <el-step title="填写课程基本信息"/>
      <el-step title="创建课程大纲"/>
      <el-step title="发布课程"/>
    </el-steps>

    <div class="ccInfo">
      <img :src="coursePublish.cover">
      <div class="main">
        <h2>{{ coursePublish.title }}</h2>
        <p class="gray"><span>共{{ coursePublish.lessonNum }}课时</span></p>
        <p><span>所属分类:{{ coursePublish.subjectLevelOne }} — {{ coursePublish.subjectLevelTwo }}</span></p>
        <p>课程讲师:{{ coursePublish.teacherName }}</p>
        <h3 class="red">¥{{ coursePublish.price }}</h3>
      </div>
    </div>

    <div>
      <el-button @click="previous">返回修改</el-button>
      <el-button :disabled="saveBtnDisabled" type="primary" @click="publish">发布课程</el-button>
    </div>
  </div>
</template>
<style scoped>
.ccInfo {
    background: #f5f5f5;
    padding: 20px;
    overflow: hidden;
    border: 1px dashed #DDD;
    margin-bottom: 40px;
    position: relative;
}
.ccInfo img {
    background: #d6d6d6;
    width: 500px;
    height: 278px;
    display: block;
    float: left;
    border: none;
}
.ccInfo .main {
    margin-left: 520px;
}

.ccInfo .main h2 {
    font-size: 28px;
    margin-bottom: 30px;
    line-height: 1;
    font-weight: normal;
}
.ccInfo .main p {
    margin-bottom: 10px;
    word-wrap: break-word;
    line-height: 24px;
    max-height: 48px;
    overflow: hidden;
}

.ccInfo .main p {
    margin-bottom: 10px;
    word-wrap: break-word;
    line-height: 24px;
    max-height: 48px;
    overflow: hidden;
}
.ccInfo .main h3 {
    left: 540px;
    bottom: 20px;
    line-height: 1;
    font-size: 28px;
    color: #d32f24;
    font-weight: normal;
    position: absolute;
}
</style>
3、引入接口
import course from '@/api/edu/course'
4、编写前端js
data() {
    return {
      //....
      saveBtnDisabled:false,
      courseId: '',
      coursePublish: {}
    }
  },
  created() {
    //获取路由中id值
    if(this.$route.params && this.$route.params.id) {
        this.courseId = this.$route.params.id
        //调用接口方法根据课程id查询
        this.getPublishCourseInfo()
    }
  },
  methods: {
    //根据课程id查询课程信息
    getPublishCourseInfo(){
          course.getPublishCourseInfo(this.courseId).then(response=>{
            this.coursePublish = response.data.courseInfo
          })
        }
    //.....
  }
5、页面效果图

三、课程最终发布 – 前后端

1、编写Controller类
//课程发布
@PutMapping("publishCourse/{id}")
public R publishCourse(@PathVariable String id){
    EduCourse course = new EduCourse();
    course.setId(id);
    course.setStatus("Normal");
    boolean update = courseService.updateById(course);
    if(update){
        return R.ok();
    }else{
        return R.error();
    }
}
2、定义api接口
//发布课程信息
publishCourse(id) {
    return request({
        url: `/eduservice/course/publishCourse/${id}`,
        method: 'put'
    })
}
3、编写前端js
publish(){
    course.publishCourse(this.courseId).then(response=>{
        this.$confirm('确认发布此课程吗,是否继续?','提示',{
            confirmButtonText:'确定',
            cancelButtonText:'取消',
            type:'warning'
        }).then(()=>{//点击确定
            this.$message({
                type:'success',
                message:'课程发布成功!'
            })
            //跳转到课程列表页面
            this.$router.push({path:'/course/list'})
        }).catch(()=>{
            this.$message({
                type: 'info',
                message: '已取消发布!'
            })
        })
    }).catch(()=>{
        this.$message({
            type: 'error',
            message: '课程发布失败!'
        })
    })
}
四、课程列表 – 后端
1、编写查询实体类
@Data
public class CourseQuery implements Serializable {

    private static final long serialVersionUID = 1L;

    //一级分类id
    private String subjectParentId;

    //二级分类id
    private String subjectId;

    //课程名称
    private String title;

    //讲师id
    private String teacherId;


}
2、Controller类
//分页查询课程
@PostMapping("pageQuery/{current}/{limit}")
public R pageQuery(@PathVariable Integer current,
                   @PathVariable Integer limit,
                   @RequestBody CourseQuery courseQuery)
{
    Page<EduCourse> page =  courseService.pageQuery(current,limit,courseQuery);
    return R.ok().data("total",page.getTotal()).data("list",page.getRecords());
}

//删除课程
@DeleteMapping("removeCourse/{id}")
public R removeCourse(@PathVariable String id){
    courseService.removeCourse(id);
    return R.ok();
}
3、Service类
//对课程进行分页查询
@Override
public Page <EduCourse> pageQuery(Integer current, Integer limit, CourseQuery courseQuery) {
    Page <EduCourse> page = new Page <>(current,limit);
    QueryWrapper <EduCourse> wrapper = new QueryWrapper <>();
    String title = courseQuery.getTitle();
    String subjectId = courseQuery.getSubjectId();
    String subjectParentId = courseQuery.getSubjectParentId();
    String teacherId = courseQuery.getTeacherId();
    //判空,构造查询条件
    if(!StringUtils.isEmpty(title)){
        wrapper.like("title",title);
    }
    if(!StringUtils.isEmpty(subjectId)){
        wrapper.eq("subject_id",subjectId);
    }
    if(!StringUtils.isEmpty(subjectParentId)){
        wrapper.eq("subject_parent_id",subjectParentId);
    }
    if(!StringUtils.isEmpty(teacherId)){
        wrapper.eq("teacher_id",teacherId);
    }
    wrapper.orderByDesc("gmt_create");
    //进行分页查询
    this.baseMapper.selectPage(page, wrapper);//分页查询后自动封装到page中
    return page;
}

//根据id删除课程信息
@Override
public void removeCourse(String id) {
    //1.删除小节
    videoService.removeVideoByCourseId(id);
    //2.删除章节
    chapterService.removeChapterByCourseId(id);
    //3.删除课程描述信息
    courseDescriptionService.removeById(id);
    //4.删除课程信息
    this.baseMapper.deleteById(id);
}
五、课程列表 – 前端
1、定义api接口
//删除课程
removeCourse(id) {
    return request({
        url: `/eduservice/course/removeCourse/${id}`,
        method: 'delete'
    })
},
//分页查询课程
pageQuery(current, limit, courseQuery) {
    return request({
        url: `/eduservice/course/pageQuery/${current}/${limit}`,
        method: 'post',
        data: courseQuery
    })
}
2、 前端页面—list.vue
<template>

  <div class="app-container">
    <!--查询表单-->
    <el-form :inline="true" class="demo-form-inline">

      <!-- 所属分类:级联下拉列表 -->
      <!-- 一级分类 -->
      <el-form-item label="课程类别">
        <el-select
          v-model="searchObj.subjectParentId"
          placeholder="请选择"
          @change="subjectLevelOneChanged">
          <el-option
            v-for="subject in subjectNestedList"
            :key="subject.id"
            :label="subject.title"
            :value="subject.id"/>
        </el-select>

        <!-- 二级分类 -->
        <el-select v-model="searchObj.subjectId" placeholder="请选择">
          <el-option
            v-for="subject in subSubjectList"
            :key="subject.id"
            :label="subject.title"
            :value="subject.id"/>
        </el-select>
      </el-form-item>

      <!-- 标题 -->
      <el-form-item>
        <el-input v-model="searchObj.title" placeholder="课程标题"/>
      </el-form-item>
      <!-- 讲师 -->
      <el-form-item>
        <el-select
          v-model="searchObj.teacherId"
          placeholder="请选择讲师">
          <el-option
            v-for="teacher in teacherList"
            :key="teacher.id"
            :label="teacher.name"
            :value="teacher.id"/>
        </el-select>
      </el-form-item>

      <el-button type="primary" icon="el-icon-search" @click="getList()">查询</el-button>
      <el-button type="default" @click="resetData()">清空</el-button>
    </el-form>

    <!-- 表格 -->
    <el-table
      v-loading="listLoading"
      :data="list"
      element-loading-text="数据加载中"
      border
      fit
      highlight-current-row
      row-class-name="myClassList">

      <el-table-column
        label="序号"
        width="70"
        align="center">
        <template slot-scope="scope">
          {{ (page - 1) * limit + scope.$index + 1 }}
        </template>
      </el-table-column>

      <el-table-column label="课程信息" width="470" align="center">
        <template slot-scope="scope">
          <div class="info">
            <div class="pic">
              <img :src="scope.row.cover" alt="scope.row.title" width="150px">
            </div>
            <div class="title">
              <a href="">{{ scope.row.title }}</a>
              <p>{{ scope.row.lessonNum }}课时</p>
            </div>
          </div>

        </template>
      </el-table-column>

      <el-table-column label="创建时间" align="center">
        <template slot-scope="scope">
          {{ scope.row.gmtCreate.substr(0, 10) }}
        </template>
      </el-table-column>
      <el-table-column label="发布时间" align="center">
        <template slot-scope="scope">
          {{ scope.row.gmtModified.substr(0, 10) }}
        </template>
      </el-table-column>
      <el-table-column label="价格" width="100" align="center" >
        <template slot-scope="scope">
          {{ Number(scope.row.price) === 0 ? '免费' :
          '¥' + scope.row.price.toFixed(2) }}
        </template>
      </el-table-column>
      <el-table-column prop="buyCount" label="付费学员" width="100" align="center" >
        <template slot-scope="scope">
          {{ scope.row.buyCount }}人
        </template>
      </el-table-column>

      <el-table-column prop="viewCount" label="播放次数" width="100" align="center" >
        <template slot-scope="scope">
          {{ scope.row.viewCount }}次
        </template>
      </el-table-column>

      <el-table-column label="操作" width="150" align="center">
        <template slot-scope="scope">
          <router-link :to="'/course/info/'+scope.row.id">
            <el-button type="text" size="mini" icon="el-icon-edit" >编辑课程信息</el-button>
          </router-link>
          <router-link :to="'/course/chapter/'+scope.row.id">
            <el-button type="text" size="mini" icon="el-icon-edit" >编辑课程大纲</el-button>
          </router-link>
          <el-button type="text" size="mini" icon="el-icon-delete" @click="removeCourse(scope.row.id)">删除</el-button>
        </template>
      </el-table-column>
    </el-table>

<!-- 分页 -->
<el-pagination
  :current-page="page"
  :page-size="limit"
  :total="total"
  style="padding: 30px 0; text-align: center;"
  layout="total, prev, pager, next, jumper"
  @current-change="getList"
/>


  </div>
</template>
3、页面样式
<style scoped>
.myClassList .info {
    width: 450px;
    overflow: hidden;
}
.myClassList .info .pic {
    width: 150px;
    height: 90px;
    overflow: hidden;
    float: left;
}
.myClassList .info .pic a {
    display: block;
    width: 100%;
    height: 100%;
    margin: 0;
    padding: 0;
}
.myClassList .info .pic img {
    display: block;
    width: 100%;
}
.myClassList td .info .title {
    width: 280px;
    float: right;
    height: 90px;
}
.myClassList td .info .title a {
    display: block;
    height: 48px;
    line-height: 24px;
    overflow: hidden;
    color: #00baf2;
    margin-bottom: 12px;
}
.myClassList td .info .title p {
    line-height: 20px;
    margin-top: 5px;
    color: #818181;
}
</style>
4、编写前端js
<script>
import course from '@/api/edu/course'
import subject from '@/api/edu/subject'
export default {

    data() {
      return {
        listLoading: false, // 是否显示loading信息
        list: null, // 数据列表
        total: 0, // 总记录数
        page: 1, // 页码
        limit: 10, // 每页记录数
        searchObj: {
          subjectParentId: '',
          subjectId: '',
          title: '',
          teacherId: ''
        }, // 查询条件
        teacherList: [], // 讲师列表
        subjectNestedList: [], // 一级分类列表
        subSubjectList: [] // 二级分类列表,
      }
    },
    created() {
      this.init()
    },
    methods: {
        //编辑课程大纲
        updateChapter(id){
          this.$router.push({path:'/course/chapter/'+id})
        },
        //编辑课程基本信息
        updateCourse(id){
          this.$router.push({path:'/course/info/'+id})
        },
        removeCourse(id){
            this.$confirm('此操作将永久删除该课程的所有内容,是否继续?','提示',{
            confirmButtonText:'确定',
            cancelButtonText:'取消',
            type:'warning'
          }).then(()=>{//点击确定
              course.removeCourse(id).then((response)=>{
                this.$message({
                  type:'success',
                  message:'删除成功!'
                })
                //回到列表页面
                this.getList()
              }).catch(()=>{
                this.$message({
                  type:'error',
                  message:'删除失败!'
                })
              })
          }).catch(() => { // 点击取消
              this.$message({
                  type: 'info',
                  message: '已取消删除!'
              })
           })
        },
        //分页+条件查询
        getList(page = 1){//page默认值为1,当使用分页组件时会传入新的page参数
          this.page = page
          course.pageQuery(this.page,this.limit,this.searchObj).then(response=>{
            this.list = response.data.list
            this.total = response.data.total
          })
        },
      //查询表单重置方法
        resetData(){
          this.searchObj = {},
          this.subSubjectList = []
        },
        //当一级分类下拉菜单改变时的方法
        subjectLevelOneChanged(id){
          // console.log(id);
          for(var i = 0;i < this.subjectNestedList.length;i++){
            if(this.subjectNestedList[i].id == id){
              this.subSubjectList = this.subjectNestedList[i].children
            }
          }
        },
        //初始化方法
        init(){
          //1.查询一级分类
          subject.getAllSubject().then(response=>{
            this.subjectNestedList = response.data.list
          })
          //2.查询所有讲师
          course.getTeacherList().then(response=>{
            this.teacherList = response.data.items
          })
          //3.查询课程列表
          this.getList()
        }
    }
}
</script>
五、页面效果图

六、阿里云视频点播服务
视频点播(ApsaraVideo for VoD)是集音视频采集、编辑、上传、自动化转码处理、媒体资源管理、分发加速于一体的一站式音视频点播解决方案。
1、开通视频点播
进入阿里云官网:https://www.aliyun.com/,找到视频点播

开通视频点播服务(选择按流量计费)

2、资费说明
https://www.aliyun.com/price/product?spm=a2c4g.11186623.2.12.7fbd59b9vmXVN6#/vod/detail
3、整体流程
使用视频点播实现音视频上传、存储、处理和播放的整体流程如下:
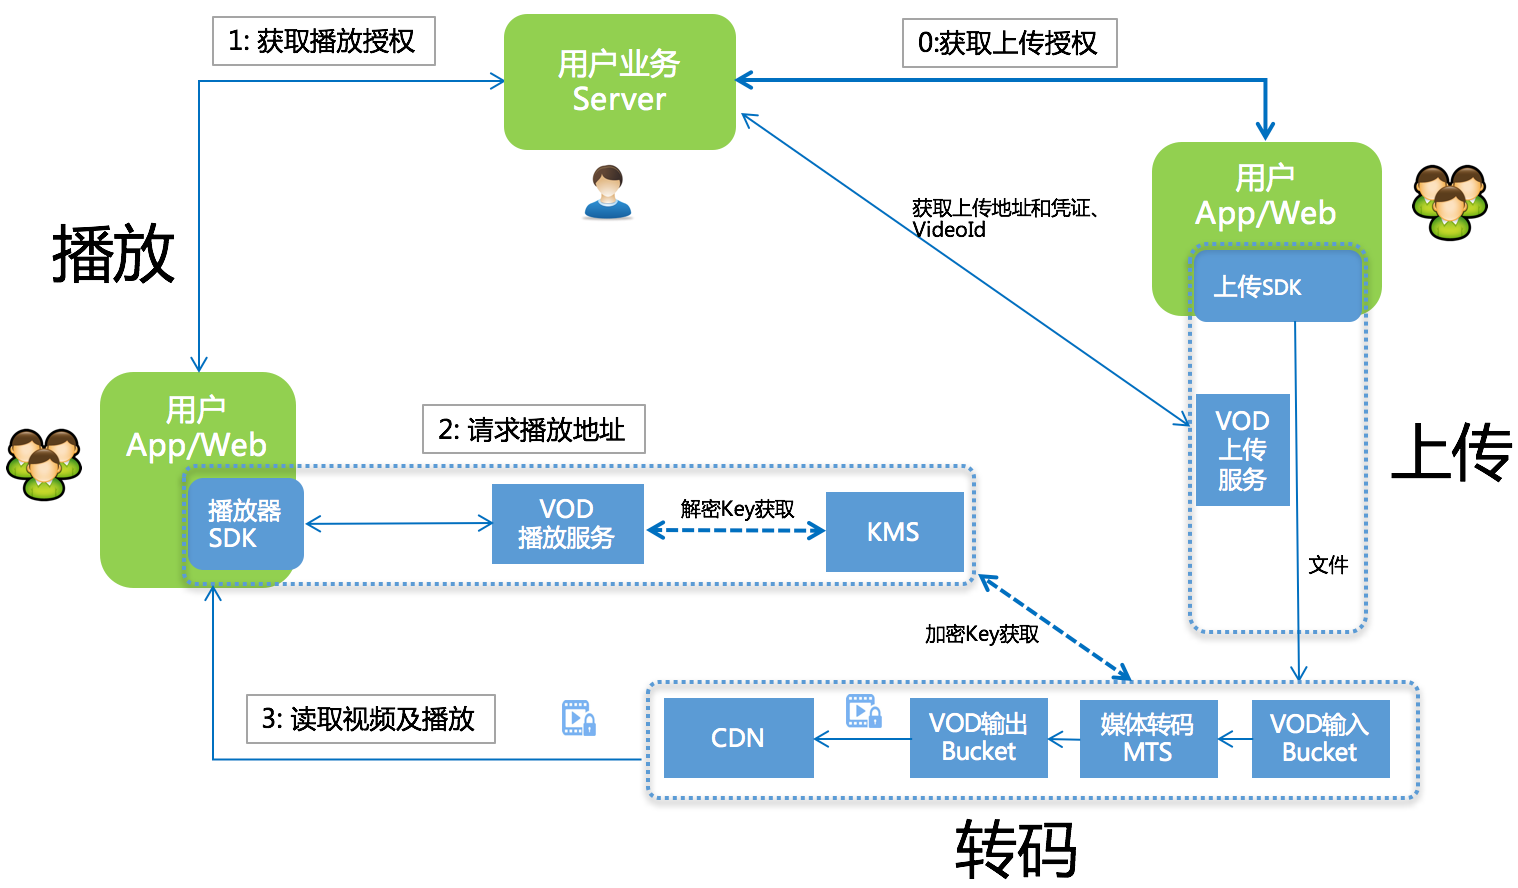
4、视频点播服务的基本使用
完整的参考文档 https://help.aliyun.com/product/29932.html?spm=a2c4g.11186623.6.540.3c356a58OEmVZJ

-
服务端:后端接口
-
客户端:浏览器、安卓、ios
-
API:阿里云提供固定的地址,只需要调用这个固定的地址,向地址传递参数,实现功能。
-
SDK:sdk对api方式进行封装,更方便使用。之前使用EayExcel调用阿里云提供类或者接口里面的方法实现视频功能。
5、使用Java代码具体使用SDK方式
注意:因为上传视频可以进行加密,加密之后,使用加密之后的地址不能进行视频播放,所以在数据库存储不存地址,而是存储视频id。
(1)在service下创建子模块service_vod模块
POM.xml
<dependencies>
    <dependency>
        <groupId>com.aliyun</groupId>
        <artifactId>aliyun-java-sdk-core</artifactId>
    </dependency>
    <dependency>
        <groupId>com.aliyun.oss</groupId>
        <artifactId>aliyun-sdk-oss</artifactId>
    </dependency>
    <dependency>
        <groupId>com.aliyun</groupId>
        <artifactId>aliyun-java-sdk-vod</artifactId>
    </dependency>
    <dependency>
        <groupId>com.aliyun</groupId>
        <artifactId>aliyun-sdk-vod-upload</artifactId>
    </dependency>
    <dependency>
        <groupId>com.alibaba</groupId>
        <artifactId>fastjson</artifactId>
    </dependency>
    <dependency>
        <groupId>org.json</groupId>
        <artifactId>json</artifactId>
    </dependency>
    <dependency>
        <groupId>com.google.code.gson</groupId>
        <artifactId>gson</artifactId>
    </dependency>

    <dependency>
        <groupId>joda-time</groupId>
        <artifactId>joda-time</artifactId>
    </dependency>
</dependencies>
(2)初始化操作,创建 DefaultAcsClient 对象
public class InitVodClient {
    public static DefaultAcsClient initVodClient(String accessKeyId, String accessKeySecret) throws ClientException {
        String regionId = "cn-shanghai";  // 点播服务接入地域
        DefaultProfile profile = DefaultProfile.getProfile(regionId, accessKeyId, accessKeySecret);
        DefaultAcsClient client = new DefaultAcsClient(profile);
        return client;
    }
}
(3)实现根据视频id获取视频播放地址
//根据id获取视频播放地址
public static void getPlayUrl()throws ClientException{

    //创建初始化对象
    DefaultAcsClient client = InitVodClient.initVodClient("your keyId", "your keySecret");
    //创建获取视频地址request和response
    GetPlayInfoRequest request = new GetPlayInfoRequest();
    GetPlayInfoResponse response = new GetPlayInfoResponse();
    request.setVideoId("efc88346e5dd45fda5b161c9ddbd0d9d");
    //调用初始化对象里面的方法,传递request,获取数据
    response = client.getAcsResponse(request);

    List <GetPlayInfoResponse.PlayInfo> playInfoList = response.getPlayInfoList();
    //播放地址
    for (GetPlayInfoResponse.PlayInfo playInfo : playInfoList) {
        System.out.print("PlayInfo.PlayURL = " + playInfo.getPlayURL() + "\n");
    }
    //Base信息 视频名称
    System.out.print("VideoBase.Title = " + response.getVideoBase().getTitle() + "\n");
}
(4)获取视频播放凭证
//根据id获取视频播放凭证
public static void getPlayAuth()throws ClientException{
    //创建初始化对象
    DefaultAcsClient client = InitVodClient.initVodClient("your keyId", "your keySecret");

    GetVideoPlayAuthRequest request = new GetVideoPlayAuthRequest();
    GetVideoPlayAuthResponse response = new GetVideoPlayAuthResponse();

    request.setVideoId("003a83891a7b444d93727d83a5ba7d3a");

    response = client.getAcsResponse(request);
    System.out.println("palyAuth:"+response.getPlayAuth());
}
(5)上传视频到阿里云视频点播服务
//以文件流的方式进行上传
public static void testUploadFileStream(){
    String accessKeyId = "your keyId";
    String accessKeySecret = "your keySecret";
    String title = "6 - What If I Want to Move Faster123.mp4 ";
    String fileName = "F:/自学课程/项目资料/02谷粒学苑(分布式项目)/项目资料/1-阿里云上传测试视频/6 - What If I Want to Move Faster.mp4";
    UploadFileStreamRequest request = new UploadFileStreamRequest(accessKeyId, accessKeySecret, title, fileName);

    UploadVideoImpl uploader = new UploadVideoImpl();
    UploadFileStreamResponse response = uploader.uploadFileStream(request);
    System.out.print("RequestId=" + response.getRequestId() + "\n"); //请求视频点播服务的请求ID
    if (response.isSuccess()) {
        System.out.print("VideoId=" + response.getVideoId() + "\n");
    } else {
        /* 如果设置回调URL无效,不影响视频上传,可以返回VideoId同时会返回错误码。其他情况上传失败时,VideoId为空,此时需要根据返回错误码分析具体错误原因 */
        System.out.print("VideoId=" + response.getVideoId() + "\n");
        System.out.print("ErrorCode=" + response.getCode() + "\n");
        System.out.print("ErrorMessage=" + response.getMessage() + "\n");
    }
}
七、添加小节实现视频上传和删除 – 后端
1、引入依赖
2、创建application配置文件
#服务端口
server:
  port: 8003

#服务名
spring:
  application:
    name: service-vod

  #环境设置:dev,test,prod
  profiles:
    active: dev


  servlet:
    multipart:
      max-file-size: 1024MB # 最大上传单个文件大小:默认1M
      max-request-size: 1024MB # 最大置总上传的数据大小 :默认10M

#阿里云VOD地址
aliyun:
  vod:
    file:
      keyid: your keyId
      keysecret: your keySecret
3、常量工具类
@Component //把属性的设置交给Spring.
public class ConstantPropertiesUtil implements InitializingBean {// InitializingBean:在初始化的时候,该类被执行.

    //从配置文件中读取值,赋值给这些属性
    //注意@value无法给静态属性注入值
    @Value("${aliyun.vod.file.keyid}")
    private String keyId;

    @Value("${aliyun.vod.file.keysecret}")
    private String keySecret;

    //定义公开静态方法
    public static String ACCESS_KEY_ID;
    public static String ACCESS_KEY_SECRET;

    //当属性值设置完毕后执行该方法.
    @Override
    public void afterPropertiesSet() throws Exception {
        ACCESS_KEY_ID = keyId;
        ACCESS_KEY_SECRET = keySecret;
    }
}
4、主启动类
@SpringBootApplication(exclude = DataSourceAutoConfiguration.class)
@ComponentScan("com.rg")//为了扫描外部的swagger
public class VodApplication {
    public static void main(String[] args) {
        SpringApplication.run(VodApplication.class, args);
    }
}
5、编写Controller类
@RestController
@RequestMapping("/vodService/video")
@CrossOrigin
public class VodController {

    @Autowired
    private VodService vodService;

    //上传视频到阿里云VOD
    @PostMapping("uploadVideoAly")
    public R uploadVideoAly(@RequestBody MultipartFile file){
        String videoId = vodService.uploadVideoAly(file);
        return R.ok().data("videoId",videoId);
    }

    //根据视频id从阿里云删除视频
    @DeleteMapping("removeAlyVideo/{id}")
    public R removeAlyVideo(@PathVariable String id){
        vodService.removeAlyVideo(id);
        return R.ok();
    }
}
6、编写Service类
@Service
public class VodServiceImpl implements VodService {
    //上传视频到阿里云VOD
    @Override
    public String uploadVideoAly(MultipartFile file) {

        String accessKeyId = ConstantPropertiesUtil.ACCESS_KEY_ID;
        String accessKeySecret = ConstantPropertiesUtil.ACCESS_KEY_SECRET;
        String title = file.getOriginalFilename().substring(0,file.getOriginalFilename().lastIndexOf("."));//上传之后显示名称
        String fileName = file.getOriginalFilename();//上传文件原始名称
        try {
            InputStream inputStream = file.getInputStream();//上传文件流
            UploadStreamRequest request = new UploadStreamRequest(accessKeyId, accessKeySecret, title, fileName, inputStream);

            UploadVideoImpl uploader = new UploadVideoImpl();
            UploadStreamResponse response = uploader.uploadStream(request);
            String videoId = response.getVideoId();
            return videoId;
        } catch (Exception e) {
            e.printStackTrace();
            throw new GuLiException(20001, "文件上传失败!");
        }
    }

    //根据id删除阿里云上的视频
    @Override
    public void removeAlyVideo(String id) {
        try {
            DefaultAcsClient client = InitVodClient.initVodClient(ConstantPropertiesUtil.ACCESS_KEY_ID, ConstantPropertiesUtil.ACCESS_KEY_SECRET);
            //
            DeleteVideoRequest request = new DeleteVideoRequest();
            DeleteVideoResponse response = new DeleteVideoResponse();
            //想request中设置视频id
            request.setVideoIds(id);
            response = client.getAcsResponse(request);
        } catch (ClientException e) {
            e.printStackTrace();
            throw new GuLiException(20001, "视频删除失败!");
        }
    }
}
八、添加小节实现视频上传和删除 – 前端
1、定义api
//根据id删除视频
removeAlyVideo(id) {
    return request({
        url: `/vodService/video/removeAlyVideo/${id}`,
        method: 'delete'
    })
}
2、整合上传组件
<el-form-item label="上传视频">
    <el-upload
        :on-success="handleVodUploadSuccess"
        :on-remove="handleVodRemove"
        :before-remove="beforeVodRemove"
        :on-exceed="handleUploadExceed"
        :file-list="fileList"
        :action="BASE_API+'/vodService/video/uploadVideoAly'"
        :limit="1"
        class="upload-demo">
    <el-button size="small" type="primary">上传视频</el-button>
    <el-tooltip placement="right-end">
        <div slot="content">最大支持1G,<br>
            支持3GP、ASF、AVI、DAT、DV、FLV、F4V、<br>
            GIF、M2T、M4V、MJ2、MJPEG、MKV、MOV、MP4、<br>
            MPE、MPG、MPEG、MTS、OGG、QT、RM、RMVB、<br>
            SWF、TS、VOB、WMV、WEBM 等视频格式上传</div>
        <i class="el-icon-question"/>
    </el-tooltip>
    </el-upload>
</el-form-item>
3、数据定义
fileList: [],//上传文件列表
BASE_API: process.env.BASE_API // 接口API地址
video: {// 课时对象
    title: '',
    sort: 0,
    isFree: 0,
    videoSourceId: '',
    videoOriginalName:''
}
4、页面js方法
//上传视频超过最大数量的方法
handleUploadExceed(file,fileList){
    this.$message.warning('想要重新上传视频,请先删除已经上传的视频')
},
//点击确定调用的方法
handleVodRemove(){
    video.removeAlyVideo(this.video.videoSourceId).then(response=>{
        this.$message({
            type:'success',
            message:'删除视频成功!'
        })
        //把文件列表清空
        this.fileList = []
        //删除的视频信息不再存入数据库
        this.video.videoSourceId = ''
        this.video.videoOriginalName = ''
    })

},
//点击×调用的方法
beforeVodRemove(file,fileList){
    return this.$confirm(`确定移除 ${file.name}?`)
},
//上传成功方法
handleVodUploadSuccess(response,file,fileList){
    this.video.videoSourceId = response.data.videoId
    this.video.videoOriginalName = file.name
}
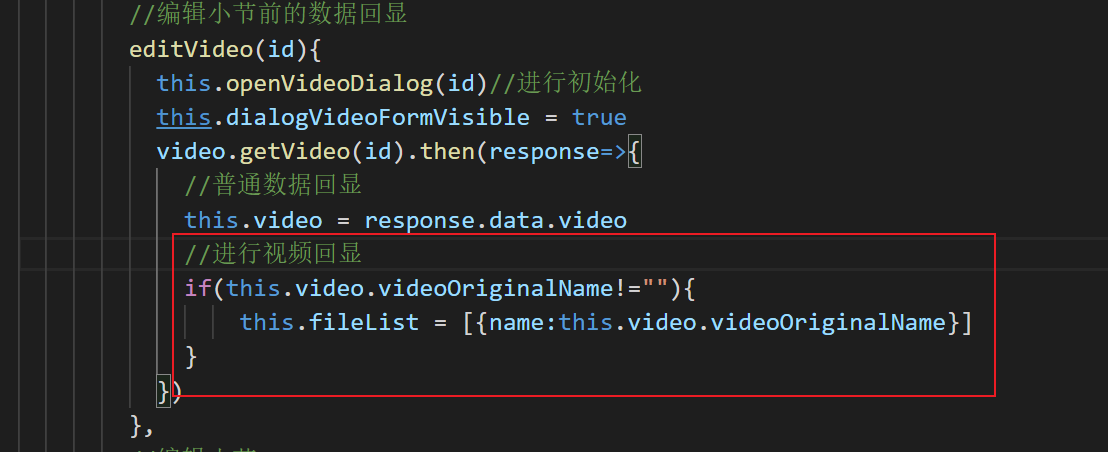
5、编辑小节时视频回显
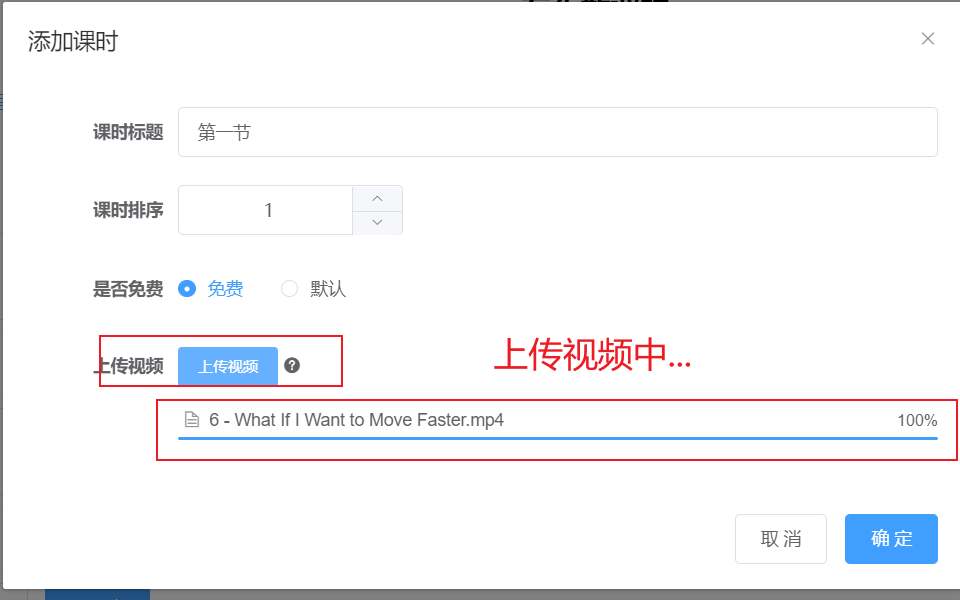
6、页面效果展示


如果有收获!!! 希望老铁们来个三连,点赞、收藏、转发。
创作不易,别忘点个赞,可以让更多的人看到这篇文章,顺便鼓励我写出更好的博客


 844
844


 被折叠的 条评论
为什么被折叠?
被折叠的 条评论
为什么被折叠?
 到【灌水乐园】发言


