


01
1. 框架
框架相当于是一个脚手架,内部已经写好了很多代码,我们只要其基础上进行开发就可以提高我们的开发效率。
框架阶段学习:
①先去学习如何使用框架
②然后再使用熟练的情况下去猜测内部的原理
③通过源码去验证自己的猜测。
2.Mybatis介绍
-
MyBatis 是一款优秀的持久层框架。
-
MyBatis 免除了几乎所有的 JDBC 代码以及设置参数和获取结果集的工作。
3. 快速入门
①数据准备
CREATE DATABASE /*!32312 IF NOT EXISTS*/`mybatis_db` /*!40100 DEFAULT CHARACTER SET utf8 */;
USE `mybatis_db`;
DROP TABLE IF EXISTS `user`;
CREATE TABLE `user` (
  `id` int(11) NOT NULL AUTO_INCREMENT,
  `username` varchar(50) DEFAULT NULL,
  `age` int(11) DEFAULT NULL,
  `address` varchar(50) DEFAULT NULL,
  PRIMARY KEY (`id`)
) ENGINE=InnoDB AUTO_INCREMENT=3 DEFAULT CHARSET=utf8;
insert  into `user`(`id`,`username`,`age`,`address`) values (1,'UZI',19,'上海'),(2,'PDD',25,'上海');
②导入依赖
        <!--mybatis依赖-->
        <dependency>
            <groupId>org.mybatis</groupId>
            <artifactId>mybatis</artifactId>
            <version>3.5.4</version>
        </dependency>
        <!--mysql驱动-->
        <dependency>
            <groupId>mysql</groupId>
            <artifactId>mysql-connector-java</artifactId>
            <version>5.1.47</version>
        </dependency>
③编写核心配置
在资源目录下创建:mybatis-config.xml 内容如下:
<?xml version="1.0" encoding="UTF-8" ?>
<!DOCTYPE configuration
        PUBLIC "-//mybatis.org//DTD Config 3.0//EN"
        "http://mybatis.org/dtd/mybatis-3-config.dtd">
<configuration>
    <environments default="development">
        <environment id="development">
            <transactionManager type="JDBC"/>
            <dataSource type="POOLED">
                <property name="driver" value="com.mysql.jdbc.Driver"/>
                <property name="url" value="jdbc:mysql://localhost:3306/test"/>
                <property name="username" value="root"/>
                <property name="password" value="root"/>
            </dataSource>
        </environment>
    </environments>
    <mappers>
        <mapper resource="com/test/dao/UserDao.xml"/>
    </mappers>
</configuration>
④定义接口及对应的xml映射文件
com.test.dao.UserDao:
public interface UserDao {
    List<User> findAll();
}
资源目录下:com/test/dao/UserDao.xml
<?xml version="1.0" encoding="UTF-8" ?>
<!DOCTYPE mapper
        PUBLIC "-//mybatis.org//DTD Mapper 3.0//EN"
        "http://mybatis.org/dtd/mybatis-3-mapper.dtd">
<mapper namespace="com.test.dao.UserDao">

    <select id="findAll" resultType="com.test.pojo.User">
      select * from user
    </select>
</mapper>
⑤编写测试类
获取SqlSession,通过SqlSession获取UserDao调用对应的方法
    public static void main(String[] args) throws IOException {
        //定义mybatis配置文件的路径
        String resource = "mybatis-config.xml";
        InputStream inputStream = Resources.getResourceAsStream(resource);
        SqlSessionFactory sqlSessionFactory = new SqlSessionFactoryBuilder().build(inputStream);
        //获取Sqlsession对象
        SqlSession sqlSession = sqlSessionFactory.openSession();
        //获取UserDao实现类对象
        UserDao userDao = sqlSession.getMapper(UserDao.class);
        //调用方法测试
        List<User> userList = userDao.findAll();
        System.out.println(userList);
        //释放资源
        sqlSession.close();
    }
3.9 高效编程
3.9.1 配置代码模板
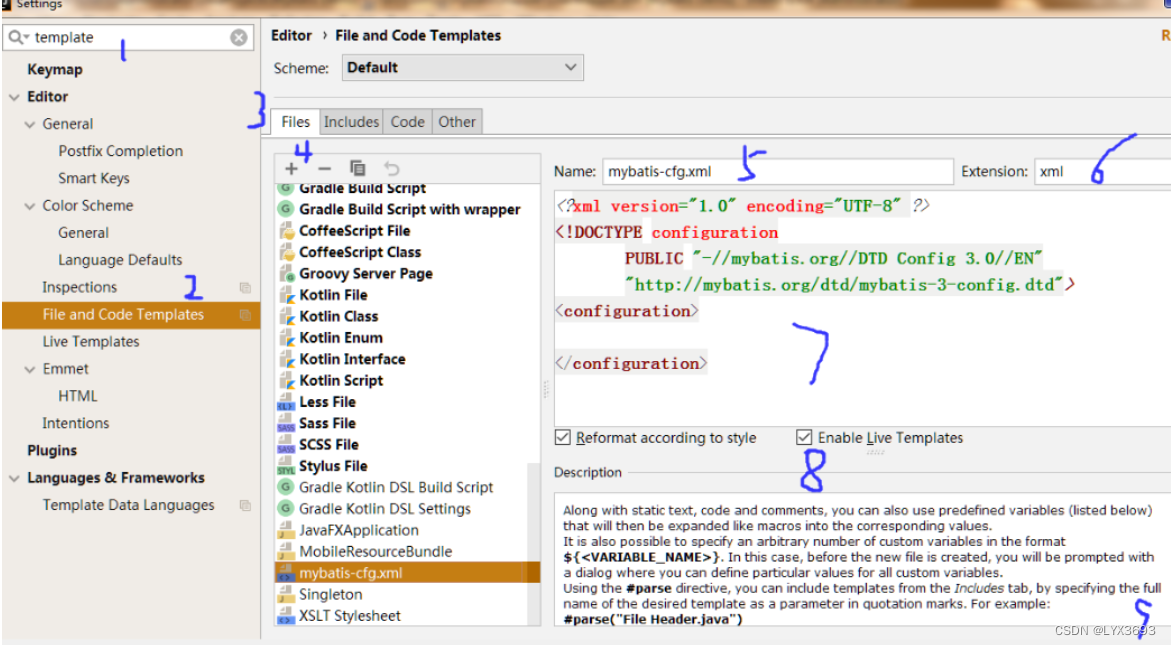
3.9.2 Mybatis插件
下载安装Free Mybatis plugin,安装完后重启IDEA
4. 参数获取
4.1 一个参数
4.1.1 基本参数
我们可以使用#{}直接来取值,写任意名字都可以获取到参数。但是一般用方法的参数名来取。
例如:
接口中方法定义如下
User findById(Integer id);xml中内容如下:
<select id="findById" resultType="com.test.pojo.User">
 select * from user where id = #{id}
</select>
4.1.2 POJO
我们可以使用POJO中的属性名来获取对应的值。
例如:
接口中方法定义如下
User findByUser(User user);xml中内容如下:
    <select id="findByUser" resultType="com.test.pojo.User">
        select * from user where id = #{id}
            and username = #{username}
            and age = #{age}
            and address = #{address}
    </select>
4.1.3 Map
我们可以使用map中的key来获取对应的值。
例如:
接口中方法定义如下
User findByMap(Map map);xml中内容如下:
    <select id="findByMap" resultType="com.test.pojo.User">
        select * from user where id = #{id}
            and username = #{username}
            and age = #{age}
            and address = #{address}
    </select>
方法调用:
        Map map = new HashMap();
        map.put("id",2);
        map.put("username","PDD");
        map.put("age",25);
        map.put("address","上海");
        userDao.findByMap(map);
4.2 多个参数
Mybatis会把多个参数放入一个Map集合中,默认的key是argx和paramx这种格式。
例如:
接口中方法定义如
User findByCondition(Integer id,String username);最终map中的键值对如下:
{arg1=PDD, arg0=2, param1=2, param2=PDD}我们虽然可以使用对应的默认key来获取值,但是这种方式可读性不好。我们一般在方法参数前使用@Param来设置参数名。
例如:
接口中方法定义
User findByCondition(@Param("id") Integer id,@Param("username") String username);
最终map中的键值对如下:
{id=2, param1=2, username=PDD, param2=PDD}所以我们就可以使用如下方式来获取参数
    <select id="findByCondition" resultType="com.test.pojo.User">
         select * from user where id = #{id}
            and username = #{username}
    </select>
4.3 总结
建议如果只有一个参数的时候不用做什么特殊处理。如果是有多个参数的情况下一定要加上@Param来设置参数名。
5. 核心类
5.1 SqlSessionFactory
SqlSessionFactory是一个SqlSession的工厂类。主要用来获取SqlSession对象。
成员方法如下
SqlSession openSession();
//获取SqlSession对象,传入的参数代表创建的SqlSession是否自动提交
SqlSession openSession(boolean autoCommit);
5.2 SqlSession
SqlSession 提供了在数据库执行 SQL 命令所需的所有方法 。它还提供了事务的相关操作。
成员方法如下:
T getMapper(Class<T> type);//获取mapper对象
void commit();//提交事务
void rollback();//回滚事务
void close();//释放资源
6.Mybatis实现增删改查
6.1 新增
①接口中增加相关方法
void insertUser(User user);②映射文件UserDao.xml增加响应的标签
    <insert id="insertUser">
        insert into user values(null,#{username},#{age},#{address})
    </insert>
注意:要记得提交事务。
6.2 删除
①接口中增加相关方法
void deleteById(Integer id);②映射文件UserDao.xml增加响应的标签
    <delete id="deleteById">
        delete from user where id = #{id}
    </delete>
注意:要记得提交事务。
6.3 修改
①接口中增加相关方法
void updateUser(User user);②映射文件UserDao.xml增加响应的标签
    <!--更新用户-->
    <update id="updateUser">
        UPDATE USER SET age = #{age} ,
            username = #{username},
            address = #{address}
             WHERE id = #{id}
    </update>
注意:要记得提交事务。
6.4 根据id查询
①接口中增加相关方法
User findById(Integer id);②映射文件UserDao.xml增加响应的标签
   <select id="findById" resultType="com.test.pojo.User">
      select * from user where id = #{id}
    </select>
6.5 查询所有
①接口中增加相关方法
List<User> findAll();②映射文件UserDao.xml增加响应的标签
    <select id="findAll" resultType="com.test.pojo.User">
      select * from user
    </select>
7. 配置文件详解
7.1 properties
可以使用properties读取properties配置文件。使用其中的resource属性来设置配置文件的路径。
然后使用${key}来获取配置文件中的值
例如:
在resources目录下有jdbc.properties文件,内容如下:
jdbc.url=jdbc:mysql://localhost:3306/mybatis_db
jdbc.driver=com.mysql.jdbc.Driver
jdbc.username=root
jdbc.password=root
在mybatis-config.xml中:
<?xml version="1.0" encoding="UTF-8" ?>
<!DOCTYPE configuration
        PUBLIC "-//mybatis.org//DTD Config 3.0//EN"
        "http://mybatis.org/dtd/mybatis-3-config.dtd">
<configuration>
    <!--设置配置文件所在的路径-->
    <properties resource="jdbc.properties"></properties>
    <environments default="development">
        <environment id="development">
            <transactionManager type="JDBC"/>
            <dataSource type="POOLED">
                <!--获取配置文件中配置的对应的值来设置连接相关参数-->
                <property name="driver" value="${jdbc.driver}"/>
                <property name="url" value="${jdbc.url}"/>
                <property name="username" value="${jdbc.username}"/>
                <property name="password" value="${jdbc.password}"/>
            </dataSource>
        </environment>
    </environments>
</configuration>
7.2 settings
可以使用该标签来设置进行一些设置
例如:
   <settings>
        <!--开启自动驼峰命名映射-->
        <setting name="mapUnderscoreToCamelCase" value="true"/>
</settings>具体的设置参考:mybatis – MyBatis 3 | 配置
7.3 typeAliases
可以用来设置给全类名设置别名,简化书写。一般设置一个包下的类全部具有默认别名。默认别名是类目首字母小写。例如:com.test.pojo.User别名为user
   <typeAliases>
        <package name="com.test.dao"></package>
    </typeAliases>
7.4 environments
配置数据库相关的环境,例如事物管理器,连接池相关参数等。
    <!--设置默认环境-->
	<environments default="development">

        <!--设置该环境的唯一标识-->
        <environment id="development">
            <transactionManager type="JDBC"/>
            <dataSource type="POOLED">
                <!--获取配置文件中配置的对应的值来设置连接相关参数-->
                <property name="driver" value="${jdbc.driver}"/>
                <property name="url" value="${jdbc.url}"/>
                <property name="username" value="${jdbc.username}"/>
                <property name="password" value="${jdbc.password}"/>
            </dataSource>
        </environment>
    </environments>
7.5 mappers
该标签的作用是加载映射的,加载方式有如下几种(主要使用第四种):
①使用相对于类路径的资源引用,例如:
<!-- 使用相对于类路径的资源引用 -->
<mappers>
  <mapper resource="org/mybatis/builder/AuthorMapper.xml"/>
  <mapper resource="org/mybatis/builder/BlogMapper.xml"/>
  <mapper resource="org/mybatis/builder/PostMapper.xml"/>
</mappers>
②使用完全限定资源定位符(URL),例如:
<!-- 使用完全限定资源定位符(URL) -->
<mappers>
  <mapper url="file:///var/mappers/AuthorMapper.xml"/>
  <mapper url="file:///var/mappers/BlogMapper.xml"/>
  <mapper url="file:///var/mappers/PostMapper.xml"/>
</mappers>
③使用映射器接口实现类的完全限定类名,例如:
<!-- 使用映射器接口实现类的完全限定类名 -->
<mappers>
  <mapper class="org.mybatis.builder.AuthorMapper"/>
  <mapper class="org.mybatis.builder.BlogMapper"/>
  <mapper class="org.mybatis.builder.PostMapper"/>
</mappers>
④将包内的映射器接口实现全部注册为映射器,例如:
<!-- 定义dao接口所在的包。要求xml文件存放的路径和dao接口的包名要对应 -->
<mappers>
  <package name="org.mybatis.builder"/>
</mappers>
8. 打印日志
①log4j配置 在resources目录下创建log4j.properties文件,内容如下:
### direct log messages to stdout ###
log4j.appender.stdout=org.apache.log4j.ConsoleAppender
log4j.appender.stdout.Target=System.out
log4j.appender.stdout.layout=org.apache.log4j.PatternLayout
log4j.appender.stdout.layout.ConversionPattern=%d{ABSOLUTE} %5p %c{1}:%L - %m%n

### direct messages to file mylog.log ###
log4j.appender.file=org.apache.log4j.FileAppender
log4j.appender.file.File=c:/mylog.log
log4j.appender.file.layout=org.apache.log4j.PatternLayout
log4j.appender.file.layout.ConversionPattern=%d{ABSOLUTE} %5p %c{1}:%L - %m%n

### set log levels - for more verbose logging change 'info' to 'debug' ###

log4j.rootLogger=debug, stdout
②引入依赖
        <dependency>
            <groupId>log4j</groupId>
            <artifactId>log4j</artifactId>
            <version>1.2.17</version>
        </dependency>
9.获取参数时 #{}和${}的区别
如果使用#{}.他是预编译的sql可以防止SQL注入攻击
如果使用${}他是直接把参数值拿来进行拼接,这样会有SQL注入的危险
如果使用的是#{}来获取参数值日志如下:
Preparing: select * from user where id = ? and username = ? and age = ? and address = ? Parameters: 2(Integer), 快乐风男(String), 29(Integer), 北京(String)如果使用${}来获取参数值日志如下:
Preparing: select * from user where id = 2 and username = 快乐风男 and age = 29 and address = 北京02
1. 注解开发
我们也可以使用注解的形式来进行开发,用注解来替换掉xml。 使用注解来映射简单语句会使代码显得更加简洁,但对于稍微复杂一点的语句,Java 注解不仅力不从心,还会让你本就复杂的 SQL 语句更加混乱不堪。 所以我们在实际企业开发中一般都是使用XML的形式。
1.1 步骤
①在核心配置文件中配置mapper接口所在的包名
    <mappers>
        <package name="com.test.dao"></package>
    </mappers>
②在接口对应方法上使用注解来配置需要执行的sql
public interface UserDao {

    @Select("select * from user")
    List<User> findAll();

    @Insert("insert into user values(null,#{username},#{age},#{address})")
    void insertUser(User user);

    @Update("UPDATE USER SET age = #{age} , username = #{username},address = #{address} WHERE id = #{id}")
    void updateUser(User user);

    @Delete("delete from user where id = #{id}")
    void deleteById(Integer id);
}
③和之前的一样获取Mapper调用方法即可
    public static void main(String[] args) throws IOException {
        //定义mybatis配置文件的路径
        String resource = "mybatis-config.xml";
        InputStream inputStream = Resources.getResourceAsStream(resource);
        SqlSessionFactory sqlSessionFactory = new SqlSessionFactoryBuilder().build(inputStream);
        //获取Sqlsession对象
        SqlSession sqlSession = sqlSessionFactory.openSession();
        //获取UserDao实现类对象
        UserDao userDao = sqlSession.getMapper(UserDao.class);
        //调用方法测试
        List<User> userList = userDao.findAll();
        System.out.println(userList);
        //释放资源
        sqlSession.close();
    }
2.动态SQL
在实际开发中的SQL语句没有之前的这么简单,很多时候需要根据传入的参数情况动态的生成SQL语句。Mybatis提供了动态SQL相关的标签让我们使用。
2.1 if
可以使用if标签进行条件判断,条件成立才会把if标签中的内容拼接进sql语句中。
例如:
    <select id="findByCondition" resultType="com.test.pojo.User">
         select * from user
         where  id = #{id}
        <if test="username!=null">
           and username = #{username}
        </if>
</select>如果参数username为null则执行的sql为:select * from user where id = ?
如果参数username不为null则执行的sql为:select * from user where id = ? and username = ?
注意:在test属性中表示参数的时候不需要写#{},写了会出问题。
2.2 trim
可以使用该标签动态的添加前缀或后缀,也可以使用该标签动态的消除前缀。
2.2.1 prefixOverrides属性
用来设置需要被清除的前缀,多个值可以用|分隔,注意|前后不要有空格。例如: and|or
例如:
    <select id="findByCondition" resultType="com.test.pojo.User">
        select * from user
        <trim prefixOverrides="and|or" >
            and
        </trim>
    </select>
最终执行的sql为: select * from user
2.2.2 suffixOverrides属性
用来设置需要被清除的后缀,多个值可以用|分隔,注意|前后不要有空格。例如: and|or
例如:
    <select id="findByCondition" resultType="com.test.pojo.User">
        select * from user
        <trim suffixOverrides="like|and" >
            where 1=1 like
        </trim>
    </select>
最终执行的sql为: select * from user 去掉了后缀like
2.2.3 prefix属性
用来设置动态添加的前缀,如果标签中有内容就会添加上设置的前缀
例如:
    <select id="findByCondition" resultType="com.test.pojo.User">
        select * from user
        <trim prefix="where" >
           1=1
        </trim>
    </select>
最终执行的sql为:select * from user where 1=1 动态增加了前缀where
2.2.4 suffix属性
用来设置动态添加的后缀,如果标签中有内容就会添加上设置的后缀
    <select id="findByCondition" resultType="com.test.pojo.User">
        select * from user
        <trim suffix="1=1" >
           where
        </trim>
    </select>
最终执行的sql为:select * from user where 1=1 动态增加了后缀1=1
2.2.5 动态添加前缀where 并且消除前缀and或者or
User findByCondition(@Param("id") Integer id,@Param("username") String username); <select id="findByCondition" resultType="com.test.pojo.User">
select * from user
<trim prefix="where" prefixOverrides="and|or" >
<if test="id!=null">
id = #{id}
</if>
<if test="username!=null">
and username = #{username}
</if>
</trim>
</select>调用方法时如果传入的id和username为null则执行的SQL为:select * from user
调用方法时如果传入的id为null,username不为null,则执行的SQL为:select * from user where username = ?
2.2 where
where标签等价于:
<trim prefix="where" prefixOverrides="and|or" ></trim>可以使用where标签动态的拼接where并且去除前缀的and或者or。
例如:
    <select id="findByCondition" resultType="com.test.pojo.User">
        select * from user
        <where>
            <if test="id!=null">
                id = #{id}
            </if>
            <if test="username!=null">
                and username = #{username}
            </if>
        </where>
</select>如果id和username都为null,则执行的sql为:select * from user
如果id为null,username不为null,则执行的sql为:select * from user where username = ?
2.3 set
set标签等价于
<trim prefix="set" suffixOverrides="," ></trim>可以使用set标签动态的拼接set并且去除后缀的逗号。
例如:
    <update id="updateUser">
        UPDATE USER
        <set>
            <if test="username!=null">
                username = #{username},
            </if>
            <if test="age!=null">
                age = #{age},
            </if>
            <if test="address!=null">
                address = #{address},
            </if>
        </set>
        where id = #{id}
    </update>
如果调用方法时传入的User对象的id为2,username不为null,其他属性都为null则最终执行的sql为:UPDATE USER SET username = ? where id = ?
2.4 foreach
可以使用foreach标签遍历集合或者数组类型的参数,获取其中的元素拿来动态的拼接SQL语句。
例如:
方法定义如下
List<User> findByIds(@Param("ids") Integer[] ids);如果期望动态的根据实际传入的数组的长度拼接SQL语句。例如传入长度为4个数组最终执行的SQL为:
select * from User WHERE id in( ? , ? , ? , ?, ? ) 则在xml映射文件中可以使用以下写法
	<select id="findByIds" resultType="com.test.pojo.User">
        select * from User
        <where>
            <foreach collection="ids" open="id in(" close=")" item="id" separator=",">
                #{id}
            </foreach>
        </where>
    </select>
collection:表示要遍历的参数。
open:表示遍历开始时拼接的语句
item:表示给当前遍历到的元素的取的名字
separator:表示每遍历完一次拼接的分隔符
close:表示最后一次遍历完拼接的语句
注意:如果方法参数是数组类型,默认的参数名是array,如果方法参数是list集合默认的参数名是list。建议遇到数组或者集合类型的参数统一使用@Param注解进行命名。
2.5 choose、when、otherwise
当我们不想使用所有的条件,而只是想从多个条件中选择一个使用时。可以使用choose系列标签。类似于java中的switch。
例如:
接口中方法定义如下
List<User> selectChose(User user);期望:
如果user对象的id不为空时就通过id查询。
如果id为null,username不为null就通过username查询。
如果id和username都会null就查询id为3的用户
xml映射文件如下
 	<select id="selectChose" resultType="com.test.pojo.User">
        select * from user
        <where>
            <choose>
                <when test="id!=null">
                    id = #{id}
                </when>
                <when test="username!=null">
                    username = #{username}
                </when>
                <otherwise>
                    id = 3
                </otherwise>
            </choose>
        </where>
</select>-
choose类似于java中的switch
-
when类似于java中的case
-
otherwise类似于java中的dufault
一个choose标签中最多只会有一个when中的判断成立。从上到下去进行判断。如果成立了就把标签体的内容拼接到sql中,并且不会进行其它when的判断和拼接。如果所有的when都不成立则拼接otherwise中的语句。
3. SQL片段抽取
我们在xml映射文件中编写SQL语句的时候可能会遇到重复的SQL片段。这种SQL片段我们可以使用sql标签来进行抽取。然后在需要使用的时候使用include标签进行使用。
例如:
    <sql id="baseSelect" >id,username,age,address</sql>
    <select id="findAll" resultType="com.test.pojo.User">
        select <include refid="baseSelect"/>  from user
    </select>
最终执行的sql为: select id,username,age,address from user
03
0. 案例环境
0.1 案例数据初始化sql
CREATE DATABASE /*!32312 IF NOT EXISTS*/`mybatis_db` /*!40100 DEFAULT CHARACTER SET utf8 */;

USE `mybatis_db`;
DROP TABLE IF EXISTS `orders`;
CREATE TABLE `orders` (
  `id` int(11) NOT NULL AUTO_INCREMENT,
  `createtime` timestamp NOT NULL DEFAULT CURRENT_TIMESTAMP ON UPDATE CURRENT_TIMESTAMP COMMENT '创建时间',
  `price` int(11) DEFAULT NULL COMMENT '价格',
  `remark` varchar(100) DEFAULT NULL COMMENT '备注',
  `user_id` int(11) DEFAULT NULL COMMENT '用户id',
  PRIMARY KEY (`id`)
) ENGINE=InnoDB AUTO_INCREMENT=4 DEFAULT CHARSET=utf8;
insert  into `orders`(`id`,`createtime`,`price`,`remark`,`user_id`) values (1,'2014-06-26 16:55:43',2000,'无',2),(2,'2021-02-23 16:55:57',3000,'无',3),(3,'2021-02-23 16:56:21',4000,'无',2);
DROP TABLE IF EXISTS `role`;

CREATE TABLE `role` (
  `id` int(11) NOT NULL AUTO_INCREMENT,
  `name` varchar(100) DEFAULT NULL COMMENT '角色名',
  `desc` varchar(100) DEFAULT NULL COMMENT '角色描述',
  PRIMARY KEY (`id`)
) ENGINE=InnoDB AUTO_INCREMENT=3 DEFAULT CHARSET=utf8;

/*Data for the table `role` */

insert  into `role`(`id`,`name`,`desc`) values (1,'总经理','一人之下'),(2,'CFO',NULL);

/*Table structure for table `user` */

DROP TABLE IF EXISTS `user`;

CREATE TABLE `user` (
  `id` int(11) NOT NULL AUTO_INCREMENT,
  `username` varchar(50) DEFAULT NULL,
  `age` int(11) DEFAULT NULL,
  `address` varchar(50) DEFAULT NULL,
  PRIMARY KEY (`id`)
) ENGINE=InnoDB AUTO_INCREMENT=33 DEFAULT CHARSET=utf8;

/*Data for the table `user` */

insert  into `user`(`id`,`username`,`age`,`address`) values (2,'pdd',26,NULL),(3,'UZI',19,'上海11'),(4,'RF',19,NULL);

/*Table structure for table `user_role` */

DROP TABLE IF EXISTS `user_role`;

CREATE TABLE `user_role` (
  `user_id` int(11) DEFAULT NULL,
  `role_id` int(11) DEFAULT NULL
) ENGINE=InnoDB DEFAULT CHARSET=utf8;

/*Data for the table `user_role` */

insert  into `user_role`(`user_id`,`role_id`) values (2,2),(2,1),(3,1);
0.2 实体类
0.2.1 User.java
public class User {

    private Integer id;

    private String username;

    private Integer age;

    private String address;


    @Override
    public String toString() {
        return "User{" +
                "id=" + id +
                ", username='" + username + '\'' +
                ", age=" + age +
                ", address='" + address + '\'' +
                '}';
    }

    public Integer getId() {
        return id;
    }

    public void setId(Integer id) {
        this.id = id;
    }

    public String getUsername() {
        return username;
    }

    public void setUsername(String username) {
        this.username = username;
    }

    public Integer getAge() {
        return age;
    }

    public void setAge(Integer age) {
        this.age = age;
    }

    public String getAddress() {
        return address;
    }

    public void setAddress(String address) {
        this.address = address;
    }

    public User() {
    }

    public User(Integer id, String username, Integer age, String address) {
        this.id = id;
        this.username = username;
        this.age = age;
        this.address = address;
    }

}
0.2.2 Order.java
public class Order {
    private Integer id;
    private Date createtime;
    private Integer price;
    private String remark;
    private Integer userId;

    @Override
    public String toString() {
        return "Order{" +
                "id=" + id +
                ", createtime=" + createtime +
                ", price=" + price +
                ", remark='" + remark + '\'' +
                ", userId=" + userId +
                '}';
    }
  	public Order() {
    }
    public Integer getId() {
        return id;
    }

    public void setId(Integer id) {
        this.id = id;
    }

    public Date getCreatetime() {
        return createtime;
    }

    public void setCreatetime(Date createtime) {
        this.createtime = createtime;
    }

    public Integer getPrice() {
        return price;
    }

    public void setPrice(Integer price) {
        this.price = price;
    }

    public String getRemark() {
        return remark;
    }

    public void setRemark(String remark) {
        this.remark = remark;
    }

    public Integer getUserId() {
        return userId;
    }

    public void setUserId(Integer userId) {
        this.userId = userId;
    }

    public Order(Integer id, Date createtime, Integer price, String remark, Integer userId) {
        this.id = id;
        this.createtime = createtime;
        this.price = price;
        this.remark = remark;
        this.userId = userId;
    }
}
0.2.3 Role.java
public class Role {
    private Integer id;
    private String name;
    private String desc;

    @Override
    public String toString() {
        return "Role{" +
                "id=" + id +
                ", name='" + name + '\'' +
                ", desc='" + desc + '\'' +
                '}';
    }
	public Role() {
    }
    public Integer getId() {
        return id;
    }

    public void setId(Integer id) {
        this.id = id;
    }

    public String getName() {
        return name;
    }

    public void setName(String name) {
        this.name = name;
    }

    public String getDesc() {
        return desc;
    }

    public void setDesc(String desc) {
        this.desc = desc;
    }

    public Role(Integer id, String name, String desc) {
        this.id = id;
        this.name = name;
        this.desc = desc;
    }
}
1. ResultMap
1.1 基本使用
我们可以使用resultMap标签自定义结果集和实体类属性的映射规则。
    <!--
        resultMap 用来自定义结果集和实体类的映射
            属性:
                id 相当于这个resultMap的唯一标识
                type 用来指定映射到哪个实体类
        id标签  用来指定主键列的映射规则
            属性:
                property 要映射的属性名
                column  对应的列名
        result标签 用来指定普通列的映射规则
            属性:
                property 要映射的属性名
                column 对应的列名
    -->
    <resultMap id="orderMap" type="com.test.pojo.Order" >
        <id column="id" property="id"></id>
        <result column="createtime" property="createtime"></result>
        <result column="price" property="price"></result>
        <result column="remark" property="remark"></result>
        <result column="user_id" property="userId"></result>
    </resultMap>

	<!--使用我们自定义的映射规则-->
    <select id="findAll" resultMap="orderMap">
        SELECT id,createtime,price,remark,user_id  FROM ORDERS
    </select>
1.2 自动映射
我们定义resultMap时默认情况下自动映射是开启状态的。也就是如果结果集的列名和我们的属性名相同是会自动映射的我们只需要写特殊情况的映射关系即可。
例如:
下面这种写法和上面的写法会有相同的效果,因为其他属性的属性名和结果集的列名都是相同的会自动映射。
    <resultMap id="orderMap" type="com.test.pojo.Order" >
        <result column="user_id" property="userId"></result>
    </resultMap>
	<!--使用我们自定义的映射规则-->
    <select id="findAll" resultMap="orderMap">
        SELECT id,createtime,price,remark,user_id  FROM ORDERS
    </select>
如有需要可以选择关闭自动映射可以把resultMap的autoMapping属性设置为false。
例如:
    <resultMap id="orderMap" type="com.test.pojo.Order" autoMapping="false">
        <id column="id" property="id"></id>
        <result column="createtime" property="createtime"></result>
        <result column="price" property="price"></result>
        <result column="remark" property="remark"></result>
        <result column="user_id" property="userId"></result>
    </resultMap>
1.3 继承映射关系
我们可以使用resultMap 的extends属性来指定一个resultMap,从而复用重复的映射关系配置。
例如:
  	<!--定义个父映射,供其他resultMap继承-->
	<resultMap id="baseOrderMap" type="com.test.pojo.Order" >
        <id column="id" property="id"></id>
        <result column="createtime" property="createtime"></result>
        <result column="price" property="price"></result>
        <result column="remark" property="remark"></result>
    </resultMap>
	<!--继承baseOrderMap,然后只需要写自己特有的映射关系即可-->
    <resultMap id="orderMap" type="com.test.pojo.Order" autoMapping="false" extends="baseOrderMap">
        <result column="user_id" property="userId"></result>
    </resultMap>
2. 多表查询
有的时候我们需要查询多张表的数据才可以得到我们要的结果。
我们可以直接写一个多表关联的SQL进行查询。也可以分步进行多次的查询来拿到我们需要的结果。
Mybatis就提供了对应的配置,可以让我们去更方便的进行相应的查询和对应的结果集处理。
2.1 多表关联查询
2.1.1 一对一关系
两个实体之间是一对一的关系。(例如我们需要查询订单,要求还需要下单用户的数据。这里的订单相对于用户是一对一。)
例如:
方法定义如下
    //根据订单id查询订单,要求把下单用户的信息也查询出来
    Order findById(Integer id);
因为期望Order中还能包含下单用户的数据,所以可以再Order中增加一个属性
private User user;SQL语句如下
SELECT
	o.id,o.`createtime`,o.`price`,o.`remark`,o.`user_id`,u.`id` uid,u.`username`,u.`age`,u.`address`
FROM
	orders o,USER u
WHERE
	o.`user_id` = u.`id`
	AND o.id = 2
我们可以使用如下两种方式封装结果集。
2.1.1.1 使用ResultMap对所有字段进行映射
可以使用ResultMap设置user对象的属性的映射规则。
①resultMap定义,主要是对user对象的属性设置映射规则
 	<resultMap id="baseOrderMap" type="com.test.pojo.Order" >
        <id column="id" property="id"></id>
        <result column="createtime" property="createtime"></result>
        <result column="price" property="price"></result>
        <result column="remark" property="remark"></result>
    </resultMap>

    <resultMap id="orderMap" type="com.test.pojo.Order" autoMapping="false" extends="baseOrderMap">
        <result column="user_id" property="userId"></result>
    </resultMap>

    <!--Order和User关联的映射-->
    <resultMap id="orderUserMap" type="com.test.pojo.Order" autoMapping="false" extends="orderMap">
        <result property="user.id" column="uid"></result>
        <result property="user.username" column="username"></result>
        <result property="user.age" column="age"></result>
        <result property="user.address" column="address"></result>
    </resultMap>
②使用定义好的resultMap
<!--根据订单id查询订单,要求把下单用户的信息也查询出来-->
    <select id="findById" resultMap="orderUserMap">
        SELECT
            o.`id`,o.`createtime`,o.`price`,o.`remark`,o.`user_id`,u.`id` uid,u.`username`,u.`age`,u.`address`
        FROM
            orders o,`user` u
        WHERE
            o.id = #{id} AND
            o.`user_id`=u.`id`
    </select>
2.1.1.2 使用ResultMap中的association
可以使用ResultMap中的子标签association 来设置关联实体类的映射规则.
①定义resultMap
 	<resultMap id="baseOrderMap" type="com.test.pojo.Order" >
        <id column="id" property="id"></id>
        <result column="createtime" property="createtime"></result>
        <result column="price" property="price"></result>
        <result column="remark" property="remark"></result>
    </resultMap>

    <resultMap id="orderMap" type="com.test.pojo.Order" autoMapping="false" extends="baseOrderMap">
        <result column="user_id" property="userId"></result>
    </resultMap>

    <!--Order和User关联的映射(使用association)-->
    <resultMap id="orderUserMapUseAssociation" type="com.test.pojo.Order" autoMapping="false" extends="orderMap">
        <association property="user" javaType="com.test.pojo.User">
            <id property="id" column="uid"></id>
            <result property="username" column="username"></result>
            <result property="age" column="age"></result>
            <result property="address" column="address"></result>
        </association>
    </resultMap>
②使用resultMap
<!--根据订单id查询订单,要求把下单用户的信息也查询出来-->
    <select id="findById" resultMap="orderUserMapUseAssociation">
        SELECT
            o.`id`,o.`createtime`,o.`price`,o.`remark`,o.`user_id`,u.`id` uid,u.`username`,u.`age`,u.`address`
        FROM
            orders o,`user` u
        WHERE
            o.id = #{id} AND
            o.`user_id`=u.`id`
    </select>
2.1.2 一对多关系
两个实体之间是一对多的关系。(例如我们需要查询用户,要求还需要该用户所具有的角色信息。这里的用户相对于角色是一对多的。)
例如:
方法定义如下
 //根据id查询用户,并且要求把该用户所具有的角色信息也查询出来
    User findById(Integer id);
因为期望User中还能包含该用户所具有的角色信息,所以可以在User中增加一个属性
//    该用户所具有的角色
    private List<Role> roles;
SQL语句如下
SELECT
	u.`id`,u.`username`,u.`age`,u.`address`,r.id rid,r.name,r.desc
FROM
	USER u,user_role ur,role r
WHERE
	u.id=ur.user_id AND ur.role_id = r.id
	AND u.id = 2
结果集

我们可以使用如下的方式封装结果集。
2.1.2.1 使用ResultMap中的collection
可以使用ResultMap中的子标签association 来设置关联实体类的映射规则.
①定义ResultMap
	<!--定义User基本属性映射规则-->
	<resultMap id="userMap" type="com.test.pojo.User">
        <id property="id" column="id"></id>
        <result property="username" column="username"></result>
        <result property="age" column="age"></result>
        <result property="address" column="address"></result>
    </resultMap>

    <resultMap id="userRoleMap" type="com.test.pojo.User"  extends="userMap">
        <collection property="roles" ofType="com.test.pojo.Role" >
            <id property="id" column="rid"></id>
            <result property="name" column="name"></result>
            <result property="desc" column="desc"></result>
        </collection>
    </resultMap>
②使用ResultMap
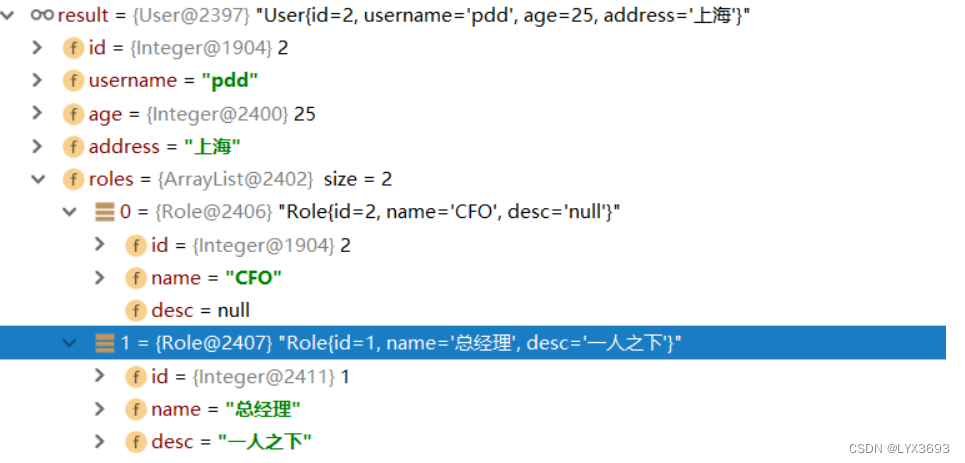
    <select id="findById" resultMap="userRoleMap" >
        SELECT
            u.`id`,u.`username`,u.`age`,u.`address`,r.id rid,r.name,r.desc
        FROM
            USER u,user_role ur,role r
        WHERE
            u.id=ur.user_id AND ur.role_id = r.id
            AND u.id = #{id}
    </select>
最终封装完的结果如下:
2.2 分步查询
如果有需要多表查询的需求我们也可以选择用多次查询的方式来查询出我们想要的数据。Mybatis也提供了对应的配置。
例如我们需要查询用户,要求还需要查询出该用户所具有的角色信息。我们可以选择先查询User表查询用户信息。然后在去查询关联的角色信息。
2.2.1实现步骤
具体步骤如下:
①定义查询方法
因为我们要分两步查询: 1.查询User 2.根据用户的id查询Role 所以我们需要定义下面两个方法,并且把对应的标签也先写好
1.查询User
   //根据用户名查询用户,并且要求把该用户所具有的角色信息也查询出来
   User findByUsername(String username);
2.根据user_id查询Role
public interface RoleDao {
	//根据userId查询所具有的角色
    List<Role> findRoleByUserId(Integer userId);
}
    <!--根据userId查询所具有的角色-->
    <select id="findRoleByUserId" resultType="com.test.pojo.Role">
        select
            r.id,r.name,r.desc
        from
            role r,user_role ur
        where
            ur.role_id = r.id
            and ur.user_id = #{userId}
    </select>
②配置分步查询
我们期望的效果是调用findByUsername方法查询出来的结果中就包含角色的信息。所以我们可以设置findByUsername方法的RestltMap,指定分步查询
    <resultMap id="userMap" type="com.test.pojo.User">
        <id property="id" column="id"></id>
        <result property="username" column="username"></result>
        <result property="age" column="age"></result>
        <result property="address" column="address"></result>
    </resultMap>
    <!--
           select属性:指定用哪个查询来查询当前属性的数据 写法:包名.接口名.方法名
           column属性:设置当前结果集中哪列的数据作为select属性指定的查询方法需要参数
       -->
	<resultMap id="userRoleMapBySelect" type="com.test.pojo.User" extends="userMap">
        <collection property="roles"
                    ofType="com.sangeng.pojo.Role"
                    select="com.sangeng.dao.RoleDao.findRoleByUserId"
                    column="id">
        </collection>
    </resultMap>
指定findByUsername使用我们刚刚创建的resultMap
    <!--根据用户名查询用户-->
    <select id="findByUsername" resultMap="userRoleMapBySelect">
        select id,username,age,address from user where username = #{username}
    </select>
2.2.2 设置按需加载
我们可以设置按需加载,这样在我们代码中需要用到关联数据的时候才会去查询关联数据。
有两种方式可以配置分别是全局配置和局部配置
-
局部配置
设置fetchType属性为lazy
	<resultMap id="userRoleMapBySelect" type="com.test.pojo.User" extends="userMap">
        <collection property="roles"
                    ofType="com.test.pojo.Role"
                    select="com.test.dao.RoleDao.findRoleByUserId"
                    column="id" fetchType="lazy">
        </collection>
    </resultMap>
2.全局配置
设置lazyLoadingEnabled为true
  <settings>
       <setting name="lazyLoadingEnabled" value="true"/>
    </settings>
3.分页查询-PageHelper
我们可以使用PageHelper非常方便的帮我们实现分页查询的需求。不需要自己在SQL中拼接SQL相关参数,并且能非常方便的获取的总页数总条数等分页相关数据
3.1 实现步骤
①定义方法查询方法以及生成对应标签
List<User> findAll(); <select id="findAll" resultType="com.test.pojo.User">
select id,username,age,address from user
</select>② 引入依赖
<dependency>
    <groupId>com.github.pagehelper</groupId>
    <artifactId>pagehelper</artifactId>
    <version>4.0.0</version>
</dependency>
③ 配置Mybatis核心配置文件使用分页插件
 <plugins>
        <!-- 注意:分页助手的插件  配置在通用馆mapper之前 -->
        <plugin interceptor="com.github.pagehelper.PageHelper">
            <!-- 指定方言 -->
            <property name="dialect" value="mysql"/>
        </plugin>
    </plugins>
④ 开始分页查询
我们只需要在使用查询方法前设置分页参数即可
    //设置分页参数
	UserDao userDao = session.getMapper(UserDao.class);
    //设置分页查询参数
    PageHelper.startPage(1,1);
    List<User> users = userDao.findAll();
    System.out.println(users.get(0));
如果需要获取总页数总条数等分页相关数据,只需要创建一个PageInfo对象,把刚刚查询出的返回值做为构造方法参数传入。然后使用pageInfo对象获取即可。
	PageInfo<User> pageInfo = new PageInfo<User>(users);
    System.out.println("总条数:"+pageInfo.getTotal());
	System.out.println("总页数:"+pageInfo.getPages());
	System.out.println("当前页:"+pageInfo.getPageNum());
	System.out.println("每页显示长度:"+pageInfo.getPageSize());
3.2 一对多多表查询分页问题
我们在进行一对多的多表查询时,如果使用了PageHelper进行分页。会出现关联数据不全的情况。我们可以使用分步查询的方式解决该问题。
4.Mybatis缓存
Mybatis的缓存其实就是把之前查到的数据存入内存(map),下次如果还是查相同的东西,就可以直接从缓存中取,从而提高效率。
Mybatis有一级缓存和二级缓存之分,一级缓存(默认开启)是sqlsession级别的缓存。二级缓存相当于mapper级别的缓存。
4.1 一级缓存
几种不会使用一级缓存的情况
1.调用相同方法但是传入的参数不同
2.调用相同方法参数也相同,但是使用的是另外一个SqlSession
3.如果查询完后,对同一个表进行了增,删改的操作,都会清空这sqlSession上的缓存
4.如果手动调用SqlSession的clearCache方法清除缓存了,后面也使用不了缓存
4.2 二级缓存
注意:只在sqlsession调用了close或者commit后的数据才会进入二级缓存。
4.2.1 开启二级缓存
①全局开启
在Mybatis核心配置文件中配置
    <settings>
        <setting name="cacheEnabled" value="true"/>
    </settings>
②局部开启
在要开启二级缓存的mapper映射文件中设置 cache标签
<?xml version="1.0" encoding="UTF-8" ?>
<!DOCTYPE mapper PUBLIC "-//mybatis.org//DTD Mapper 3.0//EN" "http://mybatis.org/dtd/mybatis-3-mapper.dtd" >
<mapper namespace="com.sangeng.dao.RoleDao">
    <cache></cache>
</mapper>
4.2.2 使用建议
二级缓存在实际开发中基本不会使用。
Mybatis一级缓存和二级缓存的区别
缓存原理图:
一级缓存
Mybatis对缓存提供支持,但是在没有配置的默认情况下,它只开启一级缓存,一级缓存只是相对于同一个SqlSession而言。所以在参数和SQL完全一样的情况下,我们使用同一个SqlSession对象调用一个Mapper方法,往往只执行一次SQL,因为使用SelSession第一次查询后,MyBatis会将其放在缓存中,以后再查询的时候,如果没有声明需要刷新,并且缓存没有超时的情况下,SqlSession都会取出当前缓存的数据,而不会再次发送SQL到数据库。
每一次会话都对应自己的一级缓存,作用范围比较小,一旦会话关闭就查询不到了。


生命周期
a、MyBatis在开启一个数据库会话时,会 创建一个新的SqlSession对象,SqlSession对象中会有一个新的Executor对象。Executor对象中持有一个新的PerpetualCache对象;当会话结束时,SqlSession对象及其内部的Executor对象还有PerpetualCache对象也一并释放掉。
b、如果SqlSession调用了close()方法,会释放掉一级缓存PerpetualCache对象,一级缓存将不可用。
c、如果SqlSession调用了clearCache(),会清空PerpetualCache对象中的数据,但是该对象仍可使用。
d、SqlSession中执行了任何一个update操作(update()、delete()、insert()) ,都会清空PerpetualCache对象的数据,但是该对象可以继续使用
判断某两次查询是完全相同的查询
mybatis认为,对于两次查询,如果以下条件都完全一样,那么就认为它们是完全相同的两次查询。
2.1 传入的statementId
2.2 查询时要求的结果集中的结果范围
2.3. 这次查询所产生的最终要传递给JDBC java.sql.Preparedstatement的Sql语句字符串(boundSql.getSql() )
2.4 传递给java.sql.Statement要设置的参数值
一级缓存失效的四种情况:
1、sqlsession不同(会话不同)

2、sqlsession相同,查询缓存中没有的数据
@Test
public void testFirstLevelCache() throws IOException{
	SqlSessionFactory sqlSessionFactory = getSqlSessionFactory();
	SqlSession openSession = sqlSessionFactory.openSession();
	try{
		EmployeeMapper mapper = openSession.getMapper(EmployeeMapper.class);
		Employee emp01 = mapper.getEmpById(1);
		System.out.println(emp01);

		//sqlSession相同,查询条件不同
		Employee emp03 = mapper.getEmpById(3);
		System.out.println(emp03);
		System.out.println(emp01==emp03);

	}finally{
		openSession.close();
	}
}
![]()

当缓存中没有数据时,会重新查数据库
3、sqlsession相同,但两次查询之间执行了增删改操作
@Test
public void testFirstLevelCache() throws IOException{
	SqlSessionFactory sqlSessionFactory = getSqlSessionFactory();
	SqlSession openSession = sqlSessionFactory.openSession();
	try{
		EmployeeMapper mapper = openSession.getMapper(EmployeeMapper.class);
		Employee emp01 = mapper.getEmpById(1);
		System.out.println(emp01);

		//sqlSession相同,两次查询之间执行了增删改操作(这次增删改可能对当前数据有影响)
		mapper.addEmp(new Employee(null, "testCache", "cache", "1"));
		System.out.println("数据添加成功");

		Employee emp02 = mapper.getEmpById(1);
		System.out.println(emp02);
		System.out.println(emp01==emp02);

	}finally{
		openSession.close();
	}
}

原因:每个增删改标签都有默认清空缓存配置:flushCache=“true”,不过这是默认的是一级和二级缓存都清空
4、sqlsession相同,但手动清楚了一级缓存(缓存清空)
清空缓存:openSession.clearCache();
@Test
public void testFirstLevelCache() throws IOException{
	SqlSessionFactory sqlSessionFactory = getSqlSessionFactory();
	SqlSession openSession = sqlSessionFactory.openSession();
	try{
		EmployeeMapper mapper = openSession.getMapper(EmployeeMapper.class);
		Employee emp01 = mapper.getEmpById(1);
		System.out.println(emp01);

		//sqlSession相同,手动清除了一级缓存(缓存清空)
		openSession.clearCache();

		Employee emp02 = mapper.getEmpById(1);
		System.out.println(emp02);
		System.out.println(emp01==emp02);

	}finally{
		openSession.close();
	}
}

手动清空缓存后,需要重新查数据库
二级缓存
MyBatis的二级缓存是Application级别的缓存,它可以提高对数据库查询的效率,以提高应用的性能。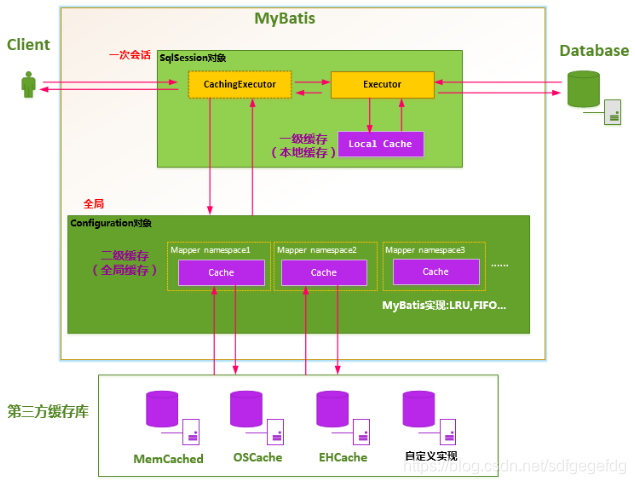
SqlSessionFactory层面上的二级缓存默认是不开启的,二级缓存需要进行配置,实现二级缓存的时候,MyBatis要求返回的POJO必须是可序列化的。 也就是要求实现Serializable接口,配置方法很简单,只需要在映射XML文件配置就可以开启缓存了,如果我们配置了二级缓存就意味着:
映射语句文件中的所有select语句将会被缓存。
映射语句文件中的insert、update和delete语句会刷新缓存。
缓存会使用默认的Least Recently Used(LRU,最近最少使用的)算法来收回。
根据时间表,比如No Flush Interval,(CNFI没有刷新间隔),缓存不会以任何时间顺序来刷新。
缓存会存储列表集合或对象(无论查询方法返回什么)的1024个引用
缓存会被视为是read/write(可读/可写)的缓存,意味着对象检索不是共享的,而且可以安全的被调用者修改,不干扰其他调用者或线程所做的潜在修改。
基于namespace名称空间级别的缓存:一个namespace对应一个二级缓存
即一个mapper.xml对应一个缓存:
1、工作机制:
1、一个会话,查询一条数据,这个数据就会被放在当前会话的一级缓存中;
2、如果会话关闭;一级缓存中的数据会被保存到二级缓存中;新的会话查询信息,就可以参照二级缓存中的内容;
- 1
3、sqlSession=EmployeeMapper>Employee
DepartmentMapper===>Department
不同namespace查出的数据会放在自己对应的缓存中(map)
效果:数据会从二级缓存中获取
查出的数据都会被默认先放在一级缓存中。
只有会话提交或者关闭以后,一级缓存中的数据才会转移到二级缓存中
2、 使用:
1)开启全局二级缓存配置: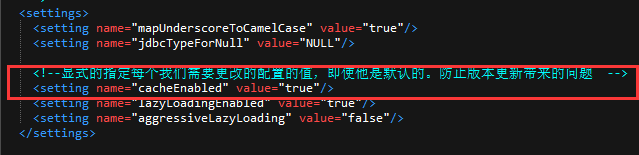
2)去mapper.xml中配置使用二级缓存 :<cache><cache/>
<?xml version="1.0" encoding="UTF-8" ?>
<!DOCTYPE mapper
 PUBLIC "-//mybatis.org//DTD Mapper 3.0//EN"
 "http://mybatis.org/dtd/mybatis-3-mapper.dtd">
<mapper namespace="com.atguigu.mybatis.dao.EmployeeMapper">

	 <cache><cache/>

 	<!--public Map<Integer, Employee> getEmpByLastNameLikeReturnMap(String lastName);  -->
 	<select id="getEmpByLastNameLikeReturnMap" resultType="com.atguigu.mybatis.bean.Employee">
 		select * from tbl_employee where last_name like #{lastName}
 	</select>
</mapper>
或者
eviction:缓存的回收策略:
• LRU – 最近最少使用的:移除最长时间不被使用的对象。
• FIFO – 先进先出:按对象进入缓存的顺序来移除它们。
• SOFT – 软引用:移除基于垃圾回收器状态和软引用规则的对象。
• WEAK – 弱引用:更积极地移除基于垃圾收集器状态和弱引用规则的对象。
• 默认的是 LRU。
flushInterval:缓存刷新间隔。缓存多长时间清空一次,默认不清空,设置一个毫秒值
readOnly:是否只读:
true:只读;mybatis认为所有从缓存中获取数据的操作都是只读操作,不会修改数据。
mybatis为了加快获取速度,直接就会将数据在缓存中的引用交给用户。不安全,速度快
false:非只读:mybatis觉得获取的数据可能会被修改。
mybatis会利用序列化&反序列的技术克隆一份新的数据给你。安全,速度慢
size:缓存存放多少元素;
type="":指定自定义缓存的全类名;
实现Cache接口即可;
<?xml version="1.0" encoding="UTF-8" ?>
<!DOCTYPE mapper
 PUBLIC "-//mybatis.org//DTD Mapper 3.0//EN"
 "http://mybatis.org/dtd/mybatis-3-mapper.dtd">
<mapper namespace="com.atguigu.mybatis.dao.EmployeeMapper">

	 <cache eviction="FIFO" flushInterval="60000" readOnly="false" size="1024"></cache>

 	<!--public Map<Integer, Employee> getEmpByLastNameLikeReturnMap(String lastName);  -->
 	<select id="getEmpByLastNameLikeReturnMap" resultType="com.atguigu.mybatis.bean.Employee">
 		select * from tbl_employee where last_name like #{lastName}
 	</select>
</mapper>
3)我们的POJO需要实现序列化接口
测试:
注意:需要openSession.close();后,才能从二级缓存中查数据;
@Test
public void testSecondLevelCache() throws IOException{
	SqlSessionFactory sqlSessionFactory = getSqlSessionFactory();
	SqlSession openSession = sqlSessionFactory.openSession();
	SqlSession openSession2 = sqlSessionFactory.openSession();
	try{

		EmployeeMapper mapper = openSession.getMapper(EmployeeMapper.class);
		EmployeeMapper mapper2 = openSession2.getMapper(EmployeeMapper.class);

		Employee emp01 = mapper.getEmpById(1);
		System.out.println(emp01);
		openSession.close();

		//第二次查询是从二级缓存中拿到的数据,并没有发送新的sql
		Employee emp02 = mapper2.getEmpById(1);
		System.out.println(emp02);
		openSession2.close();

	}finally{

	}
}

从二级缓存中拿数据
如果openSession.close();在第二次查询之后才关闭,则第二次查询会从一级缓存中查,如果不是一个session,则查询不到数据:

说明:第二次又重新发送了sql,因为从二级缓存中取数据时,会话没关闭所以二级缓存中没数据,所以又去一级缓存中查询,也没有数据则发送了sql查数据库;
所以,只有会话关闭或提交后,一级缓存中的数据才会转移到二级缓存中,然后因为是同一个namespace所以可以获取到数据;
四、和缓存有关的设置/属性
1)mybatis全局配置文件中配置全局缓存开启和清空
1.1)控制二级缓存的开启和关闭
     <setting name="cacheEnabled" value="true"/>

     cacheEnabled=true:开启缓存;false:关闭缓存(二级缓存关闭)(一级缓存一直可用的)
1.2)控制一级缓存的开启和关闭
     <setting name="localCacheScope" value="SESSION"/>

     localCacheScope:本地缓存作用域(一级缓存SESSION);

     当前会话的所有数据保存在会话缓存中;STATEMENT:可以禁用一级缓存;
注意:一级缓存关闭后,二级缓存自然也无法使用;
2)方法中sqlSession清除缓存测试
sqlSession.clearCache();只是清除当前session的一级缓存;
如果openSession清空了缓存,即执行了openSession.clearCache()方法:

openSession清空缓存不影响二级缓存;只清空了一级缓存;因为在openSession.close()时,就将一级缓存保存至了二级缓存;
3)mapper.xml中也可以配置一级和二级缓存开启和使用
3.1)每个select标签都默认配置了useCache=“true”:
如果useCache= false:则表示不使用缓存(一级缓存依然使用,二级缓存不使用)
3.2)每个增删改标签默认配置了flushCache=“true”:(一级二级都会清除)

查询标签默认flushCache=“false”:如果flushCache=true;每次查询之后都会清空缓存;一级和二级缓存都无法使用
Mybatis的一级缓存和二级缓存执行顺序
1、先判断二级缓存是否开启,如果没开启,再判断一级缓存是否开启,如果没开启,直接查数据库
2、如果一级缓存关闭,即使二级缓存开启也没有数据,因为二级缓存的数据从一级缓存获取
3、一般不会关闭一级缓存
4、二级缓存默认不开启
5、如果二级缓存关闭,直接判断一级缓存是否有数据,如果没有就查数据库
6、如果二级缓存开启,先判断二级缓存有没有数据,如果有就直接返回;如果没有,就查询一级缓存,如果有就返回,没有就查询数据库;
综上:先查二级缓存,再查一级缓存,再查数据库;即使在一个sqlSession中,也会先查二级缓存;一个namespace中的查询更是如此;缓存执行顺序是:二级缓存–>一级缓存–>数据库


 5万+
5万+


 被折叠的 条评论
为什么被折叠?
被折叠的 条评论
为什么被折叠?
 到【灌水乐园】发言


