


1、检查mysql
rpm -qa | grep mysql
2、卸载mysql
rpm -e --nodeps mysql // 强力删除模式,如果使用上面命令删除时,提示有依赖的其它文件,则用该命令可以对其进行强力删除
3、上传安装包到根目录(/目录下)
(上传之前一定要检查系统版本,以防止操作系统位置造成的错误)
getconf LONG_BIT
4、在安装包存放目录下解压文件
tar -zxvf mysql-5.6.31-linux-glibc2.5-x86_64.tar.gz
5、删除安装包,重命名解压后的文件
rm -rf mysql-5.6.31-linux-glibc2.5-x86_64.tar.gz
mv mysql-5.6.31-linux-glibc2.5-x86_64/ mysql
6、添加mysql用户组和mysql用户
    1、先检查是否有mysql用户组和mysql用户
groups mysql
    2、若无,则添加
groupadd mysql
useradd -r -g mysql mysql
7、进入mysql目录更改权限
cd mysql/
chown -R mysql:mysql ./
chmod -R 755 /mysql/
8、执行安装脚本
特别注意:一定注意,此时路径一定在mysql的路径下,不然会报错5.6
./scripts/mysql_install_db --user=mysql
5.7的如下方式
/mysql/bin/mysqld --user=mysql --basedir=/mysql --datadir=/mysql/data --initialize
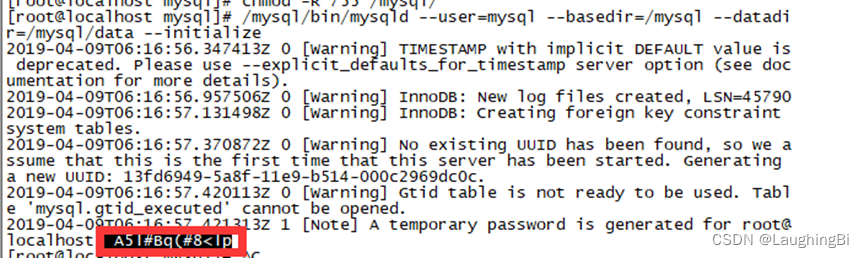
记录随机密码
9、安装完之后修改当前目录拥有者为root用户,修改data目录拥有者为mysql
chown -R root:root ./
chown -R mysql:mysql data
10、启动mysql
特别注意:一定注意,此时路径一定在mysql的路径下,不然会报错5.6
./support-files/mysql.server start
5.7 如下:
./bin/mysqld_safe&
11、启动报错处理
如果启动报错: Starting MySQL. ERROR! The server quit without updating PID file (/opt/mysql/data/localhost.localdomain.pid)
解决办法:
复制mysql文件夹下的my.cnf到etc中
cp /mysql/my.cnf /etc/my.cnf
并且修改复制后的my.cnf ,在[mysqld]下设置datadir = /mysql/data
12、再次启动mysql就可以了
13、修改密码命令
./bin/mysqladmin -u root -h localhost.localdomain password 'root'  #5.6

set password=password("root");   #5.7
14、测试登录
./bin/mysql -h127.0.0.1 -uroot -proot(可以登录)5.6#
./bin/mysql -uroot -p    #5.7
15、登录之后将其他用户的密码也可改为root
update mysql.user set password=password('root') where user='root';
flush privileges;

update mysql.user set authentication_string=password('123456') where user='root' ;   #5.7
16、配置远程连接
- grant all privileges on . to root@‘%’ identified by ‘root’;
flush privileges; #5.6
#开启远程访问 #5.7
#mysql> use mysql;Reading table information for completion of table and column names
You can turn off this feature to get a quicker startup with -A
#Database changed
#mysql> update user set host = ‘%’ where user = ‘root’;
#Query OK, 1 row affected (0.00 sec)
#Rows matched: 1 Changed: 1 Warnings: 0
#mysql> select host, user from user;
17、将MySQL加入Service系统服务
cp support-files/mysql.server /etc/init.d/mysqld
chkconfig --add mysqld
chkconfig mysqld on
service mysqld restart
service mysqld status
18、配置my.cnf
    vim my.cnf
    #添加以下两条语句并保存退出
    default-character-set=utf8
    lower_case_table_names=1
    max_allowed_packet=100M
19、开放3306端口
在etc/sysconfig/iptables 文件中增加一行
-A INPUT -m state --state NEW -m tcp -p tcp --dport 3306 -j ACCEPT


 被折叠的 条评论
为什么被折叠?
被折叠的 条评论
为什么被折叠?
 到【灌水乐园】发言


