


前言
本文章旨在提供了一个简单的kong网关自定义插件开发的思路与步骤,并未涉及到更深层次的开发,如有需要,请参考kong网关插件开发官方文档。
在进行开发之前,本文章默认读者是已经成功启动了本地kong网关服务并知道kong网关控制面板的基本操作。
本文章的kong网关是在docker容器中运行的,版本为3.2.2.1
Step01 - 编写插件Lua文件
对于开发kong网关自定义插件来说,必须要有的两个文件就是handler.lua,schema.lua。由这两者构成了最简单的插件。
对于handler.lua,我们编写的内容主要就是具体的核心代码,而schema.lua文件中,编写的主要是核心代码中需要到的一些配置动态变量。这里我贴出来官方文档对这两个文件的解释:
handler.lua: the core of your plugin. It is an interface to implement, in which each function will be run at the desired moment in the lifecycle of a request / connection.
schema.lua: your plugin probably has to retain some configuration entered by the user. This module holds the schema of that configuration and defines rules on it, so that the user can only enter valid configuration values.
以下是我粗略编写的handler.lua 和 schema.lua文件。
handler.lua
-- 此处代码类似与Java代码中的 import 某个包
local kong_meta = require "kong.meta"
local http = require "resty.http"
local cjson = require "cjson.safe"


-- 此处是定义插件的执行优先级及版本,优先级数字越大,级别越高
local CustomHandler = {
  PRIORITY = 990,
  VERSION = "1.0",
}

-- 此处类似Java中的接口,在接口中编写具体的逻辑
function CustomHandler:access(plugin_conf)
  kong.log(">>>>>>>>Test plugin is running<<<<<<<<")

  -- 根据schema.lua文件及kong网关中配置好的信息,加载配置项
  kong.log(">>>>>>>>>01-Loading config items<<<<<<<<<")
  local METHOD = plugin_conf.method
  local AUTHURL = plugin_conf.authUrl
  local HEADERS = plugin_conf.headers
  local BODY = plugin_conf.body
  kong.log(">>>>>>>>>Finish<<<<<<<<<")

  -- 创建HTTP客户端
  kong.log(">>>>>>>>>02-Start new HTTP Client<<<<<<<<<")
  local httpc = http.new()
  httpc:set_timeout(2000)
  httpc.ssl_verify = false
  httpc.ssl_handshake = false
  kong.log(">>>>>>>>>02-Finish<<<<<<<<<")

  -- 发送HTTP请求
  kong.log(">>>>>>>>>03-Send HTTP Request<<<<<<<<<")

  -- 访问本地启动的DemoSpringBootService
  kong.log(">>>>>>>>>AUTH URL = ", AUTHURL,"<<<<<<<<<")
  kong.log(">>>>>>>>>method = ", cjson.encode(METHOD), "<<<<<<<<<")
  kong.log(">>>>>>>>>headers = ", cjson.encode(HEADERS), "<<<<<<<<<")
  kong.log(">>>>>>>>>body = ", cjson.encode(BODY), "<<<<<<<<<")
  local res, err = httpc:request_uri( AUTHURL, {
      method = METHOD,
      headers = HEADERS,
      body = cjson.encode (BODY),
    })

  kong.log(">>>>>>>>> check err is empty or not <<<<<<<<<")
  kong.log(">>>>>>>>> err: ", err, "<<<<<<<<<")
  kong.log(">>>>>>>>>03-Finish<<<<<<<<<")

  -- 返回HTTP响应体
  kong.log(">>>>>>>>>04-return HTTP Response<<<<<<<<<")
  kong.log(">>>>>>>>>response status = ", res.status,"<<<<<<<<<")
  kong.log(">>>>>>>>>response = ", cjson.encode(res.body),"<<<<<<<<<")
  return res.body
end

return CustomHandler
schema.lua
local typedefs = require "kong.db.schema.typedefs"
return {
name = "custom-dynamicUpdate",
fields = {
{ protocols = typedefs.protocols_http },
{ config = {
type = "record",
-- 此处根据handler.lua文件钟的配置,来添加指定字段
fields = {
{ authUrl = { type = "string", required = true, default = "http://localhost:8080" } },
{ method = { type = "string", required = true, default = "GET"} },
{ headers = {
type = "map",
keys = typedefs.header_name {
match_none = {
{
pattern = "^[Hh][Oo][Ss][Tt]$",
err = "cannot contain 'Host' header",
},
{
pattern = "^[Cc][Oo][Nn][Tt][Ee][Nn][Tt]%-[Ll][Ee][nn][Gg][Tt][Hh]$",
err = "cannot contain 'Content-Length' header",
},
},
},
values = {
type = "string",
referenceable = true,
},
}},
{ body = {
type = "map",
keys = {
type = "string",
referenceable = true,
},
values = {
type = "string",
referenceable = true,
},
}},
},
},
},
},
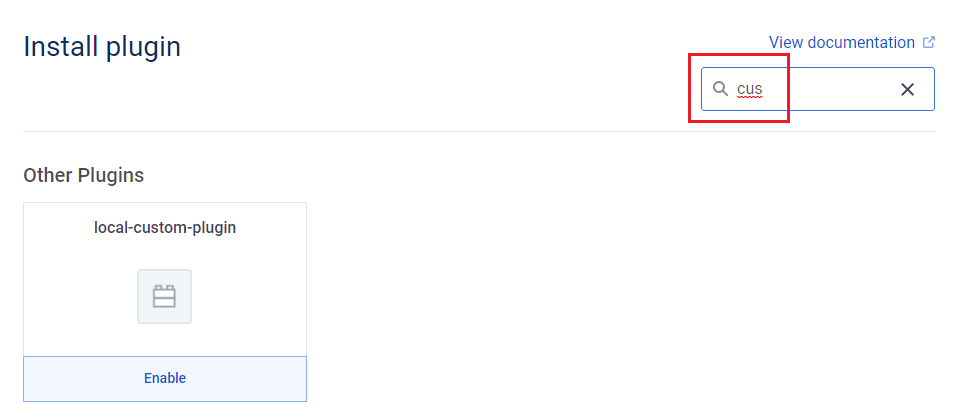
}Step02 - 准备环境及安装插件
此段启动命令是我直接从kong网关官方文档摘取过来的,有兴趣的读者也可以去kong网关官方文档查看一下
在docker中启动kong网关等相关容器
--01
 docker network create kong-net

--02
docker run -d --name kong-database --network=kong-net -p 5432:5432 -e "POSTGRES_USER=kong" -e "POSTGRES_DB=kong" -e "POSTGRES_PASSWORD=kongpass" postgres:13

--03
docker run --rm --network=kong-net -e "KONG_DATABASE=postgres" -e "KONG_PG_HOST=kong-database" -e "KONG_PG_PASSWORD=kongpass" -e "KONG_PASSWORD=test" kong/kong-gateway:3.2.2.1 kong migrations bootstrap

--04
docker run -d --name kong-gateway --network=kong-net -e "KONG_DATABASE=postgres" -e "KONG_PG_HOST=kong-database" -e "KONG_PG_USER=kong" -e "KONG_PG_PASSWORD=kongpass" -e "KONG_PROXY_ACCESS_LOG=/dev/stdout" -e "KONG_ADMIN_ACCESS_LOG=/dev/stdout" -e "KONG_PROXY_ERROR_LOG=/dev/stderr" -e "KONG_ADMIN_ERROR_LOG=/dev/stderr" -e "KONG_ADMIN_LISTEN=0.0.0.0:8001" -e "KONG_ADMIN_GUI_URL=http://localhost:8002" -e KONG_LICENSE_DATA -p 8000:8000 -p 8443:8443 -p 8001:8001 -p 8444:8444 -p 8002:8002 -p 8445:8445 -p 8003:8003 -p 8004:8004 kong/kong-gateway:3.2.2.1

--05 在kong网关容器中创建自定义插件文件夹,用来存放对应的Lua文件
mkdir /usr/local/share/lua/5.1/kong/plugins/local-custom-plugin

--06 因为我的kong网关是在docker运行的,所以我通过docker cp的形式将两份Lua文件复制过去,
--当然你也可以通过把文件夹在docker启动命令中去执行,这样就省去了 cp的步骤
docker cp D:\Laurent\kong\custom-dynamicUpdate\. kong-gateway:/usr/local/share/lua/5.1/kong/plugins/local-custom-plugin
修改kong网关容器中的constants.lua文件,在local plugins这部分的底端,添加上自己刚刚创建的插件文件夹名称。constants.lua文件的路径如下:/usr/local/share/lua/5.1/kong/constants.lua
local plugins = {
  "jwt",
  "acl",
  "correlation-id",
  "cors",
  "oauth2",
  "tcp-log",
  "udp-log",
  "file-log",
  "http-log",
  "key-auth",
  "hmac-auth",
  "basic-auth",
  "ip-restriction",
  "request-transformer",
  "response-transformer",
  "request-size-limiting",
  "rate-limiting",
  "response-ratelimiting",
  "syslog",
  "loggly",
  "datadog",
  "ldap-auth",
  "statsd",
  "bot-detection",
  "aws-lambda",
  "request-termination",
  "prometheus",
  "proxy-cache",
  "session",
  "acme",
  "grpc-gateway",
  "grpc-web",
  "pre-function",
  "post-function",
  "azure-functions",
  "zipkin",
  "opentelemetry",
  "你自己的插件名称",
}
让kong网关重新加载文件
--08
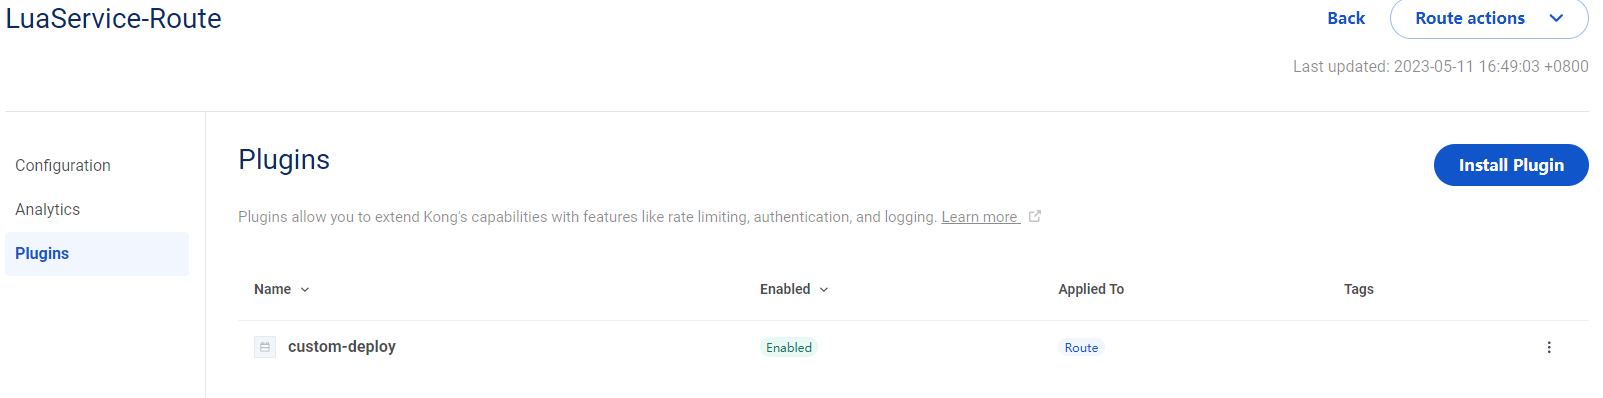
docker exec --user kong -e KONG_PLUGINS="bundled,你自己的插件名称" kong-gateway kong reload -vvStep03 - 在kong网关管理界面上创建对应的服务、路由及启用插件
Service - 此处的Service仅是配置一个用于测试使用服务,你可以起一个本地的Springboot服务,若后续需要,可以更换为其他正常运行的服务即可
Route - 此处的Route在配置时要记得与上面的Service进行绑定,以便在测试时输入了Path后,可以跳转到指定的Service
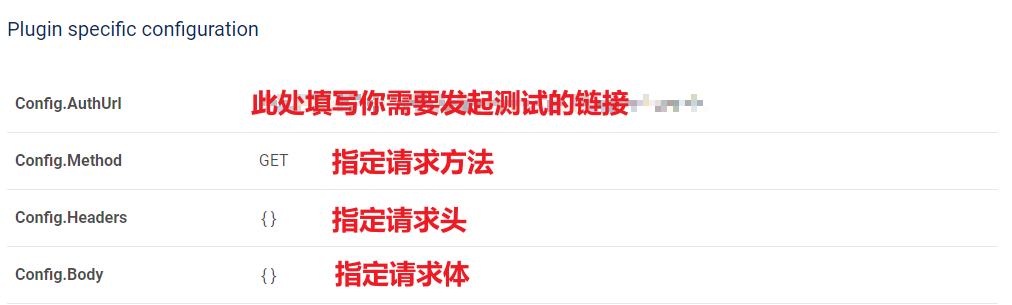
在Route中启用插件,并指定相关参数,你之所以会在配置插件的时候看到相关参数,就是因为schema.lua文件中已经制定了对应的配置字段
Step04 - 使用Postman发送测试请求
使用GET方法,访问以下的测试路径:
https://localhost:8000/你指定的path
在kong网关的运行日志中,我们可以看到以下访问成功的日志:
[notice] 2176#0: *316 [kong] handler.lua:11 [custom-deploy] >>>>>>>>Test plugin is running<<<<<<<<, client: 172.21.12.2, server: kong, request: "GET /luasvc HTTP/1.1",
[notice] 2176#0: *316 [kong] handler.lua:14 [custom-deploy] >>>>>>>>>01-Start new HTTP Client<<<<<<<<<, client: 172.21.12.2, server: kong, request: "GET /luasvc HTTP/1.1",
[notice] 2176#0: *316 [kong] handler.lua:17 [custom-deploy] >>>>>>>>>01-Finish<<<<<<<<<, client: 172.21.12.2, server: kong, request: "GET /luasvc HTTP/1.1",
[notice] 2176#0: *316 [kong] handler.lua:20 [custom-deploy] >>>>>>>>>02-Create Request body<<<<<<<<<, client: 172.21.12.2, server: kong, request: "GET /luasvc HTTP/1.1",
[notice] 2176#0: *316 [kong] handler.lua:24 [custom-deploy] >>>>>>>>>02-Finish<<<<<<<<<, client: 172.21.12.2, server: kong, request: "GET /luasvc HTTP/1.1",
[notice] 2176#0: *316 [kong] handler.lua:27 [custom-deploy] >>>>>>>>>03-Send HTTP Request:V2:8080<<<<<<<<<, client: 172.21.12.2, server: kong, request: "GET /luasvc HTTP/1.1",
[notice] 2176#0: *316 [kong] handler.lua:38 [custom-deploy] >>>>>>>>> check err is empty or not <<<<<<<<<, client: 172.21.12.2, server: kong, request: "GET /luasvc HTTP/1.1",
[error] 2176#0: *316 [kong] handler.lua:39 [custom-deploy] err: nil, client: 172.21.12.2, server: kong, request: "GET /luasvc HTTP/1.1",
[notice] 2176#0: *316 [kong] handler.lua:40 [custom-deploy] >>>>>>>>>03-Finish<<<<<<<<<, client: 172.21.12.2, server: kong, request: "GET /luasvc HTTP/1.1",
[notice] 2176#0: *316 [kong] handler.lua:43 [custom-deploy] >>>>>>>>>04-return HTTP Response<<<<<<<<<, client: 172.21.12.2, server: kong, request: "GET /luasvc HTTP/1.1",
[notice] 2176#0: *316 [kong] handler.lua:44 [custom-deploy] response body = , client: 172.21.12.2, server: kong, request: "GET /luasvc HTTP/1.1",
[notice] 2176#0: *316 [kong] handler.lua:45 [custom-deploy] response status = 200, client: 172.21.12.2, server: kong, request: "GET /luasvc HTTP/1.1",
172.21.12.2 - - [12/May/2023:07:50:44 +0000] "GET /luasvc HTTP/1.1" 200 1504 "-" "PostmanRuntime/7.32.2"
到此,一个简单的kong网关插件就已经成功在你的设备上运行起来啦!那么具体kong网关插件可以做什么用途,在我自己的实际工作开发中,目前我是开发了一个类似于拦截器一样的插件,拦截一切进入目标服务的请求,对请求进行相关校验,通过则放行,不通过则返回错误码给到浏览器。
具体用途,大家可以根据自己的需求进行编写。
笔者初次写稿,如果不理解的地方,还请评论或私信。也欢迎大家指出错误,我即刻改正。


 4529
4529

 被折叠的 条评论
为什么被折叠?
被折叠的 条评论
为什么被折叠?
 到【灌水乐园】发言


