


spring简介
Spring框架是由于软件开发的复杂性而创建的。Spring使用的是基本的JavaBean来完成以前只可能由EJB完成的事情。然而,Spring的用途不仅仅限于服务器端的开发。从简单性、可测试性和松耦合性角度而言,绝大部分Java应用都可以从Spring中受益。
◆目的:解决企业应用开发的复杂性
◆功能:使用基本的JavaBean代替EJB,并提供了更多的企业应用功能
◆范围:任何Java应用
Spring是一个轻量级控制反转(IoC)和面向切面(AOP)的容器框架。
以上简介来自百度百科,这里我再补充几句,spring是一个full-stack 框架,它的核心就是IoC和AOP
至于它为什么是full-stack呢,因为spring对每一层都有自己相应的解决方案
web层:springMVC sercice : spring dao:spring data jdbcTemplate
IoC就是把原来自己手动创建Bean的过程交给spring,
AOP就是再不修改目标源码的基础上对目标对象进行增强。底层是动态代理
spring优势
1.方便解耦,简化开发。
2.AOP编程支持。
3.声明式事物控制
4.方便程序测试
5.方便集成各种优秀框架
6.降低API使用难度
耦合与解耦和
耦合:代码与代码之间的依赖程度过高,就是你中有我我中有你,例如在service层 new了一个dao。
解耦和:降低代码与代码之间的依赖程度,不需要修改代码。
比如我们在new对象的时候。可以使用bean工厂去创建,或者使用配置文件的方式创建。只需要修改配置文件
不需要修改代码
spring快速入门
导包
因为是入门,我们这里只导入最基本的包
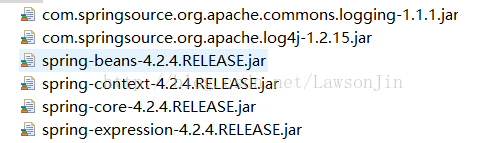
4个基本包 beans,core,context,expression
因为spring内部集成了logging技术,所以就导入两个日志包,另外在src下把log4j的配置文件导入
log4j配置
#
# Hibernate, Relational Persistence for Idiomatic Java
#
# License: GNU Lesser General Public License (LGPL), version 2.1 or later.
# See the lgpl.txt file in the root directory or <http://www.gnu.org/licenses/lgpl-2.1.html>.
#

### direct log messages to stdout ###
log4j.appender.stdout=org.apache.log4j.ConsoleAppender
log4j.appender.stdout.Target=System.err
log4j.appender.stdout.layout=org.apache.log4j.PatternLayout
log4j.appender.stdout.layout.ConversionPattern=%d{ABSOLUTE} %5p %c{1}:%L - %m%n

### direct messages to file hibernate.log ###
#log4j.appender.file=org.apache.log4j.FileAppender
#log4j.appender.file.File=hibernate.log
#log4j.appender.file.layout=org.apache.log4j.PatternLayout
#log4j.appender.file.layout.ConversionPattern=%d{ABSOLUTE} %5p %c{1}:%L - %m%n

### set log levels - for more verbose logging change 'info' to 'debug' ###

log4j.rootLogger=warn, stdout
定义bean类
public class QuickBean {

	public void show(){

		System.out.println("Quick show .. ");
	}
}
在src下创建applicationContext.xml
<?xml version="1.0" encoding="UTF-8"?>
<beans xmlns="http://www.springframework.org/schema/beans"
    xmlns:xsi="http://www.w3.org/2001/XMLSchema-instance"

    xsi:schemaLocation="http://www.springframework.org/schema/beans http://www.springframework.org/schema/beans/spring-beans.xsd">
<bean id="quick" class="cn.it.bean.QuickBean"></bean>
</beans>
测试 通过spring的客户端对象 获得指定bean实例
 @Test
 public void test1(){
	 //获得容器 加载配置文件
	 ApplicationContext applicationContext = new ClassPathXmlApplicationContext("applicationContext.xml");
	 //根据id获得指定的bean实例
	 QuickBean bean =(QuickBean) applicationContext.getBean("quick");
	 bean.show();
}spring的配置文件
为什么在src下创建applicationContext.xml,其实只是个习惯,大家都这么创建。也就是说,创建什么名字都行,业内习惯用前者。
bean标签的配置
id和class
<!-- 1. id:唯一标识
      class:要spring实例化的bean的全包名 -->
<bean id="quick" class="cn.it.bean.QuickBean"></bean>
scope
	<!-- 1. id:唯一标识 class:要spring实例化的bean的全包名 <bean id="quick" class="cn.itcast.bean.QuickBean"></bean> -->
	<!-- 2.首先提一句,我们在这里配置的所有bean默认都是单例的,由spring在加载这个配置文件时就已经创建完毕 scope: 主要使用这个属性bean是多例还是单例
		取值: 主要是singleton(默认值)单例 prototype 原型 多例 如果设置成prototype那么加载配置文件时不会创建bean,只有在调用getBean时才会创建
		并且每调用一次getBean就会实例化一个bean 那我们在项目开中哪些应该配置成多例哪些配置成单例呢? 主要考虑线程安全问题,没有线程安全问题的最好配置成单例,
		有线程安全的最好配多例, - -||好吧感觉没说大家也懂 -->
	<bean id="quick" class="cn.it.benan.QuickBean" scope=""></bean>
init-method&destroy-method
<!-- 3. init-method:初始化执行的方法,参数写方法的名字
	        destroy-method:销毁前执行的方法,参数写方法名
	        不常用,了解就行
	-->
	<bean id="quick" class="cn.it.bean.QuickBean" init-method="init" destroy-method=""></bean>
bean的实例化方式
1.无参构造
<bean id="quick" class="com.it.bean.QuickBean"></bean>2.静态工厂方式 bean是通过工厂的静态方法返回的
<bean id="quick" class="cn.it.factory.QuickBeanFactory" factory-method="getQuickBean"></bean>
public class QuickBeanFactory {
 public static QuickBean getQuickBean(){

	 return new QuickBean();
 }
}
3.实例工厂方式 bean是通过工厂的非静态方法返回的
	<bean id="quick" factory-bean="factory" factory-method="getQuickBean"></bean>
	<bean id="factory" class="cn.it.factory.NotStaticFactory"></bean>
public class NotStaticFactory {
public QuickBean getQuickBean(){
return new QuickBean();
}
}这里在配置bean时,先把工厂bean配好,然后用咱们的实体bean引用。
在web开发中service层调用dao层,我们来看一下如何配置,先把dao和service层写好,CustomerService,CustomerDao
xml
<bean id="customerDao" class="cn.it.dao.impl.CustomerDaoImpl"></bean><!-- 属性注入标签
name:属性名称 service的属性名称 本质setXXX的名称
ref:引用容器中的哪个实例对象的id 使用较多
value:注入普通数据
-->
<bean id="customerService" class="cn.it.service.impl.CustomerServiceImpl">
<property name="customerDao" ref="customerDao"></property>
<property name="username" value="NanJin"></property>customerServiceimpl
public class CustomerServiceImpl implements CustomerService {

	private CustomerDao customerDao;
	//在创建Service对象时 spring负责将需要的customerDao进行注入(在容器中进行注入)
	public void setCustomerDao(CustomerDao customerDao) {
		this.customerDao = customerDao;
	}

	private String username;
	public void setUsername(String username) {
		this.username = username;
	}

	@Override
	public void save() {
		System.out.println(username);
		customerDao.save();
	}

}
dao
public class CustomerDaoImpl implements CustomerDao {

	@Override
	public void save() {
		System.out.println("save执行.....");
	}

} @Test
public void test1(){
ApplicationContext applicationContext = new ClassPathXmlApplicationContext("applicationContext.xml");
CustomerService customerService = (CustomerService) applicationContext.getBean("customerService");
customerService.save();
}注意:如果正常进行实体的注入 那么注入对象与被注入对象都需要在容器中存在
属性注入
1.构造方法注入
xml
<bean id="user" class="cn.it.domain.User">
<property name="username" value="NanJin"></property>
<property name="password" value="123"></property>
</bean>
<bean id="quick" class="cn.it.bean.QuickBean">
<constructor-arg value="NanJin"></constructor-arg>
<constructor-arg value="23"></constructor-arg>
<constructor-arg ref="user"></constructor-arg>
QuickBean
public class QuickBean {

	public QuickBean(String name,int age,User user) {
		System.out.println(name);
		System.out.println(age);
		System.out.println(user);
} //获得容器 加载配置文件
ApplicationContext applicationContext = new ClassPathXmlApplicationContext("applicationContext.xml");
//根据id获得指定的bean实例
QuickBean bean =(QuickBean) applicationContext.getBean("quick");
bean.show();2.set方式
<bean id="user" class="cn.it.domain.User">
<property name="username" value="NanJin"></property>
<property name="password" value="123"></property>
</bean>
public class User {
private String username;
private String password;
public String getUsername() {
return username;
}
public void setUsername(String username) {
this.username = username;
}
public String getPassword() {
return password;
}
public void setPassword(String password) {
this.password = password;
}}3.p命名空间注入 本质也是set方法注入 比set方法注入简洁一些
xmlns:p="http://www.springframework.org/schema/p"
然后开始配置
<bean id="quick" class="com.it.bean.QuickBean" p:company="NanJin小站" p:yearNum="11"></bean>public class QuickBean {
private String company;
private int yearNum;
public void setCompany(String company) {
this.company = company;
}
public void setYearNum(int yearNum) {
this.yearNum = yearNum;
}
4.通过set方法注入复杂数据 集合
一个集合beanpublic class CollectionBean {
/*
* 通过set方法注入复杂数据类型--集合
*/
private List<String> strList;
private List<User> userList;
private Map<String,User> userMap;
private Set<String> strSet;
private Properties props;
public void show(){
System.out.println(strList);
System.out.println(userList);
System.out.println(userMap);
System.out.println(strSet);
System.out.println(props);
}
public List<String> getStrList() {
return strList;
}
public void setStrList(List<String> strList) {
this.strList = strList;
}
public List<User> getUserList() {
return userList;
}
public void setUserList(List<User> userList) {
this.userList = userList;
}
public Map<String, User> getUserMap() {
return userMap;
}
public void setUserMap(Map<String, User> userMap) {
this.userMap = userMap;
}
public Set<String> getStrSet() {
return strSet;
}
public void setStrSet(Set<String> strSet) {
this.strSet = strSet;
}
public Properties getProps() {
return props;
}
public void setProps(Properties props) {
this.props = props;
}
}
<bean id="user" class="cn.it.domain.User">
<property name="username" value="NanJin"></property>
<property name="password" value="123"></property>
</bean>
<bean id="user2" class="cn.it.domain.User">
<property name="username" value="NanJin123"></property>
<property name="password" value="123456"></property>
</bean>
<bean id="quick" class="cn.it.bean.QuickBean" p:company="NanJin" p:yearNum="11"></bean>
<bean id="collection" class="cn.it.bean.CollectionBean" >
<property name="strList">
<list>
<value>aaa</value>
<value>BBB</value>
<value>CCC</value>
</list>
</property>
<property name="userList">
<list>
<ref bean="user"/>
<ref bean="user2"/>
</list>
</property>
<property name="userMap">
<map>
<entry key="user" value-ref="user"></entry>
<entry key="user2" value-ref="user2"></entry>
</map>
</property>
<property name="strSet">
<set>
<value>aaa</value>
<value>bbb</value>
<value>ccc</value>
</set>

</property>
<property name="props">
<props>
<prop key="k1">v1</prop>
<prop key="k2">v2</prop>
</props>
</property>
</bean> //获得容器 加载配置文件
ApplicationContext applicationContext = new ClassPathXmlApplicationContext("applicationContext.xml");
//根据id获得指定的bean实例
CollectionBean bean = (CollectionBean) applicationContext.getBean("collection");
bean.show();
import的配置
引入其他的spring文件 分模块开发用的
 <import resource="applicationContext-service.xml"/>
 <import resource="applicationContext-dao.xml"/>
Spring容器的创建方式
	@Test
	//测试Spring容器的创建方式(加载配置文件的方式)
	public void test10(){
		/*
		 * ClassPath:类加载路径(src)  字节码文件存在的位置 		java工程:bin下面		web工程:classes下面
		 * Xml:要加载的文件是xml文件
		 * ApplicationContext:应用的上下文 认为spring容器
		 */
		//ApplicationContext applicationContext = new ClassPathXmlApplicationContext("applicationContext.xml");
		/*
		 * FileSystem:文件系统 磁盘
		 * Xml:要加载的文件是xml文件
		 * ApplicationContext:应用的上下文 认为spring容器
		 */
		ApplicationContext applicationContext = new FileSystemXmlApplicationContext("I:\\Heima57\\Spring_Day01\\src\\applicationContext.xml");
		CollectionBean coll = (CollectionBean) applicationContext.getBean("coll");
		coll.show();
	}


 448
448

 被折叠的 条评论
为什么被折叠?
被折叠的 条评论
为什么被折叠?
 到【灌水乐园】发言


