


一:基础集群环境搭建
1.2:简介
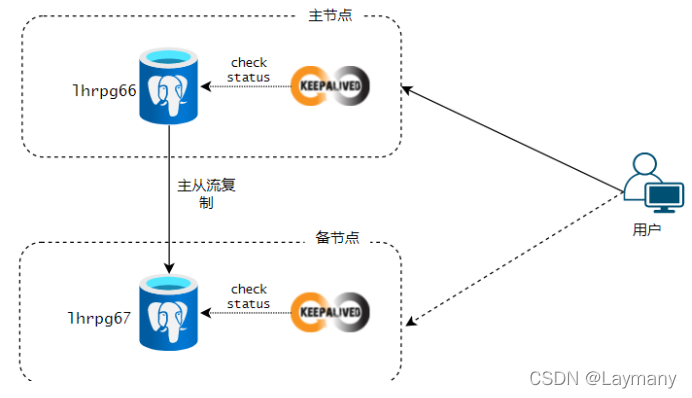
通过keepalived 来实现 PostgreSQL 数据库的主从自动切换,以达到高可用。当主节点宕机时,从节点可自动切换为主节点,继续对外提供服务。
基于流复制部署,keepalived检测postgresql状态,如果pgsql死了,那么keepalived的VIP漂移到备库,同时提升备库为主库,可以进行读写操作。(默认流复制的主库为可读可写,备库为只读)
1.2.1:环境架构
1.2.2:服务器统计:
| IP地址 | 主机名 | 角色 |
|---|---|---|
| 192.168.48.147 | pg1 | master |
| 192.168.48.149 | pg2 | slave |
| 192.168.48.100 | VIP |
1.2.3:软件清单:
端口:192.168.48.100:5432
操作系统:CentOS Linux release 7.7.1908 (Core)
postgresql版本:12.0
keepalived版本:v1.3.5
1.3: 基础环境准备
1.3.1:系统配置
-
主机名
-
IP
-
解析
-
防火墙
1.4:Postgres主从
1.4.1 两台服务器都做以下步骤
[root@pg1 ~]# useradd postgres
[root@pg1 ~]# passwd postgres
Changing password for user postgres.
New password:
BAD PASSWORD: The password contains the user name in some form
Retype new password:
passwd: all authentication tokens updated successfully.
[root@pg1 ~]# yum -y install gcc gcc-c++ make openssl openssl-devel openssh-server openssh-clients readline-devel
[root@pg1 ~]# tar -zxvf postgresql-12.0.tar.gz -C /home/postgres/
[root@pg1 ~]# cd /home/postgres/postgresql-12.0/
[root@pg1 postgresql-12.0]# ./configure --prefix=/usr/local/postgresql
root@pg1 postgresql-12.0]# make
[root@pg1 postgresql-12.0]# make install
[root@pg1 postgresql-12.0]# chown -R postgres:postgres /usr/local/postgresql/
[root@pg1 postgresql-12.0]# chown -R postgres:postgres /home/postgres/
#设置环境变量
[root@pg1 postgresql-12.0]# su - postgres
[postgres@pg1 ~]$ vi .bash_profile
PGHOME=/usr/local/postgresql
export PGHOME
PGDATA=/usr/local/postgresql/data
export PGDATA
PATH=$PATH:$HOME/.local/bin:$HOME/bin:$PGHOME/bin
export PATH
[postgres@pg1 ~]$ source ~/.bash_profile
[postgres@pg1 ~]$ psql -V
psql (PostgreSQL) 12.0
1.4.2:pg1服务器操作
[postgres@pg1 ~]$ cd /usr/local/postgresql/
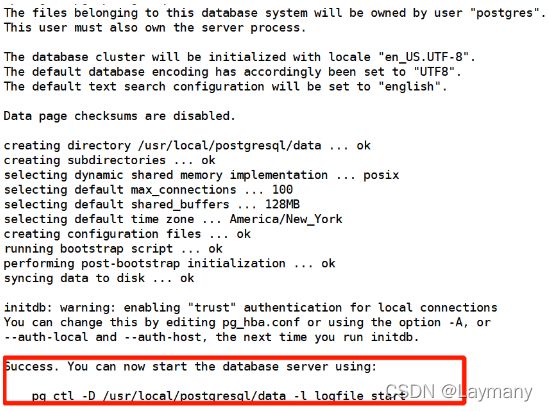
#数据库初始化
[postgres@pg1 postgresql]$ initdb
#创建相关文件夹
[postgres@pg1 postgresql]$ mkdir /usr/local/postgresql/log
[postgres@pg1 postgresql]$ mkdir /home/postgres/arch
#编辑主库配置文件
[postgres@pg1 postgresql]$ vim /usr/local/postgresql/data/postgresql.conf
# 新增或修改下列属性设置
listen_addresses = '*' # 监听所有IP
archive_mode = on # 开启归档,也用于数据查询
archive_command = 'test ! -f /var/lib/pgsql/12/data/pg_archive/%f && cp %p /var/lib/pgsql/12/data/pg_archive/%f' #归档命令
wal_level = replica # 9.6开始没有hot_standby(热备模式)
max_wal_senders = 5 #最多有5个流复制连接
wal_keep_segments = 16 #设置流复制堡垒最多的xlog数目
wal_sender_timeout = 60s #流复制超时时间
max_connections = 100 # 最大连接数,据说从机需要大于或等于该值
wal_receiver_status_interval = 10s # 多久向主报告一次从的状态,当然从每次数据复制都会向主报告状态,>这里只是设置最长的间隔时间
hot_standby_feedback = on # 如果有错误的数据复制,是否向主进行反馈
#编辑访问控制文件
[postgres@pg1 postgresql]$ vi /usr/local/postgresql/data/pg_hba.conf
host replication repl 192.168.48.0/24 trust
#启动数据库
[postgres@pg1 postgresql]$ pg_ctl -l /usr/local/postgresql/log/pglog.log start
waiting for server to start.... done
server started
#创建同步用户
[postgres@pg1 postgresql]$ psql
psql (12.0)
Type "help" for help.
postgres=# create role repl login replication encrypted password 'repl';
CREATE ROLE
#查看角色列表
postgres=# \du
List of roles
Role name | Attributes | Member of
-----------+------------------------------------------------------------+-----------
postgres | Superuser, Create role, Create DB, Replication, Bypass RLS | {}
repl | Replication
1.4.3:pg2服务器操作
[postgres@pg2 ~]$ mkdir /usr/local/postgresql/log
[postgres@pg2 ~]$ mkdir /home/postgres/arch
#从主服务器上copy数据到从服务器,基础备份
[postgres@pg2 postgresql]$ pg_basebackup -h pg1 -p 5432 -U repl -Fp -Xs -Pv -R -D /usr/local/postgresql/data
24589/24589 kB (100%), 1/1 tablespace
参数解析:
-h,主库主机,-p,主库服务端口;-U,复制用户;
-F,p是默认输出格式,输出数据目录和表空间相同的布局,t表示tar格式输出;
-P,同--progress,显示进度;
-D,输出到指定目录
-X 使用指定的方法包含所需的 WAL 文件
-s 状态数据包发送到服务器之间的时间
-v 输出版本信息,然后退出
-R --write-recovery-conf
为复制写入配置
#次是data目录下会出现standby.signal文件,编辑此文件
## 加入
standby_mode = 'on'
[postgres@pg2 data]$ vim standby.signal
#编辑postgresql.conf文件
listen_addresses = '*' # 监听所有IP
archive_mode = on # 开启归档,也用于数据查询
archive_command = 'test ! -f /var/lib/pgsql/12/data/pg_archive/%f && cp %p /var/lib/pgsql/12/data//pg_archive/%f' #归档命令
wal_level = replica # 9.6开始没有hot_standby(热备模式)
max_wal_senders = 5 #最多有2个流复制连接
wal_keep_segments = 16 #设置流复制堡垒最多的xlog数目
wal_sender_timeout = 60s #流复制超时时间
max_connections = 120 # 大于主节点
wal_receiver_status_interval = 10s # 多久向主报告一次从的状态,当然从每次数据复制都会向主报告状态,>这里只是设置最长的间隔时间
hot_standby_feedback = on # 如果有错误的数据复制,是否向主进行反馈
#从机信息和连接用户
primary_conninfo = 'host=pg1 port=5432 user=repl password=repl'
#启动备库服务器,已更新配置
[postgres@pg2 data]$ pg_ctl -l /usr/local/postgresql/log/pglog.log start
waiting for server to start.... done
server started
1.5:验证主从
#主库执行
[postgres@pg1 data]$ psql
psql (12.0)
Type "help" for help.
postgres=# select pg_is_in_recovery();
pg_is_in_recovery
-------------------
f
(1 row)
#从库执行
postgres@pg2 data]$ psql
psql (12.0)
Type "help" for help.
postgres=# select pg_is_in_recovery();
pg_is_in_recovery
-------------------
t
(1 row)
备库是t,主库是f
#开启展示显示
postgres=# \x
Expanded display is on.
postgres=# select * from pg_stat_replication;
-[ RECORD 1 ]----+------------------------------
pid | 24047
usesysid | 16384
usename | repl
application_name | walreceiver
client_addr | 192.168.48.149
client_hostname |
client_port | 57716
backend_start | 2022-02-15 10:25:42.668016-05
backend_xmin | 490
state | streaming
sent_lsn | 0/5013A08
write_lsn | 0/5013A08
flush_lsn | 0/5013A08
replay_lsn | 0/5013A08
write_lag |
flush_lag |
replay_lag |
sync_priority | 0
sync_state | async
reply_time | 2022-02-15 18:14:49.426918-05
#主
[postgres@pg1 data]$ pg_controldata | grep cluster
Database cluster state: in production
#从
[postgres@pg2 data]$ pg_controldata | grep cluster
Database cluster state: in archive recovery
1.5.1:主从数据验证
#主库进行数据测试,是否同步到从库
postgres=# create database test;
CREATE DATABASE
postgres=# \c test
You are now connected to database "test" as user "postgres"
test=# create table test(id int);
CREATE TABLE
test=# insert into test values(111);
INSERT 0 1
test=# select * from test;
id
-----
111
(1 row)
#从库查看
postgres=# \l
List of databases
Name | Owner | Encoding | Collate | Ctype | Access privileges
-----------+----------+----------+-------------+-------------+-----------------------
postgres | postgres | UTF8 | en_US.UTF-8 | en_US.UTF-8 |
template0 | postgres | UTF8 | en_US.UTF-8 | en_US.UTF-8 | =c/postgres +
| | | | | postgres=CTc/postgres
template1 | postgres | UTF8 | en_US.UTF-8 | en_US.UTF-8 | =c/postgres +
| | | | | postgres=CTc/postgres
test | postgres | UTF8 | en_US.UTF-8 | en_US.UTF-8 |
(4 rows)
postgres=# \c test
You are now connected to database "test" as user "postgres".
test=# select * from test;
id
-----
111
(1 row)
test=# insert into test values(22);
ERROR: cannot execute INSERT in a read-only transaction
#从库插入数据报错,从库默认用于读
1.6: 安装keepalived
#pg1
服务器执行
[root@pg1 keepalived]# yum -y install keepalived
#编辑keeplaived.conf文件
[root@pg1 keepalived]# vim /etc/keepalived/keepalived.conf
! Configuration File for keepalived
global_defs {
notification_email {
acassen@firewall.loc
failover@firewall.loc
sysadmin@firewall.loc
}
notification_email_from Alexandre.Cassen@localhost
smtp_server 192.168.48.147
smtp_connect_timeout 30
router_id 192.168.48.147
vrrp_skip_check_adv_addr
vrrp_garp_interval 0
vrrp_gna_interval 0
}
#执行脚本配置
vrrp_script check_pg_alived {
script "/etc/keepalived/scripts/check_pg.sh" #检测脚本位置
interval 2
weight -5
fall 2
rise 1
}
vrrp_instance VI_1 {
state BACKUP # 主备一致,都是BACKUP
interface ens33 #网卡
virtual_router_id 51 # 主备需要一致
priority 100 # 优先级 ,主需要比备高 比如主是101 备可以是100
advert_int 1
authentication {
auth_type PASS # 主备需要一致
auth_pass 1111 # 主备需要一致
}
track_script {
check_pg_alived
}
virtual_ipaddress { # vip设置 主备一致
192.168.48.100
}
}
#pg2
[root@pg2 keepalived]# yum -y install keepalived
[root@pg2 keepalived]# vim /etc/keepalived/keepalived.conf
! Configuration File for keepalived
global_defs {
notification_email {
acassen@firewall.loc
failover@firewall.loc
sysadmin@firewall.loc
}
notification_email_from Alexandre.Cassen@localhost
smtp_server 192.168.48.149
smtp_connect_timeout 30
router_id 192.168.48.149
vrrp_skip_check_adv_addr
vrrp_garp_interval 0
vrrp_gna_interval 0
}
#执行脚本配置
vrrp_script check_pg_alived {
script "/etc/keepalived/scripts/check_pg.sh" #检测脚本位置
interval 2
weight -5
fall 2
rise 1
}
vrrp_instance VI_1 {
state BACKUP # 主备一致,都是BACKUP
interface ens33 #网卡
virtual_router_id 51 # 主备需要一致
priority 95 # 优先级 ,主需要比备高 比如主是101 备可以是100
advert_int 1
authentication {
auth_type PASS # 主备需要一致
auth_pass 1111 # 主备需要一致
}
track_script {
check_pg_alived
}
virtual_ipaddress { # vip设置 主备一致
192.168.48.100
}
}
1.6.3: 检测脚本定义(两个库一样)
[root@pg1 keepalived]# mkdir scripts
[root@pg1 scripts]# cat check_pg.sh
#!/bin/bash
#判断pg是否活着
A=`ps -C postgres --no-header | wc -l`
#判断vip浮到哪里 这里的vip需要更改成自己设置的vip
B=`ip a | grep 192.168.48.100 | wc -l`
#判断是否是主库
C=`su - postgres -c "pg_controldata | grep cluster" | grep production | wc -l`
#判断是否是从库
D=`su - postgres -c "pg_controldata | grep cluster" | grep recovery | wc -l`
#判断主库是否有从库的同步进程
E=`ps -ef | grep postgres | grep 'walsender repl' | wc -l`
#如果pg死了,将消息写入日记并且关闭keepalived
if [ $A -eq 0 ];then
echo "`date "+%Y-%m-%d--%H:%M:%S"` postgresql stop so vip stop " >> /etc/keepalived/log/check_pg.log
systemctl stop keepalived
else
#判断出主ku挂了,vip漂移到了从,提升从的地位让他可读写
if [ $B -eq 1 -a $C -eq 0 -a $D -eq 1 ];then
su - postgres -c "pg_ctl promote -D /usr/local/postgresql/data" #重新加载pgsql使其可写
sed -i 's/primary_conninfo/\#primary_conninfo/g' /usr/local/postgresql/data/postgresql.auto.conf
echo "`date "+%Y-%m-%d--%H:%M:%S"` standby promote " >> /etc/keepalived/log/check_pg.log
fi
#判断出自己是主并且和从失去联系
if [ $B -eq 1 -a $C -eq 1 -a $D -eq 0 -a $E -eq 0 ];then
echo "`date "+%Y-%m-%d--%H:%M:%S"` can't find standby " >> /etc/keepalived/log/check_pg.log
fi
fi
1.6.3.1:修改keepalived配置(两个服务器都执行)
[root@pg1 scripts]# mkdir /etc/keepalived/log
[root@pg1 scripts]# cat /etc/sysconfig/keepalived
把KEEPALIVED_OPTIONS="-D" 修改为KEEPALIVED_OPTIONS="-D -d -S 0"
[root@pg1 scripts]# vim /etc/rsyslog.conf
加入如下配置:
#keepalived -S 0
local0.* /var/log/keepalived.log
[root@pg1 scripts]# cat /usr/lib/systemd/system/keepalived.service
[Unit]
Description=LVS and VRRP High Availability Monitor
After=syslog.target network-online.target
[Service]
Type=forking
PIDFile=/var/run/keepalived.pid
#KillMode=process
EnvironmentFile=-/etc/sysconfig/keepalived
ExecStart=/usr/sbin/keepalived $KEEPALIVED_OPTIONS
ExecReload=/bin/kill -HUP $MAINPID
[Install]
WantedBy=multi-user.target
[root@pg1 scripts]# systemctl daemon-reload
[root@pg1 scripts]# systemctl restart keepalived && systemctl enable keepalived
#查看keepalived服务VIP情况
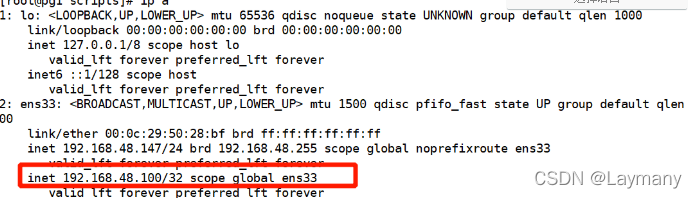
1.7:模拟故障演示
1.7.1:停掉主
#主库停掉VIP会不会飘逸到备库,备库提升为主库
[postgres@pg1 ~]$ pg_ctl stop
waiting for server to shut down....... done
server stopped
#查看日志keepalived已停掉

1.7.1.1:备库验证
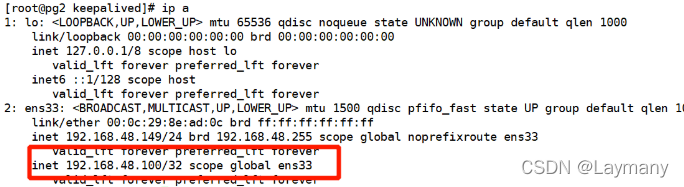
#VIP已飘逸到备库,进库查看备库是否变成主
[postgres@pg2 ~]$ psql
psql (12.0)
Type "help" for help.
postgres=# select pg_is_in_recovery();
pg_is_in_recovery
-------------------
f
(1 row)
postgres=# \c test
You are now connected to database "test" as user "postgres".
test=# \dt
List of relations
-[ RECORD 1 ]----
Schema | public
Name | test
Type | table
Owner | postgres
test=# insert into test values(222);
INSERT 0 1
test=# select * from test;
-[ RECORD 1 ]
id | 111
-[ RECORD 2 ]
id | 222
1.8:优化
通过以上方案,已完成了postgres高可用,但是不完美,实现了VIP飘逸实现了从数据库自动切换为主库,但是还需要手工把冗机的主服务器启动,并且需要一系列操作把原主库切换为从库,稍微有点麻烦,以下脚本,实现了原主库自动完成删除原数据,同步数据库,作为从库启动数据库,脚本需要使用postgres用户执行
#pg1自动切换脚本
#!/bin/bash
rm -rf /usr/local/postgresql/data/* && echo "数据删除成功" || echo "数据删除发生错误" #也可以将数据备份
sleep 1
#同步主库数据,ip为主库ip
pg_basebackup -D /usr/local/postgresql/data/ -F p -X stream -v -R -Pv -h pg2 -U repl && echo “数据同步成功” || echo “数据同步发生错误”
sleep 2
cp /home/postgres/postgresql-12.0/standby.signal /usr/local/postgresql/data/ && echo "文件standby.signal修改成功" || echo "standby.signal修改失败"
sleep 0.5
rm -rf /usr/local/postgresql/data/postgresql.auto.conf
sleep 0.5
cp /home/postgres/postgresql-12.0/postgresql.auto.conf /usr/local/postgresql/data/ && echo "文件postgresql.auto.conf修改成功" || echo "postgresql.auto.conf修改失败"
sleep 0.5
cp /home/postgres/postgresql-12.0/postgresql.conf /usr/local/postgresql/data/ && echo "文件postgresql.conf修改成功" || echo "postgresql.conf修改失败"
pg_ctl -l /usr/local/postgresql/log/pglog.log start && echo "pgsql start success" || echo "pgsql start fial"
sleep 1
echo "提示:请去修改keepalived优先级(/etc/keepalived/keepalived.conf)!!!然后开启keepalived!!!"
#脚本需要的关联文件
[postgres@pg1 ~]$ cat /home/postgres/postgresql-12.0/standby.signal
primary_conninfo = 'host=pg2 application_name=standby_pg1 port=5432 user=repl password=repl options=''-c wal_sender_timeout=5000'''
standby_mode = on
[postgres@pg1 ~]$ cat /home/postgres/postgresql-12.0/postgresql.auto.conf
primary_conninfo = 'host=pg2 application_name=standby_pg1 port=5432 user=repl password=repl options=''-c wal_sender_timeout=5000'''
#pg2自动切换脚本
#!/bin/bash
rm -rf /usr/local/postgresql/data/* && echo "数据删除成功" || echo "数据删除发生错误" #也可以将数据备份
sleep 1
#同步主库数据,ip为主库ip
pg_basebackup -D /usr/local/postgresql/data/ -F p -X stream -v -P -h pg1 -U repl && echo “数据同步成功” || echo “数据同步发生错误”
sleep 2
cp /home/postgres/postgresql-12.0/standby.signal /usr/local/postgresql/data/ && echo "文件standby.signal修改成功" || echo "standby.signal修改失败"
sleep 0.5
rm -rf /usr/local/postgresql/data/postgresql.auto.conf
sleep 0.5
cp /home/postgres/postgresql-12.0/postgresql.auto.conf /usr/local/postgresql/data/ && echo "文件postgresql.auto.conf修改成功" || echo "postgresql.auto.conf修改失败"
sleep 0.5
cp /home/postgres/postgresql-12.0/postgresql.conf /usr/local/postgresql/data/ && echo "文件postgresql.conf修改成功" || echo "postgresql.conf修改失败"
pg_ctl -l /usr/local/postgresql/log/pglog.log start && echo "pgsql start success" || echo "pgsql start fial"
sleep 1
echo "提示:请去修改keepalived优先级(/etc/keepalived/keepalived.conf)!!!然后开启keepalived!!!"
#需要关联的文件
[postgres@pg2 ~]$ cat /home/postgres/postgresql-12.0/standby.signal
primary_conninfo = 'host=pg1 application_name=standby_pg2 port=5432 user=repl password=repl options=''-c wal_sender_timeout=5000'''
standby_mode = on
[postgres@pg2 ~]$ cat /home/postgres/postgresql-12.0/postgresql.auto.conf
# Do not edit this file manually!
# It will be overwritten by the ALTER SYSTEM command.
primary_conninfo = 'user=repl passfile=''/home/postgres/.pgpass'' host=pg1 port=5432 sslmode=disable sslcompression=0 gssencmode=disable target_session_attrs=any'
#当主库挂了,从库自动切换为主后,在原主库执行脚本
[postgres@pg1 ~]$ bash /home/postgres/postgresql-12.0/pqsql.sh
数据删除成功
pg_basebackup: initiating base backup, waiting for checkpoint to complete
pg_basebackup: checkpoint completed
pg_basebackup: write-ahead log start point: 0/C000028 on timeline 2
pg_basebackup: starting background WAL receiver
pg_basebackup: created temporary replication slot "pg_basebackup_34933"
32559/32559 kB (100%), 1/1 tablespace
pg_basebackup: write-ahead log end point: 0/C000100
pg_basebackup: waiting for background process to finish streaming ...
pg_basebackup: syncing data to disk ...
pg_basebackup: base backup completed
“数据同步成功”
文件standby.signal修改成功
文件postgresql.auto.conf修改成功
文件postgresql.conf修改成功
waiting for server to start.... done
server started
pgsql start success
提示:请去修改keepalived优先级(/etc/keepalived/keepalived.conf)!!!然后开启keepalived!!!
#查看pg1库已变成从库
[postgres@pg1 ~]$ psql
psql (12.0)
Type "help" for help.
postgres=# select pg_is_in_recovery();
pg_is_in_recovery
-------------------
t
(1 row)
#数据无法插入
test=# insert into test values(333);
ERROR: cannot execute INSERT in a read-only transaction
#查看同步的数据
test=# select * from test;
id
-----
111
222
(2 rows)
#在主库上插入数据,从库上查库
postgres=# \c test
You are now connected to database "test" as user "postgres".
test=# insert into test values(444);
INSERT 0 1
#从库
test=# select * from test;
id
-----
111
222
444
(3 rows)


 被折叠的 条评论
为什么被折叠?
被折叠的 条评论
为什么被折叠?
 到【灌水乐园】发言


