


React之动画实现
一,介绍与需求
1.1,介绍
1,Ant Motion
Ant Motion能够快速在 React 框架中使用动画。在 React 框架下,只需要一段简单的代码就可以实现动画效果
2,SVG
- SVG 指可伸缩矢量图形 (Scalable Vector Graphics)
- SVG 用来定义用于网络的基于矢量的图形
- SVG 使用 XML 格式定义图形
- SVG 图像在放大或改变尺寸的情况下其图形质量不会有所损失
- SVG 是万维网联盟的标准
- SVG 与诸如 DOM 和 XSL 之类的 W3C 标准是一个整体
1.2,需求
提高网站的交互效果,提高用户体验。界面动效能加强用户认知且增加活力。
二,基于Ant Motion的react动画
2.1,动画效果
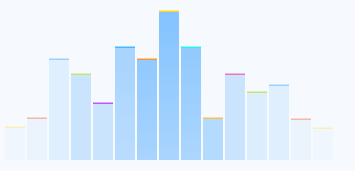
1,snow掉落效果

2,聚集与散开

2.2,动画实现方式
以掉落效果为例:
 1 import React from 'react';
 2 import Snow from './Snow';
 3 import './index.less';
 4 class App extends React.Component {
 5   constructor() {
 6     super(...arguments);
 7     this.state = {
 8       show: true,
 9     };
10   }
11   onEnd = () => {
12     this.setState({
13       show: false,
14     });
15   }
16   render() {
17     const children = Array(5).fill(1).map((c, i) => (
18       <div key={i} className="addMoneyAnim" style={{ animationDelay: `${-Math.random() * 0.6}s` }} />
19     ));
20     return (
21       <div className="snow-demo-wrapper" >
22       <div className="snow-demo">
23
24           <Snow onEnd={this.onEnd} >
25             {children}
26           </Snow>
27
28       </div>
29     </div>
30     );
31   }
32 }
33
34 export default App;
组件snow代码:
  1   import React from 'react';
  2   import TweenOne from 'rc-tween-one';
  3   import BezierPlugin from 'rc-tween-one/lib/plugin/BezierPlugin';
  4   import PropTypes from 'prop-types';
  5
  6   import './index.less';
  7
  8   TweenOne.plugins.push(BezierPlugin);
  9
 10   class Snow extends React.Component {
 11     static propTypes = {
 12       children: PropTypes.any,
 13       className: PropTypes.string,
 14       prefixCls: PropTypes.string,
 15       amount: PropTypes.number,
 16       repeat: PropTypes.number,
 17       ease: PropTypes.string,
 18       startArea: PropTypes.object,
 19       endArea: PropTypes.object,
 20       startDelayRandom: PropTypes.number,
 21       basicToDuration: PropTypes.number,
 22       randomToDuration: PropTypes.number,
 23       rotateRandom: PropTypes.number,
 24       bezierSegmentation: PropTypes.number,
 25       onEnd: PropTypes.func,
 26     }
 27     static defaultProps = {
 28       prefixCls: 'snow',
 29       amount: 10,
 30       repeat: 0,
 31       ease: 'linear',
 32       startArea: {
 33         x: 0, y: -200, width: '100%', height: 50,
 34       },
 35       endArea: {
 36         x: -200, y: '100%', width: '120%', height: 100,
 37       },
 38       basicToDuration: 1200,
 39       randomToDuration: 800,
 40       startDelayRandom: 800,
 41       rotateRandom: 180,
 42       bezierSegmentation: 2,
 43       onEnd: () => { },
 44     };
 45
 46     constructor(props) {
 47       super(props);
 48       this.state = {
 49         children: null,
 50       };
 51     }
 52     componentDidMount() {
 53       this.setChilrenToState();
 54     }
 55
 56     onAnimEnd = () => {
 57       this.animEnd += 1;
 58       if (this.animEnd >= this.props.amount) {
 59         this.animEnd = 0;
 60         if (this.props.onEnd) {
 61           this.props.onEnd();
 62         }
 63       }
 64     }
 65
 66     setChilrenToState() {
 67       const children = this.getChildrenToRender();
 68       this.setState({
 69         children,
 70       });
 71     }
 72
 73     getChildrenToRender = () => {
 74       const {
 75         bezierSegmentation, basicToDuration, randomToDuration,
 76         amount, ease, startDelayRandom, repeat, rotateRandom,
 77       } = this.props;
 78       const children = React.Children.toArray(this.props.children);
 79       const rect = this.wrapperDom.getBoundingClientRect();
 80       const startArea = this.dataToNumber(this.props.startArea, rect);
 81       const endArea = this.dataToNumber(this.props.endArea, rect);
 82       return Array(amount).fill(1).map((k, i) => {
 83         const item = children[Math.floor(Math.random() * children.length)];
 84         const vars = Array(bezierSegmentation).fill(1).map((c, j) => {
 85           const hegiht = endArea.y - startArea.y - startArea.height;
 86           const y = (hegiht / bezierSegmentation) * (j + 1);
 87           const x = Math.random() * (Math.max(startArea.width, endArea.width)
 88             + Math.min(startArea.x, endArea.x));
 89           // console.log(hegiht, startArea, endArea, y);
 90           return {
 91             y,
 92             x,
 93           };
 94         });
 95         const delay = Math.random() * startDelayRandom;
 96         const animation = {
 97           bezier: {
 98             type: 'soft',
 99             autRotate: true,
100             vars,
101           },
102           ease,
103           repeat,
104           repeatDelay: delay,
105           delay,
106           duration: basicToDuration + Math.random() * randomToDuration,
107           onComplete: this.onAnimEnd,
108         };
109         const style = {
110           transform: `translate(${Math.random() * (startArea.width) + startArea.x}px, ${
111             Math.random() * (startArea.height) + startArea.y
112           }px)`,
113         };
114         const child = rotateRandom ? (
115           <TweenOne
116             className="snowRotate"
117             style={{ transform: `rotate(${Math.random() * rotateRandom}deg)` }}
118             animation={{
119               rotate: 0,
120               duration: animation.duration * 4 / 5,
121               delay: animation.delay,
122               repeat: animation.repeat,
123             }}
124           >
125             {item}
126           </TweenOne>
127         ) : item;
128         return (
129           <TweenOne
130             animation={animation}
131             style={style}
132             key={`${item}-${i.toString()}`}
133             className="snowChild"
134           >
135             {child}
136           </TweenOne>
137         );
138       });
139     }
140     dataToNumber = (obj, rect) => {
141       const toNumber = (v, full) => {
142         if (typeof v === 'number') {
143           return v;
144         }
145         const unit = v.replace(/[0-9|.]/g, '');
146         switch (unit) {
147           case '%':
148             return parseFloat(v) * full / 100;
149           case 'em':
150             return parseFloat(v) * 16;
151           default:
152             return null;
153         }
154       };
155       return {
156         x: toNumber(obj.x, rect.width),
157         y: toNumber(obj.y, rect.height),
158         width: toNumber(obj.width, rect.width),
159         height: toNumber(obj.height, rect.height),
160       };
161     }
162     animEnd = 0;
163     render() {
164       const { prefixCls, ...props } = this.props;
165       const { children } = this.state;
166       [
167         'amount',
168         'repeat',
169         'ease',
170         'startArea',
171         'endArea',
172         'basicToDuration',
173         'randomToDuration',
174         'startDelayRandom',
175         'bezierSegmentation',
176         'rotateRandom',
177         'onEnd',
178       ].forEach(k => delete props[k]);
179       const className = `${prefixCls}${props.className ? ` ${props.className}` : ''}`;
180       return (
181         <div
182           {...props}
183           ref={(c) => {
184             this.wrapperDom = c;
185           }}
186           className={className}
187         >
188           {children}
189         </div>
190       );
191     }
192   }
193   export default Snow
194
样式代码:
 1 .snow-demo-wrapper {
 2   background: #DFEAFF;
 3   overflow: hidden;
 4   height: 500px;
 5   display: flex;
 6   align-items: center;
 7   position: relative;
 8 }
 9
10 .snow-demo {
11   width: 300px;
12   height: 90%;
13   margin: auto;
14   position: relative;
15   background-image: url(https://gw.alipayobjects.com/zos/rmsportal/dNpuKMDHFEpMGrTxdLVR.jpg);
16   background-position: top;
17   background-size: 100% auto;
18   box-shadow: 0 0 32px rgba(0, 0, 0, 0.15);
19 }
20
21 .snow {
22   width: 100%;
23   height: 100%;
24   position: absolute;
25   top: 0;
26   overflow: hidden;
27 }
28
29 .snowChild {
30   position: absolute;
31   top: 0;
32   left: 0;
33 }
34
35 .snowRotate {
36   transform-origin: center center;
37 }
2.3,动画分类
1,单元素动画rc-tween-one
1 cnpm install rc-tween-one --save
2,css样式动画rc-animate
1 cnpm install rc-animate --save
3,QueueAnim进出场动画
1 cnpm install rc-queue-anim --save
4,TextyAnim文字动画
1 cnpm install rc-texty --save
5,ScrollAnim页面滚动动画
1 cnpm install rc-scroll-anim --save
6,Banner动画
1 cnpm install rc-banner-anim --save
详细动画实例可查看官网
三,基于svg的react动画
3.1,动画效果
鼠标移入动画执行,鼠标移出动画停止
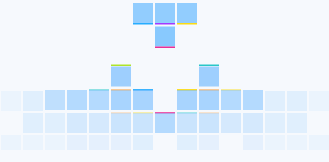
1,纵队动画
2,俄罗斯方块
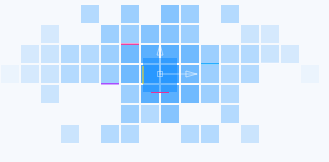
3,坐标动画
3.2,动画实现方式
以纵队动画为例如下代码:
 1 import React from 'react';
 2 import Column from '../technology/Column';//实现动画的svg组件
 3
 4 export default class ReactAnimation extends React.Component {
 5   constructor(props) {
 6     super(props);
 7     this.state = {
 8       hover: null,//是否有鼠标的移入
 9     };
10   }
11
12   onMouseEnter = (hover) => {//鼠标移入
13     this.setState({
14       hover,
15     });
16   };
17   onMouseLeave = () => {//鼠标移出
18     this.setState({
19       hover: null,
20     });
21   };
22   render() {
23
24     return (
25       <div>
26          <div
27             onMouseEnter={() => { this.onMouseEnter(1); }}
28             onMouseLeave={this.onMouseLeave}
29           >
30          <div>
31               {Column && React.createElement(Column, {
32                 hover:this.state.hover === 1,
33               })}
34             </div>
35             </div>
36       </div>
37     );
38   }
39 }
React.createElement(): 根据指定的第一个参数创建一个React元素。
1 React.createElement(
2   type,
3   [props],
4   [...children]
5 )
第一个参数是必填,传入的是似HTML标签名称,如: ul, li
第二个参数是选填,表示的是属性,如: className
第三个参数是选填, 子节点,如: 要显示的文本内容
SVG配置组件Column.jsx:
 1 import React from 'react';
 2 import TweenOne from 'rc-tween-one';//引入动画插件
 3
 4 function TweenOneG(props) {
 5   function getAnimation() {
 6     return props.animation.map((item, i) => {
 7       return { ...item, duration: 400 };
 8     });
 9   }
10   return (
11     <TweenOne
12       component="g"
13       {...props}
14       animation={
15         props.animation ?
16           getAnimation() :
17           null
18       }
19     />);
20 }
21
22 export default class Column extends React.PureComponent {
23   render() {
24     const { hover } = this.props;
25     return (
26       <svg width="328px" height="150px" viewBox="0 0 328 150">
27         <defs>
28           <linearGradient x1="50%" y1="3.05125957%" x2="50%" y2="157.404891%" id="linearGradient-1">
29             <stop stopColor="#2898FF" offset="0%" />
30           </linearGradient>
31         </defs>
32         <g id="Page-1" stroke="none" strokeWidth="1" fill="none" fillRule="evenodd">
33           <TweenOneG animation={hover ? [{ y: -20 }, { y: -10 }, { y: -30 }] : this.default1Anim}>
34             <g id="Group-33" transform="translate(0.000000, 116.000000)">
35               <rect id="Rectangle-15" fill="#1890FF" opacity="0.03" x="0" y="2" width="20" height="145" />
36             </g>
37           </TweenOneG>
38         </g>
39       </svg>);
40   }
41 }
上面展示的只是部分代码,如需完整的代码,请先留言评论加关注


 296
296

 被折叠的 条评论
为什么被折叠?
被折叠的 条评论
为什么被折叠?
 到【灌水乐园】发言


