


一.简介
1. 权限框架主要有三种:
① 自己写权限框架
② Spring Security (使用复杂, 依赖 Spring )
③ Apache Shiro (更轻量, 使用更简单, 并不完全依赖 spring,可以独立使用 )
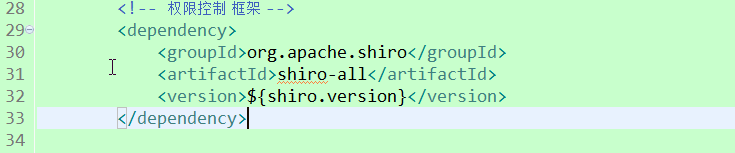
2.导入jar包(版本1.3.2)
二.用户登录功能实现.
1.配置web.xml
代码:
	<!--Shiro的Filter -->
	<filter>
		<!-- 去spring配置文件中寻找同名bean -->
		<filter-name>shiroFilter</filter-name>
		<filter-class>org.springframework.web.filter.DelegatingFilterProxy</filter-class>
	</filter>
	<filter-mapping>
		<filter-name>shiroFilter</filter-name>
		<url-pattern>/*</url-pattern>
	</filter-mapping>
2.配置applicationContext-shiro.xml(别忘了在applicationContext.xml中引入)
代码:
<?xml version="1.0" encoding="UTF-8"?>
<beans xmlns="http://www.springframework.org/schema/beans"
	xmlns:xsi="http://www.w3.org/2001/XMLSchema-instance" xmlns:aop="http://www.springframework.org/schema/aop"
	xmlns:context="http://www.springframework.org/schema/context"
	xmlns:jdbc="http://www.springframework.org/schema/jdbc" xmlns:tx="http://www.springframework.org/schema/tx"
	xmlns:jpa="http://www.springframework.org/schema/data/jpa" xmlns:task="http://www.springframework.org/schema/task"
	xsi:schemaLocation="
		http://www.springframework.org/schema/beans http://www.springframework.org/schema/beans/spring-beans.xsd
		http://www.springframework.org/schema/aop http://www.springframework.org/schema/aop/spring-aop.xsd
		http://www.springframework.org/schema/context http://www.springframework.org/schema/context/spring-context.xsd
		http://www.springframework.org/schema/jdbc http://www.springframework.org/schema/jdbc/spring-jdbc.xsd
		http://www.springframework.org/schema/tx http://www.springframework.org/schema/tx/spring-tx.xsd
		http://www.springframework.org/schema/data/jpa
		http://www.springframework.org/schema/data/jpa/spring-jpa.xsd">

	<!-- 配置Shiro核心Filter -->
	<bean id="shiroFilter" class="org.apache.shiro.spring.web.ShiroFilterFactoryBean">
		<!-- 安全管理器 -->
		<property name="securityManager" ref="securityManager" />
		<!-- 未认证,跳转到哪个页面 -->
		<property name="loginUrl" value="/login.html" />
		<!-- 登录页面页面 -->
		<property name="successUrl" value="/index.html" />
		<!-- 认证后,没有权限跳转页面 -->
		<property name="unauthorizedUrl" value="/unauthorized.html" />
		<!-- shiro URL控制过滤器规则 -->
		<property name="filterChainDefinitions">
			<value>
				/login.html* = anon
				/user_login.action* = anon
				/validatecode.jsp* = anon
				/css/** = anon
				/js/** = anon
				/images/** =anon
				/services/** = anon
				/pages/base/courier.html* = perms[courier:list]
				/pages/base/area.html* = roles[base]
				/** =authc
			</value>
		</property>
	</bean>

	<!-- 安全管理器 -->
	<bean id="securityManager" class="org.apache.shiro.web.mgt.DefaultWebSecurityManager">
		<property name="realm" ref="bosRealm" />
	</bean>
	<!-- 配置Realm -->
	<bean id="bosRealm" class="cn.itcast.bos.realm.BosRealm">
		<!-- 缓存区的名字 就是 ehcache.xml 自定义 cache的name -->
		<property name="authorizationCacheName" value="bos" />
	</bean>

	<bean id="lifecycleBeanPostProcessor" class="org.apache.shiro.spring.LifecycleBeanPostProcessor" />
</beans> ①anon 未认证可以访问
②authc 认证后可以访问
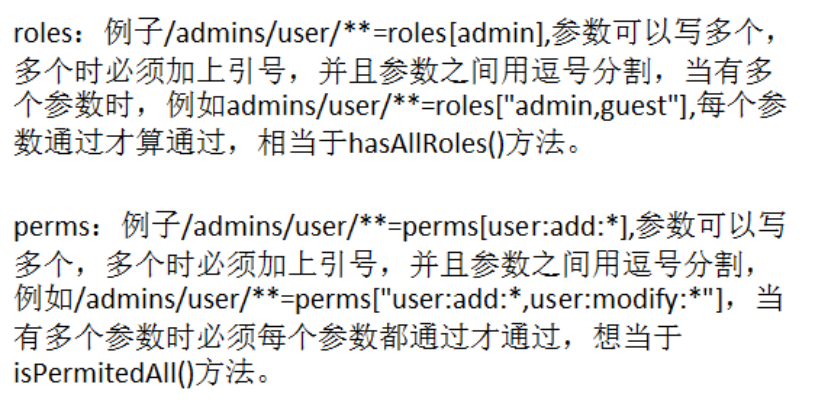
③perms 需要特定权限才能访问
④roles 需要特定角色才能访问
⑤user 需要特定用户才能访问
⑥port 需要特定端口才能访问
⑦reset 根据指定 HTTP 请求访问才能访问
⑧perms[courier:list]:用于用户权限控制,后面会有写到.
3.页面代码.
<!DOCTYPE html>
<html>
	<head>
		<meta charset="UTF-8">
		<meta name="viewport" content="width=device-width,innitial-scale=1">
		<title>BOS管理系统 登陆页面</title>
		<script src="./js/jquery-1.8.3.js" type="text/javascript"></script>
		<link rel="stylesheet" type="text/css" href="css/bootstrap.css">
		<link rel="stylesheet" type="text/css" href="css/login.css">
	</head>

	<body>
		<div class="loginbox">
		<div class="loginnav">
			<nav class="navbar navbar-default">
				<div class="container">
					<div class="navbar-header">
						<a class="navbar-brand" href="#"><img src="images/logo.png"></a>
						<span class="logintitle">员工登录</span>
					</div>
				</div>
			</nav>
		</div>

		<section class="mainlogin">
			<div class="container">
				<div class="col-md-4 col-md-offset-7 logincontent">
					<h4>员工登录</h4>
					<form class="form-horizontal" id="loginform" name="loginform" method="post" action="user_login.action">
						<div class="form-group" id="idInputLine">
							<label for="inputPassword3" class="col-sm-3 control-label">账号</label>
							<div class="col-sm-8">
								<input id="loginform:idInput" type="text" name="username" class="form-control" placeholder="请输入手机号/邮箱/用户名">
							</div>
						</div>
						<div class="form-group" id="pwdInputLine">
							<label id="loginform:pwdInput" class="col-sm-3 control-label" >密码</label>
							<div class="col-sm-8">
								<input for="pwdInput" type="password" name="password" class="form-control" id="inputaccount" placeholder="请输入您的密码">
							</div>
						</div>
						<div class="form-group">
							<label for="inputvalidate" class="col-sm-3 control-label">验证码</label>
							<div class="col-sm-4">
								<input type="text" class="form-control" id="inputaccount" placeholder="请输入验证码">
							</div>
							<div class="col-sm-4">
								<img id="loginform:vCode" src="validatecode.jsp"  οnclick="javascript:document.getElementById('loginform:vCode'). src='validatecode.jsp?'+Math.random();" />
							</div>
						</div>
						<div class="form-group">

							<div class="col-sm-offset-3 col-sm-4">
								<input type="checkbox"><span class="size12"> 记住用户名</span>
							</div>
							<div class="col-sm-4">
								<a href="#"><span class="size12 forget">忘记密码</span></a>
							</div>
						</div>
						<div class="col-md-offset-3 col-md-8">
							<a href="javascript:$('#loginform').submit();" id="loginform:j_id19" name="loginform:j_id19"
								 class="btn btn-danger" >立即登录</a>

						</div>
					</form>
				</div>
			</div>
		</section>

		<footer class="clearfix">
			<div class="container">
			<p class="text-center">地址:北京市昌平区建材城西路金燕龙办公楼一层 邮编:100096 电话:400-618-4000 传真:010-82935100 </p>
<p  class="text-center">京ICP备08001421号京公网安备110108007702</p>
</div>
		</footer>
		</div>
	</body>
</html>
注意:红色的"action"的字段在过滤器中是"/user_login.action* = anon",意思就是这个action可以不用认证(没有登录)就可以访问.
4.UserAction提供"login"登录的方法
package cn.itcast.bos.web.action.base.system;

import org.apache.shiro.SecurityUtils;
import org.apache.shiro.authc.AuthenticationException;
import org.apache.shiro.authc.UsernamePasswordToken;
import org.apache.shiro.subject.Subject;
import org.apache.struts2.convention.annotation.Action;
import org.apache.struts2.convention.annotation.Namespace;
import org.apache.struts2.convention.annotation.ParentPackage;
import org.apache.struts2.convention.annotation.Result;
import org.springframework.context.annotation.Scope;
import org.springframework.stereotype.Controller;

import cn.itcast.bos.system.User;

import com.opensymphony.xwork2.ActionSupport;
import com.opensymphony.xwork2.ModelDriven;

@ParentPackage("json-default")
@Namespace("/")
@Controller
@Scope("prototype")
public class UserAction extends ActionSupport implements ModelDriven<User> {

	private User user = new User();

	@Override
	public User getModel() {
		return user;
	}

	@Action(value = "user_login", results = {
			@Result(name = "login", type = "redirect", location = "login.html"),
			@Result(name = "success", type = "redirect", location = "index.html") })
	public String login() {
		//基于Shiro实现登录
		Subject subject = SecurityUtils.getSubject();

		//用户名和密码信息
		UsernamePasswordToken token = new UsernamePasswordToken(user.getUsername(),user.getPassword());

		try {
			subject.login(token);
			//登录成功,将用户信息保存到session当中
			return SUCCESS;
		} catch (AuthenticationException e) {
			//登录失败
			e.printStackTrace();
			return LOGIN;
		}

	}

	//用户推出登录
	@Action(value="user_logout",results={@Result(name="success",type="redirect",location="login.html")})
	public String logout(){
		Subject subject = SecurityUtils.getSubject();
		subject.logout();
		return SUCCESS;
	}
}
Shiro 执行流程: 应用程序 --- Subject(action) --- SecurityManager(xml) --- Realm 安全数据
5.自定义Realm对象(实际开发中,只需要继承 AuthorizingRealm )
①将自定义 Realm 注入安全管理器 SecurityManager 当中
<!-- 安全管理器 -->
	<bean id="securityManager" class="org.apache.shiro.web.mgt.DefaultWebSecurityManager">
		<property name="realm" ref="bosRealm" />
</bean>package cn.itcast.bos.realm;
import java.util.List;
import org.apache.shiro.SecurityUtils;
import org.apache.shiro.authc.AuthenticationException;
import org.apache.shiro.authc.AuthenticationInfo;
import org.apache.shiro.authc.AuthenticationToken;
import org.apache.shiro.authc.SimpleAuthenticationInfo;
import org.apache.shiro.authc.UsernamePasswordToken;
import org.apache.shiro.authz.AuthorizationInfo;
import org.apache.shiro.authz.SimpleAuthorizationInfo;
import org.apache.shiro.realm.AuthorizingRealm;
import org.apache.shiro.subject.PrincipalCollection;
import org.apache.shiro.subject.Subject;
import org.springframework.beans.factory.annotation.Autowired;
import org.springframework.stereotype.Service;
import cn.itcast.bos.service.base.system.PermissionService;
import cn.itcast.bos.service.base.system.RoleService;
import cn.itcast.bos.service.base.system.Userservice;
import cn.itcast.bos.system.Permission;
import cn.itcast.bos.system.Role;
import cn.itcast.bos.system.User;
// 自定义Realm ,实现安全数据 连接
@Service("bosRealm")
public class BosRealm extends AuthorizingRealm {
@Autowired
private Userservice userService;
@Autowired
private RoleService roleService;
@Autowired
private PermissionService permissionService;
@Override
// 认证...
protected AuthenticationInfo doGetAuthenticationInfo(
AuthenticationToken token) throws AuthenticationException {
System.out.println("shiro 认证管理... ");
// 转换token
UsernamePasswordToken usernamePasswordToken = (UsernamePasswordToken) token;
// 根据用户名 查询 用户信息
User user = userService.findByUsername(usernamePasswordToken
.getUsername());
if (user == null) {
// 用户名不存在
// 参数一: 期望登录后,保存在Subject中信息
// 参数二: 如果返回为null 说明用户不存在,报用户名
// 参数三 :realm名称
return null;
} else {
// 用户名存在
// 当返回用户密码时,securityManager安全管理器,自动比较返回密码和用户输入密码是否一致
// 如果密码一致 登录成功, 如果密码不一致 报密码错误异常
return new SimpleAuthenticationInfo(user, user.getPassword(),
getName());
}
}
}③Service和Dao代码
package cn.itcast.bos.service.base.system;

import cn.itcast.bos.system.User;

public interface Userservice {

	public User findByUsername(String username);
}
package cn.itcast.bos.service.base.impl;

import org.springframework.beans.factory.annotation.Autowired;
import org.springframework.stereotype.Service;
import org.springframework.transaction.annotation.Transactional;

import cn.itcast.bos.dao.base.system.UserRepository;
import cn.itcast.bos.service.base.system.Userservice;
import cn.itcast.bos.system.User;
@Service
@Transactional
public class UserServiceImpl implements Userservice{

	@Autowired
	private UserRepository userRepository;

	@Override
	public User findByUsername(String username) {
		 return userRepository.findByUsername(username);
	}

}
package cn.itcast.bos.dao.base.system;

import org.springframework.data.jpa.repository.JpaRepository;
import org.springframework.stereotype.Repository;

import cn.itcast.bos.system.User;
@Repository
public interface UserRepository extends JpaRepository<User, Integer>{
	public User findByUsername(String username);
}
6.在user表中插入临时用户密码数据,可以校验代码是否正确;
三,用户授权
1.表之间的关系;

菜单,权限,角色,用户
①用户:每个用户属于一个角色

②每个角色有相应的权限,还有对应的菜单

总结:每一位用户都有对应的权限,也有属于自己的菜单列表(动态显示菜单,后面有)
2.实现 Realm的授权方法
完整的Realm(包括认证和授权)的代码:
package cn.itcast.bos.realm;


import java.util.List;

import org.apache.shiro.SecurityUtils;
import org.apache.shiro.authc.AuthenticationException;
import org.apache.shiro.authc.AuthenticationInfo;
import org.apache.shiro.authc.AuthenticationToken;
import org.apache.shiro.authc.SimpleAuthenticationInfo;
import org.apache.shiro.authc.UsernamePasswordToken;
import org.apache.shiro.authz.AuthorizationInfo;
import org.apache.shiro.authz.SimpleAuthorizationInfo;
import org.apache.shiro.realm.AuthorizingRealm;
import org.apache.shiro.subject.PrincipalCollection;
import org.apache.shiro.subject.Subject;
import org.springframework.beans.factory.annotation.Autowired;
import org.springframework.stereotype.Service;

import cn.itcast.bos.service.base.system.PermissionService;
import cn.itcast.bos.service.base.system.RoleService;
import cn.itcast.bos.service.base.system.Userservice;
import cn.itcast.bos.system.Permission;
import cn.itcast.bos.system.Role;
import cn.itcast.bos.system.User;


// 自定义Realm ,实现安全数据 连接
 @Service("bosRealm")
public class BosRealm extends AuthorizingRealm {

	@Autowired
	private Userservice userService;	//用户

	@Autowired
	private RoleService roleService;//角色

	@Autowired
	private PermissionService permissionService;//权限名称


	@Override
	// 认证...
	protected AuthenticationInfo doGetAuthenticationInfo(
			AuthenticationToken token) throws AuthenticationException {
		System.out.println("shiro 认证管理... ");

		// 转换token
		UsernamePasswordToken usernamePasswordToken = (UsernamePasswordToken) token;

		// 根据用户名 查询 用户信息
		User user = userService.findByUsername(usernamePasswordToken
				.getUsername());
		if (user == null) {
			// 用户名不存在
			// 参数一: 期望登录后,保存在Subject中信息
			// 参数二: 如果返回为null 说明用户不存在,报用户名
			// 参数三 :realm名称
			return null;
		} else {
			// 用户名存在
			// 当返回用户密码时,securityManager安全管理器,自动比较返回密码和用户输入密码是否一致
			// 如果密码一致 登录成功, 如果密码不一致 报密码错误异常
			return new SimpleAuthenticationInfo(user, user.getPassword(),
					getName());
		}

	}


	@Override
	// 授权...
	protected AuthorizationInfo doGetAuthorizationInfo(PrincipalCollection pc) {
		System.out.println("shiro 授权管理...");
		SimpleAuthorizationInfo authorizationInfo = new SimpleAuthorizationInfo();
		// 根据当前登录用户 查询对应角色和权限
		Subject subject = SecurityUtils.getSubject();
		User user = (User) subject.getPrincipal();
		// 调用业务层,查询角色
		List<Role> roles = roleService.findByUser(user);
		for (Role role : roles) {
			authorizationInfo.addRole(role.getKeyword());
		}
		// 调用业务层,查询权限
		List<Permission> permissions = permissionService.findByUser(user);
		for (Permission permission : permissions) {
			authorizationInfo.addStringPermission(permission.getKeyword());
		}

		return authorizationInfo;
	}
}
博主还没有弄懂查询用户权限之后返回到哪去了!!!知道的小伙请在下面留言,或者去哪个博客下看!
未完待续========================================================!!!!!!!!!!!!!!!!!!!!!!!!!!!!!!!!!!!!!


 1522
1522

 被折叠的 条评论
为什么被折叠?
被折叠的 条评论
为什么被折叠?
 到【灌水乐园】发言


