


之前实例化对象都是在Spring的xml配置文件中进行配置,每新增一个对象就需要配置一次,这样就会特别麻烦,也会造成xml配置文件特别大,再者不利于开发,影响开发效率,所以出现了注解装配JavaBean的方式。使用注解,可以减少代码的开发量。
在Spring中,默认是禁用注解配置的,如果想要开启注解,需要进行配置,开启注解扫描。
开启注解扫描的方式有以下两种:
<context:component-scan>组件扫描
<context:annotation-config>注解配置
二者的区别是:
<context:annotation-config>用于激活那些已经在spring容器里注册过(配置过)的bean(无论是通过xml的方式还是通过package sanning的方式)上面的注解。
<context:component-scan>除了具有<context:annotation-config>的功能之外,还可以在指定的package下扫描以及注册javabean .
所以一般使用<context:component-scan>。
例:
<!-- 开启注解扫描 -->
<context:component-scan base-package="com.gxj" />
base-package 属性指定一个需要扫描的基类包,Spring 容器将会扫描这个基类包里及其子包中的所有类. 当需要扫描多个包时, 可以使用逗号分隔.
也可以使用resource-pattern属性来过滤特定的类。配置示例如下:
<context:component-scan base-package="com.gxj" resource-pattern="three/*.class"/> 上述配置要求Spring扫描com.gxj 下的three注解配置bean的关联关系。
< context:component-scan> 元素还会自动注册 AutowiredAnnotationBeanPostProcessor 实例, 该实例可以自动装配具有 @Autowired 和 @Resource 、@Inject注解的属性.包下的所有类。一般使用@Autowired。
通过注解的方式配置Bean是通过扫描的动作来完成的。在xml文件中通过配置(包括一个路径),Spring就会在这个路径中扫描、侦测以及实例化具有特定注解的组件。
这些注解包括:
@Component: 基本注解,标识了一个受Spring管理的组件
@Repository:标识持久层组件
@Service: 标识服务层(业务层)组件
@Controller: 标识表现层组件
这些注解的功能都是一样的,都是实例化对象,只是基于实际项目开发的架构,在不同层级进行区分和使用。
注解默认命名规则:
我们使用注解配置bean的时候,并没有指定bean的id,那么spring帮我们创建bean的时候会给一个默认的id,id为类名首字母小写。如TestController实例化对象之后是 testController
我们也可以指定bean的名称(id),使用注解的value属性,如@Service(value=”myService”)
value属性是注解的默认属性,可以省略,即@Service(“myService”)
例:
项目结构如下:
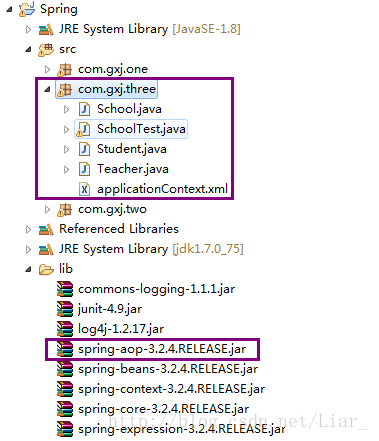
在原来的基础上新增spring-aop-3.2.4.RELEASE.jar。
在applicationContext.xml配置文件中配置(需要引入context约束):
<?xml version="1.0" encoding="UTF-8"?>
<beans xmlns="http://www.springframework.org/schema/beans"
    xmlns:xsi="http://www.w3.org/2001/XMLSchema-instance"
    xmlns:context="http://www.springframework.org/schema/context"
    xmlns:p="http://www.springframework.org/schema/p"
    xsi:schemaLocation="http://www.springframework.org/schema/beans
                                http://www.springframework.org/schema/beans/spring-beans.xsd
                                http://www.springframework.org/schema/context
                                http://www.springframework.org/schema/context/spring-context.xsd">

    <!-- 开启注解扫描 -->
    <context:component-scan base-package="com.gxj" />

    <!-- <context:component-scan base-package="com.gxj" resource-pattern="three/*.class"/> -->
    <!-- <bean id="school" class="com.gxj.three.School"></bean> -->
    <!-- <bean id="teacher" class="com.gxj.three.Teacher"></bean> -->
    <!-- <bean id="student" class="com.gxj.three.Student"></bean> -->
</beans>
实例对象:
Teacher.java:

    package com.gxj.three;

    import org.springframework.stereotype.Component;

    @Component
    public class Teacher {
        public void teach() {
            System.out.println("老师:上课!");
        }
    }


----------
Student.java:

    package com.gxj.three;

    import org.springframework.stereotype.Service;

    @Service
    public class Student {
        public void study() {
            System.out.println("学生:老师好!");
        }
    }


----------


School.java:

    package com.gxj.three;

    import javax.annotation.Resource;

    import org.springframework.beans.factory.annotation.Autowired;
    import org.springframework.stereotype.Controller;
    @Controller
    public class School {
        @Autowired
        private Teacher teacher;

        @Resource
        private Student student;

        public void inClass() {
            teacher.teach();
            student.study();
            System.out.println("老师:同学们好!");
        }
    }
测试:
SchoolTest.java:

    package com.gxj.three;

    import org.junit.Test;
    import org.springframework.context.ApplicationContext;
    import org.springframework.context.support.ClassPathXmlApplicationContext;

    public class SchoolTest {

        @Test
        public void test() {
            ApplicationContext context = new ClassPathXmlApplicationContext("com/gxj/three/applicationContext.xml");
            School school = (School) context.getBean("school");
            school.inClass();
        }
    }
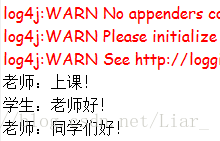
结果:


 1377
1377

 被折叠的 条评论
为什么被折叠?
被折叠的 条评论
为什么被折叠?
 到【灌水乐园】发言


