


day02 spring-ioc
1.使用IOC和依赖注入进行增删改查
1.1 Maven依赖 pom.xml
    <dependencies>
        <!-- 基于Maven依赖传递性,导入spring-context依赖即可导入当前所需所有jar包 -->
        <dependency>
            <groupId>org.springframework</groupId>
            <artifactId>spring-context</artifactId>
            <version>5.3.1</version>
        </dependency>
        <!-- junit测试 -->
        <dependency>
            <groupId>junit</groupId>
            <artifactId>junit</artifactId>
            <version>4.12</version>
            <scope>test</scope>
        </dependency>
        <!--引入datasource、mysql驱动依赖-->
        <!-- MySQL驱动 -->
        <dependency>
            <groupId>mysql</groupId>
            <artifactId>mysql-connector-java</artifactId>
            <version>8.0.19</version>
        </dependency>
        <!-- 数据源 -->
        <dependency>
            <groupId>com.alibaba</groupId>
            <artifactId>druid</artifactId>
            <version>1.0.31</version>
        </dependency>
        <!--DBUtils-->
        <dependency>
            <groupId>commons-dbutils</groupId>
            <artifactId>commons-dbutils</artifactId>
            <version>1.7</version>
        </dependency>
    </dependencies>
1.2 创建Soldier类
package com.atguigu.pojo;

public class Soldier {
    private Integer soldierId;
    private String soldierName;
    private String soldierWeapon;

    public Integer getSoldierId() {
        return soldierId;
    }

    public void setSoldierId(Integer soldierId) {
        this.soldierId = soldierId;
    }

    public String getSoldierName() {
        return soldierName;
    }

    public void setSoldierName(String soldierName) {
        this.soldierName = soldierName;
    }

    public String getSoldierWeapon() {
        return soldierWeapon;
    }

    public void setSoldierWeapon(String soldierWeapon) {
        this.soldierWeapon = soldierWeapon;
    }

    @Override
    public String toString() {
        return "Soldier{" +
                "soldierId=" + soldierId +
                ", soldierName='" + soldierName + '\'' +
                ", soldierWeapon='" + soldierWeapon + '\'' +
                '}';
    }
}
1.3 创建SoldierDao接口
package com.atguigu.dao;

import com.atguigu.pojo.Soldier;

import java.sql.SQLException;
import java.util.List;

public interface SoldierDao {
    /**
     * 根据id删除soldier
     * @param soldierId
     */
    void deleteById(Integer soldierId) throws SQLException;

    /**
     * 更新soldier
     * @param soldier
     */
    void update(Soldier soldier) throws SQLException;

    /**
     * 添加soldier
     * @param soldier
     */
    void add(Soldier soldier) throws SQLException;

    /**
     * 根据id获取soldier
     * @param soldierId
     * @return
     */
    Soldier getById(Integer soldierId) throws SQLException;

    /**
     * 获取所有soldier
     * @return
     */
    List<Soldier> findAll() throws SQLException;
}
1.4 创建SoldierDaoImpl实现类
package com.atguigu.dao.impl;

import com.atguigu.dao.SoldierDao;
import com.atguigu.pojo.Soldier;
import org.apache.commons.dbutils.QueryRunner;
import org.apache.commons.dbutils.handlers.BeanHandler;
import org.apache.commons.dbutils.handlers.BeanListHandler;

import java.sql.SQLException;
import java.util.List;

public class SoldierDaoImpl implements SoldierDao {

    private QueryRunner queryRunner;

    // 创建set方法 在配置文件中注入数据
    public void setQueryRunner(QueryRunner queryRunner) {
        this.queryRunner = queryRunner;
    }

    @Override
    public void deleteById(Integer soldierId) throws SQLException {
        String sql = "delete from t_soldier where soldier_id=?";
        queryRunner.update(sql, soldierId);
    }

    @Override
    public void update(Soldier soldier) throws SQLException {
        String sql = "update t_soldier set soldier_name=?,soldier_weapon=? where soldier_id=?";
        queryRunner.update(sql, soldier.getSoldierName(), soldier.getSoldierWeapon(),soldier.getSoldierId());
    }

    @Override
    public void add(Soldier soldier) throws SQLException {
        String sql = "insert into t_soldier(soldier_name,soldier_weapon) values(?,?)";
        queryRunner.update(sql, soldier.getSoldierName(),soldier.getSoldierWeapon());

    }

    @Override
    public Soldier getById(Integer soldierId) throws SQLException {
        String sql = "select soldier_name soldierName,soldier_weapon soldierWeapon from t_soldier where soldier_id=?";
        return queryRunner.query(sql, new BeanHandler<>(Soldier.class),soldierId);
    }

    @Override
    public List<Soldier> findAll() throws SQLException {
        String sql = "select soldier_name soldierName,soldier_weapon soldierWeapon from t_soldier";
        return queryRunner.query(sql, new BeanListHandler<>(Soldier.class));
    }
}
1.5创建SoldierService接口
package com.atguigu.service;

import com.atguigu.pojo.Soldier;

import java.sql.SQLException;
import java.util.List;

public interface SoldierService {
    /**
     * 根据id删除soldier
     * @param soldierId
     */
    void deleteById(Integer soldierId) throws SQLException;

    /**
     * 更新soldier
     * @param soldier
     */
    void update(Soldier soldier) throws SQLException;

    /**
     * 添加soldier
     * @param soldier
     */
    void add(Soldier soldier) throws SQLException;

    /**
     * 根据id获取soldier
     * @param soldierId
     * @return
     */
    Soldier getById(Integer soldierId) throws SQLException;

    /**
     * 获取所有soldier
     * @return
     */
    List<Soldier> findAll() throws SQLException;
}
1.6 创建SoldierServiceIImpl实现类
package com.atguigu.service.impl;

import com.atguigu.dao.SoldierDao;
import com.atguigu.pojo.Soldier;
import com.atguigu.service.SoldierService;

import java.sql.SQLException;
import java.util.List;

public class SoldierServiceImpl implements SoldierService {
    private SoldierDao soldierDao;

    // 创建set方法 在配置文件中注入数据
    public void setSoldierDao(SoldierDao soldierDao) {
        this.soldierDao = soldierDao;
    }

    @Override
    public void deleteById(Integer soldierId) throws SQLException {
        soldierDao.deleteById(soldierId);
    }

    @Override
    public void update(Soldier soldier) throws SQLException {
        soldierDao.update(soldier);
    }

    @Override
    public void add(Soldier soldier) throws SQLException {
        soldierDao.add(soldier);
    }

    @Override
    public Soldier getById(Integer soldierId) throws SQLException {
        return soldierDao.getById(soldierId);
    }

    @Override
    public List<Soldier> findAll() throws SQLException {
        return soldierDao.findAll();
    }
}
1.7 创建SoldierController类
package com.atguigu.controller;

import com.atguigu.pojo.Soldier;
import com.atguigu.service.SoldierService;

import java.sql.SQLException;
import java.util.List;

/**
 * 给对象的属性赋值的三种方式:
 *  1.set方法
 *  2.构造器
 *  3.暴力反射
 *
 */
public class SoldierController {
    private SoldierService soldierService;

    // 创建set方法 在配置文件中进行注入
    public void setSoldierService(SoldierService soldierService) {
        this.soldierService = soldierService;
    }

    /**
     * 根据id删除soldier
     * @param soldierId
     */
    public void deleteById(Integer soldierId) throws SQLException{
        soldierService.deleteById(soldierId);
    };

    /**
     * 更新soldier
     * @param soldier
     */
    public void update(Soldier soldier) throws SQLException{
        soldierService.update(soldier);
    }

    /**
     * 添加soldier
     * @param soldier
     */
    public void add(Soldier soldier) throws SQLException{
        soldierService.add(soldier);
    }

    /**
     * 根据id获取soldier
     * @param soldierId
     * @return
     */
    public void getById(Integer soldierId) throws SQLException{
        System.out.println(soldierService.getById(soldierId));
    }

    /**
     * 获取所有soldier
     * @return
     */
    public void findAll() throws SQLException{
        List<Soldier> soldierList = soldierService.findAll();
        for (Soldier soldier : soldierList) {
            System.out.println(soldier);
        }
    }
}
1.8 在resources下创建jdbc.properties配置文件
dataSource.username=root
dataSource.password=123456
dataSource.url=jdbc:mysql://localhost:3306/mybatis2?characterEncoding=utf8&serverTimezone=UTC
dataSource.driverClassName=com.mysql.cj.jdbc.Driver
1.9 创建xml文件 创建IOC和注入数据 resources/spring.xml
<?xml version="1.0" encoding="UTF-8"?>
<beans xmlns="http://www.springframework.org/schema/beans"
       xmlns:xsi="http://www.w3.org/2001/XMLSchema-instance"
       xmlns:context="http://www.springframework.org/schema/context"
       xsi:schemaLocation="http://www.springframework.org/schema/beans http://www.springframework.org/schema/beans/spring-beans.xsd http://www.springframework.org/schema/context https://www.springframework.org/schema/context/spring-context.xsd">

    <bean id="controller" class="com.atguigu.controller.SoldierController">
        <property name="soldierService" ref="soldierService"></property>
    </bean>

    <bean id="soldierService" class="com.atguigu.service.impl.SoldierServiceImpl">
        <property name="soldierDao" ref="soldierDao"></property>
    </bean>

    <bean id="soldierDao" class="com.atguigu.dao.impl.SoldierDaoImpl">
        <property name="queryRunner" ref="queryRunner"></property>
    </bean>

    <bean id="queryRunner" class="org.apache.commons.dbutils.QueryRunner">
        <constructor-arg name="ds" ref="dataSource" ></constructor-arg>
    </bean>

    <context:property-placeholder location="classpath:jdbc.properties"></context:property-placeholder>
    <bean id="dataSource" class="com.alibaba.druid.pool.DruidDataSource">
        <property name="username" value="${dataSource.username}"></property>
        <property name="password" value="${dataSource.password}"></property>
        <property name="url" value="${dataSource.url}"></property>
        <property name="driverClassName" value="${dataSource.driverClassName}"></property>
    </bean>

</beans>
2.0测试代码
package com.atguigu;

import com.atguigu.controller.SoldierController;
import com.atguigu.pojo.Soldier;
import org.junit.Test;
import org.springframework.context.ApplicationContext;
import org.springframework.context.support.ClassPathXmlApplicationContext;

import java.sql.SQLException;

public class SpringIOCTest {

    @Test
    public void testAdd() throws SQLException {
        ApplicationContext aot = new ClassPathXmlApplicationContext("spring.xml");
        SoldierController soldierController = aot.getBean(SoldierController.class);
        Soldier soldier = new Soldier();
        soldier.setSoldierName("女警");
        soldier.setSoldierWeapon("枪");
        soldierController.add(soldier);
    }


    @Test
    public void testUpdate() throws SQLException {
        ApplicationContext aot = new ClassPathXmlApplicationContext("spring.xml");
        SoldierController soldierController = aot.getBean(SoldierController.class);
        Soldier soldier = new Soldier();
        soldier.setSoldierId(2);
        soldier.setSoldierName("男枪");
        soldier.setSoldierWeapon("枪");
        soldierController.update(soldier);

    }

    @Test
    public void testFindAll() throws SQLException {
        ApplicationContext aot = new ClassPathXmlApplicationContext("spring.xml");
        SoldierController soldierController = aot.getBean(SoldierController.class);
        soldierController.findAll();
    }
}
2.使用Lombok
- Lombok的作用是什么?
在类的编译期,在字节码文件中生成属性的get、set方法、以及对象toString、有参构造、无参构造、equals等等- 怎么使用Lombok
2.1 引入Lombok的依赖
2.2 添加Lombok的注解
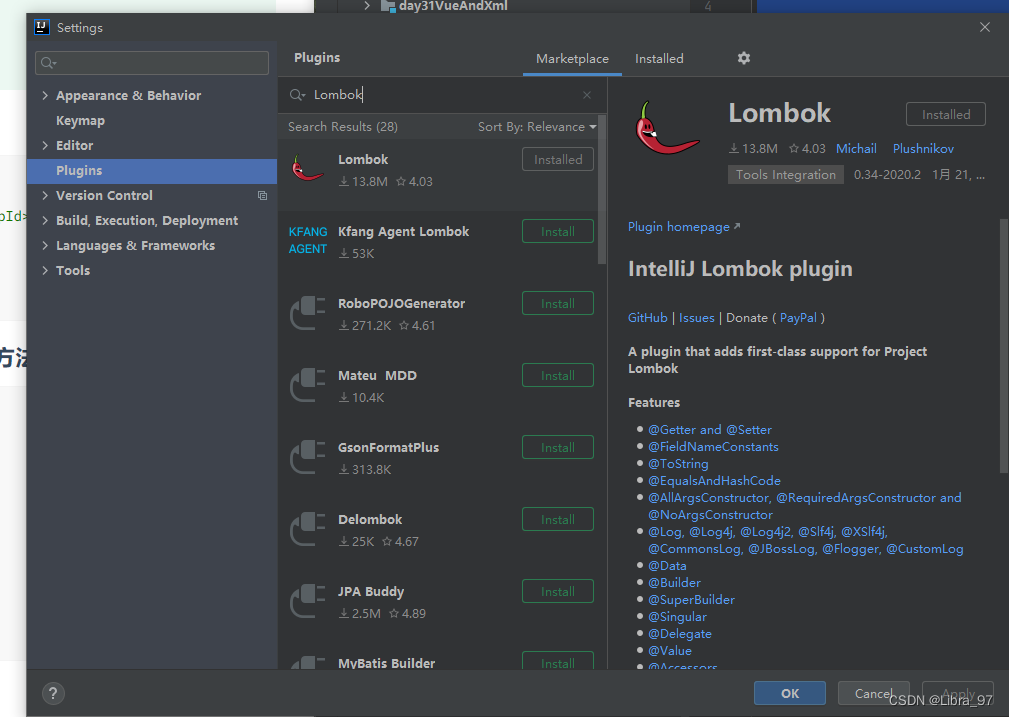
2.3 安装Lombok的插件
2.1 添加Maven坐标
        <!--lombok-->
        <dependency>
            <groupId>org.projectlombok</groupId>
            <artifactId>lombok</artifactId>
            <version>1.18.24</version>
            <scope>provided</scope>
        </dependency>
2.2 Soldier类中添加注解 删除get和set方法以及tostring
package com.atguigu.pojo;

import lombok.Data;

@Data
public class Soldier {
    private Integer soldierId;
    private String soldierName;
    private String soldierWeapon;

}
2.3 安装Lombok插件(不安装插件运行也可以 但idea会提示代码异常 以及没有代码补全提示)
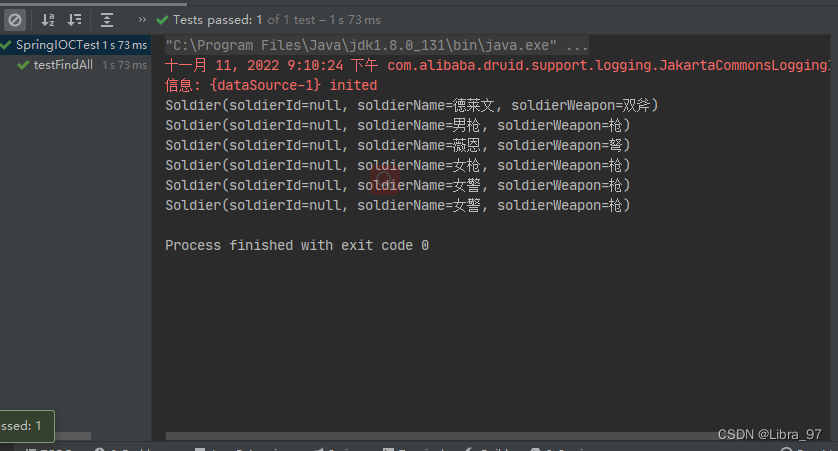
2.4 测试效果正常
3.注解方式进行IOC
3.1 注解的优势
和XML配置文件一样,注解本身并不能执行,注解本身仅仅只是做一个标记,具体的功能是框架检测到注解标记的位置,然后针对这个位置按照注解标记的功能来执行具体操作。使用注解开发比使用XML更加简洁明了
3.2 常用的进行IOC的注解
我们在类上添加注解,可以实现将该类的对象配置到spring的IOC容器中,常用的注解有如下四种:
3.2.1 Component注解
该注解主要用在普通类上,即除了三层架构之外的其他类的对象如果需要配置到sping的IOC容器中,那么则需要在类上添加Component注解
3.2.2 Controller注解
该注解主要用在控制层的类上,控制层处于三层结构中的表现层,在JavaWeb阶段表现层使用的是Servlet,而在学习了spring-framework之后,表现层我们使用Controler代替
// 表现层注解
@Controller
public class SoldierController {
}
3.2.3 Service注解
该注解主要用在三层结构中的业务层的实现类上,用于将业务层的对象配置到spring的IOC容器中
// 业务层注解
@Service
public class SoldierServiceImpl implements SoldierService {
}
3.2.4 Repository注解
该注解主要用在三层结构中的持久层的实现类上,用于将持久层的对象配置到spring的IOC容器中,但是以后我们整合了Mybatis,这里就变成了Mapper接口,而Mapper接口是由Mybatis和spring的IOC容器需要结合Mybatis对Mapper配置文件的解析,所以这个事情是Mybatis和spring的整合包来完成,将来由Mybatis负责扫描,也不需要使用Repository注解。
// 持久层注解
@Repository
public class SoldierDaoImpl implements SoldierDao {
}
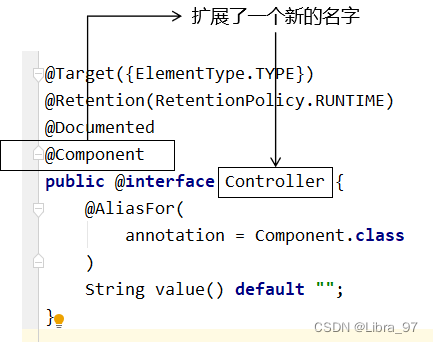
虽然我们学习的上述四个注解都实现了IOC,但是其实他们四个在本质上是没有区别的,通过查看源码我们的值,@Controller、@Service、@Repository这三个注解只是在@Component注解的基础上三个新的名字。对于Spring使用IOC容器管理这些组件来说没有区别。所以@Controller、@Service、@Repository这三个注解只是给开发人员看的,让我们能够便于分辨组件的作用。
注意:虽然它们本质上一样,但是为了代码的可读性,为了程序结构严谨我们肯定不能随便胡乱标记。
3.3 包扫描
使用注解进行Bean管理必须要在xml配置文件中进行包扫描,这样的话spring-framework才能够解析你在Bean上所添加的注解,包扫描包含下面列举的四种情况:
3.3.1 最基本的扫描方式[常用]
扫描指定包下的所有类以及子包下的所有类
<!--    基础扫描 -->
<!--    表示ICO容器会扫描com.atguigu包以及其后代包-->
    <context:component-scan base-package="com.atguigu"></context:component-scan>
3.3.2 指定匹配模式
根据具体的匹配规则,扫描某个包下的某些类,需要注意规则匹配是匹配的直接在这个包下的类,不能是子包下的类
<!--    指定匹配模式的扫描-->
<!--    指定扫描com.atguigu.service.impl包中以Impl结尾结尾的类-->
    <context:component-scan base-package="com.atguigu.service.impl" resource-pattern="*Impl.class"></context:component-scan>
3.3.3 指定要排除的组件
扫描某个包下的所有类,但是排除掉一些注解
<!--    指定排除某种/某些类型的注解-->
<!--    扫描com.atuigu包及其子包下的所有类上的所有注解,但是会排除掉exclude-filter指定的注解(Controller)-->
    <context:component-scan base-package="com.atguigu">
        <context:exclude-filter type="annotation" expression="org.springframework.stereotype.Controller"/>
    </context:component-scan>
3.3.4 指定扫描的组件
扫描某个剥下的所有类,但是只扫描某种注解
<!--    指定只扫描某种/某些类型的注解-->
<!--    仅扫描 = 关闭默认规则 + 追加规则-->
<!--    use-default-filters属性:false表示关闭默认扫描规则-->
<!--    扫描指定包及其子包下的所有类(但是不扫描任何注解),只扫描include-filter指定的注解(Controller)-->
    <context:component-scan base-package="com.atguigu" use-default-filters="false">
        <context:include-filter type="annotation" expression="org.springframework.stereotype.Controller"/>
    </context:component-scan>
3.4 给Bean设置name
在我们使用XML方式管理bean的时候,每个bean都有一个唯一标识,便于在其他地方引用。
限制使用注解后,每个组件任然应该有一个唯一标识。
3.4.1 默认情况
类名首字母小写就是bean的id。例如:SoldierController对于的bean的id就是soldierController.
3.4.2 使用value属性指定
// 业务层注解
@Service(value = "soldierService")
public class SoldierServiceImpl implements SoldierService {
}
当注解中只设置一个属性时,value属性的属性名可以省略
// 业务层注解
@Service("soldierService")
public class SoldierServiceImpl implements SoldierService {
}
3.4 怎么选择
1.如果这个类是自己写的类,可以在上面添加注解,所以可以使用注解方式进行IOC
2.如果这个类不是自己写的类,而是第三方依赖中的类,不能再它上面加注解,那么就只能用配置文件方式进行IOC
4.注解方式进行依赖注入
4.1 注入简单类型的属性
Value注解是用于给IOC容器中的Bean注入简单类型的属性值
4.2 注入Bean类型属性
4.2.1 场景
- SoldierController需要SoldierService
- SoldierService需要SoldierDao
同时在各个组件中声明成员变量和方法
4.2.2 Autowired在各个组件中进行依赖注入
@Autowired注解:
(1). 它是Spring框架中的注解
(2). 它的使用位置: 构造器、方法、方法参数、成员变量(包含枚举常量)、注解类型
(3). 底层作用原理(自动装配时候的流程):见图
4.2.2.1 SoldierController进行依赖注入
package atguigu.controller;

import atguigu.pojo.Soldier;
import atguigu.service.SoldierService;
import org.springframework.stereotype.Controller;

import javax.annotation.Resource;
import java.sql.SQLException;
import java.util.List;

/**
 * 给对象的属性赋值的三种方式:
 *  1.set方法
 *  2.构造器
 *  3.暴力反射
 */
/*
 * 为了规范代码,提高代码的可读性,三层结构中不同层次的类使用不同的IOC注解
 * 1. Controller注解使用在表现层
 * 2. Service注解使用在业务层
 * 3. Repository注解使用在持久层
 * 4. Component注解使用在三层结构之外的类上
 *
 * 依赖注入的注解:
 * 1. Autowired注解: 表示自动装配,它只能用于注入Bean类型的对象
 * 2. Value注解: 注入简单类型的值
 */
@Controller
public class SoldierController {

    // 自动装配 spring提供的
    @Resource
    private SoldierService soldierService;

    /**
     * 根据id删除
     * @param soldierId
     */
    public void deleteById(Integer soldierId) throws SQLException{
        soldierService.deleteById(soldierId);
    }

    /**
     * 更新士兵对象
     * @param soldier
     */
    public void update(Soldier soldier) throws SQLException{
        soldierService.update(soldier);
    }


    /**
     * 添加士兵对象
     * @param soldier
     */
    public void add(Soldier soldier) throws SQLException{
        soldierService.add(soldier);
    }


    /**
     * 根据id查询士兵
     * @param soldierId
     * @return
     */
    public void getById(Integer soldierId) throws SQLException{
        System.out.println(soldierService.getById(soldierId));
    }

    /**
     * 获取所有士兵
     * @return
     */
    public void findAll() throws SQLException{
        System.out.println(soldierService.findAll());
    }
}
4.2.2.2 SoldierServiceImpl进行依赖注入
package com.atguigu.service.impl;

import com.atguigu.dao.SoldierDao;
import com.atguigu.pojo.Soldier;
import com.atguigu.service.SoldierService;
import org.springframework.beans.factory.annotation.Autowired;
import org.springframework.stereotype.Service;

import javax.annotation.Resource;
import java.sql.SQLException;
import java.util.List;

// 业务层注解
@Service("soldierService")
public class SoldierServiceImpl implements SoldierService {

    // 自动装配 是spring中的注解
    @Autowired
    private SoldierDao soldierDao;

    // 创建set方法 在配置文件中注入数据
    public void setSoldierDao(SoldierDao soldierDao) {
        this.soldierDao = soldierDao;
    }

    @Override
    public void deleteById(Integer soldierId) throws SQLException {
        soldierDao.deleteById(soldierId);
    }

    @Override
    public void update(Soldier soldier) throws SQLException {
        soldierDao.update(soldier);
    }

    @Override
    public void add(Soldier soldier) throws SQLException {
        soldierDao.add(soldier);
    }

    @Override
    public Soldier getById(Integer soldierId) throws SQLException {
        return soldierDao.getById(soldierId);
    }

    @Override
    public List<Soldier> findAll() throws SQLException {
        System.out.println("这是SoldierServiceImpl");
        return soldierDao.findAll();
    }
}
4.2.3 SoldierDaoImpl进行依赖注入
package com.atguigu.dao.impl;

import com.atguigu.dao.SoldierDao;
import com.atguigu.pojo.Soldier;
import org.apache.commons.dbutils.QueryRunner;
import org.apache.commons.dbutils.handlers.BeanHandler;
import org.apache.commons.dbutils.handlers.BeanListHandler;
import org.springframework.beans.factory.annotation.Autowired;
import org.springframework.stereotype.Repository;

import java.sql.SQLException;
import java.util.List;

// 持久层注解
@Repository("SoldierDaoImpl")
public class SoldierDaoImpl implements SoldierDao {

    // 自动装配 spring提供的
    @Autowired
    private QueryRunner queryRunner;

    // 创建set方法 在配置文件中注入数据
    public void setQueryRunner(QueryRunner queryRunner) {
        this.queryRunner = queryRunner;
    }

    @Override
    public void deleteById(Integer soldierId) throws SQLException {
        String sql = "delete from t_soldier where soldier_id=?";
        queryRunner.update(sql, soldierId);
    }

    @Override
    public void update(Soldier soldier) throws SQLException {
        String sql = "update t_soldier set soldier_name=?,soldier_weapon=? where soldier_id=?";
        queryRunner.update(sql, soldier.getSoldierName(), soldier.getSoldierWeapon(),soldier.getSoldierId());
    }

    @Override
    public void add(Soldier soldier) throws SQLException {
        String sql = "insert into t_soldier(soldier_name,soldier_weapon) values(?,?)";
        queryRunner.update(sql, soldier.getSoldierName(),soldier.getSoldierWeapon());

    }

    @Override
    public Soldier getById(Integer soldierId) throws SQLException {
        String sql = "select soldier_name soldierName,soldier_weapon soldierWeapon from t_soldier where soldier_id=?";
        return queryRunner.query(sql, new BeanHandler<>(Soldier.class),soldierId);
    }

    @Override
    public List<Soldier> findAll() throws SQLException {
        String sql = "select soldier_name soldierName,soldier_weapon soldierWeapon from t_soldier";
        return queryRunner.query(sql, new BeanListHandler<>(Soldier.class));
    }
}
4.2.4 Autowired工作流程
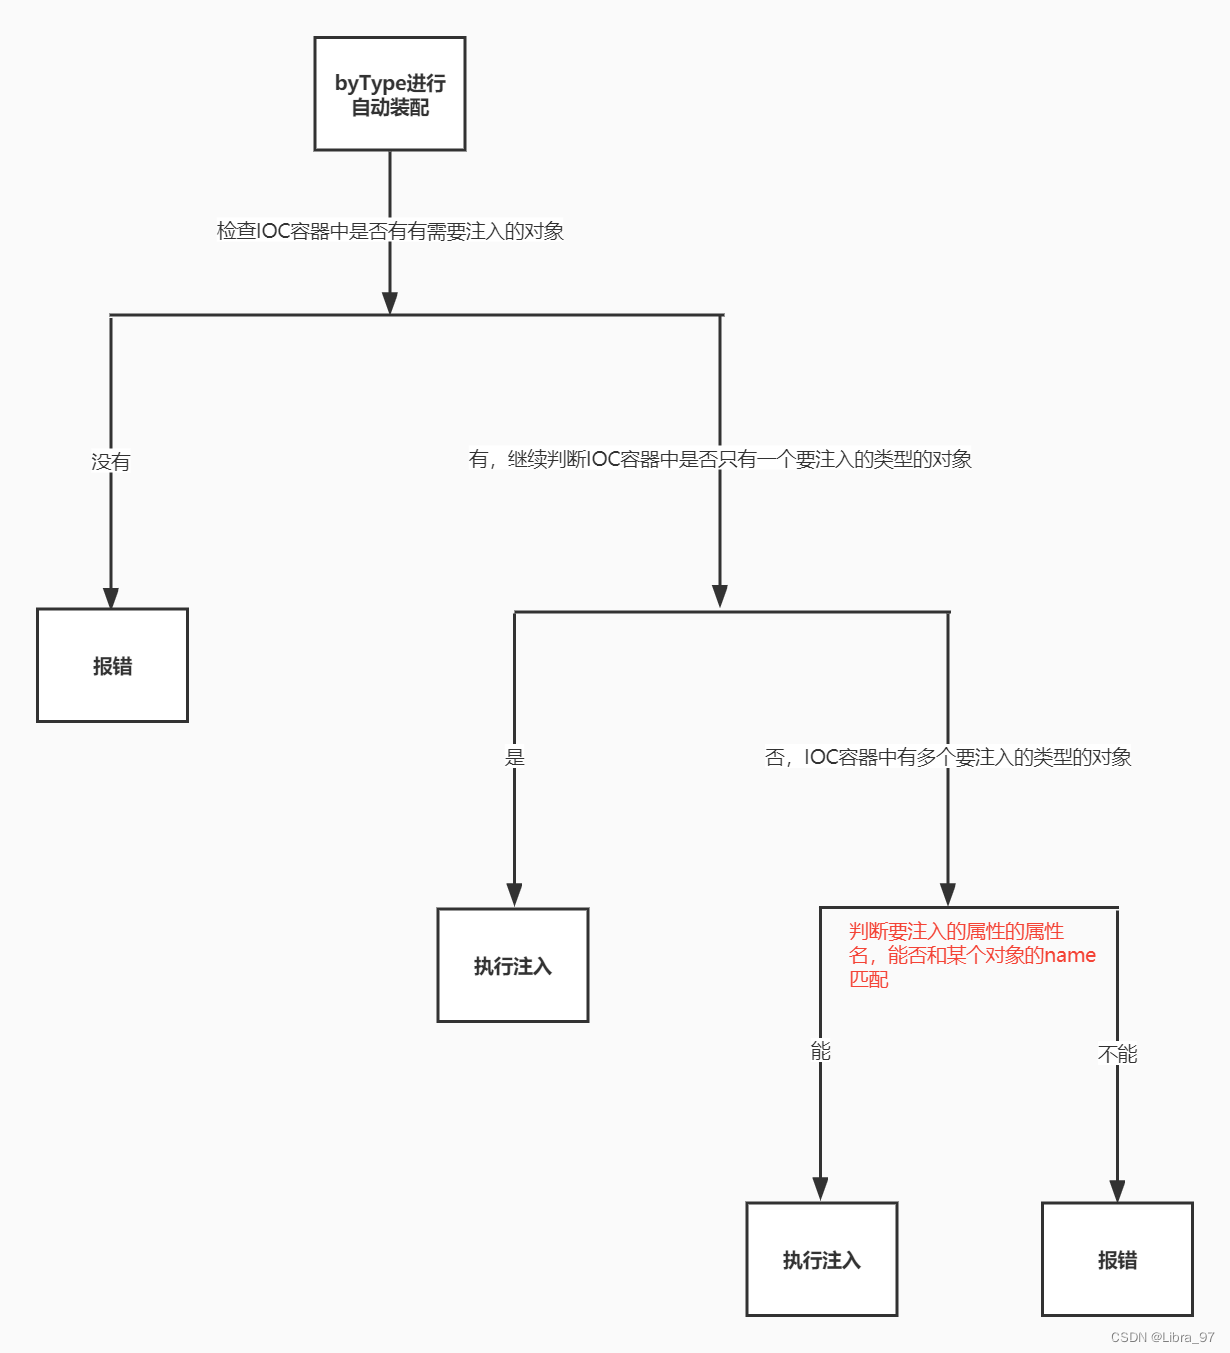
首先根据所需要的组件类型到IOC容器中查找
-
能够找到唯一的bean:直接执行装配
-
如果完全找不到匹配这个类型的bean:装配失败
-
和所需类型匹配的bean不止一个
-
没有@Qualifier注解:根据@Autowired标记位置成员变量的变量名作为bean的id进行匹配(bean的id默认为类名首字母小写,也可以取别名)
- 能够找到:执行装配
- 找不到:装配失败
-
使用@Qualifier注解:根据@Qualifier注解中指定的名称作为bean的id进行匹配
- 能够找到:执行装配
- 找不到:装配失败
-
4.2.5 Qualifier注解(这里是根据soldierServiceImplAnother查找id进行注入,如果没加Qualifier就是根据soldierService查找id进行注入,id默认为类名首字母小写,也可以取自定义名字)
@Qualifier注解: 它必须得配合@Autowired一起使用,用来指定根据name进行依赖注入
package com.atguigu.controller;

import com.atguigu.pojo.Soldier;
import com.atguigu.service.SoldierService;
import org.springframework.beans.factory.annotation.Autowired;
import org.springframework.beans.factory.annotation.Qualifier;
import org.springframework.stereotype.Controller;

import java.sql.SQLException;
import java.util.List;

/**
 * 给对象的属性赋值的三种方式:
 *  1.set方法
 *  2.构造器
 *  3.暴力反射
 *
 */

// 表现层注解
@Controller
public class SoldierController {

    // 自动装配 spring提供的
    // Qualifier 根据name进行依赖注入 必须结合Autowired使用 不然会报错
    @Autowired
    @Qualifier("soldierServiceImplAnother")
    private SoldierService soldierService;

    // 创建set方法 在配置文件中进行注入
    public void setSoldierService(SoldierService soldierService) {
        this.soldierService = soldierService;
    }

    /**
     * 根据id删除soldier
     * @param soldierId
     */
    public void deleteById(Integer soldierId) throws SQLException{
        soldierService.deleteById(soldierId);
    };

    /**
     * 更新soldier
     * @param soldier
     */
    public void update(Soldier soldier) throws SQLException{
        soldierService.update(soldier);
    }

    /**
     * 添加soldier
     * @param soldier
     */
    public void add(Soldier soldier) throws SQLException{
        soldierService.add(soldier);
    }

    /**
     * 根据id获取soldier
     * @param soldierId
     * @return
     */
    public void getById(Integer soldierId) throws SQLException{
        System.out.println(soldierService.getById(soldierId));
    }

    /**
     * 获取所有soldier
     * @return
     */
    public void findAll() throws SQLException{
        List<Soldier> soldierList = soldierService.findAll();
        for (Soldier soldier : soldierList) {
            System.out.println(soldier);
        }
    }
}
4.2.3 使用Resource注解进行注入
@Resource注解(默认是byName): 提升项目的可扩展性、可插拔性
(1). 它是JDK中的注解
(2). 它的使用位置:类、接口、注解、枚举、成员变量(包含枚举常量)、方法上
(3). 底层作用原理(自动装配时候的流程):
① type和name属性都有值: 它首先会byName(根据属性名去匹配对象),匹配到对象之后再匹配type
② type属性有值但是name属性没有值:
它首先会byName(根据属性名去匹配对象),匹配到对象之后再匹配type
③ name属性有值但是type属性没值:
它首先会byName(根据name属性的值去匹配)
④ name属性和type属性都没有值:
它首先会byName(根据属性名去匹配对象),根据name匹配上之后再匹配type
特殊情况: 如果IOC容器中有且只有一个要注入的类型的对象,它byName匹配不上的时候,会byType
4.2.3.1 进行依赖注入
// 业务层注解
@Service("soldierService")
public class SoldierServiceImpl implements SoldierService {

    // 自动装配 是JDK中的注解
    @Resource
    private SoldierDao soldierDao;
4.2.4 Autowired注解和Resource注解的区别
@Autowired功能虽说非常强大,但是也有些不足之处。比如:比如它跟spring强耦合了,如果换成了JFinal等其他框架,功能就会失效。而@Resource是JSR-250提供的,它是Java标准,绝大部分框架都支持。
除此之外,有些场景使用@Autowired无法满足的要求,改成@Resource却能解决问题。接下来,我们重点看看@Autowired和@Resource的区别。
- @Autowired默认按byType自动装配,而@Resource默认byName自动装配。
- @Autowired只包含一个参数:required,表示是否开启自动注入,默认是true。而@Resource包含七个参数,其中最重要的两个参数是:name 和 type。
- @Autowired如果要使用byName,需要使用@Qualifier一起配合。而@Resource如果指定了name,则用byName自动装配,如果指定了type,则用byType自动装配。
- @Autowired能够用在:构造器、方法、参数、成员变量和注解上,而@Resource能用在:类、成员变量和方法上。
- @Autowired是spring定义的注解,而@Resource是JSR-250定义的注解。
此外,它们的装配顺序不同。
5.纯注解开发
- 为什么要学习纯注解开发?
因为后续将要学习的SpringBoot框架是使用纯注解开发,完全舍弃XML配置,所以我们学习Spring的纯注解开发主要是为了给SpringBoot打基础- 纯注解开发的优势?
减少了很多复杂、冗余的一些配置- 使用纯注解开发达到的目标:
舍弃XML配置文件- 实现纯注解开发的步骤:
4.1 创建一个配置类用来代替配置文件:配置类上要添加@Configuration注解
4.2 在配置类中做原本配置文件所做的那些事情
(1). 包扫描: @ComponentScan注解
(2). 第三方jar包中的类进行IOC和依赖注入
(3). 引入外部的properties文件:@PropertySource
5.1 使用配置类取代配置文件
5.1.1 创建配置类
删除配置文件,创建配置类
使用@Configuration注解将一个普通的类标记为Spring的配置类。
package com.atguigu.config;

import org.springframework.context.annotation.Configuration;


@Configuration
public class AtguiguSpringConfiguration {
}
5.1.2 在配置类中配置包扫描
package com.atguigu.config;

import org.springframework.context.annotation.ComponentScan;
import org.springframework.context.annotation.Configuration;


@ComponentScan("com.atguigu")
@Configuration
public class AtguiguSpringConfiguration {
}
5.1.3 在配置类中配置bean
对Bean进行IOC的时候,如果是自己编写的类,则可以直接通过IOC注解进行配置,如果是非自己写的类:例如JDK中或第三方框架中的类,我们可以通过配置文件进行IOC,但是在纯注解中没有了配置文件,所以我们需要使用@Bean注解进行IOC
package com.atguigu.config;

import com.alibaba.druid.pool.DruidDataSource;
import org.apache.commons.dbutils.QueryRunner;
import org.springframework.beans.factory.annotation.Value;
import org.springframework.context.annotation.Bean;
import org.springframework.context.annotation.ComponentScan;
import org.springframework.context.annotation.Configuration;
import org.springframework.context.annotation.PropertySource;

import javax.sql.DataSource;


/**
 * 1.配置类要加上@Configuration注解
 * 2.使用ComponentScan注解进行包扫描
 * 3.使用@Bean注解配置第三方的类的IOC
 * 4.从properties文件中读取数据
 */

@Configuration
@ComponentScan("com.atguigu")
@PropertySource("classpath:jdbc.properties")
public class AtguiguSpringConfiguration {
    @Value("${dataSource.username}")
    private String username;
    @Value("${dataSource.password}")
    private String password;
    @Value("${dataSource.url}")
    private String url;
    @Value("${dataSource.driverClassName}")
    private String driverClassName;

    @Bean
    public DataSource createDataSource(){
        // 1.创建DruidDataSource对象
        DruidDataSource druidDataSource = new DruidDataSource();
        // 2.设置druidDataSource的username/password/url/driverClassName属性
        druidDataSource.setUsername(username);
        druidDataSource.setPassword(password);
        druidDataSource.setUrl(url);
        druidDataSource.setDriverClassName(driverClassName);
        return druidDataSource;

    }

    @Bean
    public QueryRunner createQueryRunner(DataSource dataSource){
        return new QueryRunner(dataSource);
    }

}
6.Spring整合Junit单元测试
6.1 Spring整合junit4的好处
为什么要使用Spring整合单元测试?
为了简化、方便单元测试在Spring项目中的使用使用Spring整合单元测试之后要达到的目标:
2.1 不需要使用者自己创建IOC容器,Junit框架帮我们创建
2.2 不需要我们自己通过IOC容器getBean()方法获取对象,由IOC容器将对象注入给单元测试类使用实现步骤:
3.1 引入spring和junit整合的依赖
3.2 spring5整合junit只支持junit4.12以及以上版本
3.3 在单元测试类上添加@Runwith(SpringJUnit4ClassRunner.class)
3.4 在单元测试类上使用@ContextConfiguration(location=“要加载的配置文件的路径”)
6.2 具体操作
6.2.1 加入依赖
        <!--spring整合junit的依赖-->
        <dependency>
            <groupId>org.springframework</groupId>
            <artifactId>spring-test</artifactId>
            <version>5.3.1</version>
            <scope>test</scope>
        </dependency>
6.2.2 创建测试类
package com.atguigu;

import com.atguigu.config.AtguiguSpringConfiguration;
import com.atguigu.controller.SoldierController;
import com.atguigu.pojo.Soldier;
import org.junit.Test;
import org.junit.runner.RunWith;
import org.springframework.beans.factory.annotation.Autowired;
import org.springframework.context.ApplicationContext;
import org.springframework.context.support.ClassPathXmlApplicationContext;
import org.springframework.test.context.ContextConfiguration;
import org.springframework.test.context.junit4.SpringJUnit4ClassRunner;

import java.sql.SQLException;

/*
 * 目标:在单元测试类中注入要测试的对象,这样就不需要自己创建核心容器了,也不需要自己调用getBean()方法从核心容器中获取对象了
 *
 * 实现方案:使用Spring整合Junit单元测试
 * 实现步骤:
 * 1. 引入spring整合Junit的依赖
 * 2. 让单元测试类依赖SpringJUnit4ClassRunner来运行:在测试类上添加@RunWith(SpringJUnit4ClassRunner.class)
 * 3. 加载配置文件或者配置类: 在测试类上添加@ContextConfiguration(classes = AtguiguSpringConfiguration.class)
 */
@RunWith(SpringJUnit4ClassRunner.class)
@ContextConfiguration(classes = AtguiguSpringConfiguration.class)
public class SpringIOCTest {

    @Autowired
    private SoldierController soldierController;

    @Test
    public void test02() throws SQLException {
        soldierController.findAll();
    }

    @Test
    public void test01() throws SQLException {
        ApplicationContext aot = new ClassPathXmlApplicationContext("spring.xml");
        SoldierController soldierController = aot.getBean(SoldierController.class);
        soldierController.findAll();

    }

}
如果是使用的配置文件:
@RunWith(SpringJUnit4ClassRunner.class)
@ContextConfiguration("classpath:spring-application.xml")
public class TestSpringAnnotation {
    @Autowired
    private UserController userController;
    @Test
    public void testPrintConnection(){
        userController.printConnection();
    }
}
7.内容总结
- 包扫描: 指定要进行组件扫描的包
- 基础扫描(用的最多)
- 指定模式的扫描
- 排除某些注解
- 只扫描某些注解
- IOC 注解:
- Component注解: 三层结构之外的其他类使用
- Controller注解: 表现层的类使用
- Service注解: 业务层的类使用
- Repository注解: 持久层的类使用
- 依赖注入注解:
- 注入Bean:
- Autowired注解,它是byType进行自动注入,如果要byName必须结合Qualifier注解一起使用
- Resource注解,它默认是byName进行自动注入
- 注入简单类型: Value注解,以及使用PropertySource注解引入外部的properties文件
- 注解方式和配置文件方式进行IOC和依赖注入的选择问题:
- 如果是自己写的类就使用注解方式
- 如果是第三方jar中的类就使用配置文件方式
- Spring整合Junit:
- 目的:简化单元测试
- 实现步骤:
- 引入spring-test的依赖
- Junit的依赖版本必须是4.12及以上
- 给单元测试类添加@Runwith(SpringJUnit4ClassRunner.class)
- 给单元测试类添加@ContextConfiguration(locations="配置文件的路径"或者是classes=配置类.class)
- 直接注入你想使用的IOC容器中的对象就可以直接使用了
- Spring的纯注解开发
- 目的: 为了以后学习SpringBoot做准备,我们项目如果是使用Spring做开发的话是不会用纯注解的
- 步骤:
- 配置类上要添加@Configuration注解标示为配置类
- 配置类上要添加@ComponentScan指定要扫描的包
- 如果要对第三方的类进行IOC配置
- 在配置类中创建一个方法
- 修饰符public
- 返回值是要进行IOC的对象的类型
- 方法体中编写创建IOC对象的代码
- 如果要给这个方法注入一个IOC容器中存在的对象,直接在方法的参数中声明就行了
- 给该方法添加@Bean注解
- 如果是使用纯注解开发,整合Junit的时候,@ContextConfiguration(classes=配置类.class)


 764
764


 被折叠的 条评论
为什么被折叠?
被折叠的 条评论
为什么被折叠?
 到【灌水乐园】发言


