


day03 Spring-AOP面向切面编程
1.AOP的概述
1.1 为什么需要AOP
1.1.1 情景设定
1.1.1.1 声明一个计算器接口
public interface Calculator {

    int add(int i, int j);

    int sub(int i, int j);

    int mul(int i, int j);

    int div(int i, int j);

}
1.1.1.2 给接口声明一个纯净版实现类

package com.atuigu;

/**
 * 计算器接口的实现类
 */

public class CalculatorPureImpl implements Calculator {
    @Override
    public int add(int i, int j) {
        return i + j;
    }

    @Override
    public int sub(int i, int j) {
        return i - j;
    }

    @Override
    public int mul(int i, int j) {
        return i * j;
    }

    @Override
    public int div(int i, int j) {
        return i / j;
    }
}
1.1.1.3 需求
在计算器的每个方法执行前后加入日志打印
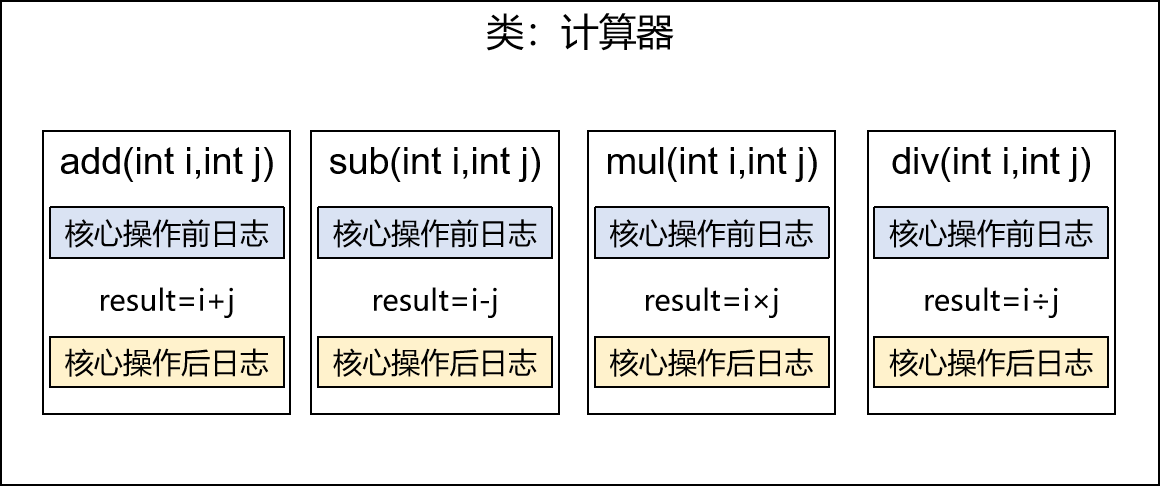
1.1.1.4 实现方案探讨
方案一:在每个方法的前后都加上日志打印的代码
方案二:创建一个工具类,将日志打印的代码写在工具类中,然后再每个方法的前后直接调用工具类中的方法打印日志
方案三:创建一个父类,在父类的方法中打印日志,子类重写父类的方法(对目前功能不适用)
方案四:动态代理
方案五:AOP
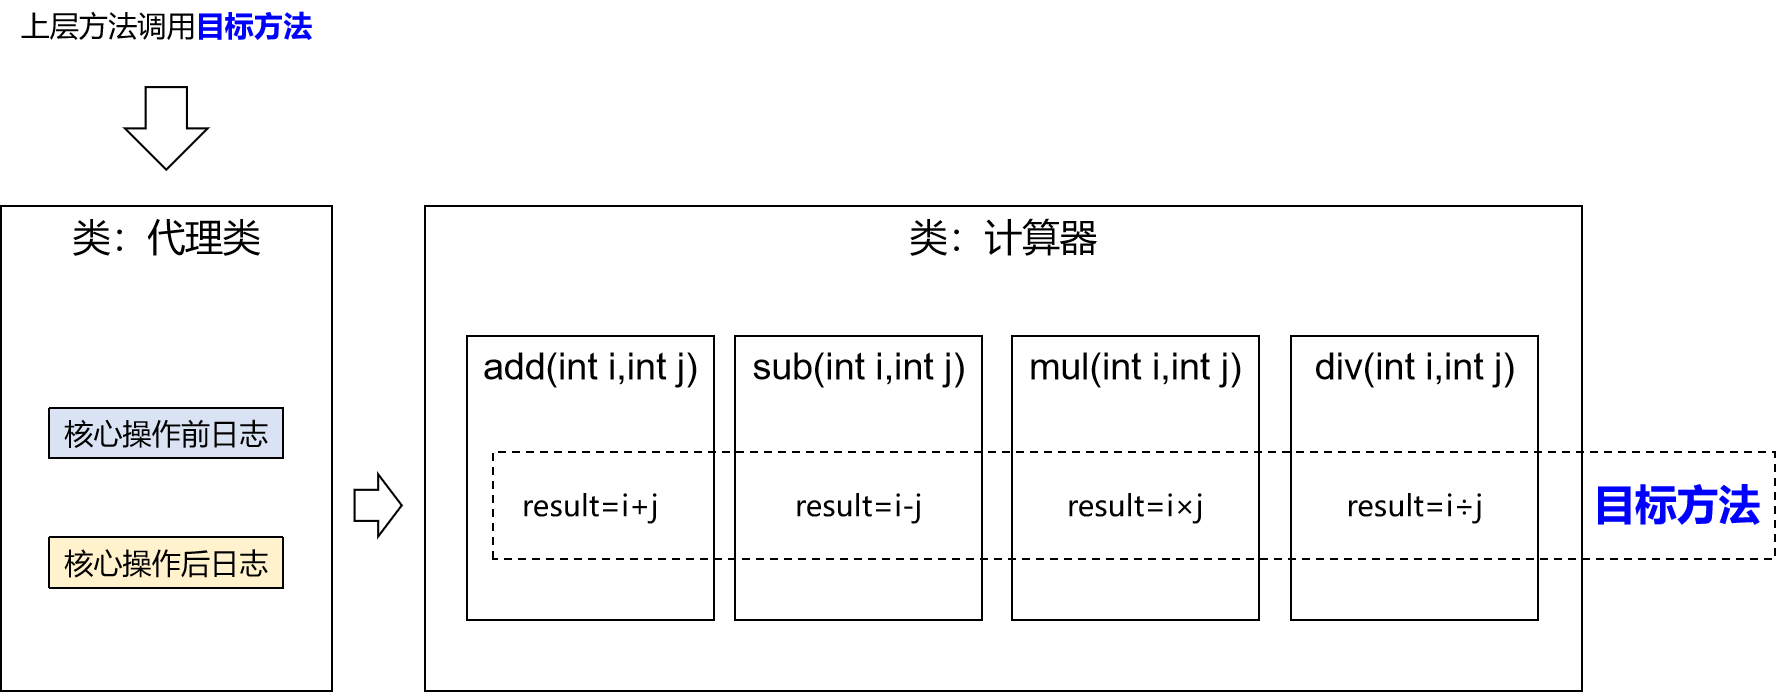
2.代理模式
2.1 概念
二十三种设计模式中的一种,属于结构型模式。它的作用就是通过提供一个代理类,让我们在调用目标方法的时候,不再是直接对目标方法进行调用,而是通过代理类间接调用。让不属于目标方法核心逻辑的代码从目标方法中剥离出来——解耦。调用目标方法时先调用代理对象的方法,减少对目标方法的调用和打扰,同时让附加功能能够集中在一起也有利于统一维护。
未经过代理的情况:

使用了代理模式的情况:

2.2 相关术语
- 代理: 又称之为代理者,用于将非核心逻辑剥离出来以后,封装这些非核心逻辑的类、对象、方法
- 目标: 又称之为被代理者,用于执行核心逻辑,并且将代理者的非核心逻辑代码套用在目标类、对象、方法上
2.3 静态代理
2.3.1 创建静态代理类:
先添加依赖包
    <dependencies>
        <dependency>
            <groupId>junit</groupId>
            <artifactId>junit</artifactId>
            <version>4.13</version>
            <scope>test</scope>
        </dependency>

        <dependency>
            <groupId>org.springframework</groupId>
            <artifactId>spring-context</artifactId>
            <version>5.3.1</version>
        </dependency>

        <dependency>
            <groupId>org.springframework</groupId>
            <artifactId>spring-test</artifactId>
            <version>5.3.1</version>
        </dependency>
    </dependencies>
创建代理类
package com.atuigu.proxy;

import com.atuigu.Calculator;
import org.springframework.beans.factory.annotation.Autowired;
import org.springframework.stereotype.Component;

/**
 * 代理类
 */
@Component
public class CalculatorProxy implements Calculator {

    // 自动装配 根据类型进行依赖注入
    @Autowired
    private Calculator calculator;

    @Override
    public int add(int i, int j) {
        System.out.println("日志 add 方法开始了,参数是:" + i + "," + j);
        // 调用代理对象的核心方法
        int result = calculator.add(i, j);
        System.out.println("日志 add 方法结束了,结果是:" + result);
        return result;
    }

    @Override
    public int sub(int i, int j) {
        System.out.println("日志 sub 方法开始了,参数是:" + i + "," + j);
        // 调用代理对象的核心方法
        int result = calculator.sub(i, j);
        System.out.println("日志 sub 方法结束了,结果是:" + result);
        return result;
    }

    @Override
    public int mul(int i, int j) {
        System.out.println("日志 mul 方法开始了,参数是:" + i + "," + j);
        // 调用代理对象的核心方法
        int result = calculator.mul(i, j);
        System.out.println("日志 mul 方法结束了,结果是:" + result);
        return result;
    }

    @Override
    public int div(int i, int j) {
        System.out.println("日志 div 方法开始了,参数是:" + i + "," + j);
        // 调用代理对象的核心方法
        int result = calculator.div(i, j);
        System.out.println("日志 div 方法结束了,结果是:" + result);
        return result;
    }
}
2.3.2 测试结果
package com.atguigu;
import com.atuigu.Calculator;
import com.atuigu.proxy.CalculatorProxy;
import org.junit.Test;
import org.junit.runner.RunWith;
import org.springframework.beans.factory.annotation.Autowired;
import org.springframework.test.context.ContextConfiguration;
import org.springframework.test.context.junit4.SpringJUnit4ClassRunner;
import javax.annotation.Resource;
@RunWith(SpringJUnit4ClassRunner.class)
@ContextConfiguration(locations = "classpath:spring.xml")
public class CalculatorTest {
// 自动装配 根据类型匹配
@Autowired
private CalculatorProxy calculatorProxy;
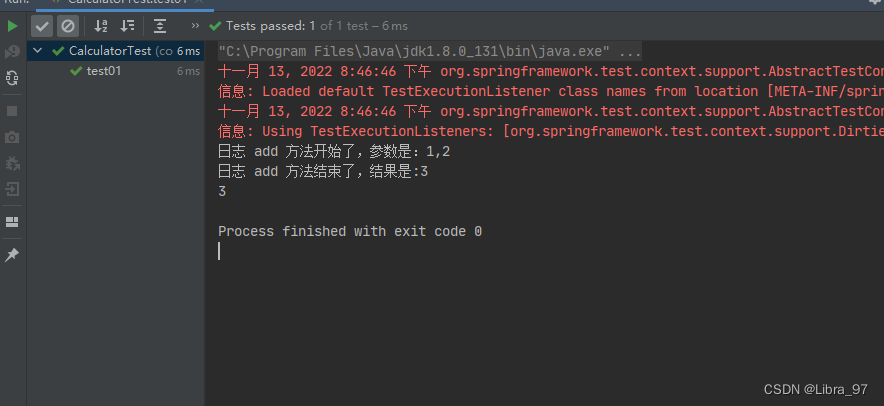
@Test
public void test01(){
System.out.println(calculatorProxy.add(1, 2));
}
}
实现需求
2.3.3 问题思考
静态代理确实实现了解耦,但是由于代码都写死了,完全不具备任何的灵活性。就拿日志功能来说,将来其他地方也需要附加日志,那还得再声明更多个静态代理类,那就产生了大量重复的代码,日志功能还是分散的,没有统一管理。
提出进一步的需求:将日志功能集中到一个代理类中,将来有任何日志需求,都通过这一个代理类来实现。这就需要使用动态代理技术了。
2.4 动态代理
2.4.1 创建生产代理对象的工厂类
JDK本身就支持动态代理,这是反射技术的一部分。下面我们还是创建一个代理类(生产代理对象的工厂类)
package com.atuigu.proxy;

import com.atuigu.Calculator;

import java.lang.reflect.InvocationHandler;
import java.lang.reflect.Method;

/**
 * 在此类中编写代理规则
 */
public class AtguiguInvocationHandler<T> implements InvocationHandler {
    // 被代理者
    private T t;

    public AtguiguInvocationHandler(T t) {
        this.t = t;
    }

    @Override
    public Object invoke(Object proxy, Method method, Object[] args) throws Throwable {
        // 1.invoke()方法它会在代理对象调用任何方法的时候都执行,所以我们在invoke()方法中编写代理规则
        // 参数一 proxy:指定的是代理对象
        // 参数二 method:指定的是代理对象调用的方法
        String methodName = method.getName();
        // 参数三 args:指定的是代理对象调用的方法传入的参数

        // 编写代理的规则
        // 1.如果被代理者是Calculator接口的实现类,并且调用的方法不是Object类的方法(就表示调用的是加减乘除方法)
        if (t instanceof Calculator && !Object.class.equals(method.getDeclaringClass())){
            System.out.println("日志" + methodName + "方法开始了,参数是:" + args[0] + "," + args[1]);
            // 调用被代理者的方法
            Object result = method.invoke(t, args);
            System.out.println("日志" + methodName + "方法结束了,参数是:" + result);
        }
        // 表示调用不是我们需要代理的方法,按照原本的方法执行
        return method.invoke(t, args);
    }
}
package com.atuigu.proxy;

import java.lang.reflect.Proxy;

public class ProxyFactory<T> {
    // 被代理者
    private final T t;
    // 创建代理工厂的时候将代理者传进来

    public ProxyFactory(T t) {
        this.t = t;
    }

    // 创建代理对象
    public T newInstance(AtguiguInvocationHandler<T> atguiguInvocationHandler){
        // Proxy.newProxyInstance(类加载器对象,要代理的接口的字节码对象数组,InvocationHandler接口的实现类对象)就是JDK提供的动态代理的API
        // 参数一:类加载器,我们可以使用被代理对象的类加载器
        // 1.获取被代理对象的字节码对象
        Class<?> clazz = t.getClass();
        // 2.使用被代理对象的字节码对象获取类加载器
        ClassLoader classLoader = clazz.getClassLoader();
        // 参数二:要代理的接口的字节码对象数组,我们可以使用被代理者对象实现的接口的数组
        // 3.使用被代理者的字节码对象获取被代理者实现的接口的数组
        Class<?>[] interfaces = clazz.getInterfaces();
        // 参数三:InvocationHandler接口的实现类对象,我们可以创建一个InvocationHandler接口的实现类
        // 转成代理类型
        return (T) Proxy.newProxyInstance(classLoader, interfaces, atguiguInvocationHandler);

    }
}
2.4.2 测试
package com.atguigu;
import com.atuigu.Calculator;
import com.atuigu.CalculatorPureImpl;
import com.atuigu.proxy.AtguiguInvocationHandler;
import com.atuigu.proxy.ProxyFactory;
import org.junit.Test;
import org.junit.runner.RunWith;
import org.springframework.beans.factory.annotation.Autowired;
import org.springframework.test.context.ContextConfiguration;
import org.springframework.test.context.junit4.SpringJUnit4ClassRunner;
@RunWith(SpringJUnit4ClassRunner.class)
@ContextConfiguration(locations = "classpath:spring.xml")
public class CalculatorTest {
// 自动装配 根据类型匹配
@Autowired
private CalculatorPureImpl calculatorPure;
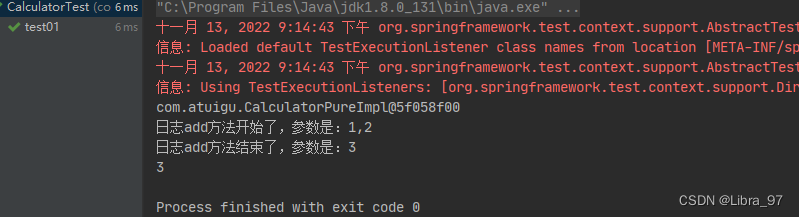
@Test
public void test01(){
// calculatorPure是被代理对象
// 1.创建代理工厂
ProxyFactory<Calculator> calculatorProxyFactory = new ProxyFactory<>(calculatorPure);
// 2.创建代理对象
Calculator proxyCalculatorPure = calculatorProxyFactory.newInstance(new AtguiguInvocationHandler<>(this.calculatorPure));
// 3.代理方法调用方法
// 调用Object方法并不会进行代理,没有在方法执行前后添加日志
System.out.println(proxyCalculatorPure.toString());
System.out.println(proxyCalculatorPure.add(1, 2));
}
}
3.AOP的相关概念
3.1 概念
AOP:Aspect Oriented Programming 面向切面编程
3.2 作用
- 简化代码:把目标方法中固定位置的重复的代码抽取出来,让目标方法更专注于自己的核心功能,提高内聚性。
- 代码增强:把抽取出来的特定的功能封装到切面类中,看哪里有需要,就往上套,被套用了切面逻辑的方法就被切面给增强了。
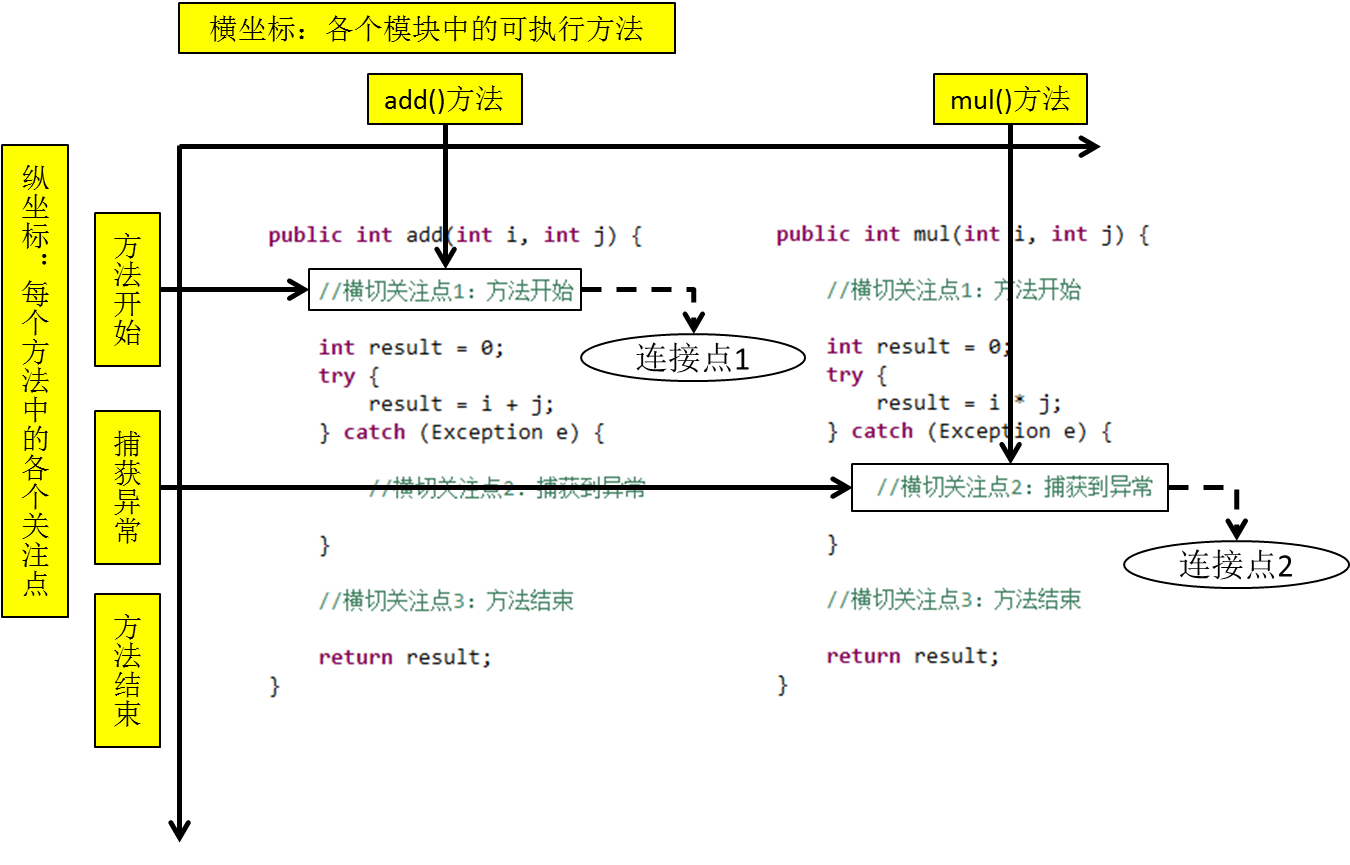
3.3 AOP的核心思路
3.4 AOP的相关术语
3.4.1 横切关注点(了解)
横切关注点是从每个方法中抽取出来的同一类非核心业务。在同一个项目中,我们可以使用多个横切关注点对相关方法进行多个不同方面的增强。
这个概念不是语法层面天然存在的,而是根据附加功能的逻辑上的需要:有十个附加功能,就有十个横切关注点。
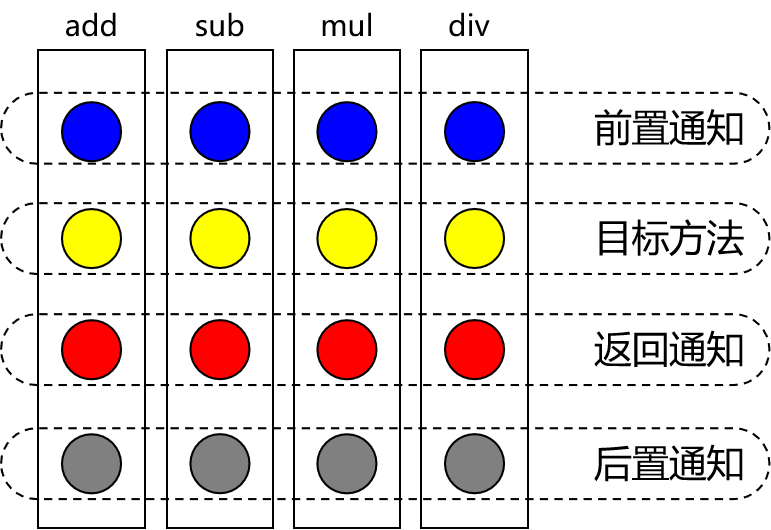
3.4.2 通知
每一个横切关注点上要做的事情都需要写一个方法来实现,这样的方法就叫通知方法。
- 前置通知:在被代理的目标方法前执行
- 返回通知:在被代理的目标方法成功结束后执行(寿终正寝)
- 异常通知:在被代理的目标方法异常结束后执行(死于非命)
- 后置通知:在被代理的目标方法最终结束后执行(盖棺定论)
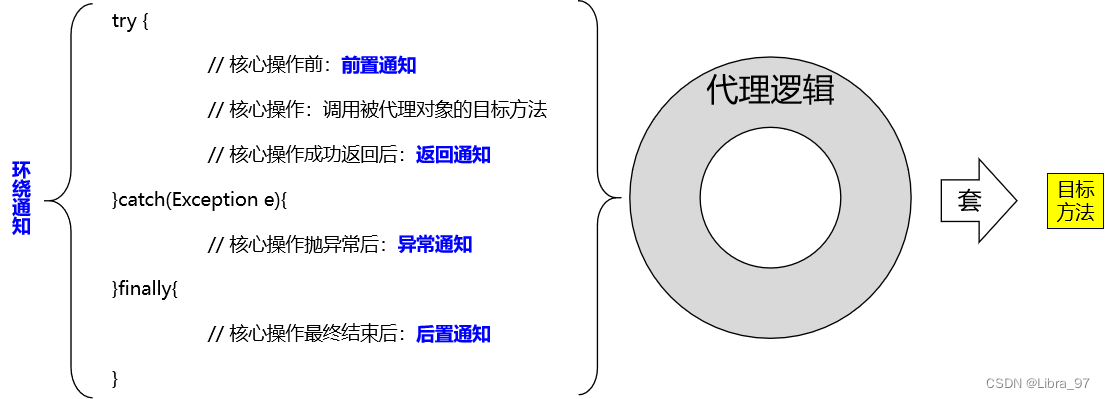
- 环绕通知:使用try…catch…finally结构围绕整个被代理的目标方法,包括上面四种通知对应的所有位置
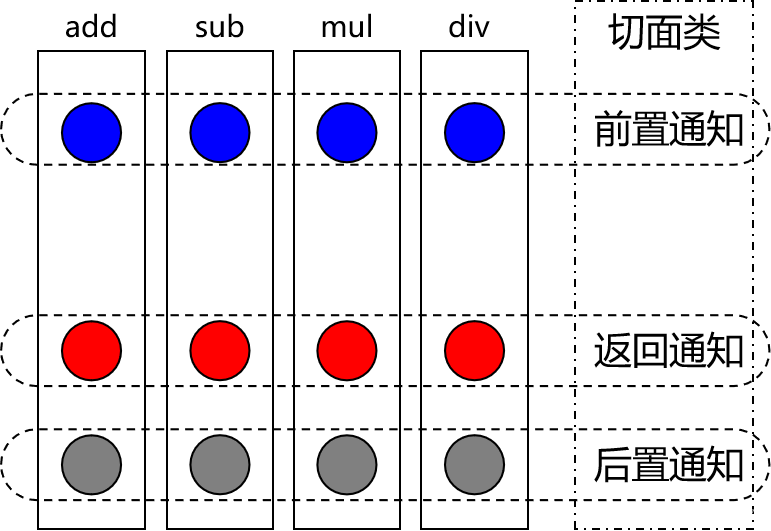
3.4.3 切面
封装通知方法的类。
3.4.4 目标
被代理的目标对象,执行核心业务代码的那个对象
3.4.5 代理(了解)
向目标对象应用通知之后创建的代理对象
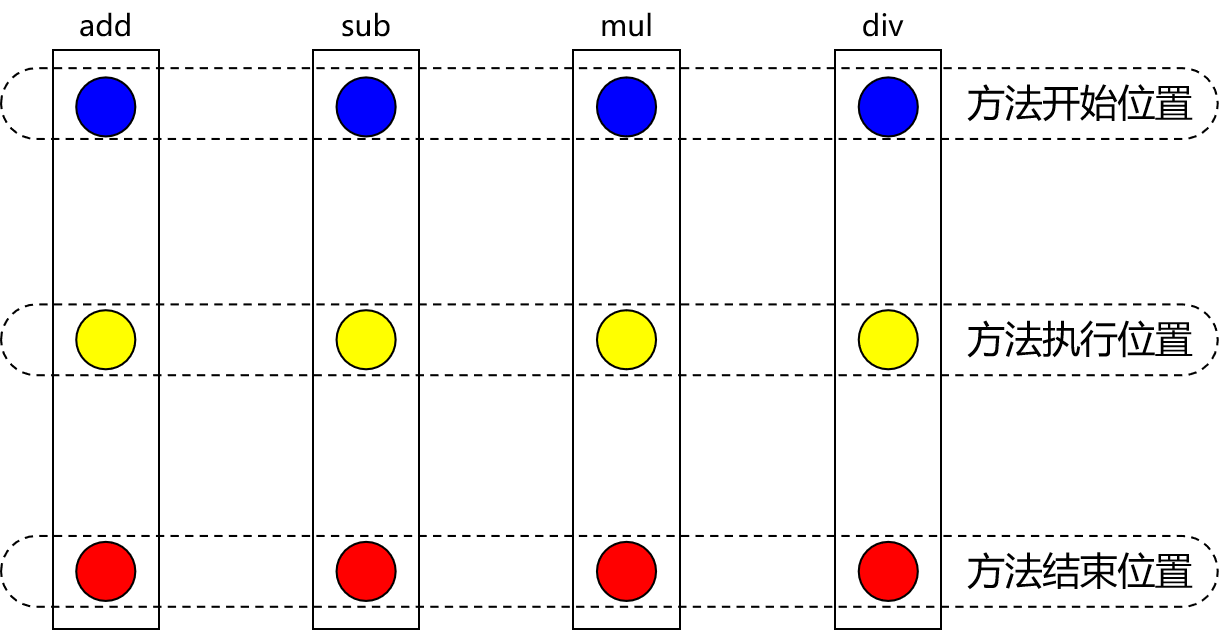
3.4.6连接点(了解)
这也是一个纯逻辑概念,不是语法定义的。
把方法排成一排,每一个横切位置看成x轴方向,把方法从上到下执行的顺序看成y轴,x轴和y轴的交叉点就是连接点。连接点其实就是各个方法中可以被增强或修改的点
3.4.7 切入点
每个类的方法中都包含多个连接点,所以连接点是类中客观存在的事物(从逻辑上来说)。而切入点指的则是方法中真正要去配置增强或者配置修改的地方
4 基于注解方式配置AOP
4.1 加入依赖
在IOC所需依赖基础上载入下面依赖即可
    <dependencies>
        <dependency>
            <groupId>junit</groupId>
            <artifactId>junit</artifactId>
            <version>4.13</version>
            <scope>test</scope>
        </dependency>

        <dependency>
            <groupId>org.springframework</groupId>
            <artifactId>spring-context</artifactId>
            <version>5.3.1</version>
        </dependency>

        <dependency>
            <groupId>org.springframework</groupId>
            <artifactId>spring-test</artifactId>
            <version>5.3.1</version>
            <scope>test</scope>
        </dependency>

<!--        引入aop的依赖-->
        <dependency>
            <groupId>org.springframework</groupId>
            <artifactId>spring-aspects</artifactId>
            <version>5.3.1</version>
        </dependency>
    </dependencies>
4.2 准备被代理的目标资源
4.2.1 接口
package com.atuigu;


/**
 * 计算器
 */
public interface Calculator {

    int add(int i, int j);

    int sub(int i, int j);

    int mul(int i, int j);

    int div(int i, int j);
}
4.2.2 接口的实现类
在Spring环境下工作,所有的一切都必须放在IOC容器中。现在接口的实现类是AOP要代理的目标类,所以它也必须放入IOC容器
package com.atuigu;

import org.springframework.stereotype.Component;

/**
 * 计算器接口的实现类
 * 被代理类
 */

@Component
public class CalculatorPureImpl implements Calculator {
    @Override
    public int add(int i, int j) {
        return i + j;
    }

    @Override
    public int sub(int i, int j) {
        return i - j;
    }

    @Override
    public int mul(int i, int j) {
        return i * j;
    }

    @Override
    public int div(int i, int j) {
        return i / j;
    }
}
4.2.3 创建切面类
package com.atuigu.aspect;

import org.aspectj.lang.annotation.*;
import org.springframework.stereotype.Component;

/**
 * Aspect注解:指定一个切面类
 * Component注解:对这个切面类进行IOC
 * <p>
 * 注解AOP的关键点:
 * 1.一定要在配置文件中加上<aop:aspectj-autoproxy></> 表示允许自动代理
 * 2.切面类一定要加上Aspect注解,并且切面类一定要进行IOC
 * 3.其他的类改进型IOC和依赖注入的就一定要进行IOC和依赖注入
 * 4.通知上一定要指定切入点(怎么使用切入点表达式描述切入点又是一个难点)
 */
@Aspect
@Component
public class LogAspect {

    // 切入点 后续再介绍
    @Before("execution(int com.atuigu.CalculatorPureImpl.* (int,int))")
    public void printLogBefore() {
        System.out.println("[前置通知]在方法执行之前打印日志...");
    }

    @AfterReturning("execution(int com.atuigu.CalculatorPureImpl.* (int,int))")
    public void printLogAfterReturning() {
        System.out.println("[返回通知]在方法执行成功之后打印日志...");    }

    @AfterThrowing("execution(int com.atuigu.CalculatorPureImpl.* (int,int))")
    public void printLogAfterThrowing() {
        System.out.println("[AOP异常通知]在方法抛出异常之后打印日志...");
    }

    @After("execution(int com.atuigu.CalculatorPureImpl.* (int,int))")
    public void printLogAfter() {
        System.out.println("[AOP后置通知]在方法最终结束之后打印日志...");
    }


}
4.2.4 创建Spring的配置文件
<?xml version="1.0" encoding="UTF-8"?>
<beans xmlns="http://www.springframework.org/schema/beans"
       xmlns:xsi="http://www.w3.org/2001/XMLSchema-instance"
       xmlns:context="http://www.springframework.org/schema/context"
       xmlns:aop="http://www.springframework.org/schema/aop"
       xsi:schemaLocation="http://www.springframework.org/schema/beans http://www.springframework.org/schema/beans/spring-beans.xsd http://www.springframework.org/schema/context https://www.springframework.org/schema/context/spring-context.xsd http://www.springframework.org/schema/aop https://www.springframework.org/schema/aop/spring-aop.xsd">
<!--    包扫描-->
    <context:component-scan base-package="com.atuigu"></context:component-scan>

<!--    开启注解AOP-->
    <aop:aspectj-autoproxy></aop:aspectj-autoproxy>

</beans>
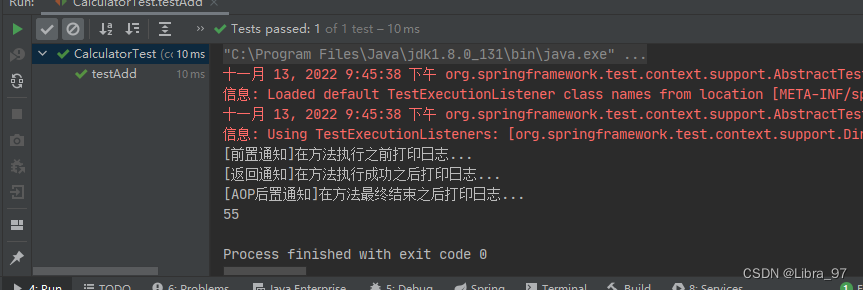
4.2.5 测试
package com.atguigu;

import com.atuigu.Calculator;
import com.atuigu.CalculatorPureImpl;
import org.junit.Test;
import org.junit.runner.RunWith;
import org.springframework.beans.factory.annotation.Autowired;
import org.springframework.test.context.ContextConfiguration;
import org.springframework.test.context.junit4.SpringJUnit4ClassRunner;

import javax.annotation.Resource;

@RunWith(SpringJUnit4ClassRunner.class)
@ContextConfiguration(locations = "classpath:spring.xml")
public class CalculatorTest {

    // 自动装配 根据类型匹配
    @Resource
    private Calculator Calculator;

    @Test
    public void testAdd(){
        System.out.println(Calculator.add(22, 33));

    }
}
4.3 通知执行顺序
- Spring版本5.3.x以前:
- 前置通知
- 目标操作
- 后置通知
- 返回通知或异常通知
- Spring版本5.3.x以后:
- 前置通知
- 目标操作
- 返回通知或异常通知
- 后置通知
4.4 在通知内部获取细节信息
4.4.1 JoinPoint接口
- 要点1:JoinPoint接口通过getSignature()方法获取目标方法的签名
- 要点2:通过目标方法签名对象获取方法名
- 要点3:通过JoinPoint对象获取外界调用目标方法时传入的实参列表组成的数组
    // 切入点表达式:告诉Sprint当前通知方法套用到哪个目标方法上
    // 在前置通知方法形参位置声明一个JoinPoint类型的参数,spring就会将这个对象传入
    // 根据JoinPoint对象就可以获取目标方法名称/实际参数列表
    @Before("execution(int com.atuigu.CalculatorPureImpl.* (int,int))")
    public void printLogBefore(JoinPoint joinPoint) {
        // 1.通过JoinPoint对象获取目标方法签名对象
        // 获取方法的签名信息
        MethodSignature methodSignature = (MethodSignature) joinPoint.getSignature();
        // 2.从方法的签名信息中,我们可以获取到很多东西
        // 2.1 获取切入点方法
        Method method = methodSignature.getMethod();
        // 2.2 获取方法的所属的类的全限定名
        Class<?> clazz = method.getDeclaringClass();
        String className = clazz.getName();
        // 2.3 获取方法名
        String methodName = method.getName();
        // 2.4 获取方法的返回值类型
        Class<?> returnType = method.getReturnType();
        String returnTypeName = returnType.getName();
        // 2.5 获取方法的参数信息
        Object[] args = joinPoint.getArgs();

        System.out.println("[前置通知]" + className + "." + methodName + "方法开始了,参数是:" + args[0] + "," + args[1]);
    }
需要获取方法签名、传入的实参等信息时,可以在通知方法声明JoinPoint类型的形参。
4.4.2 获取目标方法的方法返回值
只有在AfterReturning返回通知中才能够获取目标方法的返回值
// @AfterReturning注解标记返回通知方法
// 在返回通知中获取目标方法返回值分两步:
// 第一步:在@AfterRetruning注解中通过returnning属性设置一个名称
// 第二部:使用returning属性设置的名称在通知方法中声明一个对应的形参
@AfterReturning(value = "execution(int com.atuigu.CalculatorPureImpl.* (int,int))", returning = "result")
public void printLogAfterReturning(JoinPoint joinPoint, Object result) {
// 1.获取方法的签名信息
MethodSignature methodSignature = (MethodSignature) joinPoint.getSignature();
// 获取切入点方法
Method method = methodSignature.getMethod();
// 获取全限定名
String className = method.getDeclaringClass().getName();
// 获取方法名
String methodName = method.getName();
// 2.获取切入点执行的结果
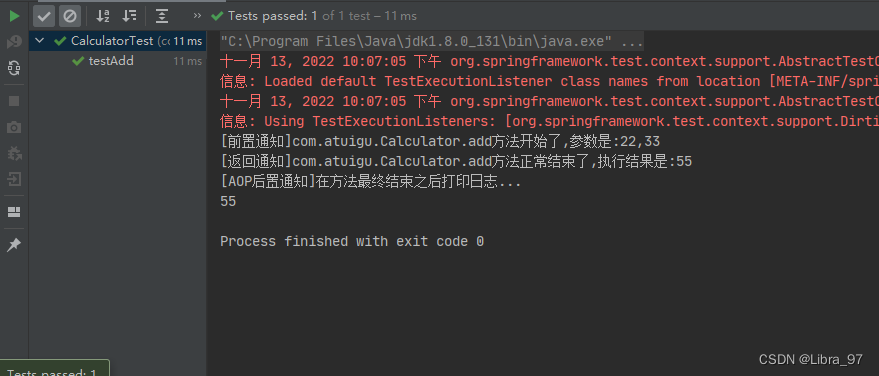
System.out.println("[返回通知]" + className + "." + methodName + "方法正常结束了,执行结果是:" + result); }
打印效果:
4.4.3 获取目标方法抛出的异常
只有在AfterThrowing异常通知中才能获取到目标方法抛出的异常
通过@AfterThrowing注解的throwing属性获取目标方法抛出的异常对象
// @AfterThrowing注解标记异常通知方法
// 在异常通知中获取目标方法抛出的异常分两步:
// 第一步:在@AfterThrowing注解中声明一个throwing属性设定形参名称
// 第二步:使用throwing属性指定的名称在通知方法声明形参,Spring会将目标方法抛出的异常对象从这里传给我们
@AfterThrowing(value = "execution(int com.atuigu.CalculatorPureImpl.* (int,int))", throwing = "throwable")
public void printLogAfterThrowing(JoinPoint joinPoint, Throwable throwable) {
// 1.获取方法的签名信息
MethodSignature methodSignature = (MethodSignature) joinPoint.getSignature();
// 获取切入点方法
Method method = methodSignature.getMethod();
// 获取全限定名
String className = method.getDeclaringClass().getName();
// 获取方法名
String methodName = method.getName();
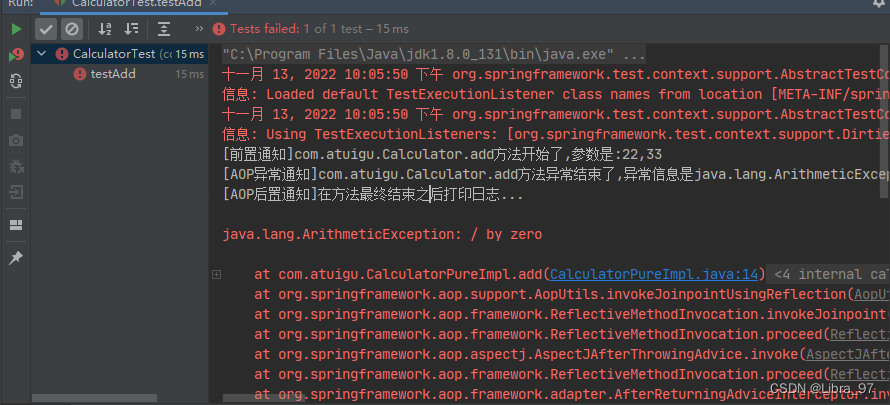
System.out.println("[AOP异常通知]" + className + "." + methodName + "方法异常结束了,异常信息是" + throwable);
}
打印效果:
4.4.4 After 目标方法执行后执行
无论是正常结束还是异常结束都会执行
    // @AfterThrowing注解通知方法
    // 不管是正常结束还是异常结束 都会执行此方法 无法获取到返回值和报错信息 因为不确定是否正常执行结束和异常结束
    @After("execution(int com.atuigu.CalculatorPureImpl.* (int,int))")
    public void printLogAfter(JoinPoint joinPoint) {
        // 1.h获取方法的签名信息
        MethodSignature methodSignature = (MethodSignature) joinPoint.getSignature();
        // 2.获取方法对象
        Method method = methodSignature.getMethod();
        // 3.获取全限定名
        String className = method.getDeclaringClass().getName();
        // 4.获取方法名
        String methodName = method.getName();

        System.out.println("[AOP后置通知]" + className +"." + methodName + "方法执行结束了");
    }
4.5 切入点
4.5.1 重用切入点
4.5.1.1 声明切入点
在一处声明切入点表达式之后,其他有需要的地方引用这个切入点表达式。易于维护,一处修改,处处生效。声明方式如下:
@Pointcut("execution(int com.atguigu.component.CalculatorPureImpl.*(int,int))")
public void calculatorPointCut(){
}
4.5.1.2 同一个类内部引用切入点
@Before("calculatorPointCut()")
public void printLogBeforeCore(JoinPoint joinPoint){
4.5.1.3 在其他类中引用切入点
@Before("com.atguigu.pointcut.AtguiguPointCut.calculatorPointCut()")
public void printLogBeforeCore(JoinPoint joinPoint){}
4.5.1.4 对项目中的所有切入点进行统一管理
而作为存放切入点表达式的类,可以把整个项目中所有切入点表达式全部集中过来,便于统一管理:
package com.atguigu.pointcut;

import org.aspectj.lang.annotation.Pointcut;
import org.springframework.stereotype.Component;

@Component
public class AtguiguPointCut {

    // 表示返回值可以任意类型 任意包中任意类的任意方法 任意参数类型和任意个数
    @Pointcut("execution(* *..*.*(..))")
    public void pt1(){}

    // 精确匹配
    @Pointcut("!execution(int com.atguigu.component.CalculatorPureImpl.add(int,int))")
    public void pt2(){}

    // 两者任意一个都可以匹配
    @Pointcut("execution(int com.atguigu.component.CalculatorPureImpl.add(int,int)) || execution(int com.atguigu.component.CalculatorPureImpl.sub(int,int))")
    public void pt3(){}

    // 两者都满足才可以匹配
    @Pointcut("!execution(int com.atguigu.component.CalculatorPureImpl.add(int,int)) && execution(int com.atguigu.component.CalculatorPureImpl.*(int,int))")
    public void pt4(){}
}
4.6 切入点表达式语法
4.6.1 切入点表达式的作用
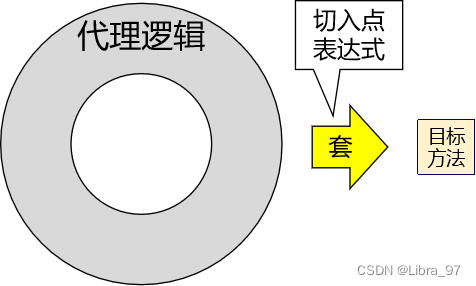
切入点表达式的作用是用于描述将代理逻辑套用在哪些目标方法上
4.6.2 语法细节
- 用*号代替“权限修饰符”和“返回值”部分表示“权限修饰符”和“返回值”不限
- 在包名的部分,一个“*”号只能代表包的层次结构中的一层,表示这一层是任意的。
- 例如:*.Hello匹配com.Hello,不匹配com.atguigu.Hello
- 在包名的部分,使用“*…”表示包名任意、包的层次深度任意
- 在类名的部分,类名部分整体用*号代替,表示类名任意
- 在类名的部分,可以使用*号代替类名的一部分
*Impl
(1). 返回值类型
① 精确
② * 表示任意返回值类型(2). 包名:
① 精确
② *. 表示一级包,包名可以任意
③ *… 表示包的层级任意,包名也任意(3). 类名:
① 精确
② * 任意类名
③ *Impl(4). 方法名:
① 精确 add
② * 任意方法名
③ select*(5). 参数:
① 精确 (int,int)
② * 表示一个参数,但是类型可以任意
③ (…) 参数的个数和类型都任意
对于execution()表达式整体可以使用三个逻辑运算符号
- execution() || execution()表示满足两个execution()中的任何一个即可
- execution() && execution()表示两个execution()表达式必须都满足
- !execution()表示不满足表达式的其他方法
4.6.3 总结

4.7 环绕通知
4.7.1 什么是环绕通知
环绕通知对应整个try…catch…finally结构,可以在目标方法的各个部位进行套用代理逻辑,它能够真正介入并改变目标方法的执行
(1). 作用位置: 切入点执行的前后
(2). 注解: @Around
4.7.2 什么情况下使用环绕通知?
在切入点执行之前,校验切入点的参数; 在切入点执行成功之后,记录切入点执行的结果; 在切入点执行出现异常之后,将异常信息记录到日志文件中。不适合用环绕通知,因为这里是多件事情
在切入点上加入事务控制: 适合使用环绕通知
(1). 开启事务
(2). 执行切入点
(3). 没有异常,则提交事务
(4). 出现异常,则回滚事务
(5). 无论出没出现异常,都需要设置connection的autoCommit为true,并且归还连接
计算切入点的执行时长: 适合使用环绕通知
(1). 获取切入点执行之前的毫秒数
(2). 执行切入点
(3). 获取切入点执行结束之后的毫秒数
(4). 两个毫秒数之间的差值就是切入点的执行时长
缓存: 适合使用环绕通知
(1). 从缓存中查询数据,如果有数据则直接返回
(2). 如果缓存中没有数据,则执行切入点从数据库查询数据
(3). 将数据库查询出来的数据存储到缓存中
(4). 返回数据库查询到的数据
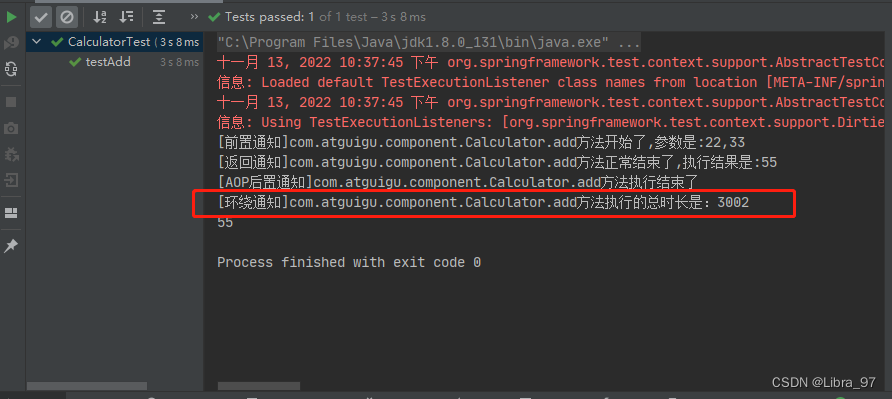
4.7.3 计算方法执行总时长
    @Around("com.atguigu.pointcut.AtguiguPointCut.pt1()")
    public Object printExecuteTime(ProceedingJoinPoint proceedingJoinPoint) throws Throwable {
        // 1.获取切入点执行前的毫秒数
        long startTime = System.currentTimeMillis();
        // 2.执行切入点
        try {
            Object result = proceedingJoinPoint.proceed();
            return result;
        } catch (Throwable e) {
            e.printStackTrace();
            throw e;
        } finally {
            // 休眠3秒
            Thread.sleep(3000);
            // 3.获取切入点执行之后的毫秒数
            long endTime = System.currentTimeMillis();
            // 4.计算执行时长
            long executeTime = endTime - startTime;
            MethodSignature methodSignature = (MethodSignature) proceedingJoinPoint.getSignature();
            String className = methodSignature.getMethod().getDeclaringClass().getName();
            String methodName = methodSignature.getMethod().getName();
            // 5.日志输出执行时长
            System.out.println("[环绕通知]" + className + "." + methodName + "方法执行的总时长是:" + executeTime);
        }
    }
测试结果
4.8 切面的优先级
4.8.1 优先级的规则
相同目标方法上同时存在多个切面时,切面的优先级控制切面的内外嵌套顺序。
- 优先级高的切面:外面
- 优先级低的切面:里面
使用@Order注解可以控制切面的优先级:
- @Order(较小的数):优先级高
- @Order(较大的数):优先级低

4.8.2 实际意义
实际开发时,如果有多个切面嵌套的情况,要慎重考虑。例如:如果事务切面优先级高,那么在缓存中命中数据的情况下,事务切面的操作都浪费了。

此时应该将缓存切面的优先级提高,在事务操作之前先检查缓存中是否存在目标数据。

4.9 CGLIB的动态代理
4.9.1 动态代理的分类
动态代理分成两种:
第一种是JDK内置的动态代理,这种动态代理需要被代理者实现接口,如果被代理者没有实现接口,那么则无法使用JDK的动态代理
第二种是CGLIB的动态代理,在被代理类没有实现任何接口的情况下,Spring会自动使用cglib技术实现代理。
4.9.2 Debug查看
4.9.2.1 没有实现接口的情况

4.9.2.2 由实现接口的情况

4.9.3 Spring中到底使用哪种动态代理
如果要创建代理对象的类实现了接口,那么就使用JDK的动态代理;如果要创建代理对象的类没有实现接口,那么就使用CGLIB的动态代理
5.基于XML方式配置AOP(了解)
5.1 准备工作
5.1.1 加入依赖
和基于注解的AOP时一样
5.1.2 准备代码
把基于注解的Module复制一份,修改Module名,并导入到工程中,然后去除所有AOP注解。
5.2 配置Spirng配置文件
<?xml version="1.0" encoding="UTF-8"?>
<beans xmlns="http://www.springframework.org/schema/beans"
       xmlns:xsi="http://www.w3.org/2001/XMLSchema-instance"
       xmlns:context="http://www.springframework.org/schema/context"
       xmlns:aop="http://www.springframework.org/schema/aop"
       xsi:schemaLocation="http://www.springframework.org/schema/beans
                           http://www.springframework.org/schema/beans/spring-beans.xsd
                           http://www.springframework.org/schema/context
                           https://www.springframework.org/schema/context/spring-context.xsd
                           http://www.springframework.org/schema/aop
                           https://www.springframework.org/schema/aop/spring-aop.xsd">
    <!--包扫描-->
    <context:component-scan base-package="com.atguigu"/>

    <!--
        使用xml方式配置AOP:
            1. 切面: 封装非核心逻辑的那个类,非核心逻辑就是封装在切面的方法中
            2. 通知: 将非核心逻辑套在核心逻辑上进行执行
            3. 切入点: 核心逻辑
    -->
    <aop:config>
        <!--
            1. 切面: ref属性就是指定作为切面的那个对象的id,order属性表示切面的优先级
        -->
        <aop:aspect id="myAspect" ref="logAspect">
            <!--2. 通知-->
            <!--配置前置通知-->
            <aop:before method="printLogBeforeCore" pointcut-ref="calculatorPoint"/>
            <!--配置返回通知-->
            <aop:after-returning method="printLogAfterReturning" pointcut-ref="calculatorPoint" returning="result"/>
            <!--配置异常通知-->
            <aop:after-throwing method="printLogAfterThrowing" pointcut-ref="calculatorPoint" throwing="throwable"/>
            <!--配置后置通知-->
            <aop:after method="printLogFinallyEnd" pointcut-ref="calculatorPoint"/>
            <!--配置环绕通知-->
            <aop:around method="printLogAround" pointcut-ref="calculatorPoint"/>
            <!--3. 切入点-->
            <aop:pointcut id="calculatorPoint"
                          expression="execution(* com.atguigu.component.CalculatorPureImpl.*(..))"/>
        </aop:aspect>
    </aop:config>
</beans>
5.3 测试
package com.atguigu;

import com.atguigu.component.Calculator;
import org.junit.Test;
import org.junit.runner.RunWith;
import org.springframework.beans.factory.annotation.Autowired;
import org.springframework.test.context.ContextConfiguration;
import org.springframework.test.context.junit4.SpringJUnit4ClassRunner;

@RunWith(SpringJUnit4ClassRunner.class)
@ContextConfiguration(locations = "classpath:spring-application.xml")
public class TestAop {
    @Autowired
    private Calculator calculator;

    @Test
    public void testAdd(){
        //调用CalculatorPureImpl对象的add()方法
        System.out.println("调用完目标方法之后获取返回值是:"+calculator.sub(5, 3));
    }
}
6. AOP总结
目标:
1. 将目标方法中的非核心业务抽取出来制作成通知
2. 在调用目标方法的核心业务的时候,底层动态自动将非核心业务套在核心业务上执行
实现目标:
-
识别出哪些地方可以抽取
-
准备一个切面类:
2.1 IOC:@Component
2.2 让他称为切面类:@Aspect
-
将抽取出来的代码封装成方法(通知),方法放在切面类中
-
让切面类中的方法称为通知
4.1 前置通知: Before
4.2 返回通知:AfterReturning
4.3 异常通知:AfterThrowing
4.4 后置通知:After
4.5 环绕通知Around
-
指定通知的作用位置(切入点):就是引用切入点
5.1 如果切入点和通知在同一个类中:根据方法名引用
5.2 如果切入点跟通知不在同一个类中:根据类的全限定名.方法名来引用
6. 声明切入点以及切入点的语法


 357
357


 被折叠的 条评论
为什么被折叠?
被折叠的 条评论
为什么被折叠?
 到【灌水乐园】发言


