


一对一关系实现员工—>部门的查询
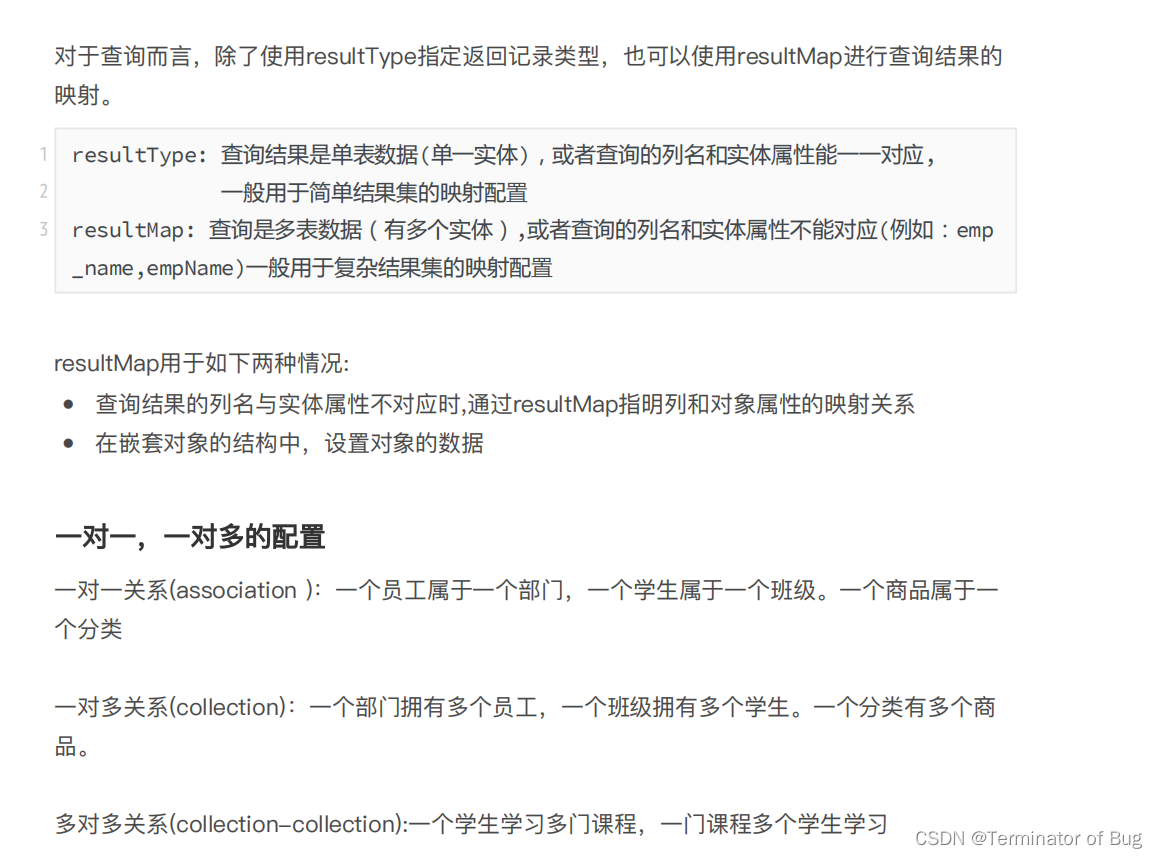
resutlType和resultMap的使用(参考文档)
实现部门和员工的查询: (参考代码)
EmpMapper.xml:
<?xml version="1.0" encoding="UTF-8"?>
<!DOCTYPE mapper PUBLIC "-//mybatis.org//DTD Mapper 3.0//EN"
        "http://mybatis.org/dtd/mybatis-3-mapper.dtd">

<mapper namespace="com.yzh7.mapper.EmpMapper">

    <resultMap id="empMap" type="emp" autoMapping="true">
        <!--id:表示表中的主键字段  column:查询表的列名 property:表示列名要映射到的实体属性-->
        <id column="emp_id" property="empId"/>
        <!--result:定义普通列和属性的映射关系-->
        <result column="emp_name" property="empName"/>
        <result column="sex" property="sex"/>
        <result column="phone" property="phone"/>
        <!--通过association标签(1对1),设置员工关联的部门对象-->
        <association property="dept" javaType="Dept" autoMapping="true">
            <id column="dept_id" property="deptId"/>
            <result column="dept_name" property="deptName"/>
            <result column="description" property="description"/>
        </association>
    </resultMap>

    <!--
    resultType:只用于单表查询,并且查询结果列名和属性可以直接对应的情况。用于简单查询映射。
    resultMap:用于多表查询,或者列名和属性映射关系负责的情况。用于复杂查询映射。
              需要通过resultMap节点,配置结果的映射关系
    -->
    <select id="listAll" resultMap="empMap">
        select e.emp_id,e.emp_name,e.sex,e.phone,
               d.dept_id,d.dept_name,d.description
        from t_emp e
        join t_dept d
        on e.dept_id = d.dept_id
    </select>
</mapper>
一对一关系实现部门和员工的查询:
效果图展示:
创建数据库/表:
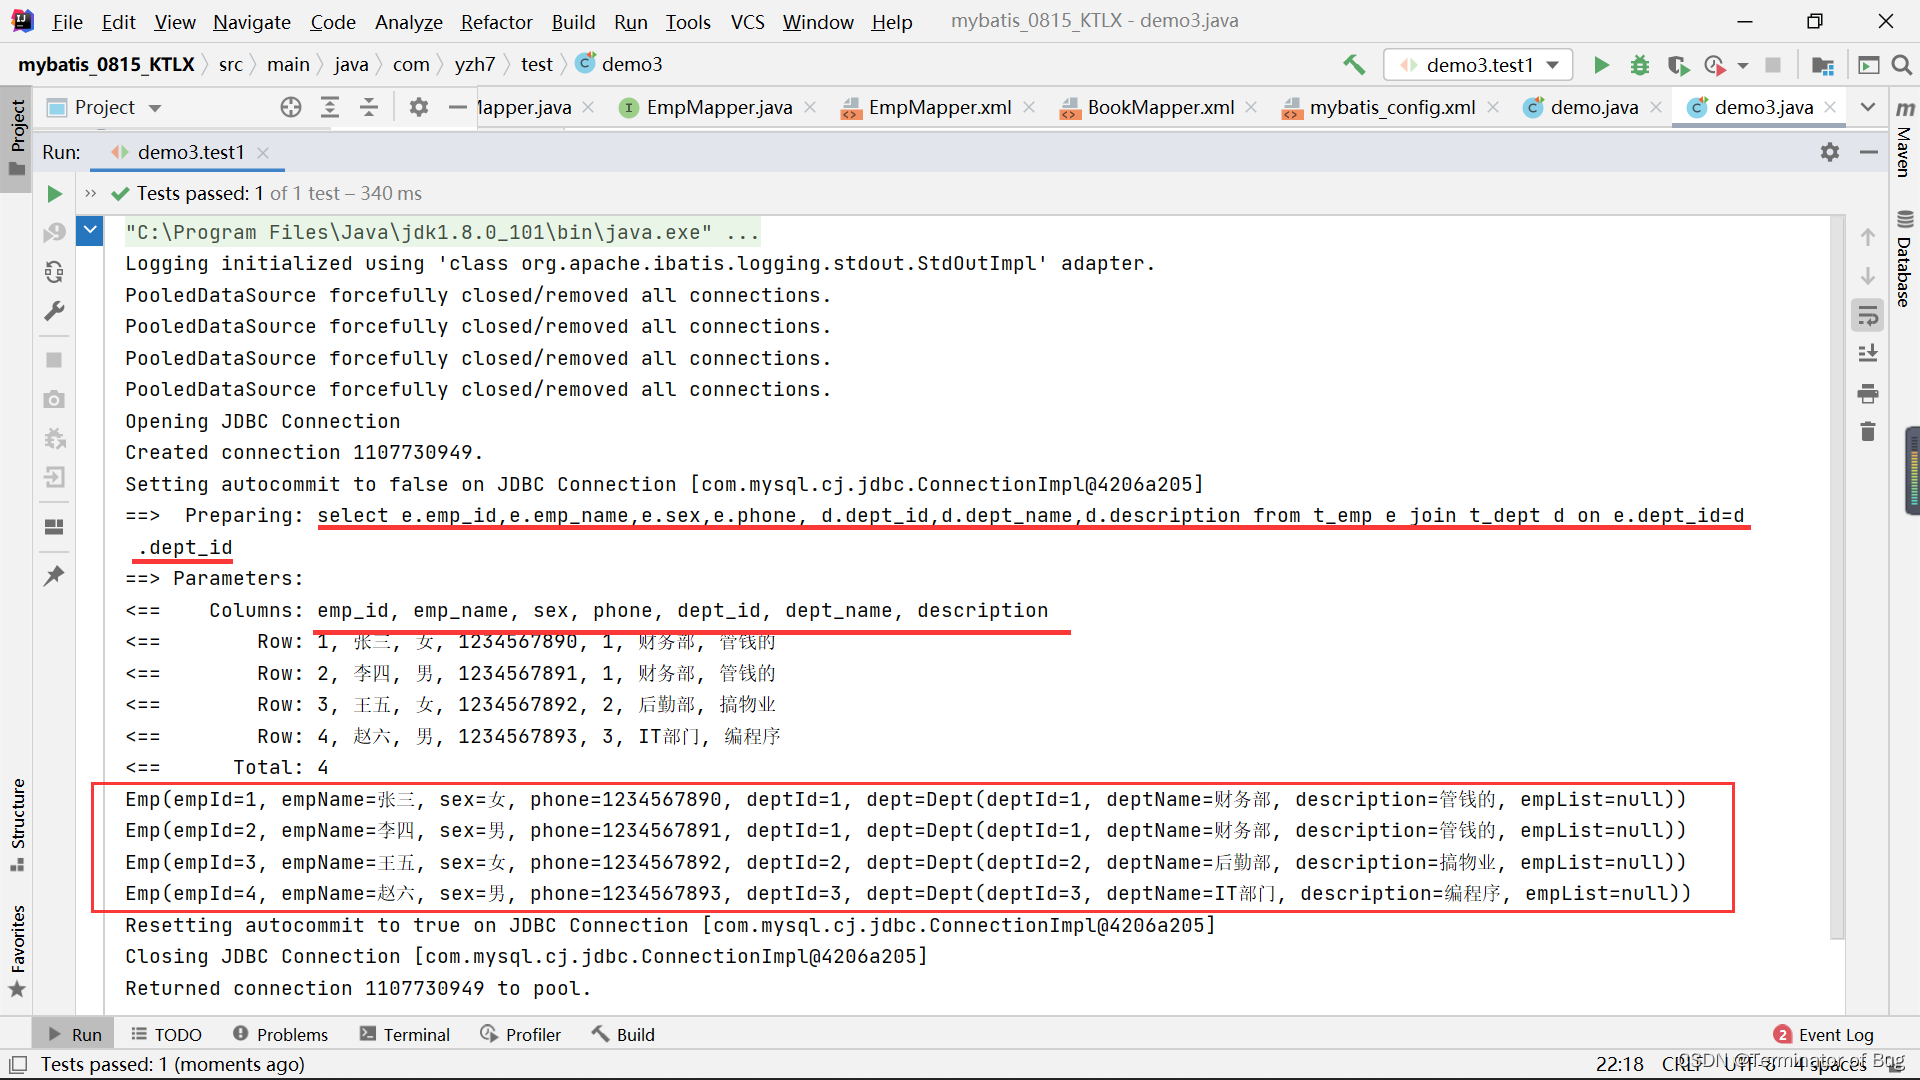
代码运行结果:
项目实现思路(参考):
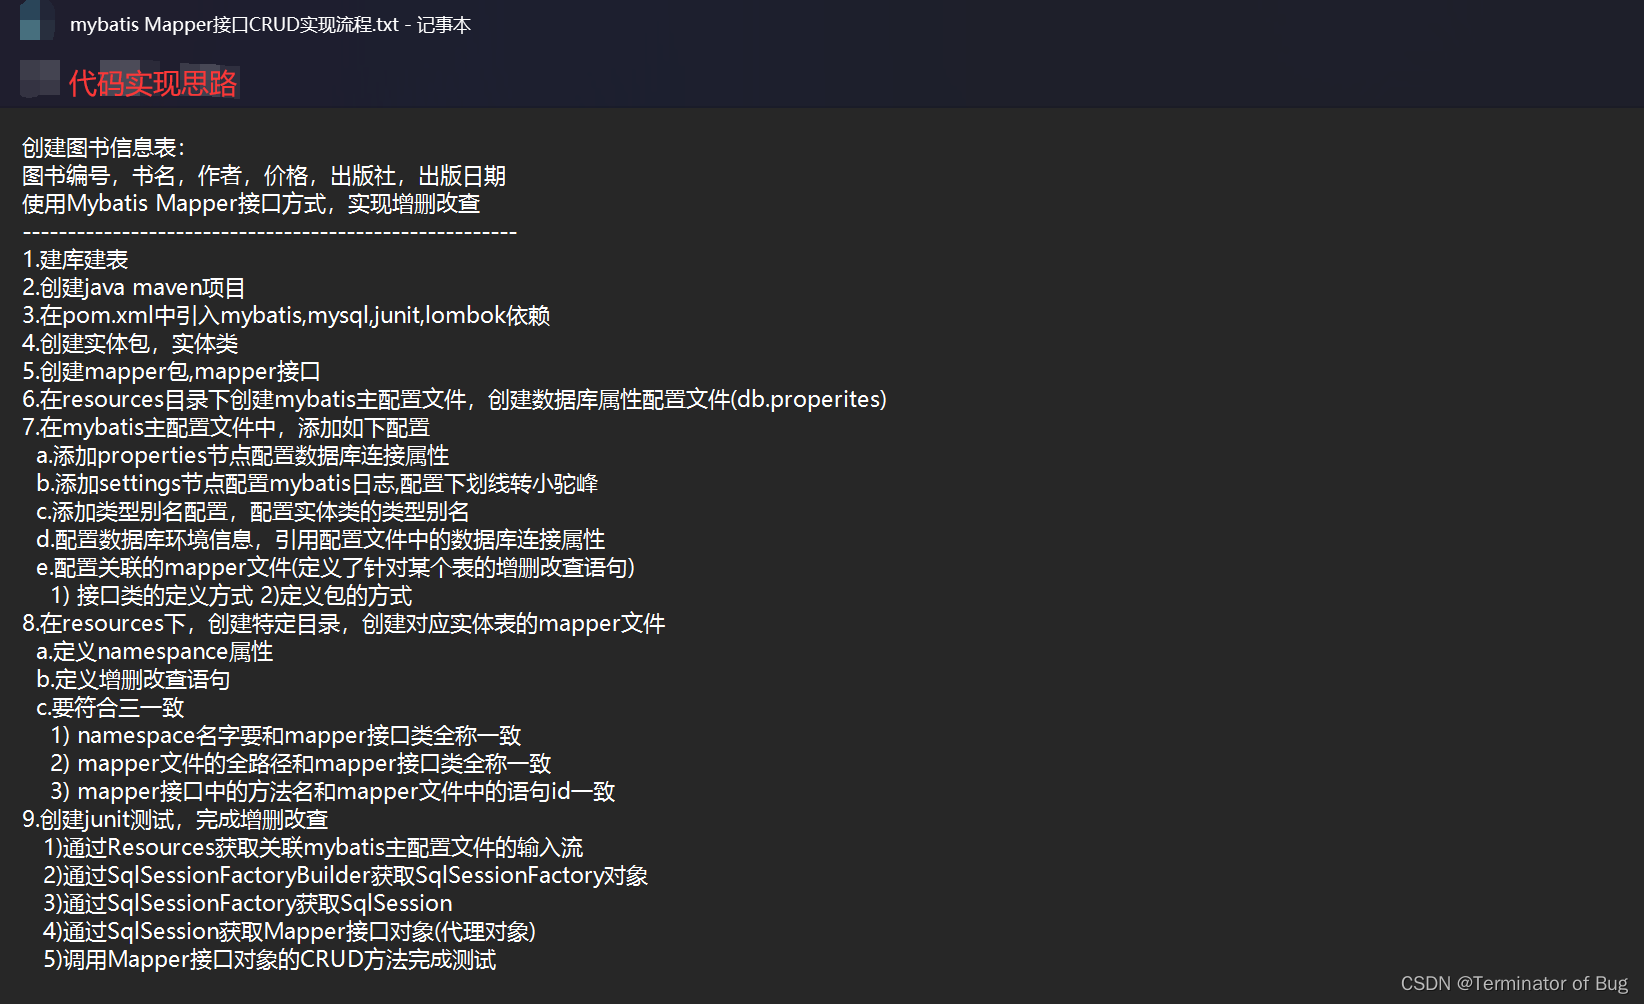
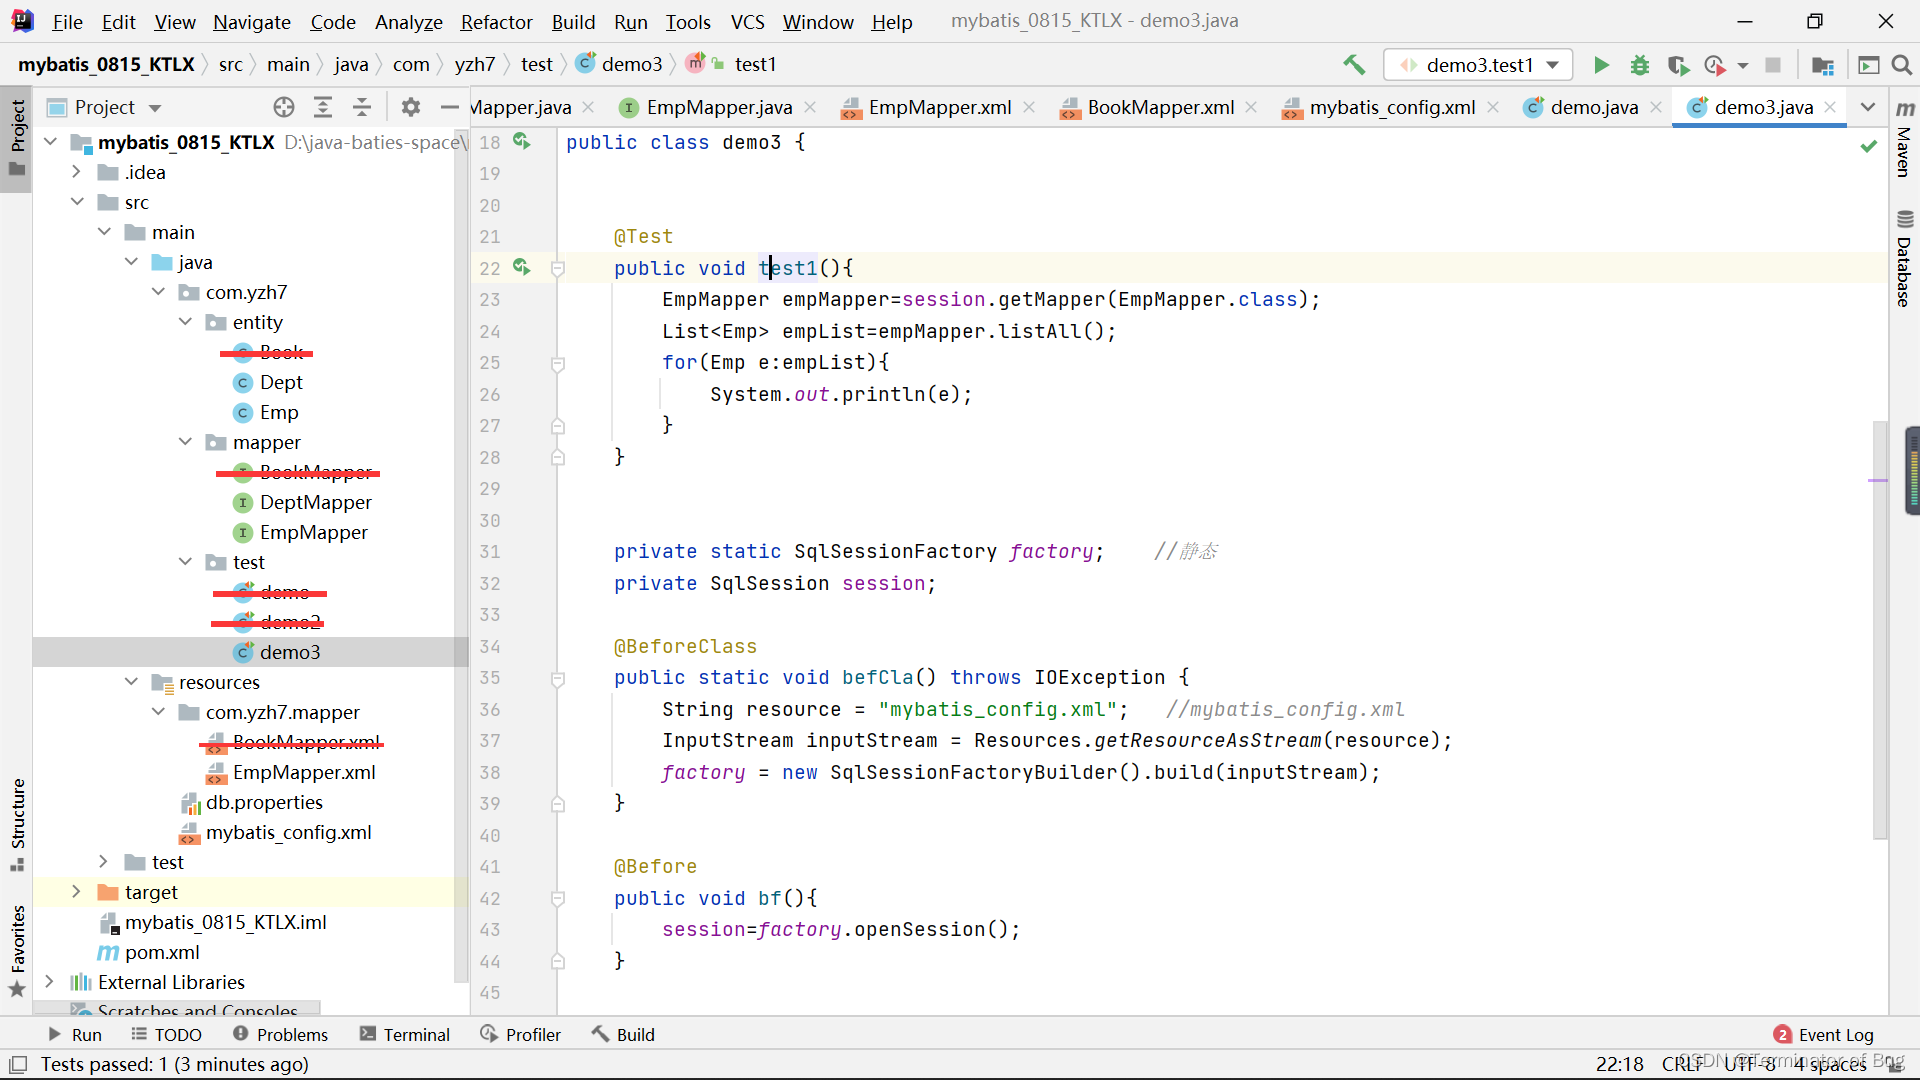
代码整体布局:
注意:
代码:
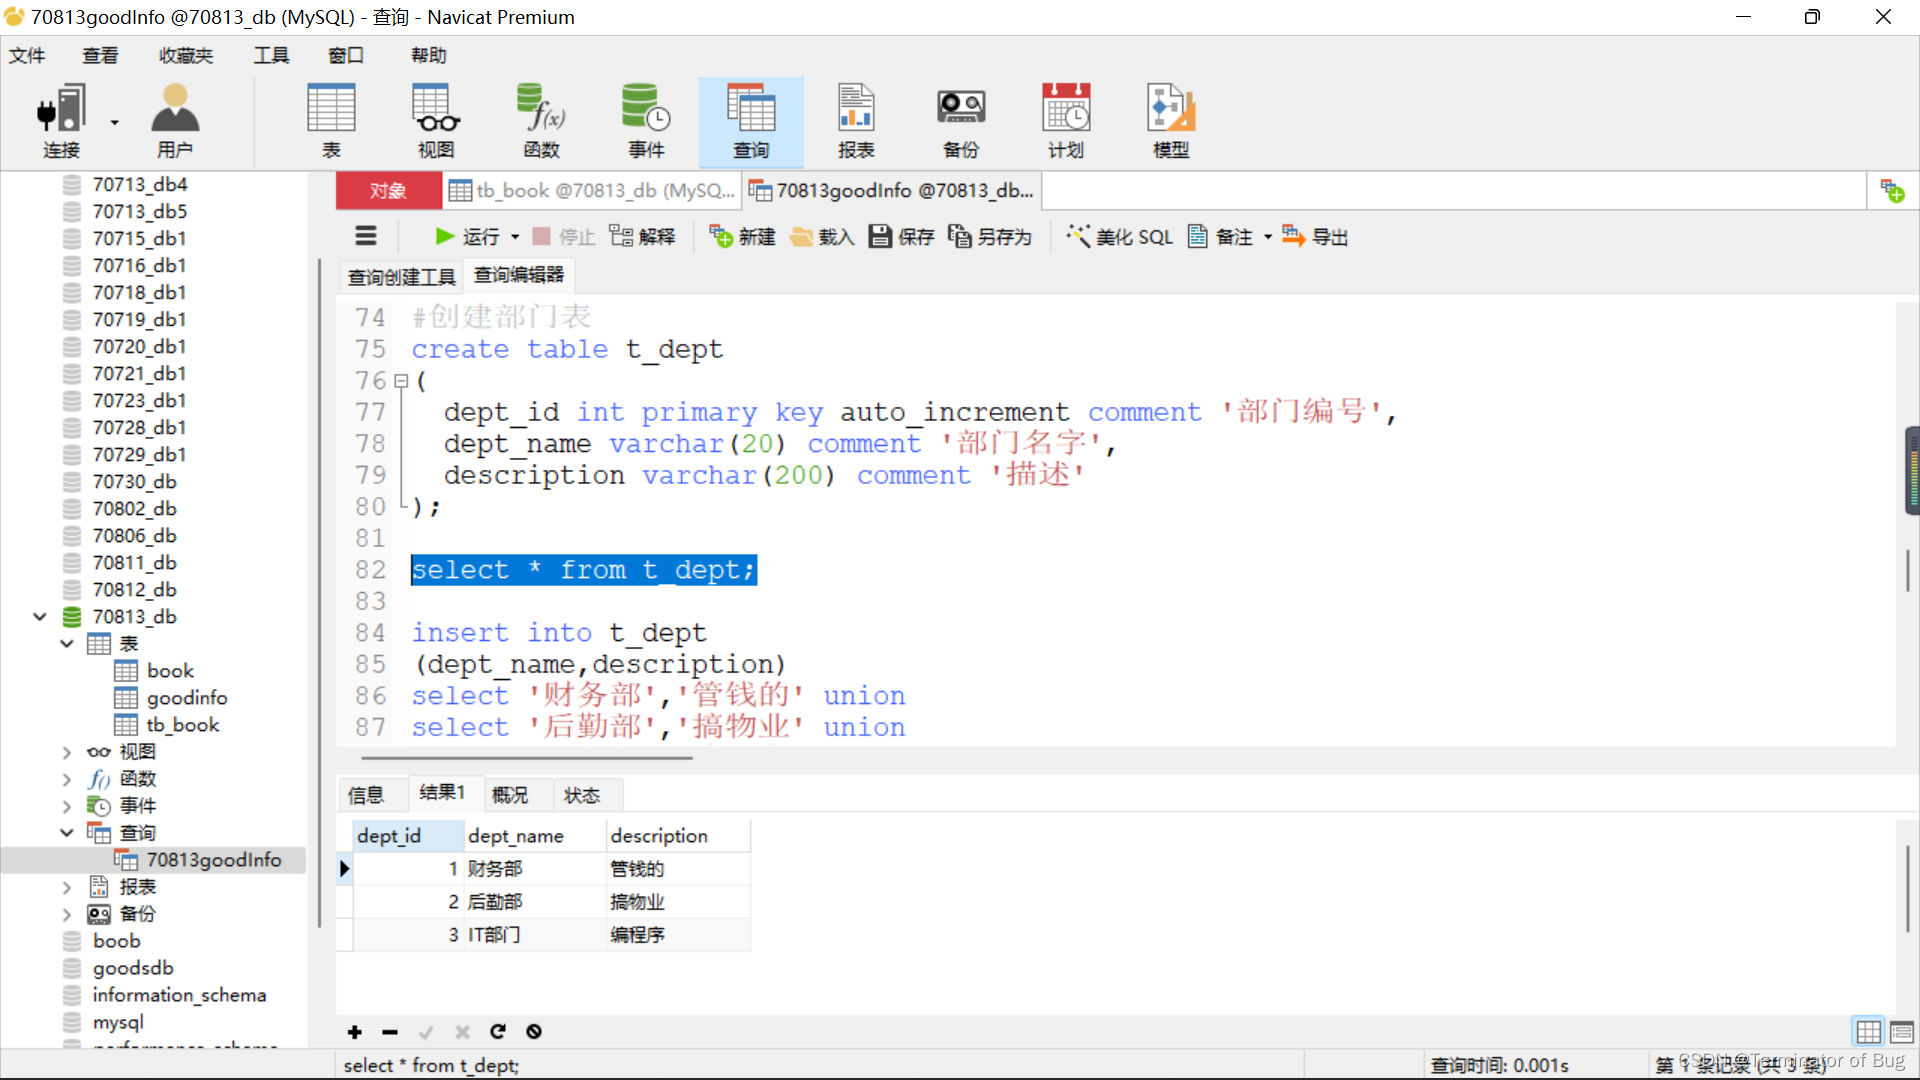
创建数据库/表:
#创建部门表
create table t_dept
(
dept_id int primary key auto_increment comment '部门编号',
dept_name varchar(20) comment '部门名字',
description varchar(200) comment '描述'
);
select * from t_dept;
insert into t_dept
(dept_name,description)
select '财务部','管钱的' union
select '后勤部','搞物业' union
select 'IT部门','编程序';
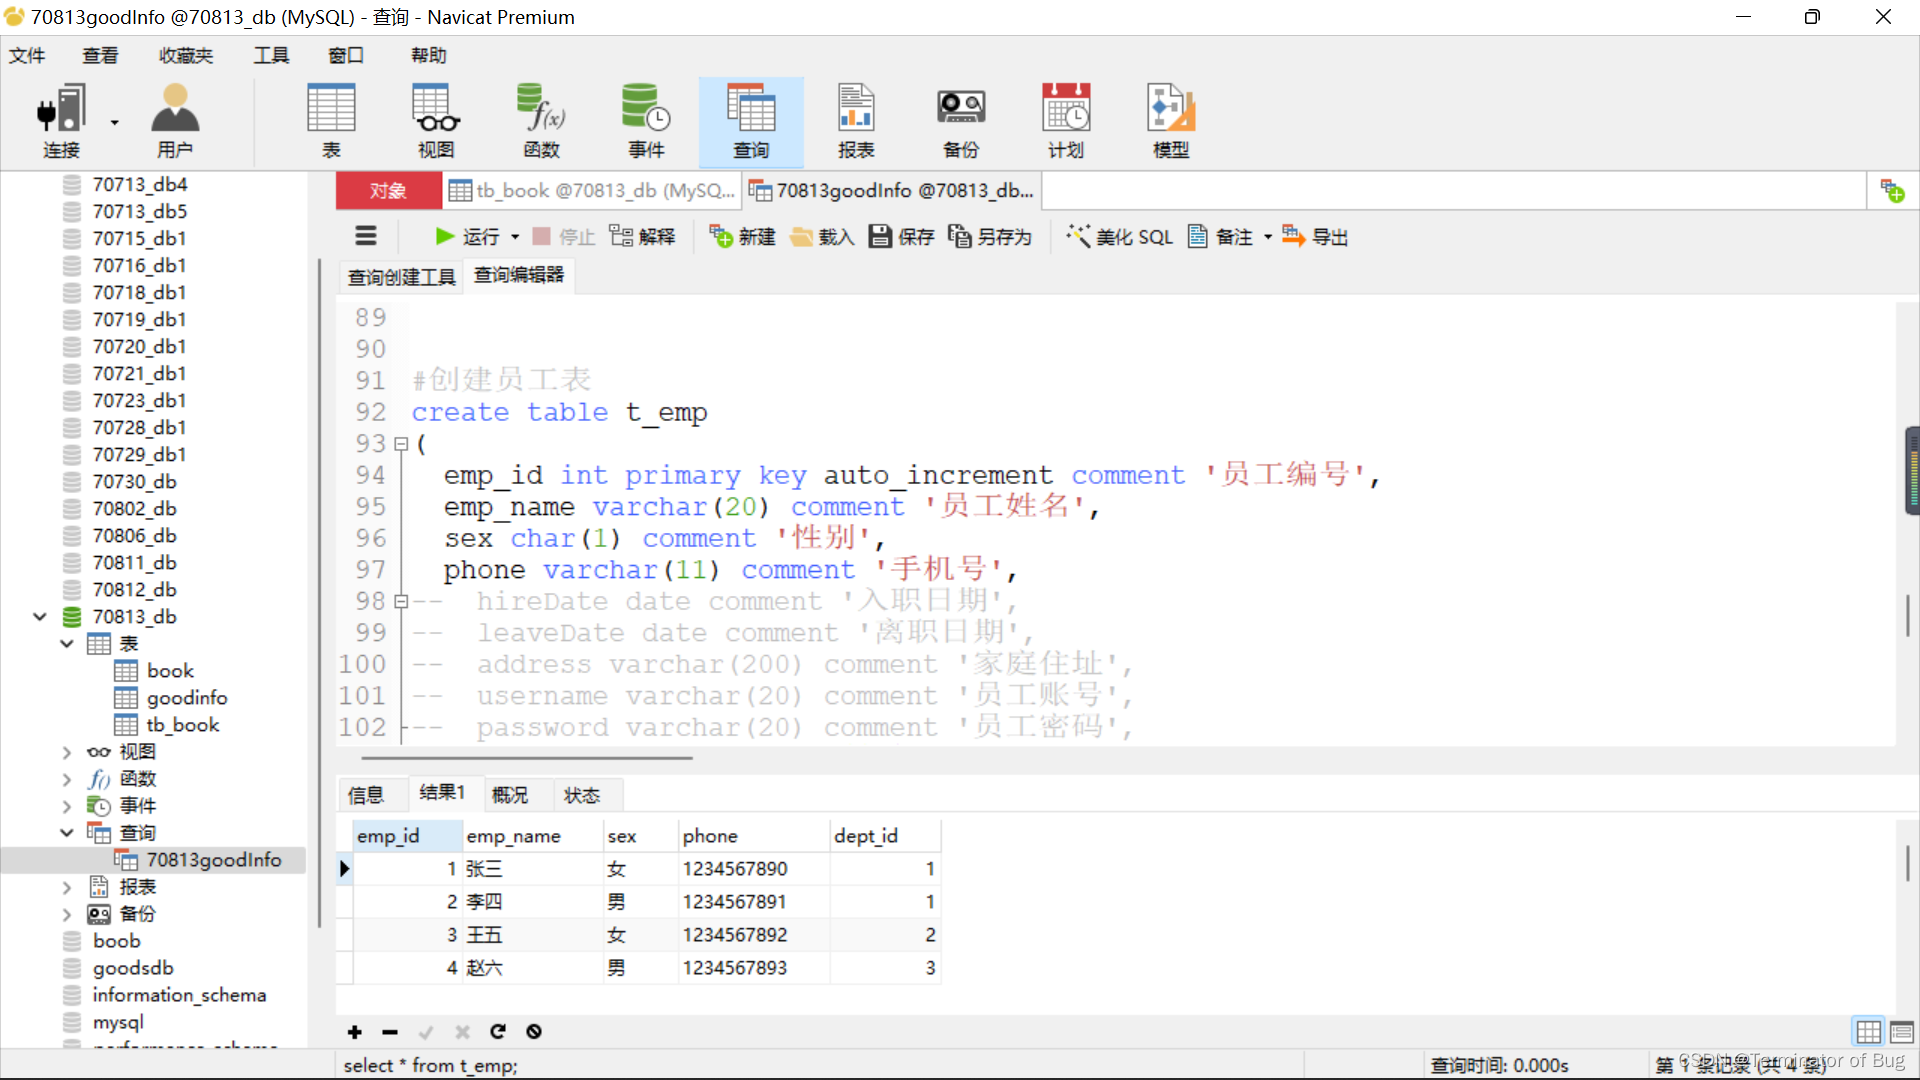
#创建员工表
create table t_emp
(
emp_id int primary key auto_increment comment '员工编号',
emp_name varchar(20) comment '员工姓名',
sex char(1) comment '性别',
phone varchar(11) comment '手机号',
-- hireDate date comment '入职日期',
-- leaveDate date comment '离职日期',
-- address varchar(200) comment '家庭住址',
-- username varchar(20) comment '员工账号',
-- password varchar(20) comment '员工密码',
dept_id int comment '所属部门'
);
select * from t_emp;
insert into t_emp
(emp_name,sex,phone,dept_id)
select '张三','女','1234567890',1 union
select '李四','男','1234567891',1 union
select '王五','女','1234567892',2 union
select '赵六','男','1234567893',3 ;
pom.xml:
<?xml version="1.0" encoding="UTF-8"?>
<project xmlns="http://maven.apache.org/POM/4.0.0"
         xmlns:xsi="http://www.w3.org/2001/XMLSchema-instance"
         xsi:schemaLocation="http://maven.apache.org/POM/4.0.0 http://maven.apache.org/xsd/maven-4.0.0.xsd">
    <modelVersion>4.0.0</modelVersion>

    <groupId>org.example</groupId>
    <artifactId>mybatis_0815_KTLX</artifactId>
    <version>1.0-SNAPSHOT</version>

    <properties>
        <maven.compiler.source>8</maven.compiler.source>
        <maven.compiler.target>8</maven.compiler.target>
    </properties>

    <!--引入jar包-->
    <dependencies>
        <!-- mybatis -->
        <dependency>
            <groupId>org.mybatis</groupId>
            <artifactId>mybatis</artifactId>
            <version>3.4.6</version>
        </dependency>

        <!-- mysql驱动类 -->
        <dependency>
            <groupId>mysql</groupId>
            <artifactId>mysql-connector-java</artifactId>
            <version>8.0.11</version>
        </dependency>
        <!--lombok-->
        <dependency>
            <groupId>org.projectlombok</groupId>
            <artifactId>lombok</artifactId>
            <version>1.18.22</version>
        </dependency>
        <!--junit-->
        <dependency>
            <groupId>junit</groupId>
            <artifactId>junit</artifactId>
            <version>4.13</version>
            <scope>compile</scope>
        </dependency>
    </dependencies>

</project>
db.properties:
jdbc.driver=com.mysql.cj.jdbc.Driver
jdbc.url=jdbc:mysql://localhost:3306/70813_db?useSSL=false&serverTimezone=Asia/Shanghai&characterEncoding=utf8&allowPublicKeyRetrieval=true
jdbc.username=root
jdbc.password=123456
mybatis_config.xml:
<?xml version="1.0" encoding="UTF-8" ?>
<!DOCTYPE configuration
PUBLIC "-//mybatis.org//DTD Config 3.0//EN"
"http://mybatis.org/dtd/mybatis-3-config.dtd">
<configuration>
<properties resource="db.properties"></properties>
<settings>
<setting name="logImpl" value="STDOUT_LOGGING"/>
<setting name="mapUnderscoreToCamelCase" value="true"/>
</settings>
<typeAliases>
<package name="com.yzh7.entity"/>
</typeAliases>
<environments default="development">
<environment id="development">
<transactionManager type="JDBC"/>
<dataSource type="POOLED">
<property name="driver" value="${jdbc.driver}"/>
<property name="url" value="${jdbc.url}"/>
<property name="username" value="${jdbc.username}"/>
<property name="password" value="${jdbc.password}"/>
</dataSource>
</environment>
</environments>
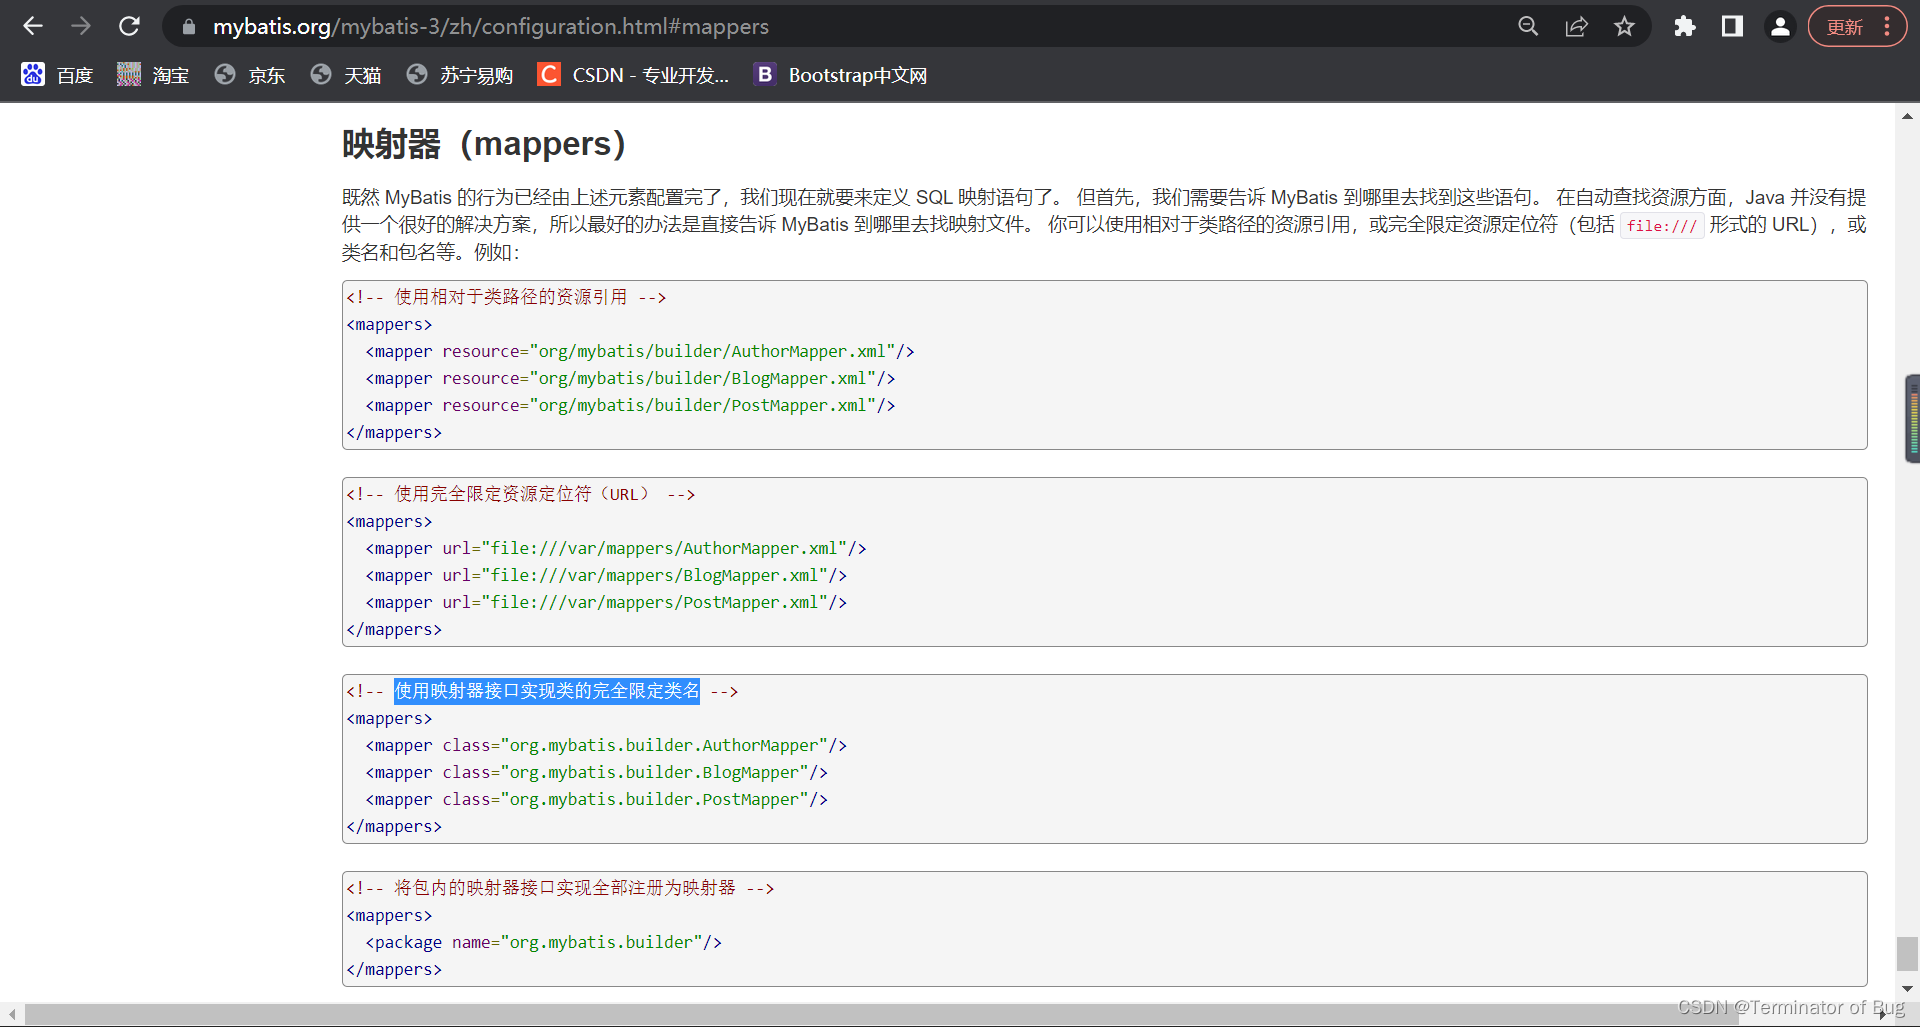
<mappers>
<!--定义关联的mapper接口,通过三一致的规则自动与mapper文件关联-->
<mapper class="com.yzh7.mapper.BookMapper"/>
<mapper class="com.yzh7.mapper.EmpMapper"/>
</mappers>
</configuration>
参考官网:mybatis映射器mappers
https://mybatis.org/mybatis-3/zh/configuration.html#mappers
Dept:
package com.yzh7.entity;

import lombok.Data;

import java.util.List;

@Data
public class Dept {
    private Integer deptId;
    private String deptName;
    private String description;

    //一个部门拥有多个员工
    private List<Emp> empList;
}
Emp:
package com.yzh7.entity;

import lombok.Data;

@Data
public class Emp {
    private Integer empId;
    private String empName;
    private String sex;
    private String phone;
    private Integer deptId;

    //一个员工属于一个部门
    private Dept dept;
}
DeptMapper:
package com.yzh7.mapper;

import com.yzh7.entity.Dept;

import java.util.List;

public interface DeptMapper {
    //查询部门,一个部门关联多个员工
    List<Dept> listAll();
}
EmpMapper:
package com.yzh7.mapper;

import com.yzh7.entity.Emp;

import java.util.List;

public interface EmpMapper {
    //查询所有员工,并且每个员工关联一个部门对象
    List<Emp> listAll();

}
EmpMapper.xml:
<?xml version="1.0" encoding="UTF-8"?>
<!DOCTYPE mapper PUBLIC "-//mybatis.org//DTD Mapper 3.0//EN"
        "http://mybatis.org/dtd/mybatis-3-mapper.dtd">

<mapper namespace="com.yzh7.mapper.EmpMapper">


    <resultMap id="empMap" type="emp">
<!-- emp_id,emp_name,sex,phone,dept_id-->

        <!--id:表示表中的主键字段  column:查询表的列名 property:表示列名要映射到的实体属性-->
        <id column="emp_id" property="empId"/>

        <!--result:定义普通列和属性的映射关系-->
        <result column="emp_name" property="empName"/>
        <result column="sex" property="sex"/>
        <result column="phone" property="phone"/>
        <result column="dept_id" property="deptId"/>

<!-- dept_id,dept_name,description-->
        <!--通过association标签(1对1),设置员工关联的部门对象-->
        <association property="dept" javaType="Dept">

            <id column="dept_id" property="deptId"/>
            <result column="dept_name" property="deptName"/>
            <result column="description" property="description"/>
        </association>
    </resultMap>

        <!--
            resultType:只用于单表查询,并且查询结果列名和属性可以直接对应的情况。用于简单查询映射。
            resultMap:用于多表查询,或者列名和属性映射关系负责的情况。用于复杂查询映射。
            需要通过resultMap节点,配置结果的映射关系
         -->
    <select id="listAll" resultMap="empMap">
        select e.emp_id,e.emp_name,e.sex,e.phone,
                d.dept_id,d.dept_name,d.description
        from t_emp e
        join t_dept d
        on e.dept_id=d.dept_id
    </select>

</mapper>
或者:
EmpMapper.xml:
<?xml version="1.0" encoding="UTF-8"?>
<!DOCTYPE mapper PUBLIC "-//mybatis.org//DTD Mapper 3.0//EN"
"http://mybatis.org/dtd/mybatis-3-mapper.dtd">
<mapper namespace="com.yzh7.mapper.EmpMapper">
<!-- <resultMap id="empMap" type="emp">-->
<!--<!– emp_id,emp_name,sex,phone,dept_id–>-->
<!-- <!–id:表示表中的主键字段 column:查询表的列名 property:表示列名要映射到的实体属性–>-->
<!-- <id column="emp_id" property="empId"/>-->
<!-- <!–result:定义普通列和属性的映射关系–>-->
<!-- <result column="emp_name" property="empName"/>-->
<!-- <result column="sex" property="sex"/>-->
<!-- <result column="phone" property="phone"/>-->
<!-- <result column="dept_id" property="deptId"/>-->
<!--<!– dept_id,dept_name,description–>-->
<!-- <!–通过association标签(1对1),设置员工关联的部门对象–>-->
<!-- <association property="dept" javaType="Dept">-->
<!-- <id column="dept_id" property="deptId"/>-->
<!-- <result column="dept_name" property="deptName"/>-->
<!-- <result column="description" property="description"/>-->
<!-- </association>-->
<!-- </resultMap>-->
<resultMap id="empMap" type="emp" autoMapping="true">
<!-- emp_id,emp_name,sex,phone,dept_id-->
<!--id:表示表中的主键字段 column:查询表的列名 property:表示列名要映射到的实体属性-->
<id column="emp_id" property="empId"/>
<!--result:定义普通列和属性的映射关系-->
<!-- <result column="emp_name" property="empName"/>-->
<!-- <result column="sex" property="sex"/>-->
<!-- <result column="phone" property="phone"/>-->
<!-- <result column="dept_id" property="deptId"/>-->
<!-- dept_id,dept_name,description-->
<!--通过association标签(1对1),设置员工关联的部门对象-->
<association property="dept" javaType="Dept" autoMapping="true">
<id column="dept_id" property="deptId"/>
<!-- <result column="dept_name" property="deptName"/>-->
<!-- <result column="description" property="description"/>-->
</association>
</resultMap>
<!--
resultType:只用于单表查询,并且查询结果列名和属性可以直接对应的情况。用于简单查询映射。
resultMap:用于多表查询,或者列名和属性映射关系负责的情况。用于复杂查询映射。
需要通过resultMap节点,配置结果的映射关系
-->
<select id="listAll" resultMap="empMap">
select e.emp_id,e.emp_name,e.sex,e.phone,
d.dept_id,d.dept_name,d.description
from t_emp e
join t_dept d
on e.dept_id=d.dept_id
</select>
</mapper>
demo3:
package com.yzh7.test;

import com.yzh7.entity.Emp;
import com.yzh7.mapper.EmpMapper;
import org.apache.ibatis.io.Resources;
import org.apache.ibatis.session.SqlSession;
import org.apache.ibatis.session.SqlSessionFactory;
import org.apache.ibatis.session.SqlSessionFactoryBuilder;
import org.junit.After;
import org.junit.Before;
import org.junit.BeforeClass;
import org.junit.Test;

import java.io.IOException;
import java.io.InputStream;
import java.util.List;

public class demo3 {


    @Test
    public void test1(){
        EmpMapper empMapper=session.getMapper(EmpMapper.class);
        List<Emp> empList=empMapper.listAll();
        for(Emp e:empList){
            System.out.println(e);
        }
    }


    private static SqlSessionFactory factory;    //静态
    private SqlSession session;

    @BeforeClass
    public static void befCla() throws IOException {
        String resource = "mybatis_config.xml";   //mybatis_config.xml
        InputStream inputStream = Resources.getResourceAsStream(resource);
        factory = new SqlSessionFactoryBuilder().build(inputStream);
    }

    @Before
    public void bf(){
        session=factory.openSession();
    }

    @After
    public void af(){
        session.commit();
        session.close();
    }
}
// A code block
var foo = 'bar';
// A code block
var foo = 'bar';


 1583
1583


 被折叠的 条评论
为什么被折叠?
被折叠的 条评论
为什么被折叠?
 到【灌水乐园】发言


