


在界面开发中,会比较多的使用到ListView,大体用法归纳如下:
Android SDK provides three different Adapter implementation, that includes ArrayAdapter, CursorAdapter and SimpleAdapter. An ArrayAdapter expects an Array or an List as input, while CursorAdapter accepts the instance of Cursor and SimpleAdapter maps the static data defined in the resources. The type of adapter that suits your app need is purely based on the input data type.(载录自http://javatechig.com)
1. 最简单的就是使用数组适配器ArrayAdapter:
()建立 xml layout资源文件
<LinearLayout xmlns:android="http://schemas.android.com/apk/res/android"
	xmlns:tools="http://schemas.android.com/tools"
	android:layout_width="match_parent"
	android:layout_height="match_parent"
	android:orientation="vertical">

	<ListView
		android:id="@+id/months_list"
		android:layout_width="match_parent"
		android:layout_height="wrap_content" >
	</ListView>
</LinearLayout>
(2) 实例化ListView和ArrayAdpater
public class ListActivity extends Activity {
	private String[] monthsArray = { "JAN", "FEB", "MAR", "APR", "MAY", "JUNE", "JULY",
 "AUG", "SEPT", "OCT", "NOV", "DEC" };

	private ListView monthsListView;
	private ArrayAdapter arrayAdapter;

	/** Called when the activity is first created. */
	@Override
	public void onCreate(Bundle savedInstanceState) {
		super.onCreate(savedInstanceState);
		setContentView(R.layout.activity_list);

		monthsListView = (ListView) findViewById(R.id.months_list);

		// this-The current activity context.
		// Second param is the resource Id for list layout row item
		// Third param is input array
		arrayAdapter = new ArrayAdapter(this, android.R.layout.simple_list_item_1, monthsArray);
		monthsListView.setAdapter(arrayAdapter);
	}
} 
注:这里有两个要点:
a ArrayAdapter接收的物件为Array,ArrayAdapter的方法里面没有提供多栏位的显示方式。
b 第二个参数"android.R.layout.simple_list_item_1"
,表示是用Android內建的配置。当然,我们也可以使用自己的xml配置,做法步骤如下:
步骤1. 自订xml layout配置(以下转载自 http://wangshifuola.blogspot.hk/ )
<?xml version="1.0" encoding="utf-8"?>
<LinearLayout xmlns:android="http://schemas.android.com/apk/res/android"
android:orientation="horizontal"
android:layout_width="fill_parent"
android:layout_height="fill_parent"
>
<ImageView
android:id="@+id/ImageView_icon"
android:layout_width="wrap_content"
android:layout_height="wrap_content"
android:layout_centerVertical="true"
android:layout_marginLeft="10px"
android:src="@drawable/main_new"
/>
<CheckedTextView android:id="@+id/listTextView1"
xmlns:android="http://schemas.android.com/apk/res/android"
android:layout_width="wrap_content"
android:layout_height="wrap_content"
android:textColor="@drawable/green"
>
</CheckedTextView>
<CheckedTextView android:id="@+id/listTextView2"
xmlns:android="http://schemas.android.com/apk/res/android"
android:layout_width="wrap_content"
android:layout_height="wrap_content"
android:textColor="@drawable/green"
android:text="-----自訂"
>
</CheckedTextView>
</LinearLayout>
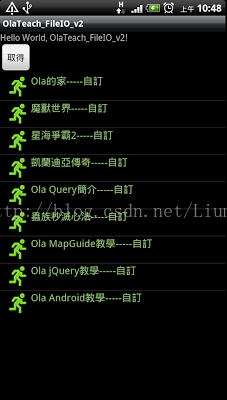
也就是前面摆放一张固定的图片,在显示的内容后面加上“--自订”文字。
步骤2. 绑定的程序代码:
String[] item = new String[]
{"Ola的家", "魔獸世界","星海爭霸2","凱蘭迪亞傳奇","Ola Query簡介","蟲族秒滅心法","Ola MapGuide教學","Ola jQuery教學","Ola Android教學"};
ArrayAdapter adapter = new ArrayAdapter(this, R.layout.sample_list,R.id.listTextView1,item);
Olalist.setAdapter(adapter);
结果截图如下:
2. 使用自定义的适配器Custom Adapter:
2.1 主要的步骤为:
(1) First step towards building custom list is to identify the data model for each row. In our example we will display list of
(2) Secondly, let us declare list view in activity layout.
(3) Declare the layout for each row item.
(4) Create your custom adapter class by extending
(5) Finally, let us instantiate your custom adapter and set to ListView by calling setAdapter() method.
NewsItem objects.(2) Secondly, let us declare list view in activity layout.
(3) Declare the layout for each row item.
(4) Create your custom adapter class by extending
BaseAdapter class.(5) Finally, let us instantiate your custom adapter and set to ListView by calling setAdapter() method.
2.2 具体代码 待续...


 1552
1552


 被折叠的 条评论
为什么被折叠?
被折叠的 条评论
为什么被折叠?
 到【灌水乐园】发言


