


安装教程来源:【PyTorch深度学习快速入门教程(绝对通俗易懂!)【小土堆】】
由于运行在base环境中的jupyter需要使用torch,有两种解决方法:
方法一:在base中安装torch;
方法二:在torch环境中安装jupyter;
本文采用方法二。
打开anaconda终端
进入有torch的环境,安装ipykernel
输入指令:conda install nb_conda
若有如下报错,若不报错,后续再输入命令jupyter notebook即可。
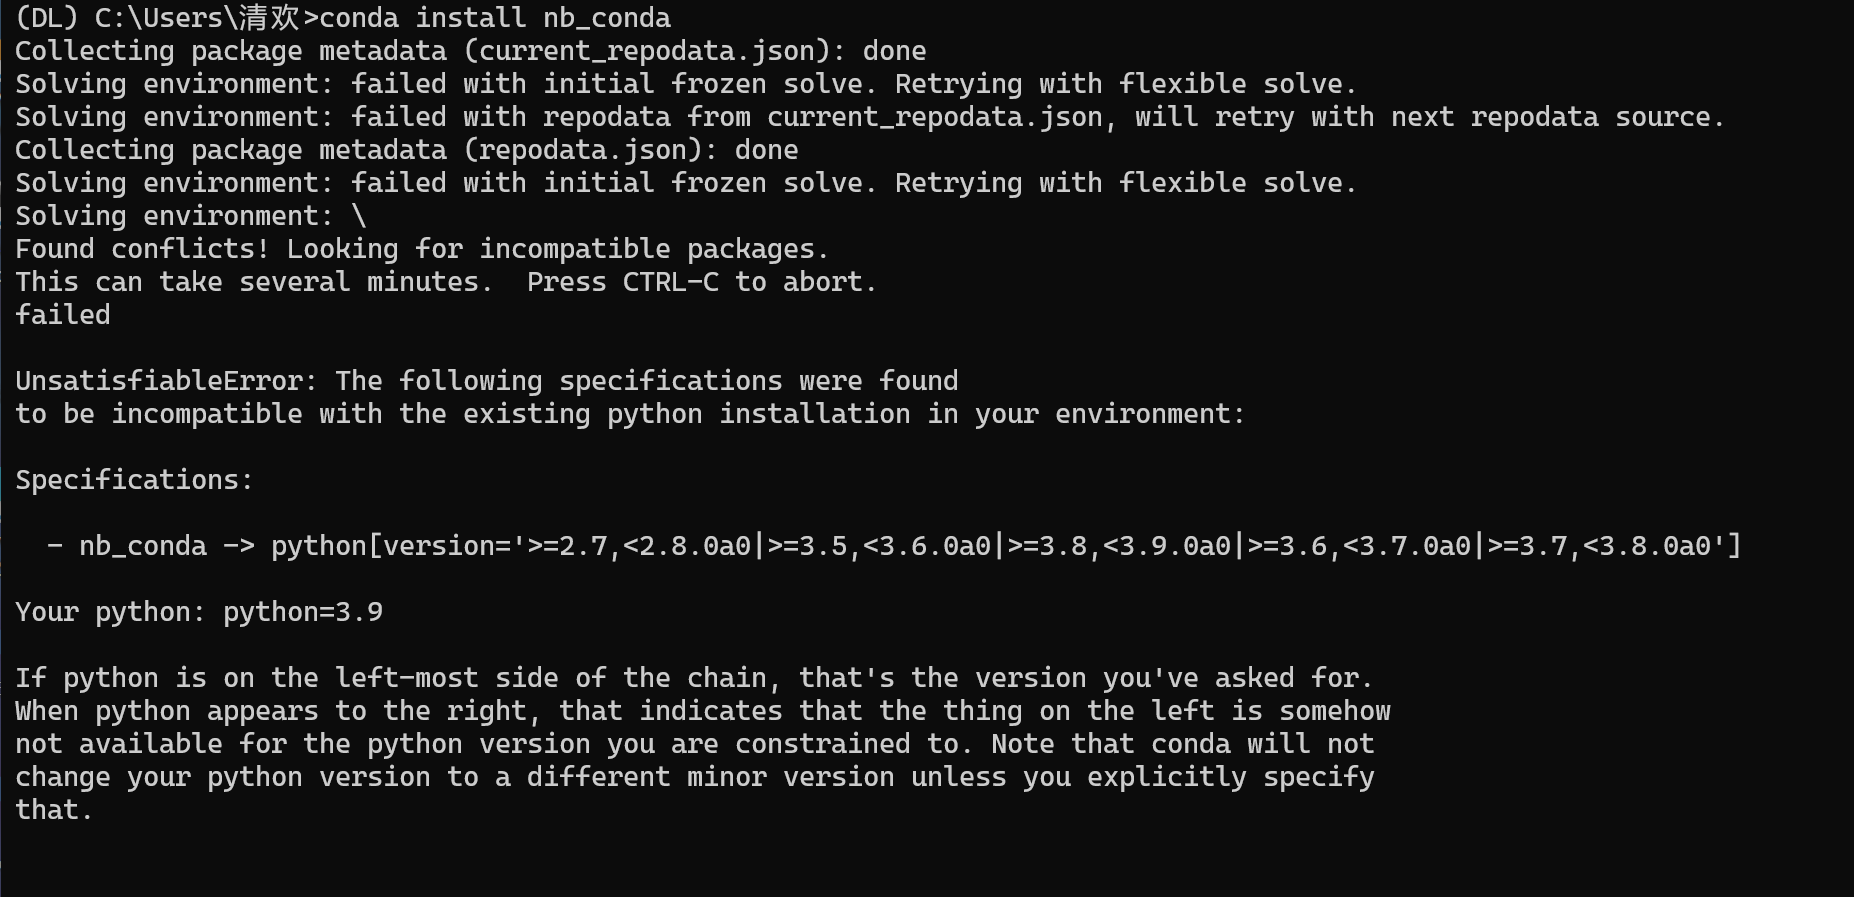
则这个错误是因为" nb_conda" 与我的的 "Python 3.9"版本 环境不兼容。"nb_conda" 是一个较老的包,它支持的 Python 版本较旧(2.7、3.5-3.8),导致冲突。
解决方法 :在base环境中安装 `nb_conda_kernels`**
conda install -n base nb_conda_kernels # 在 base 环境安装
然后激活你的有torch的环境,并安装 `ipykernel`:
conda activate your_env
conda install ipykernel
然后在该环境中启动 Jupyter ,就可以在 Kernel 菜单里切换不同的 Conda 环境
(DL) C:\Users\清欢>jupyter notebook
[I 18:19:45.645 NotebookApp] nb_conda_kernels | enabled, 2 kernels found.
[W 2025-05-04 18:19:46.679 LabApp] 'kernel_spec_manager_class' has moved from NotebookApp to ServerApp. This config will be passed to ServerApp. Be sure to update your config before our next release.
[W 2025-05-04 18:19:46.679 LabApp] 'kernel_spec_manager_class' has moved from NotebookApp to ServerApp. This config will be passed to ServerApp. Be sure to update your config before our next release.
[W 2025-05-04 18:19:46.679 LabApp] 'kernel_spec_manager_class' has moved from NotebookApp to ServerApp. This config will be passed to ServerApp. Be sure to update your config before our next release.
[I 2025-05-04 18:19:46.689 LabApp] JupyterLab extension loaded from D:\Anaconda\lib\site-packages\jupyterlab
[I 2025-05-04 18:19:46.689 LabApp] JupyterLab application directory is D:\Anaconda\share\jupyter\lab
[I 18:19:46.689 NotebookApp] Serving notebooks from local directory: C:\Users\清欢
[I 18:19:46.699 NotebookApp] Jupyter Notebook 6.4.12 is running at:
[I 18:19:46.699 NotebookApp] http://localhost:8888/?token=1c17aca8b04de03e089d7cdac11792ba2348b8b58dabaa33
[I 18:19:46.699 NotebookApp]  or http://127.0.0.1:8888/?token=1c17aca8b04de03e089d7cdac11792ba2348b8b58dabaa33
[I 18:19:46.699 NotebookApp] Use Control-C to stop this server and shut down all kernels (twice to skip confirmation).
[C 18:19:46.820 NotebookApp]

    To access the notebook, open this file in a browser:
        file:///C:/Users/%E6%B8%85%E6%AC%A2/AppData/Roaming/jupyter/runtime/nbserver-2928-open.html
    Or copy and paste one of these URLs:
        http://localhost:8888/?token=1c17aca8b04de03e089d7cdac11792ba2348b8b58dabaa33
     or http://127.0.0.1:8888/?token=1c17aca8b04de03e089d7cdac11792ba2348b8b58dabaa33
[I 18:20:04.940 NotebookApp] 302 GET /?token=1c17aca8b04de03e089d7cdac11792ba2348b8b58dabaa33 (::1) 1.000000ms
按住ctrl键点击最后三个链接中的任意一个链接即可转到浏览器使用jupyter,三个链接的功能由AI生成如下
1. `file:///` 本地文件协议链接
file:///C:/Users/%E6%B8%85%E6%AC%A2/AppData/Roaming/jupyter/runtime/nbserver-2928-open.html
- **作用**:直接通过浏览器打开本地的 HTML 文件来访问 Jupyter Notebook。
- **特点**:
  - 使用 `file://` 协议,完全本地运行,不依赖网络。
  - 路径中的 `%E6%B8%85%E6%AC%A2` 是 `清欢` 的 URL 编码形式(因为路径包含中文)。
  - **问题**:某些浏览器(如 Chrome)出于安全策略,可能阻止 `file://` 链接执行 JavaScript,导致页面无法正常加载。
- **适用场景**:通常不建议使用,除非其他方式都失败。

2. `http://localhost:8888/` 本地环回地址
http://localhost:8888/?token=1c17aca8b04de03e089d7cdac11792ba2348b8b58dabaa33
- **作用**:通过本地网络环回地址访问 Jupyter Notebook。
- **特点**:
  - `localhost` 是指向本机的域名(等价于 `127.0.0.1`)。
  - `8888` 是 Jupyter 的默认端口(可配置)。
  - `token` 是身份验证令牌,首次启动时必须使用(防止未授权访问)。
  - **最稳定**:推荐使用此方式,兼容所有浏览器。
- **适用场景**:99% 的情况直接用这个链接即可。
3. `http://127.0.0.1:8888/` 本地 IP 直连
http://127.0.0.1:8888/?token=1c17aca8b04de03e089d7cdac11792ba2348b8b58dabaa33
- **作用**:与 `localhost` 完全相同,只是用 IP 形式表示。
- **区别**:
  - `localhost` 可能被系统或 hosts 文件重定向,而 `127.0.0.1` 是直接访问。
  - 某些网络配置下(如代理或防火墙),`localhost` 可能有问题,但 `127.0.0.1` 更可靠。
- **适用场景**:如果 `localhost` 无法访问,可以尝试此链接。

4. `302 GET` 重定向日志
[I 18:20:04.940 NotebookApp] 302 GET /?token=... (::1) 1.000000ms
- **作用**:这是 Jupyter 服务器的日志,表示收到了一个 HTTP 请求并返回了 `302` 重定向。


 被折叠的 条评论
为什么被折叠?
被折叠的 条评论
为什么被折叠?
 到【灌水乐园】发言


