


SpringBoot2基础入门
环境设置
- Java8以上
- Maven3.3以上
- Idea 2020.1
二、使用步骤
Maven配置阿里云镜像和JDK1.8
配置阿里云镜像,项目下载jar包等速度会更快,效率更高。
在<mirrors></mirrors>标签中加入以下代码:
<mirrors>
      <mirror>
        <id>nexus-aliyun</id>
        <mirrorOf>central</mirrorOf>
        <name>Nexus aliyun</name>
        <url>http://maven.aliyun.com/nexus/content/groups/public</url>
      </mirror>
  </mirrors>

  <profiles>
         <profile>
              <id>jdk-1.8</id>
              <activation>
                <activeByDefault>true</activeByDefault>
                <jdk>1.8</jdk>
              </activation>
              <properties>
                <maven.compiler.source>1.8</maven.compiler.source>
                <maven.compiler.target>1.8</maven.compiler.target>
                <maven.compiler.compilerVersion>1.8</maven.compiler.compilerVersion>
              </properties>
         </profile>
  </profiles>
第一个SpringBoot程序
pom.xml中添加以下代码
<!--导入父工程-->
<parent>
        <groupId>org.springframework.boot</groupId>
        <artifactId>spring-boot-starter-parent</artifactId>
        <version>2.3.4.RELEASE</version>
 </parent>

    <dependencies>
    <!-- web场景启动器-->
        <dependency>
            <groupId>org.springframework.boot</groupId>
            <artifactId>spring-boot-starter-web</artifactId>
        </dependency>
    </dependencies>
MainApplication.java
/**
 * ResponseBody代码该类的每一个方法的返回数据直接写给浏览器的,而不是跳转到页面
 */
//@ResponseBody
//@Controller

/**
 * @RestController中包含了@ResponseBody和@Controller
 */
@RestController
public class HelloController {
    /**
     * @RequestMapping 映射请求,希望浏览器中发射hello请求,处理
     * @return给浏览器返回hello,springboot
     */
    @RequestMapping("/hello")
    public String hand01(){
        return "Hello,SpringBoot";
    }
}
HelloController.java
/**
 * ResponseBody代码该类的每一个方法的返回数据直接写给浏览器的,而不是跳转到页面
 */
//@ResponseBody
//@Controller

/**
 * @RestController中包含了@ResponseBody和@Controller
 */
@RestController
public class HelloController {
    /**
     * @RequestMapping 映射请求,希望浏览器中发射hello请求,处理
     * @return给浏览器返回hello,springboot
     */
    @RequestMapping("/hello")
    public String hand01(){
        return "Hello,SpringBoot";
    }
}
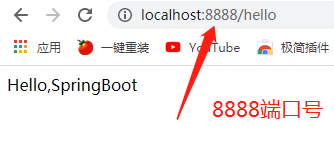
run MainApplication,运行成功,显示Tomcat端口号8080

修改Tomcat端口号
在resources中新建application.properties配置文件,写入
server.port=8888

run MainApplication,显示Tomcat端口号已修改成8888了

创建可执行Jar包
在pom.xml文件中添加以下插件代码
 <build>
        <plugins>
            <plugin>
                <groupId>org.springframework.boot</groupId>
                <artifactId>spring-boot-maven-plugin</artifactId>
            </plugin>
        </plugins>
    </build>
clean清理—>package打包
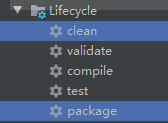

右击target—>show in Explorer在文件夹中显示

进入Target目录,在上面输入cmd

在打开的cmd窗口中输入
java -jar boot[按Tab键]
springboot应用正在启动…

依赖管理
依赖管理
<parent>
        <groupId>org.springframework.boot</groupId>
        <artifactId>spring-boot-starter-parent</artifactId>
        <version>2.3.4.RELEASE</version>
</parent>
鼠标放在spring-boot-starter-parent上面,按ctrl再点击,可进入下面的页面

他的父项目
 <parent>
    <groupId>org.springframework.boot</groupId>
    <artifactId>spring-boot-dependencies</artifactId>
    <version>2.3.4.RELEASE</version>
  </parent>

几乎声明了所有开发中常用的依赖的版本号,自动版本仲裁机制


 626
626


 被折叠的 条评论
为什么被折叠?
被折叠的 条评论
为什么被折叠?
 到【灌水乐园】发言


