


前言
我是真的不想写这篇总结,说实话,关于Handler,全面且优秀的文章多的很。
但是这东西吧,还是想以自己的方式再去细看一下它的原理,实现源码,它的各种机制,在App中使用到的地方。
这样或许能够掌握的更深吧。
handler主要用于线程间通信,在常规业务开发中会经常用到,当子线程中进行耗时操作后需要更新UI时,通过Handler将有关UI的操作切换到主线程中执行。在我之前看源码的过程中发现handler无处不在,在Activity里处理线程间的各个消息用于创建application,activity,service的创建、绑定等等。
一、主要角色
- Handler(处理者):负责Message的发送及处理。
Handler是Android中的消息处理器,它负责接收和处理消息。每个Handler实例都关联一个特定的线程,并与该线程的消息队列相关联。通过Handler,我们可以发送和处理消息,实现线程间的通信和协作。通过 Handler.sendMessage() 向消息池发送各种消息事件;通过 Handler.handleMessage() 处理相应的消息事件。
- Looper(管理者):通过Looper.loop()不断地从MessageQueue中抽取Message,按分发机制将消息分发给目标处理者。Looper 不断从 MessageQueue 中获取消息并将之传递给消息处理者(即是消息发送者 Handler 本身)进行处理。
- MessageQueue(消息队列):用来存放Handler发送过来的消息,通过 Handler 发送的消息并非是立即执行的,需要存入一个消息队列中来依次执行,内部通过单链表的数据结构来维护消息列表,等待Looper的抽取。
- Message(消息):需要被传递的消息,其中包含了消息ID,消息处理对象以及处理的数据等,由MessageQueue统一列队,最终由Handler处理。
二、Handler机制的简要流程
第一步:通过Handler.sendMessage()发送消息,然后通过MessageQueue.enqueueMessage()向MessageQueue中添加一条消息;(在这里面,会调用msg.target = this;就相当于msg.target=handler)
第二步:通过Looper.loop()开启循环后,不断轮询调用MessageQueue.next();去读取消息。
第三步:当获取到消息后,调用msg.target(就是Handler).dispatchMessage()去传递消息,目标Handler收到消息后调用Handler.handlerMessage()处理消息。
tips:当一个线程需要使用Handler来处理消息时,首先需要创建一个Looper对象,并调用其prepare()方法创建一个与当前线程关联的消息队列。因为我们的主线程(UI线程在ActivityThread类执行main方法时,已经为我们创建looper对象,并且调用了loop()方法),所以在主线程不需要去创建。
三、handler的常规使用
1.在主线程中创建handler
创建后需重写handleMessage处理消息,在子线程中sendMessage()发送消息
public class MainActivity extends AppCompatActivity {

    private TextView tv ;
    public static Handler mHandler = new Handler() {
        @Override
        public void handleMessage(Message msg) {
            if (msg.what == 101) {
                Log.i("MainActivity", "接收到handler消息...");
            }
        }
    };

    @Override
    protected void onCreate(Bundle savedInstanceState) {
        super.onCreate(savedInstanceState);
        setContentView(R.layout.activity_main);
        tv = (TextView) findViewById(R.id.tv);
        tv.setOnClickListener(new View.OnClickListener() {
            @Override
            public void onClick(View v) {
                new Thread() {
                    @Override
                    public void run() {
                        // 在子线程中发送异步消息
                        Message msg = mHandler.obtainMessage();
                        msg.what = 1; // 设置消息类型
                        msg.obj = "Hello"; // 设置消息数据
                        mHandler.sendMessage(msg); // 发送消息                    }
                }.start();
            }
        });
    }
}
2.在子线程中创建handler
子线程中需要注意,handler是依赖于looper运行的,而Looper(与消息队列)又是属于某一个线程(ThreadLocal是线程内部的数据存储类,通过它可以在指定线程中存储数据,其他线程则无法获取到),其他线程不能访问。
所以使用Handler必须要保证Handler所创建的线程中有Looper对象并且启动循环,因为主线程颐景帮我们创建好了,所以子线程必须调用looper.prepare和lopper.loop()方法。
Handler handler;
Thread thread = new Thread(new Runnable() {
    public void run() {
        Looper.prepare();
        handler = new Handler() {
            public void handleMessage(Message msg) {
                // 处理消息逻辑
            }
        };
        Looper.loop();
    }
});
thread.start();
四、Handler源码
handler的源码就在IDE里可以直接看,它的源码近千行,我这里就贴核心代码
public class Handler {
    private Looper mLooper;
    private MessageQueue mQueue;

    public Handler(@Nullable Callback callback, boolean async) {//不传入looper
        if (FIND_POTENTIAL_LEAKS) {
            final Class<? extends Handler> klass = getClass();
            if ((klass.isAnonymousClass() || klass.isMemberClass() || klass.isLocalClass()) &&
                    (klass.getModifiers() & Modifier.STATIC) == 0) {
                Log.w(TAG, "The following Handler class should be static or leaks might occur: " +
                    klass.getCanonicalName());
            }
        }

        mLooper = Looper.myLooper();//使用当前线程的Looper
        if (mLooper == null) {
            throw new RuntimeException(
                "Can't create handler inside thread " + Thread.currentThread()
                        + " that has not called Looper.prepare()");
        }
        mQueue = mLooper.mQueue;
        mCallback = callback;
        mAsynchronous = async;
    }


    public Handler(@Nullable Callback callback, boolean async) {
        if (FIND_POTENTIAL_LEAKS) {
            final Class<? extends Handler> klass = getClass();
            if ((klass.isAnonymousClass() || klass.isMemberClass() || klass.isLocalClass()) &&
                    (klass.getModifiers() & Modifier.STATIC) == 0) {
                Log.w(TAG, "The following Handler class should be static or leaks might occur: " +
                    klass.getCanonicalName());
            }
        }

        mLooper = Looper.myLooper();
        if (mLooper == null) {
            throw new RuntimeException(
                "Can't create handler inside thread " + Thread.currentThread()
                        + " that has not called Looper.prepare()");
        }
        mQueue = mLooper.mQueue;
        mCallback = callback;
        mAsynchronous = async;
    }

     public final boolean post(Runnable r){
       return  sendMessageDelayed(getPostMessage(r), 0);
    }

    private static Message getPostMessage(Runnable r) {
        Message m = Message.obtain();
        m.callback = r;
        return m;
    }

    public void handleMessage(Message msg) {
        // 处理消息的逻辑
    }

    public final boolean sendMessage(Message msg) {
        return sendMessageDelayed(msg, 0);
    }

    public final boolean sendMessageDelayed(@NonNull Message msg, long             delayMillis) {
        if (delayMillis < 0) {
            delayMillis = 0;
        }
        return sendMessageAtTime(msg, SystemClock.uptimeMillis() + delayMillis);
    }

    public boolean sendMessageAtTime(@NonNull Message msg, long uptimeMillis) {
//mQueue 变量是在构造函数中进行初始化的,且 mQueue 是成员常量,这说明 Handler
//与MessageQueue 是一一对应的关系,不可更改
        MessageQueue queue = mQueue;
        if (queue == null) {
            RuntimeException e = new RuntimeException(
                    this + " sendMessageAtTime() called with no mQueue");
            Log.w("Looper", e.getMessage(), e);
            return false;
        }
        return enqueueMessage(queue, msg, uptimeMillis);
    }
}
查看Handler的构造函数(总共有7个,去除一些版本适配和过期的方法,我粘贴了上面两种,源码SDK版本为33)
- 如果构造函数没有传入
Looper参数,则会默认使用当前线程关联的Looper对象,mQueue需要依赖于从Looper对象中获取。- 如果
Looper对象为 null ,则会直接抛出异常,且从异常信息Can't create handler inside thread that has not called Looper.prepare()中可以看到,在向Handler发送消息前,需要先调用Looper.prepare()- 查看上面的构造函数Handler(@Nullable Callback callback, boolean async),其中,async最后赋值给mAsynchronous = async;这个mAsynchronous主要是做什么用的呢?它是用来判断是否是异步消息,需要优先处理。
- 它会在 private boolean enqueueMessage(MessageQueue queue, Message msg, long uptimeMillis) {
msg.target = this;
if (mAsynchronous) {
msg.setAsynchronous(true);
}
return queue.enqueueMessage(msg, uptimeMillis);
}在此处对msg进行了赋值。
五、Message源码
public final class Message {
//next字段的注释我们可以发现Message的消息池实质上就是个链表,而这个next指向下一个Message对象;
    Message next;
//sPoolSync是一个普通Object对象,用于在获取Message对象时进行同步锁;
    private static final Object sPoolSync = new Object();
//mPool字段就是一个Message对象,mPool是链表中的第一个Message对象;
    private static Message sPool;
//sPoolSize字段表示的是消息池已有Message的数量;
    private static int sPoolSize = 0;
//MAX_POOL_SIZE表示消息池的最大容纳数量
    private static final int MAX_POOL_SIZE = 50;
    // 其他成员变量

    public static Message obtain() {
    synchronized (sPoolSync) {
        if (sPool != null) {
            Message m = sPool;
            sPool = m.next;
            m.next = null;
            m.flags = 0; // clear in-use flag
            sPoolSize--;
            return m;
        }
    }
    return new Message();
}
}
1.Message创建和销毁 (复用对象池)
如何创建
- Message msg = new Message();
- Message msg = Message.obtain();(对象池)
- Message msg = handler1.obtainMessage();(对象池)
-
Android的消息机制并不会大量重复创建Message对象,而是重复利用在消息池中已存在的Message对象。
- 从Handler类源码中我们可以看到,Handler中所有需要构建Message对象的地方,包括一系列Handler.obtainMessage()的方法,其实质上都是通过Message.obtain来获得的。
2.Message的作用
- Message类被用于发送给Handler,其可以存储一些描述信息和任意数据类型的对象。
- Message有两个额外的int字段和一个额外object字段,可以满足很多情况下的需求配置。
- 虽然Message的构造方法是public的,但是创建Message最好的方法还是去调用Message.obtain()方法或者调用一系列Handler.obtainMessage()的方法,这些方法会从一个回收池中去获取Message对象。
3.Message.obtain()
看上面的源码,可以发现
- 如果消息链中没有消息时,就会new一个新的Message对象并返回;
- 如果消息链中有可用对象,就会获取到当前链表的mPool,而后将mPool指向下一个Message对象。
4.Message.recycleUnchecked()
在Looper.loop方法中,每一条Message被处理后最终都会调用Message.recycleUnchecked()方法,此方法的作用
1.清空消息状态,同时设置flags = FLAG_IN_USE,表明该消息已被使用,这个flags在obtain()方法中会被设置为0;
2.如果消息池的大小未超过最大容纳数量,就将自身添加到链表的表头。也就是说,Message并不是在创建时而是在回收时被添加到消息池中的。
SDK33的源码调用顺序:Looper.loop() --- Looper.loopOnce() --- msg.recycleUnchecked()
//Message.java
void recycleUnchecked() {
    flags = FLAG_IN_USE;
    what = 0;
    arg1 = 0;
    arg2 = 0;
    obj = null;
    replyTo = null;
    sendingUid = -1;
    when = 0;
    target = null;
    callback = null;
    data = null;

    synchronized (sPoolSync) {
        if (sPoolSize < MAX_POOL_SIZE) {
            next = sPool;
            sPool = this;
            sPoolSize++;
        }
    }
}
六、Looper源码
源码位置:SDK下的android.os下,源码493行,不多
public final class Looper {
static final ThreadLocal<Looper> sThreadLocal = new ThreadLocal<>();
MessageQueue mQueue;
final Thread mThread;
private Looper(boolean quitAllowed) {
mQueue = new MessageQueue(quitAllowed);
mThread = Thread.currentThread();
}
public static void prepare() {
if (sThreadLocal.get() != null) {
throw new RuntimeException("Only one Looper may be created per thread");
}
sThreadLocal.set(new Looper());
}
public static Looper myLooper() {
return sThreadLocal.get();
}
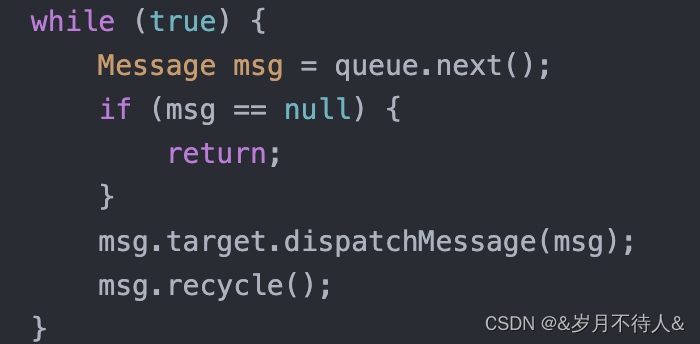
public static void loop() {
Looper me = myLooper();
if (me == null) {
throw new RuntimeException("No Looper; Looper.prepare() wasn't called on this thread.");
}
MessageQueue queue = me.mQueue;
while (true) {
Message msg = queue.next();
if (msg == null) {
return;
}
msg.target.dispatchMessage(msg);
msg.recycle();
}
}
public MessageQueue getQueue() {
return mQueue;
}
}上面的源码分析:
1.可以看到,myLooper() 方法是从 sThreadLocal 对象中获取 Looper 对象的。sThreadLocal 对象又是通过 prepare(boolean) 来进行赋值的,且该方法只允许调用一次,一个线程只能创建一个 Looper 对象,否则将抛出异常。
2.代码:看下Looper的构造函数
final Thread mThread;
private Looper(boolean quitAllowed) {
mQueue = new MessageQueue(quitAllowed);
mThread = Thread.currentThread();
}
- 可以看到 Looper 类的构造函数也是私有的,且在构造函数中还初始化了一个线程常量
mThread,这都说明了 Looper 只能关联到一个线程,且关联之后不能改变。当使用ThreadLocal维护变量时,ThreadLocal为每个使用该变量的线程提供独立的变量副本,所以每一个线程都可以独立地改变自己的副本,而不会影响其它线程所对应的副本。
3.Looper.prepare方法。
点击prepare方法,发现是在这里有调用(Looper.java)
public static void prepareMainLooper() {
        prepare(false);
        synchronized (Looper.class) {
            if (sMainLooper != null) {
                throw new IllegalStateException("The main Looper has already been prepared.");
            }
            sMainLooper = myLooper();
        }
    }
那这儿我们再看下 prepareMainLooper哪些地方有调用,再出现的几个选项里,看到了熟悉的ActivityThread里的main方法有调用,这个方法就是一个应用的起始点,即当应用启动时, 系统就自动为我们在主线程做好了 Handler 的初始化操作, 因此在主线程里我们可以直接使用 Handler,如果是在子线程中创建 Handler ,则需要我们手动来调用 Looper.prepare() 方法。
public static void main(String[] args) {
    Looper.prepareMainLooper();
    ActivityThread thread = new ActivityThread();
    thread.attach(false);
    Looper.loop();
}
3.1.主线程:通过App启动时,main方法调用Looper的prepareMainLooper方法,里面调用looper.prepare方法,里面的sThreadLocal.set(new Looper());创建了一个Looper,Looper里实现了两个步骤:第一个创建一个消息队列,第二个关联当前线程。
3.2.子线程:使用handler需要自行调用Looper.prepare方法创建Looper,关联此线程。
3.3.Looper.prepare()能否调用两次或者多次,如果运行,则会报错,并提示prepare中的Excetion信息。由此可以得出在每个线程中Looper.prepare()能且只能调用一次,源码里会直接抛出异常。
4.Looper.loop()方法
Looper.loop()方法里起了一个死循环,不断的判断MessageQueue中的消息是否为空,如果为空则直接return掉,然后执行queue.next()方法。
step1:queue.next()方法源码,Message的出栈操作,里面可能对线程,并发控制做了一些限制等
step2:获取到栈顶的Message对象之后开始执行:msg.target.dispatchMessage(msg),最后回调handleMessage处理消息,或者调用runnable的run方法(hadnler.post方法)
七、MessageQueue源码
1.MessageQueue作用 ,主要包含2个操作:插入和读取。
读取操作会伴随着删除操作,插入和读取对应的方法分别为enqueueMessage和next,其中enqueueMessage的作用是往消息队列中插入一条消息,而next的作用是从消息队列中取出一条消息并将其从消息队列中移除。
上面的Handler获取当前线程的Looper后,也与当前线程的MessagQueue方法绑定了起来。
可以看到,Handler的sendMessageAtTime() 方法中在处理 Message 时,最终调用的是enqueueMessage(queue, msg, uptimeMillis); 方法。传入了当前的消息队列和msg,uptimeMillis。看Handler此方法的源码:
private boolean enqueueMessage(MessageQueue queue, Message msg, long uptimeMillis) {
    //target 对象指向的也是发送消息的主体,即 Handler 对象
    //即由 Handler 对象发给 MessageQueue 的消息最后还是要交由 Handler 对象本身来处理
    msg.target = this;
    if (mAsynchronous) {
        msg.setAsynchronous(true);
    }
    return queue.enqueueMessage(msg, uptimeMillis);
}
最后走到了messageQueue的enqueueMessage方法里。
那接下来就看下MessageQueue的源码:
1.消息入队和排序
boolean enqueueMessage(Message msg, long when) {
	//Message 必须有处理者Handler
    if (msg.target == null) {
        throw new IllegalArgumentException("Message must have a target.");
    }
    if (msg.isInUse()) {
        throw new IllegalStateException(msg + " This message is already in use.");
    }

    synchronized (this) {
        if (mQuitting) {
            IllegalStateException e = new IllegalStateException(
                    msg.target + " sending message to a Handler on a dead thread");
            Log.w(TAG, e.getMessage(), e);
            msg.recycle();
            return false;
        }

        msg.markInUse();
        msg.when = when;
        Message p = mMessages;
        boolean needWake;
        //如果消息队列是空的或者队列中第一条的消息的触发时间要比新消息长,则将新消息作为链表头部
        if (p == null || when == 0 || when < p.when) {
            // New head, wake up the event queue if blocked.
            msg.next = p;//就是替换第一个消息的位置,谁触发早就谁最前面
            mMessages = msg;
            needWake = mBlocked;
        } else {
            // Inserted within the middle of the queue.  Usually we don't have to wake
            // up the event queue unless there is a barrier at the head of the queue
            // and the message is the earliest asynchronous message in the queue.
            needWake = mBlocked && p.target == null && msg.isAsynchronous();
            Message prev;
            //寻找消息列队中第一条触发时间比新消息晚的消息,并将新消息插到该消息前面
            for (;;) {
                prev = p;
                p = p.next;
                if (p == null || when < p.when) {
                    break;
                }
                if (needWake && p.isAsynchronous()) {
                    needWake = false;
                }
            }
            msg.next = p; // invariant: p == prev.next
            prev.next = msg;
        }
        // We can assume mPtr != 0 because mQuitting is false.
        if (needWake) {
            nativeWake(mPtr);
        }
    }
    return true;
}
1.第一个判断,如果handler为空,报错。
2.看下里面的mMessages 代表的是消息队列中的第一条消息,看下源码的判断条件:
- 如果 mMessages 为空,说明消息队列是空的,或者 mMessages 的触发时间要比新消息晚,则将新消息插入消息队列的头部;
- 如果 mMessages 不为空,则寻找消息列队中第一条触发时间比新消息晚的非空消息,并将新消息插到该消息前面
- 到此,一个按照处理时间进行排序的消息队列就完成了,后边要做的就是从消息队列中依次取出消息进行处理。
所以MessageQueue是按照Message触发时间的先后顺序排列的【也就是说会改变链表的顺序】,队头的消息是将要最早触发的消息。排在越前面的越早触发,所谓的延时呢,不是延时发送消息,而是延时去处理消息,我们在发消息都是马上插入到消息队列当中。
2.读取Message并分发给Handler
在 MessageQueue 中消息的读取其实是通过内部的 next() 方法进行的,next() 方法是一个无限循环的方法,如果消息队列中没有消息,则该方法会一直阻塞,当有新消息来的时候 next() 方法会返回这条消息并将其从单链表中删除。
最开始我很憨批,没看仔细,没从looper那边点过来,上面的msg.next误导了我,以为是Message的next,我去message里找半天,发现只是个它的属性,后面回来看MessageQueue的源码才注意到。哈哈哈
什么时候会调用next这个方法呢?请看之前Looper里的源码:
源码:这方法有点长。
//MessageQueue.java
Message next() {
    final long ptr = mPtr;
    if (ptr == 0) {
        return null;
    }
    int pendingIdleHandlerCount = -1; // -1 only during first iteration
    int nextPollTimeoutMillis = 0;
    for (;;) {
        if (nextPollTimeoutMillis != 0) {
            Binder.flushPendingCommands();
        }

        nativePollOnce(ptr, nextPollTimeoutMillis);

        synchronized (this) {
            // Try to retrieve the next message.  Return if found.
            final long now = SystemClock.uptimeMillis();
            Message prevMsg = null;
            Message msg = mMessages;
            if (msg != null && msg.target == null) {
                // Stalled by a barrier.  Find the next asynchronous message in the queue.
                do {
                    prevMsg = msg;
                    msg = msg.next;
                } while (msg != null && !msg.isAsynchronous());
            }
            if (msg != null) {
                if (now < msg.when) {
                    // Next message is not ready.  Set a timeout to wake up when it is ready.
                    nextPollTimeoutMillis = (int) Math.min(msg.when - now, Integer.MAX_VALUE);
                } else {
                    // Got a message.
                    mBlocked = false;
                    if (prevMsg != null) {
                        prevMsg.next = msg.next;
                    } else {
                        mMessages = msg.next;
                    }
                    msg.next = null;
                    if (DEBUG) Log.v(TAG, "Returning message: " + msg);
                    msg.markInUse();
                    return msg;
                }
            } else {
                // No more messages.
                nextPollTimeoutMillis = -1;
            }

            // Process the quit message now that all pending messages have been handled.
            if (mQuitting) {
                dispose();
                return null;
            }

            if (pendingIdleHandlerCount < 0
                    && (mMessages == null || now < mMessages.when)) {
                pendingIdleHandlerCount = mIdleHandlers.size();
            }
            if (pendingIdleHandlerCount <= 0) {
                // No idle handlers to run.  Loop and wait some more.
                mBlocked = true;
                continue;
            }

            if (mPendingIdleHandlers == null) {
                mPendingIdleHandlers = new IdleHandler[Math.max(pendingIdleHandlerCount, 4)];
            }
            mPendingIdleHandlers = mIdleHandlers.toArray(mPendingIdleHandlers);
        }

        // Run the idle handlers.
        // We only ever reach this code block during the first iteration.
        for (int i = 0; i < pendingIdleHandlerCount; i++) {
            final IdleHandler idler = mPendingIdleHandlers[i];
            mPendingIdleHandlers[i] = null; // release the reference to the handler

            boolean keep = false;
            try {
                keep = idler.queueIdle();
            } catch (Throwable t) {
                Log.wtf(TAG, "IdleHandler threw exception", t);
            }

            if (!keep) {
                synchronized (this) {
                    mIdleHandlers.remove(idler);
                }
            }
        }
        pendingIdleHandlerCount = 0;
        nextPollTimeoutMillis = 0;
    }
}
源码分析:
1.loop是个死循环,next也是个死循环,跳出循环的条件是
queue.next()方法返回为null。2.
next()方法是一个阻塞操作,所以当没有消息也会导致loop()方法一直阻塞着,而当 MessageQueue 中有了新的消息,Looper 就会及时地处理这条消息并调用msg.target.dispatchMessage(Message)方法将消息传回给 Handler 进行处理3.看handler的
dispatchMessage方法public void dispatchMessage(@NonNull Message msg) { if (msg.callback != null) { handleCallback(msg); } else { if (mCallback != null) { if (mCallback.handleMessage(msg)) { return; } } handleMessage(msg); } }3.1.如果
msg.callback不为 null ,则调用 callback 对象的run()方法,该 callback 实际上就是一个 Runnable 对象,对应的是 Handler 对象的post()方法。//走到这儿,调用message.callback的run方法,那么先去看这个message.callback是啥 private static void handleCallback(Message message) { message.callback.run(); } //在下面两个方法里,可以看到,当使用handler.post时 public final boolean post(Runnable r){ return sendMessageDelayed(getPostMessage(r), 0); } private static Message getPostMessage(Runnable r) { Message m = Message.obtain(); m.callback = r;//这儿message.callback就等于runnable return m; } //再来个如何使用的例子 handler.post(new Runnable() { @Override public void run() { text.setText("post"); } });3.2.如果
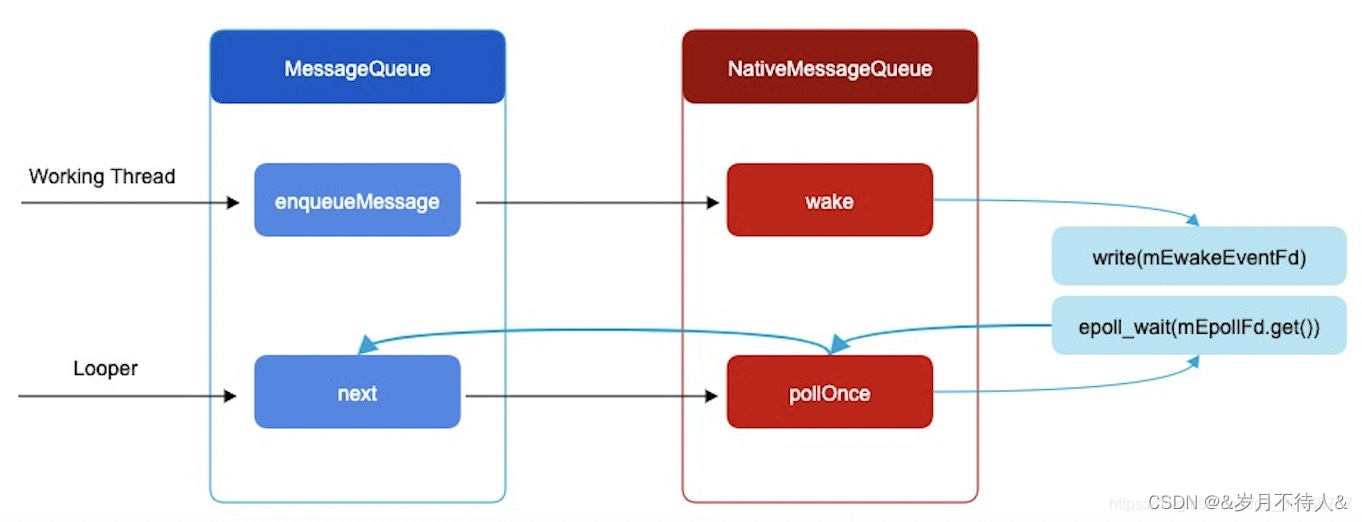
mCallback不为 null ,则通过该回调接口来处理消息,由重写 Handler的handleMessage(Message)方法来处理消息.4.nativePollOnce方法
在源码里,可以看出他是一个native方法,它的机制如图:
可以看出:
- 消息队列是按消息触发时间排序的
- 设置epoll_wait的超时时间,使其在特定时间唤醒,这里我们先计算当前时间和触发时间有多长,这个差值作为epoll_wait的超时时间。
- epoll_wait超时的时候就是消息触发的时候了,就不会继续堵塞,继续往下执行,这个线程就会被唤醒,去执行消息处理
八、Handler更新UI的方式
-
主线程中定义Handler,子线程通过mHandler发送消息,主线程Handler的handleMessage更新UI
- 用Activity对象的runOnUiThread方法
- 创建Handler,传入getMainLooper,使用handler.post更新UI
- View.post(Runnable r)
上面的方法是我们在线程间通信时经常用到的更新UI的方法,他们其实都是通过handler发送消息实现的
1.第一个就不叙述了,上面的代码就是如此
2.runOnUiThread 这个用起来很简单,很爽
- 在runOnUiThread程序首先会判断当前线程是否是UI线程,如果是就直接运行,如果不是则post,这时其实质还是使用的Handler机制来处理线程与UI通讯。
new Thread(new Runnable() {
    @Override
    public void run() {
        runOnUiThread(new Runnable() {
            @Override
            public void run() {
                text.setText("++更新UI++");
            }
        });
    }
}).start();


runOnUiThread源码:
@Override
public final void runOnUiThread(Runnable action) {
    if (Thread.currentThread() != mUiThread) {
        mHandler.post(action);
    } else {
        action.run();
    }
}
3.handler.post更新UI
new Thread(new Runnable() {
    @Override
    public void run() {
        Log.e("lx", Thread.currentThread().getName());
        //注意这里创建handler时,需要传入looper,在Looper类中有静态对象sMainLooper,并且这个sMainLooper就是在ActivityThread中创建的MainLooper。
        Handler handler = new Handler(getMainLooper());
        handler.post(new Runnable() {
            @Override
            public void run() {
                //Do Ui method
                tv_0.setText("滚犊子————————————---");
                Log.e("yc", "yc 5"+Thread.currentThread().getName());
            }
        });
    }
}).start();
4.使用 View.post()更新UI
textview.post(new Runnable() {
    @Override
    public void run() {
        textview.setText("view.post");
    }
});


//View中的源码
public boolean post(Runnable action) {
    final AttachInfo attachInfo = mAttachInfo;
//如果view已经attached,则调用ViewRootImpl中的ViewRootHandler,放入主线程Lopper等待执行。如果detach,则将其暂存在RunQueue当中,等待其它线程取出执行。
    if (attachInfo != null) {
        return attachInfo.mHandler.post(action);
    }
    getRunQueue().post(action);
    return true;
}

private HandlerActionQueue getRunQueue() {
    if (mRunQueue == null) {
        mRunQueue = new HandlerActionQueue();
    }
    return mRunQueue;
}
View.post(Runnable r)很多时候在子线程调用,用于进行子线程无法完成的操作,或者在该方法中通过getMeasuredWidth()获取view的宽高。需要注意的是,在子线程调用该函数,可能不会被执行,原因是该view不是attached状态
九、Handler内存泄漏优化方式
1.在onDestroy()函数中调用mHandler.removeCallbacksAndMessages(null);
2.使用静态内部类 + WeakReference 这种方式。
十、Looper死循环为何不阻塞应用卡死
常见的面试题,基本都会问到。
原理:使用到了Linux pipe/epoll机制,简单说就是在主线程的MessageQueue没有消息时,便阻塞在loop的queue.next()中的nativePollOnce()方法里,此时主线程会释放CPU资源进入休眠状态,直到下个消息到达或者有事务发生,通过往pipe管道写端写入数据来唤醒主线程工作。
epoll机制,是一种IO多路复用机制,可以同时监控多个描述符,当某个描述符就绪(读或写就绪),则立刻通知相应程序进行读或写操作,本质同步I/O,即读写是阻塞的。所以说,主线程大多数时候都是处于休眠状态,并不会消耗大量CPU资源。
十一:Looper.quit和quitSafely方法
在子线程里创建Looper时,我们都知道,执行 loop() 的线程在任务结束的时候,需要手动调用 quit。反之,线程将由于 loop() 的轮询一直处于可运行状态,CPU 资源无法释放。更有可能因为 Thread 作为 GC Root 持有超出生命周期的实例引发内存泄漏。
当 quit 调用后,Looper 不再因为没有 Message 去等待,而是直接取到为 null 的 Message,这将触发轮循死循环的退出。
但是如果我们在主线程里调用Looper.getMainLooper().quit(); ,则会报错java.lang.IllegalStateException: Main thread not allowed to quit。
查看源码:looper.quit
public void quit() {
    mQueue.quit(false);
}
先看下MessageQueue源码里的mQuitAllowed:它代表着是否允许MessageQueue退出
1.在主线程的构造函数里,设置了mQuitAllowed为false
 public static void prepareMainLooper() {
        prepare(false);
        synchronized (Looper.class) {
            if (sMainLooper != null) {
                throw new IllegalStateException("The main Looper has already been prepared.");
            }
            sMainLooper = myLooper();
        }
    }
所以在主线程调用quit会直接报错 。
2.而在子线程里的looper.prepare则默认为true,允许退出,看源码:
public static void prepare() {
        prepare(true);
    }

    private static void prepare(boolean quitAllowed) {
        if (sThreadLocal.get() != null) {
            throw new RuntimeException("Only one Looper may be created per thread");
        }
        sThreadLocal.set(new Looper(quitAllowed));
    }
看下messageQueue的quit方法,也就是报出异常的地方。
void quit(boolean safe) {
    if (!mQuitAllowed) {
        throw new IllegalStateException("Main thread not allowed to quit.");
    }

    synchronized (this) {
        if (mQuitting) {
            return;
        }
        mQuitting = true;

        if (safe) {
            removeAllFutureMessagesLocked();
        } else {
            removeAllMessagesLocked();
        }

        // We can assume mPtr != 0 because mQuitting was previously false.
        nativeWake(mPtr);
    }
}
接下来看
if (safe) {
removeAllFutureMessagesLocked();
} else {
removeAllMessagesLocked();
}
源码分析:
- 当我们调用Looper的quit方法时,实际上执行了MessageQueue中的removeAllMessagesLocked方法,该方法的作用是把MessageQueue消息池中所有的消息全部清空,无论是延迟消息(延迟消息是指通过sendMessageDelayed或通过postDelayed等方法发送的需要延迟执行的消息)还是非延迟消息。
- 当我们调用Looper的quitSafely方法时,实际上执行了MessageQueue中的removeAllFutureMessagesLocked方法,通过名字就可以看出,该方法只会清空MessageQueue消息池中所有的延迟消息,并将消息池中所有的非延迟消息派发出去让Handler去处理,quitSafely相比于quit方法安全之处在于清空消息之前会派发所有的非延迟消息。
- 无论是调用了quit方法还是quitSafely方法,Looper就不再接收新的消息。即在调用了Looper的quit或quitSafely方法之后,消息循环就终结了,这时候再通过Handler调用sendMessage或post等方法发送消息时均返回false,表示消息没有成功放入消息队列MessageQueue中,因为消息队列已经退出了。
总结
仅是个人对Handler机制的理解,通过翻看源码和其他大佬对源码的阅读理解对此做了总结,文中不足的是对于nativePollOnce这个native方法做的深入了解不够多。
后面如果还有其他没总结到的再写进来


 639
639

 被折叠的 条评论
为什么被折叠?
被折叠的 条评论
为什么被折叠?
 到【灌水乐园】发言


