


目录
1.Spring 简介
1.1 Spring 内容介绍
-
Spring 概念
-
IOC 容器
-
AOP
-
JdbcTemplate
-
事务管理
-
日志与测试
1.2 Spring 框架概述
文档:Index of /spring-framework/docs
Spring 是轻量级的开源的 J2EE 框架,可以解决企业应用开发的复杂性
Spring 有两个核心部分:IOC 和 AOP
-
IOC:控制反转,把创建对象过程交给 Spring 进行管理
-
AOP:面向切面,不修改源代码进行功能增强
Spring 特点
-
方便解耦,简化开发
-
支持 AOP 编程
-
方便程序测试
-
方便整合其他框架
-
方便进行事务操作
-
降低 API 开发难度
java分为:javaSE,javaEE,javaME
1.3 Spring 入门案例
创建maven(或空)项目
pom中添加依赖
<properties> <spring.version>5.3.24</spring.version> <junit.version>4.12</junit.version> </properties> <dependencies> <dependency> <groupId>org.springframework</groupId> <artifactId>spring-context</artifactId> </dependency> <dependency> <groupId>org.springframework</groupId> <artifactId>spring-aspects</artifactId> </dependency> <dependency> <groupId>junit</groupId> <artifactId>junit</artifactId> </dependency> </dependencies>
Spring5 模块介绍
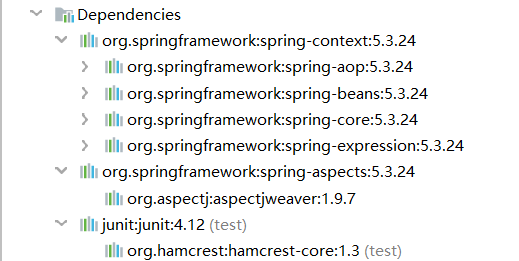
其中的
Core Container核心模块有:
Beans
Core核心包
Context上下文
Expression表达式aop 面向切面
创建普通类和方法
public class User {
    public void add(){
        System.out.println("Hello World: User.add()方法");
    }
}
创建 Spring 配置文件,配置创建的对象
<?xml version="1.0" encoding="UTF-8"?> <beans xmlns="http://www.springframework.org/schema/beans" xmlns:xsi="http://www.w3.org/2001/XMLSchema-instance" xmlns:p="http://www.springframework.org/schema/p" xsi:schemaLocation="http://www.springframework.org/schema/beans http://www.springframework.org/schema/beans/spring-beans.xsd"> <!--1 配置User对象创建--> <bean id="user" class="com.zking.spring.User"></bean> </beans>
进行测试代码的编写
@Test public void testAdd() { // 1、加载自定义的Spring配置文件 ApplicationContext context = new ClassPathXmlApplicationContext("bean1.xml"); // 2、获取配置的User对象 User user = context.getBean("user", User.class); // 3、操作User对象 System.out.println(user); user.add(); }
测试结果如下

2.IOC 容器
2.1 IOC 的概念原理
IOC 是什么?
-
控制反转,把对象的创建和对象之间的调用过程,都交给 Spring 进行管理
-
使用 IOC 的目的:降低耦合性
IOC 底层实现
-
xml 解析
-
工厂模式
-
反射技术
图解 IOC 原理
回顾自定义MVC框架
2.2 IOC 接口
1)IOC 思想基于 IOC 容器完成,IOC 容器底层就是对象工厂
2)Spring 提供了IOC 容器实现的两种方式(即两个接口)
BeanFactory
IOC 容器基本实现
加载配置文件时不会创建对象,使用对象时才会创建对象
ApplicationContext
BeanFactory的子接口,提供更多功能,提供给开发人员使用加载配置文件就创建对象
BeanFactory
BeanFactory接口的子接口和实现类
ConfigurableApplicationContext:包含一些相关的扩展功能
ApplicationContext
ApplicationContext接口的实现类
FileSystemXmlApplicationContext:xml 配置文件在系统盘中的文件全路径名new FileSystemXmlApplicationContext("D:\workspace\NOTE_Spring\src\bean1.xml");
ClassPathXmlApplicationContext:xml 配置文件在项目 src 下的相对路径名new ClassPathXmlApplicationContext("bean1.xml");
2.3 IOC 操作 Bean 管理
Bean 管理是什么
Bean 管理指的是两个操作
-
Spring 创建对象
-
Spring 注入属性
public class User{
private String userName;
public void setUserName(String userName){
this.userName = userName;
}
}Bean 管理实现方式
-
基于 XML 配置文件方式实现
-
基于注解方式实现
2.4 基于 XML 方式
创建对象
<!--配置User对象-->
<bean id="user" class="com.zking.spring.User"></bean>
1)在 Spring 配置文件中,使用bean标签,标签里添加对应属性,就可以实现对象的创建
2)bean标签中有很多属性,介绍常用的属性
-
id属性:唯一标识 -
class属性:类全限定名、类全路径 -
name属性:了解即可,早期为Struts框架服务,现已“退役”,作用跟id属性一样 -
其他属性:后面再做介绍...
3)创建对象时,默认执行无参构造方法
如果只提供一个有参构造方法,如下
public class User {
private String userName;
public User(String userName) {
this.userName = userName;
}
// ...
}仍然按照之前获取 User 对象创建方式,即
// 1、加载自定义的Spring配置文件
ApplicationContext context = new ClassPathXmlApplicationContext("bean1.xml");
// 2、获取配置的User对象
User user = context.getBean("user", User.class);
则会报错,其中主要报错信息
org.springframework.beans.factory.BeanCreationException: Error creating bean with name 'user' defined in class path resource [bean1.xml]: Instantiation of bean failed; nested exception is org.springframework.beans.BeanInstantiationException: Failed to instantiate [com.zking.spring.User]: No default constructor found; nested exception is java.lang.NoSuchMethodException: com.zking.spring.User.<init>()就是说:初始化 User 对象失败,因为没有找到默认构造,所以抛出了一个NoSuchMethodException异常,即 User 中没有<init>()方法
2.5 注入属性
DI:依赖注入,就是注入属性(但需要在创建对象基础上进行)
IOC和DI的区别:DI是IOC的一种具体实现
两种注入方式:Setter 方式、有参构造方法
-
第一种注入方式:通过 Setter 方式进行注入
public class Book{ private String bname; // Setter 方法注入 public void setBname(String bname){ this.bname = bname; } public static void main(String[] args){ Book book = new Book(); book.setBname("book1"); } } -
第二种注入方式:通过有参构造方法进行注入
public class Book{
    private String bname;

    // 有参构造注入
    public Book(String bname){
        this.bname = bname;
    }

    public static void main(String[] args){
        Book book = new Book("book1");
    }
}
通过 Setter 方式注入
① 创建类,定义属性和 Setter 方法
public class Book {
private String bname;
private String bauthor;
public void setBname(String bname) {
this.bname = bname;
}
public void setBauthor(String bauthor) {
this.bauthor = bauthor;
}
}② 在 Spring 配置文件中配置对象创建,配置属性注入
<!-- 2、Setter方法注入属性 -->
<bean id="book" class="com.zking.spring.Book">
    <!-- 使用property完成属性注入
            name: 类中属性名称
            value: 向属性中注入的值
    -->
    <property name="bname" value="Spring实战 第5版"></property>
    <property name="bauthor" value="克雷格·沃斯(Craig Walls)"></property>
</bean>
通过有参构造注入
① 创建类,定义属性,创建属性对应有参构造方法
public class Orders {
private String oname;
private String address;
public Orders(String oname, String address) {
this.oname = oname;
this.address = address;
}
}② 在 Spring 配置文件中配置对象创建,配置有参构造注入
<!-- 3、有参构造注入属性 -->
<bean id="orders" class="com.zking.spring.Orders">
    <constructor-arg name="oname" value="Spring微服务实战"></constructor-arg>
    <constructor-arg name="address" value="[美]约翰·卡内尔(John Carnell)"></constructor-arg>
</bean>或者使用index属性代替name属性,索引值大小是几就表示有参构造中的第几个参数(索引从0开始)
<!-- 3、有参构造注入属性 -->
<bean id="orders" class="com.zking.spring.Orders">
    <constructor-arg index="0" value="冰墩墩"></constructor-arg>
    <constructor-arg index="1" value="Peking"></constructor-arg>
</bean>
p 名称空间注入(了解)
① 基于p名称空间注入,可以简化基于xml的配置方式
在bean1.xml配置文件中添加 p 名称空间:xmlns:p="http://www.springframework.org/schema/p",如下
<beans xmlns="http://www.springframework.org/schema/beans"
       xmlns:xsi="http://www.w3.org/2001/XMLSchema-instance"
       xmlns:p="http://www.springframework.org/schema/p"
       xsi:schemaLocation="http://www.springframework.org/schema/beans http://www.springframework.org/schema/beans/spring-beans.xsd">
</beans>在bean标签中进行属性注入操作
<!-- 4、p名称空间注入属性 -->
<bean id="book1" class="com.zking.spring.Book" p:bname="SpringBoot实战" p:bauthor="[美]克雷格·沃斯"></bean>需要注意的是:p 名称空间只能进行属性注入
2.6 注入其他类型属性
字面量
-
null值:使用<null><bean id="book2" class="com.zking.spring.Book"> <property name="bname" value="Spring实战 第5版"></property> <property name="bauthor"> <null></null> </property> </bean> -
属性值包含特殊符号:有两种方式
-
使用转义字符,如
<>标识<><!-- 字面量:property方式注入含有特殊符号的属性 --> <bean id="book3" class="com.zking.spring.Book"> <property name="bname" value="Spring实战 第5版"></property> <property name="bauthor" value="<Test>"</property> </bean> -
使用
CDATA结构,如<![CDATA[<Test>]]><!-- 字面量:property方式注入含有特殊符号的属性 --> <bean id="book4" class="com.zking.spring.Book"> <property name="bname" value="Spring实战 第5版"></property> <property name="bauthor"> <value><![CDATA[<Test>]]></value> </property> </bean>
-
外部 Bean
① 创建两个类:Service类和Dao类
public interface UserDao {
    void update();
}
public class UserDaoImpl implements UserDao{
    @Override
    public void update() {
        System.out.println("dao update...");
    }
}
② 在Service中调用Dao中的方法
public class UserService {
private UserDao userDao;
public void setUserDao(UserDao userDao) {
this.userDao = userDao;
}
public void updateUser(){
System.out.println("service update...");
userDao.update();
}
}③ 在 Spring 配置文件中进行配置
<!--  1、配置service和dao创建  -->
<bean id="userService" class="com.zking.spring.service.UserService">
    <!-- 2、注入userDao对象
               name属性:类里面属性名称
               ref属性:创建userDao对象bean标签id值
       -->
    <property name="userDao" ref="userDaoImpl"></property>
</bean>
<bean id="userDaoImpl" class="com.zking.spring.dao.UserDaoImpl"></bean>
内部 Bean
① 一对多关系:部门和员工。部门里有多个员工,一个员工属于一个部门。部门是一的一方,员工是多的一方
② 在实体类之间表示一对多关系。在员工类中使用对象类型表示所属部门
public class Dept {
private String dname;
public String getDname() {
return dname;
}
public void setDname(String dname) {
this.dname = dname;
}
}
public class Emp {
private String ename;
private String gender;
private Dept dept;
public void setDept(Dept dept) {
this.dept = dept;
}
public String getEname() {
return ename;
}
public void setEname(String ename) {
this.ename = ename;
}
public String getGender() {
return gender;
}
public void setGender(String gender) {
this.gender = gender;
}
}③ 在 Spring 配置文件中进行配置
<bean id="emp1" class="com.zking.spring.bean.Emp">
    <property name="ename" value="Rose"></property>
    <property name="gender" value="female"></property>
    <property name="dept">
        <bean id="dept1" class="com.zking.spring.bean.Dept">
            <property name="dname" value="Develop Department"></property>
        </bean>
    </property>
</bean>
当希望一个bean只被某一个类使用时,我们可以使用内部bean。内部bean此时作为某一个类的属性,只能通过该类实例化。
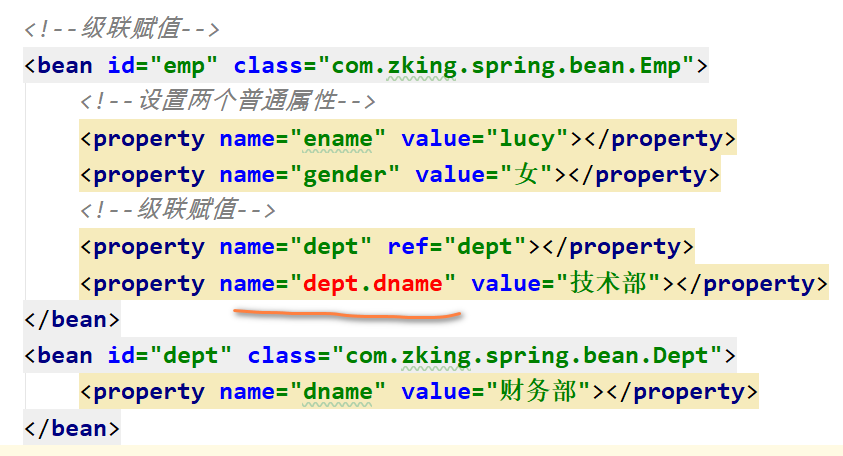
级联赋值
第一种写法
<!-- 级联赋值 -->
<bean id="emp2" class="com.zking.spring.bean.Emp">
    <property name="ename" value="Nancy"></property>
    <property name="gender" value="female"></property>
    <property name="dept" ref="dept2"></property>
</bean>
<bean id="dept2" class="com.zking.spring.bean.Dept">
    <property name="dname" value="Sallery Department"></property>
</bean>第二种写法<property name="dept.dname" value="Manage Department"></property>
<!-- 级联赋值 -->
<bean id="emp2" class="com.zking.spring.bean.Emp">
    <property name="ename" value="Nancy"></property>
    <property name="gender" value="female"></property>
    <property name="dept" ref="dept2"></property>
    <property name="dept.dname" value="Manage Department"></property>
</bean>
<bean id="dept2" class="com.zking.spring.bean.Dept">
    <property name="dname" value="Sallery Department"></property>
</bean>这种写法可以对外部Bean的属性值进行覆盖,但前提是要有dept的Getter方法
public Dept getDept() {
    return dept;
}
否则 XML 文件就会爆红
强行使用就会报如下错误
Caused by: org.springframework.beans.NotWritablePropertyException: Invalid property 'dept.dname' of bean class [com.zking.spring.bean.Emp]: Nested property in path 'dept.dname' does not exist; nested exception is org.springframework.beans.NotReadablePropertyException: Invalid property 'dept' of bean class [com.zking.spring.bean.Emp]: Bean property 'dept' is not readable or has an invalid getter method: Does the return type of the getter match the parameter type of the setter?
2.7 注入集合属性
-
注入数组类型属性
-
注入 List 集合类型属性
-
注入 Map 集合类型属性
① 创建类,定义数组、list、map、set 类型属性,生成对应 setter 方法
public class Stu {
    private String[] arrs;
    private List<String> lists;
    private Map<String, String> maps;
    private Set<String> sets;
    public void setArrs(String[] arrs){
        this.arrs = arrs;
    }
    public void setLists(List<String> lists){
        this.lists = lists;
    }
    public void setMaps(Map<String, String> maps){
        this.maps = maps;
    }
    public void setSets(Set<String> sets){
        this.sets = sets;
    }
}
② 在 Spring 配置文件中进行配置
<!-- 集合类型属性注入 -->
<bean id="stu" class="com.zking.spring.collectiontype.Stu">
    <!--  1 数组属性注入  -->
    <property name="arrs">
        <array>
            <value>数组</value>
            <value>属性</value>
            <value>注入</value>
        </array>
    </property>
    <!--  2 list属性注入  -->
    <property name="lists">
        <list>
            <value>list</value>
            <value>属性</value>
            <value>注入</value>
        </list>
    </property>
    <!--  3 map属性注入  -->
    <property name="maps">
        <map>
            <entry key="k1" value="v1"></entry>
            <entry key="k2" value="v2"></entry>
            <entry key="k3" value="v3"></entry>
        </map>
    </property>
    <!--  4 set属性注入  -->
    <property name="sets">
        <set>
            <value>set</value>
            <value>属性</value>
            <value>注入</value>
        </set>
    </property>
</bean>
4)注入 List 类型属性值,值为对象
<bean id="stu" class="com.zking.spring.collectiontype.Stu">
    <!--注入 List 类型属性值,值为对象-->
    <property name="lists2">
        <list>
            <ref bean="course1"></ref>
            <ref bean="course2"></ref>
            <ref bean="course3"></ref>
        </list>
    </property>
</bean>
<bean id="course1" class="class="com.zking.spring.collectiontype.Course"">
    <property name="cname" value="c1"></property>
</bean>
<bean id="course2" class="class="com.zking.spring.collectiontype.Course"">
    <property name="cname" value="c2"></property>
</bean>
<bean id="course3" class="class="com.zking.spring.collectiontype.Course"">
    <property name="cname" value="c3"></property>
</bean>
5)把集合注入部分提取出来
① 在 Spring 配置文件中引入
util命名空间<beans xmlns="http://www.springframework.org/schema/beans" xmlns:xsi="http://www.w3.org/2001/XMLSchema-instance" xmlns:util="http://www.springframework.org/schema/util" xsi:schemaLocation=" http://www.springframework.org/schema/beans http://www.springframework.org/schema/beans/spring-beans.xsd http://www.springframework.org/schema/util http://www.springframework.org/schema/util/spring-util.xsd"> </beans>
② 使用
util标签完成 list 集合注入提取<!--提取属性注入--> <util:list id="utilList"> <value>111</value> <value>222</value> <value>333</value> </util:list> <!--提取属性注入使用--> <bean id="stu2" class="com.zking.spring.collectiontype.Stu"> <property name="lists" ref="utilList"></property> </bean>
2.8 自动装配
自动装配:根据指定装配规则(属性名称或属性类型),Spring 自动将匹配的属性值进行注入
XML 实现自动装配:bean标签中有个属性autowire,里面有两个常用的属性值
-
byName根据属性名称注入,要求注入值bean的id值和类中属性名称一致 -
byType根据属性类型注入,要求注入值bean的类型在配置文件中只存在一份
1)根据属性名称进行自动注入
<bean id="emp" class="com.zking.spring.autowire.Emp" autowire="byName"></bean>
<bean id="dept" class="com.zking.spring.autowire.Dept"></bean>
2)根据属性类型进行自动注入
<bean id="emp" class="com.zking.spring.autowire.Emp" autowire="byType"></bean>
<bean id="dept" class="com.zking.spring.autowire.Dept"></bean>
2.9 外部属性文件
1、直接配置数据库信息
-
引入
Druid连接池依赖jar包 -
配置
Druid连接池
<bean id="dataSource" class="com.alibaba.druid.pool.DruidDataSource">
    <property name="driverClassName" value="com.mysql.jdbc.Driver"></property>
    <property name="url" value="jdbc:mysql://localhost:3306"></property>
    <property name="username" value="root"></property>
    <property name="password" value="root"></property>
</bean>
2、引入外部属性文件配置数据库连接池
1)创建
properties格式的外部属性文件,配置数据库连接信息mysql.driverClassName=com.mysql.jdbc.Driver mysql.url=jdbc:mysql://localhost:3306 mysql.username=root mysql.password=root
2)将外部
properties属性文件引入到 Spring 配置文件中<!--引入context名称空间--> <beans xmlns="http://www.springframework.org/schema/beans" xmlns:xsi="http://www.w3.org/2001/XMLSchema-instance" xmlns:context="http://www.springframework.org/schema/context" xsi:schemaLocation=" http://www.springframework.org/schema/beans http://www.springframework.org/schema/beans/spring-beans.xsd http://www.springframework.org/schema/context http://www.springframework.org/schema/context/spring-context.xsd"> <!--引入外部属性文件--> <context:property-placeholder location="classpath:jdbc.properties"/> <!--使用Spring表达式配置连接池--> <bean id="dataSource" class="com.alibaba.druid.pool.DruidDataSource"> <property name="driverClassName" value="${mysql.driverClassName}"></property> <property name="url" value="${mysql.url}"></property> <property name="username" value="${mysql.username}"></property> <property name="password" value="${mysql.password}"></property> </bean> </beans>
测试
 @Test
    public void testDataSource() throws  Exception{
        ApplicationContext ctx = new ClassPathXmlApplicationContext("beans6.xml");
        DataSource dataSource = ctx.getBean("dataSource",DataSource.class);
        //从连接池中拿连接
        Connection conn = dataSource.getConnection();
        System.out.println(conn);
        conn.close();
    }


 2万+
2万+

 被折叠的 条评论
为什么被折叠?
被折叠的 条评论
为什么被折叠?
 到【灌水乐园】发言


